Whilst this unit is presented as a sequence of five sessions, more sessions than this will be required between sessions 3 and 4. It is also expected that any session may extend beyond one teaching period.
Session 1
This session is about playing a familiar game and evaluating its health benefits and safety considerations.
Students of this age may be challenged to accurately measure their pulse rate. Therefore these lessons use an alternative ‘indicator’ of the effects of exercise: that is that the intensity of worthwhile exercise should prevent you from singing, but should not prevent you from talking.
SLOs:
- Understand how running a distance contributes to fitness and wellbeing.
- Create a personal benchmark for 1 metre.
- Accurately use three measuring devices to measure a distance of more than 3 metres.
- Correctly record length measurements using abbreviations.
- Understand how many metres are in one kilometre.
- Establish a person benchmark for 1 kilometre.
Activity 1
Begin the lesson by singing a favourite waiata. The aim of the lesson is not to learn a new waiata, so consider using one your ākonga are already familiar with.
Activity 2
- Explain to the students that they will be undertaking their regular fitness run (a distance of up to half a kilometre). Discuss the possible effects/benefits of this, and elicit specific statements. Possible responses could include “we get puffed”, “our heart beat/pulse speeds up”, and “it’s good for us”. In response, explain that the increase of beats per minute (bpm) is because their body physically needs to circulate oxygen more quickly as they exercise. Science has shown this is good for us.
Explain that today, when they each return from their run they should (individually) immediately sing the waiata from activity 1 (above), and then talk to a classmate about their run. - Have students complete their run and this task.
- Ask: ‘Who was able to sing the waiata immediately?’
‘Who was able to talk to their classmate?’
Count the responses for each and record these on the class chart. Discuss the results, explaining that being unable to sing immediately shows that they exercised well and their bodies will benefit.
Activity 3
Ask, “How far did you run today?” and “How can we find out?”
Make available 1 centimetre cubes, meter rulers, a 10 metre + tape measure and a measuring wheel.
Have the students share what they know about the metre ruler. Establish that it is called a metre ruler. It is 1 metre long. If centimetres have already been introduced and used, have students line up 1 cm cubes along the ruler to confirm that 1 metre = 100 centimetres.
Activity 4
Develop a personal benchmark by asking: “Who can jump 1 metre?”
Have student pairs measure a 1 metre length on the carpet/floor, marking this with chalk.
Highlight that the measure begins at 0 and ends at 100. Discuss the ‘extra’ space at each end of the ruler.
In their pairs, have students check if each person can jump 1 metre. A tuakana/teina model could work well here.
Agree that when we think about how big 1 metre is, we can think of it as one big personal jump.
Activity 5
- Introduce the tape measure and measuring wheel, explaining and showing how each measures 1 metre and multiples of 1 metre.
Highlight the 1 metre personal benchmark by asking:
If the tape measure is 10 metres, about how many of your jumps is that?
If we measured 100 metres with the wheel, about how many of your jumps is that? - Write ‘standard measure’ on the class chart and ask what it means. Elicit responses and point out that standard units have been created to allow consistency and communication of measures. We understand each other’s measurements if we use the same measures.
Explain that the standard units used in New Zealand, and in most countries in the world, are metric units. Some students may be familiar with the use of feet and inches, and could share their knowledge at this point. Discuss possible situations in which a standard measure might be useful (e.g. travel, building). You might be able to make links to community members (e.g. builders) or favourite hobbies (e.g. sprinting). Consider also how links might be made to your cultural context. - Write centimetre, metre and kilometre on the class chart. Explain that when we write them often, we want a quick way to record them. Model cm, m and km abbreviations. Students may mention that people often refer to "ks" when talking about kilometres.
Activity 6
Have a student model both the correct and an incorrect way to measure using a metre ruler. This could be completed in pairs. Highlight how to mark the beginning and end of the measure and how to correctly replace the metre ruler, when measuring a distance greater than 1 metre.
Have several students measure a length that is more than a metre, read the measure aloud, and record this on the class chart.
Model examples of parts of a metre as well, for example 2 ½ m.
Activity 7
Explain that students will pair up (tuakana/teina) and participate in two measuring tasks to become familiar with the measuring tools. Emphasise that their recording should use the correct abbreviations.
Show and have students make a recording sheet, as demonstrated below. Alternatively, you may feel it would be more effective to provide some, or all, of your students with a graphic organiser to be used in this activity.
Measurement
from ... to | Metre ruler | Measuring tape |
| | |
Have students measure at least three different lengths around the classroom, hall, or other designated area, using a metre ruler and a measuring tape. They should that they get the same measure using each tool.
- Clarify the exact fitness course route, the start and end points, and set relevant boundaries. Have student pairs take turns using the measuring wheel to measure the distance around the course and to then record the result.
Activity 8
Conclude the session by sharing measurement results and reviewing the fitness course distance. Discuss how many metres in 1 kilometre. Estimate and calculate together the number of times they would need to run around the fitness course to cover a 1 kilometre distance. Establish a rough benchmark for 1 kilometre. (For example, 1 kilometre is 5 times around the fitness course.)
Session 2
This session is about recognising that rules that address fairness and safety, help to ensure that a PE/fitness activity is enjoyable. As students design a PE/fitness activity, they learn more about accurately measuring outdoor spaces.
SLOs:
- Understand that rules are designed to ensure fairness and safety.
- Pose an investigative question.
- Create and write instructions for a PE/fitness game, giving consideration to fitness, safety and enjoyment.
- Accurately measure and record the length of a given outdoor space.
Activity 1
Begin with a fitness run.
Activity 2
Explain that the class is going to play a favourite PE game (for example: Ki-o-Rahi, Tunnel ball, Scatter Ball). Together, list the rules on the class chart.
Ask: Which of the rules are about making the game fair? Write F beside these. Discuss that fairness makes the game more enjoyable for everyone.
Ask: Which of the rules are about making the game safe? Write S beside these. Discuss any anomalies. If there are no specific safety rules, list some generic ones.
Activity 3
Return to the class, review the enjoyment of the game and ask if playing the game will make them fit. Discuss why/why not. Refer to the “talk/sing measure” from session 1.
(The response may be, “No, because it didn’t make me puff and I could sing.”)
Review the list of rules and confirm the fairness (F) and safety (S) decisions made earlier.
Highlight the importance of games and activities being safe and enjoyable. Ask if any other safety rules should be added and why.
Activity 4
- List on the class chart, the words ‘enjoyment, fitness and safety’.
- Suggest that students will work in pairs or small groups to create their own PE/fitness games. Through discussion, lead students to pose an investigative question. For example:
‘Can we design a game or activity that keeps us fit, is enjoyable and is safe?’
Record this on the class chart/modeling book. - Explain that students will be using an outdoor space with suitable boundaries, for example, the school tennis courts. Large balls and small balls will be made available. (Make other equipment available, as appropriate.)
- Clarify the task. Students will work in pairs or small groups to:
- Measure and record the size of the designated outdoor space (using skills learned in Session 1.)
- Invent a simple game that the class can play.
- Write down clear instructions and rules, checking for safety and fairness.
- Set time limits and clarify expectations. Have students complete the task.
Activity 5
Have groups swap game instructions with another group. Have them read, critique, seek clarification and suggest refinements or improvements to the other’s game design. You may wish to come up with guidelines and/or a rubric for students to use during this. The groups may wish to play each other’s games as well.
Give time for these adjustments to be made.
Activity 6
Review pair measurements for the outdoor space. Tennis courts are about 23.8m x 8.2m. Remind students that 1000m = 1 km. Estimate together the number of times the length of the court would need to be run to achieve the length of 1 kilometre. (eg. Round up to 25m. 25m x 40 = 1000m) Together calculate the number of lengths of the tennis court needed to run 1km.
Students may use this as a 1 kilometre benchmark. You could also consider other known lengths such as from the school gate to the walking pou, or other local community locations.
Session 3
This session is about creating a simple questionnaire to evaluate each group's activity, and learning about dot plots.
SLOs:
- Plan data collection.
- Collect data by trialing and evaluating an activity on its fitness, safety and enjoyment values.
Activity 1
Begin with a fitness run.
Activity 2
- Review the investigation question recorded on the chart in Session 2.
Ask the students how they should gather the data to answer the question. Guide discussion and agree on a simple evaluation form to be completed by the class after playing each game. For example:
The name of the game: ________________________________
Circle for each: 1 (not so good) 2, 3, 4 or 5 (excellent),
Enjoyment: 1 2 3 4 5
Fitness: 1 2 3 4 5
Safety: 1 2 3 4 5 - Print off the evaluation or have students copy this and practice using it by completing an evaluation for the game played at the start of Session 2.
Activity 3
Working together (mahi tahi model), collate and present the data using three dot plots. For example:
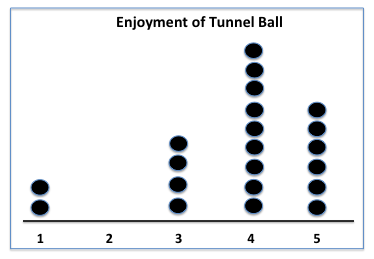

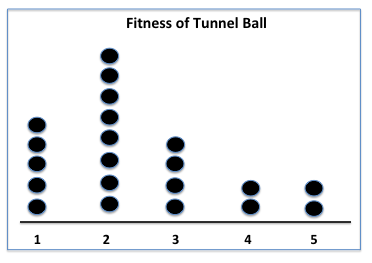
Discuss the dot plot features, the results, and draw conclusions.
Activity 4
For the remainder of the session, and for sessions to follow, have students participate in and evaluate each other’s games. Each group of students will collect the data for their game to analyse and present in Session 4.
Session 4
This session is about student groups sorting the data from their classmate’s evaluations of their activity and presenting the findings.
SLOs:
- Sort and display category data.
- Answer an investigative question.
Activity 1
Begin with a fitness run.
Activity 2
Make available pencils, paper, and sets of data for each pair activity.
Have students work in their groups to sort their data and to discuss their findings. Each student should create three dot plots to present their data, record their own findings and should answer the investigative question in their own way.
As students work, have them record on a small poster, their knowledge of centimetres, metres and kilometres, the relationship between them, and explain why we have standard measures.
Session 5
This session is about communicating investigation findings to others and sharing their understanding of standard measures of length.
SLOs:
- Present findings.
- Review and reflect on the investigative process.
- Review and reflect upon measurement learning.
- Discuss the need for small units of length measure and introduce millimetres.
Activity 1
Begin with a fitness run.
Activity 2
- Have each group present their findings about their game to the class. Allow time for other students to provide feedback.
- Together, as a class:
- Summarise on the class chart conclusions about safety, enjoyment, and fitness.
- Reflect on the investigation process and suggest ways it could have been improved.
Activity 4
Arrange the length measurement tools in front of the students.
Have individual students share their learning about each of the tools.
Ask which tool would be used to measure small lengths.
Introduce the millimetre measure for tiny lengths.
Conclude by reviewing personal benchmarks for (1cm), 1m and 1km.

Mathematical magic
This unit provides you with a range of opportunities to assess the entry level of achievement of your students.
This unit can be differentiated by altering the difficulty of the tasks to make the learning opportunities accessible to a range of learners. For example:
Some of the activities in this unit can be adapted to use contexts and materials that are familiar to students. For example:
Counting and colours in te reo Māori could be introduced in this unit and used throughout other mathematical learning.
Prior Experience
It is expected that students will have a range of prior experiences working with numbers, geometric shapes, measurement, and data. Students are expected to be able to use simple addition and subtraction in situations where sets are joined, separated, and compared.
Session One
Talk to your students about the purpose of the unit, which is to find out some information about them, so you can help them with their mathematics. In the first session students explore a ‘magic trick’ about dice and extend what they find to develop their own magic trick. Look for your students to generalise, that is, explain why the method works every time.
Dice Faces
Card Sums
In this example below only 5 is odd so the total is 20 + 1 = 21.
Note that students may find variations on a general rule:
The highest sum possible is 25, if all the odd numbers show up. Each time an odd card is turned over one is lost from the sum. The even number is always one less than the odd number. If you see how many even numbers there are you take that number from 25. For example, below there are three even cards, 0, 2, and 8, so the sum is 25 – 3 = 22.
Possible extension:
Suppose you wanted to make the trick look even more impressive by making 10 cards; 0-1, 2-3, 4-5, …,16-17, 18-19.
How could you work out the total without adding all the numbers then?
Session Two
In this session, the theme of mathematical magic is continued as students look for patterns in the place value structure of 100. Begin with a Slavonic Abacus and a Hundreds Board.
Slavonic abacus
Does the student use the tens and ones structure of the abacus or attempt to count in ones?
How many beads are on the whole abacus? How do you know?
If 45 beads are on the left side, how many beads are on the right side?
You might revisit the fact that five tens are fifty. Fifty mean five-ty or five tens.
(Student A), please move some of my kiwi to the left side and cover up the rest so I cannot see them (using an A4 sheet of paper).
Crosses Pattern
In this task students apply place value to explain why a pattern on the hundreds board works every time.
2 + 22 = 24 (top and bottom numbers) and 11 + 13 = 24 (left and right numbers).
Possible extension:
Any square on the hundreds board is magic. The numbers along each axis have the same sum. Why?
Below 12 + 23 + 34 = 69, 13 + 23 + 33 = 69, 14 + 23 + 32 = 69, 22 + 23 + 24 = 69.
Hopefully more able students can see that this works for the same reason that the cross pattern works. For each line, the sum is three times the centre number, with one of the end numbers the same amount more than that number as the other is less.
Other units that will support the development of Place Value at level 2 include:
Session Three
In this session students explore simple two-dimensional dissections in which a shape is cut up into smaller pieces and those pieces are put together to form a different shape. They will need square shaped pieces of paper or card.
Copymaster 1 contains the target shapes. Either provide students copies of the Copymaster or display it on screen. Ask the students to work out how to form each shape using all the pieces from the square. Look for your students to:
Copymaster 2 has some target shapes that can be made by connecting all four pieces. Challenge your students to make each target, record the solution, and make up their own target for someone else in the class. Be aware of the need to check for uniqueness. Is the target really the same as another? This brings in ideas about reflection and rotation.
Can you use these four pieces to create a hexagon?
Session Four
In this session students consider the likelihood of magic happening. Students will consider whether the trick is really magic or if something else is involved.
Am I magic or is something else going on?
Their beliefs might be deterministic: "You are a teacher, so you are clever."
Some beliefs might acknowledge chance: "There are only two cups. You have a good chance of being right each time."
A student might spot that the cups are marked. If not, reveal the trick to them.
Magicians like to disguise their tricks so the two cups might be a bit simple. Let’s try the same idea but have three cups and one treat. Can you figure out a way to get a treat each time?
S: I always choose the position where a treat didn’t go at first.
T: Did that always work? Did anyone else try that idea? What happened? Why do you think that happened?
Other students might always choose a position where a treat was first located, or randomly select a position.
Extend the activity:
You might extend the task by varying the number of cups and treats, e.g. four cups and one, two, or three treats.
Session Five
In this session, students look for repeating patterns and connect elements in the pattern with ordinal numbers.
Let students create their own patterns. Look for students to:
Extend the activity:
There are many ways to increase the difficulty of repeating pattern prediction:
Dear parents and whānau,
For the first week of school our mathematics unit is about mathematical magic. We will investigate number tricks, magically change a square into other shapes, predict the future of a pattern, explain and justify why things work.
Ask your child about their magical abilities and have them share some of the magic tricks they have done in class with you.
Building on two-digit place value
This unit supports students learning to understand the structure of two-digit numbers and how to operate with them.
Session One
Session Two
Session Three
Session Four
Session Five
Our number system is very sophisticated though it may not look like it. While numbers are all around us in the environment, the meaning of digits in those numbers and the quantities they represent are challenging to understand. Our number system is based on groupings of ten. Ten ones form one ten, ten tens form one hundred, ten hundreds form one thousand. And so the system continues to represent very large numbers.
To represent all the numbers we use just ten digits, 0, 1, 2, 3, 4, 5, 6, 7, 8, and 9. The word for digits also comes from our fingers. We don’t need a new number to represent ten because we think of it as one set of hands, one group of ten. Similarly when we add one to 99 we write 100 and do not need a separate symbol for one hundred. The position of the 1 in 100 tells us about the value it represents. Zero has two uses in the number system, as the number for ‘none of something’, e.g. 6 + 0 = 6, and as a place holder, e.g. 704. Place holder means it occupies a place or places so the reader knows the values represented by the other digits. In 500 zero is acting as a place holder in the tens and ones places.
Place value means that both the position of a digit as well as the value of that digit indicate what quantity it represents. In the number 273 the position of the 2 is in the hundreds column which means that it represents two hundred. Seven is in the tens column which means that it represents 7 units of ten, 70.
Renaming a number flexibly is important. In particular it is vital that students understand that when ten ones are created they form a unit of ten, and when ten tens are created they form a set of one hundred. For example, the answer to 210 + 390 is 6 hundreds since one ten and nine tens combine to form another hundred. Similarly when a unit of one hundred is ‘decomposed’ into tens the number looks different but still represents the same quantity. For example, 420 can be viewed as 4 hundreds and 2 tens, or 3 hundreds and 12 tens, or 2 hundreds and 22 tens, etc. Decomposing is used in subtraction problems such as 720 – 480 = □ where it is helpful to view 720 as 6 hundreds and 12 tens.
This unit can be differentiated by altering the difficulty of the tasks to make the learning opportunities accessible to a range of learners. For example:
Some of the activities in this unit can be adapted to use contexts and materials that are familiar and engaging for students. For example:
This unit is targeted at Level 2 so students are expected to have experience at Level 1 including:
This unit builds on the unit Place value with two digit numbers, and it would be useful for students to have worked through that unit first. Some materials created for that unit will also be useful here.
Activity
Session One
In this session the students analyse an abridged game of Snakes and Ladders to determine the gains and losses from climbing a ladder or sliding down a snake.
How many squares would a player gain by landing on the ladder on square 20?
We are now going to look at some of the other snakes and ladders.
How many squares would a player gain or lose by landing on the ladder or snake?
A beans and bags model of 91 – 30 = 61. Putting four beans back gives 65 so the amount taken is 26.
Ask the students to play Snakes and Ladders in pairs or threes - a tuakana/teina model could work well here. Use wooden or whiteboard cubes as the dice, using stickers or whiteboard pens on each face to write on. Copymaster 1 gives the playing boards. Three options of board are available for differentiation. Note that each board requires a different set of numbers to be on the dice. Tell your students to use efficient ways to work out where they will land with each dice roll rather than simply counting by ones. Note that the numbers are slightly different to a standard Snakes and Ladder board - the player moves from left to right across each row rather than zigzagging their way up the board.
After they have played the game for a while challenge your students to work out the gains and losses for each ladder and snake on their board. Expect them to apply the strategies they learned in Part One and record those strategies with numbers, equations or diagrams.
Session Two
In this session students learn to represent two digit numbers using a non-proportional representation, play money (see Material Master 4-9 to make a set of play money. At this point you only need one hundred, ten, and one dollar notes.)
Part One
What is the amount of money that this note is representing? (Holding up $1 note)
Now what happens next?
How do I write this amount of money? ($10 though some students will know about the decimal point).
What happens now? (Adding one $1 note gives ten $1 notes in the ones place that can be exchanged for one $10 note)
14, 24, 34, 44, 54, …, 94, … What happens next?
87, 77, 67, 57,…, 17, … What happens next?
95, 96, 97, 98, 99, … What happens next?
Pay Me is a task in which students make up the pay for employees. You will need:
There are two different versions of Pay Me at varying degrees of complexity:
The task is worked through in groups of three students. One student becomes the banker who exchanges notes and checks the pay envelopes for accuracy. Two students work together on creating the pay envelopes. Copymaster 3 has a set of instructions at the bottom of each page about what amount to start with and instructions about putting a pay slip in each envelope. Students cut out each pay slip and put it into an envelope with the correct amount. You might also ask them to write the amount in words though that can restrict the participation of some students. The Banker checks to see that the amount is correct. Each set of slips has a final question that students should answer to show they have completed the task correctly. Look for:
After the students have completed the task bring them together to share what they learned. You might like to pose other challenges for assessment purposes:
Session Three
In this session the students gain fluency in using ‘up through ten’ and ‘back through ten’ strategies for addition and subtraction.
Each time we make one of these totals our class scores 10 points.
I want you to think ahead about what the total will be when you add a number. Is there a way to always win or is it just good luck? Does it matter who goes first?
Suppose 0, 2 and 7 did not work. How would that change your strategy?
Session Four
In this session the students explore the place value of 3 digit whole numbers, particularly building up tens to make hundreds.
You will need about 500 groupable objects, hopefully still organised into tens and ones. You will need a way to collect ten tens into one hundred. For example, a large kete, ice cream container or bigger ribber bands. You will also need a place value mat (Copymaster 2) enlarged to A3 size.
What number have I made? Make that amount with play money.
If I add one more dollar what happens then? Show me with your play money.
Why does the calculator use a zero here (10)?
I am adding one, two, three,…, seven, eight, nine ones (Count them out as you add them). What is the number now? What happens if I add one? How does the number 19 change when I add one?
Progress in this sequence:
Why does the calculator use two zeros to show 100?
100 → 109 (Why a zero in the tens column?) → 110 (Why a zero in the ones column?) → 150 (Why does the ones digit not change?) → 198 → 200 (Two acts of rebundling or exchanging) → 204 → 214 → 294 → 300 → 305 → …etc.
An issue with the use of zero as a place holder is that the way numbers appear creates an impression that there are no units of a given place value in a number, e.g. 204 has no tens. A flexible understanding of place value is essential for calculation. In particular, knowing that ones are nested within tens, and tens are nested within hundreds is very important. So there are actually 20 tens in 204. This activity helps students rename three digit numbers in multiple ways.
How could I pay for this item with play money?
What if the cash machine only gave out $10 and $1 notes? How could I make $247?
How many $10 notes make $100? How many $10 notes make $200? How many $10 notes make $240? How many extra $1 notes will you need?
Could I make $247 with only one $100 note and $10 and $1 notes? How?
Session Five
In this session students extend their understanding of three digit whole numbers to include ‘breaking up’ of hundreds and tens units.
Use the ‘Modeling three digit numbers’ digital learning object. As with the previous day students work in pairs with a set of play money and a place value mat.
How many tens are in 378? (Students may say 7 which is correct to the place values but there are also 30 tens in 300)
If I added three ones, what would happen? (two added ones would form a set of ten ones that would combine to form a ten unit and move places. Adding another one would result in 381)
If I next added three tens what would happen? (Two more tens would create ten tens which would combine to form one hundred and move places. Another ten more would result in 411)
399 + 1 = 400, 400 + 7 = 407, 407 + 90 = 497, 497 + 3 = 500, …
What would happen if I took seven ones away? (Taking away six ones leaves 420 but to take another one away (click on the down arrow) would require one ten to be ‘broken up’ into ten ones and moved into the ones column. Removing one would leave 419).
What would happen if I took two tens away? (Taking away 19 would leave 400. To take one more away would result in two ‘break up’ actions. One hundred would become ten tens and move columns. One ten would become ten ones and move columns. One would be removed leaving 399).
183 – 4 = 179, 179 – 90 = 89, 89 – 10 = 79,…
302 – 20 = 282, 282 – 100 = 182, 182 – 80 = 102, 102 – 3 = 99,…
All students start with $800 (8 x $100 notes). They take turns to:
The first person to lose all of their money exactly is the winner. They cannot lose more than what they have left.
Dear whānau,
At school we have been learning to add and subtract two-digit and three-digit numbers. Please support your child at home by using junk mail from the letterbox or other advertisements to add and subtract items that are for sale. For example, you could circle 2 or 3 items from a supermarket mailer and your child could explain how to add up the total cost. Or, you could pretend they had $100 to spend at the local market and see how much money they would have left over after buying some items your whānau usually buys.
Paper planes: Level 2
This unit uses the context of making paper planes to develop understanding of metre and centimetre measures. Students investigate a variety of paper airplane designs, experiment to see which planes fly the furthest, and decide winners by measuring and comparing results.
This unit is suitable for students who have had plenty of previous experience with non-standard units and have been introduced to the concept of standard units. It provides an engaging context for practising the use of metres and centimetres. In the second unit, Paper Planes L4, students create scatter plots of the distance their planes travel when a variable is changed.
When students can measure lengths effectively using non-standard units, they are ready to move to the use of standard units. The motivation for moving to this stage follows from experiences where the students have used different non-standard units for measuring the same length. This develops an appreciation for consistency in the units used, and an understanding that such consistency allows for the easier and more accurate measurement.
Students' measurement experiences must enable them to:
The usual sequence used in primary school is to introduce the centimetre first, then the metre, then the kilometre and the millimetre.
The centimetre is often introduced first because it is small enough to measure common objects. The size of the centimetre can be established by constructing it, for example by cutting 1-centimetre pieces of paper or straws. You may also have a supply of 1-cm cubes that could be used to measure objects. An appreciation of the size of the unit can be built up through lots of experience in measuring everyday objects. The students should be encouraged to develop their own reference for a centimetre, for example, a fingertip.
As the students become familiar with the size of the centimetre they should be given many opportunities to estimate before measuring. After using centimetre units to measure objects the students can be introduced to the centimetre ruler. It is a good idea to let the students develop their own ruler to begin with. For example, some classrooms have linked cubes which can be joined to form 10 cm rulers. Alternatively pieces of drinking straw could be threaded together.
The correct use of a ruler to measure objects requires specific instruction. The correct alignment of the zero on the ruler with one end of the object needs to be clarified.
Metres and millimetres are established using a similar sequence of experiences: first construct the unit and then use it to measure appropriate objects.
There are many websites that give instructions for folding paper airplanes or students may like to experiment with creating their own designs.
This unit can be differentiated by altering the difficulty of the tasks to make the learning opportunities accessible to a range of learners. In particular, have students measure length using non-standard measures, such as hand spans or foot lengths, if they are not ready to progress to using metres and centimetres.
An alternative context for this unit is Manu tukutuku – Māori kites. Information about Manu tukutuku is readily available online, and the Te Ara website provides a useful overview. Within this context, students could design and make simplified Manu tukutuku to use for the measurement tasks, with the work culminating in a kite day, rather than an air show.
Getting started
How could we measure the distance our planes fly?
What could we use to measure how far our planes have travelled?
What would we need to be careful of when measuring?
Which of these measuring tools do you think would be best to measure the distance of our plane’s flight? Why?
What other things could we use?
Exploring
Encourage them to record their trials in a table similar to the one below, on paper or a device, to help them keep a track of which planes fly the best. This will help them decide which plane they will use in the air-show at the end of the week. Support students as they work through this process as needed. Students may wish to video their week’s investigation to share with whānau and classmates.
Flight 1
Flight 2
Flight 3
How far did the plane you made today fly?
How do you think you could improve your plane?
What do you think you will try tomorrow?
What did you use to measure the distance of your plane’s flight?
What steps did you take to ensure your measurements are accurate? Encourage use of the language of measurement when students are discussing their measurements.
Reflecting
What was the difference between the first and second place getters?
Which planes went the furthest?
Why do you think they flew so well?
What did we need to be careful of when we were measuring?
Which tools do you think were most useful for measuring? Why?
Dear family and whānau,
This week at school we are making paper planes and measuring how far they can fly. We will be holding an air-show on Friday to see which plane can fly the furthest. Ask your child to show you the design they are using for their plane and help them experiment with things that may make the plane go further. Run some trials at home estimating how far the plane flew each time. You can check the measurements together if you wish. Encourage the use of measuring vocabulary such as estimation, millimetres, centimetres and metres.
Number lines and bead strings
In this unit five-based bead strings and number lines are used to solve addition and subtraction problems. The aim is to get students that use an early additive strategy to solve problems using a tidy number strategy with 10.
There are several things happening in this unit. All of them are aimed at enabling students to become more fluent when working with numbers.
The students need to realise that "making a 10" is a good strategy for solving addition problems. This strategy is reinforced by the use of bead strings and the number line, so students need to understand how these representations work, and see their relevance for addition and subtraction work.
It is important that the students gradually learn to work without the bead strings and number line, so they are encouraged to ‘image’ these objects. Instead of actually using the physical materials, they should start to think about what is happening in their heads. The next stage is for these number facts to become quickly recalled. For most students, this will take a reasonable amount of practice. In the process, students are exposed to problems in context and finally they are given examples of their own to work on.
This unit develops important mathematical thinking that is relevant to learning in school and in contexts beyond the classroom. Firstly, numbers are the base of many ideas in mathematics. It is crucial that students develop fluency in addition and subtraction, and strategies for carrying out number operations. Secondly, devices like the number line are not just useful to understand addition and subtraction, they are also used extensively in coordinate geometry where two perpendicular number lines are used as axes. In this situation they enable us to visualise quite complicated functions. Even at this early stage in school, students are developing skills that will be useful throughout their school life, as well as ideas that will grow into powerful and deep mathematics.
This unit can be differentiated by varying the scaffolding provided and altering expectations. This will make the learning opportunities accessible to a range of learners. For example:
Some of the activities in this unit can be adapted to appeal to students’ interests and experiences and encourage engagement. Consider adapting the addition and subtraction problems in each session to reflect current learning from other curriculum areas (e.g. trips to the marae, swimming lessons, learning about animals). Characters from shared texts can also offer engaging contexts to frame problems in. Other contexts for number line problems include:
Numbers in te reo Māori could be introduced in this unit and used throughout other mathematical learning.
Note the following useful prior knowledge:
Session 1
Kahu the kiwi starts on number eight and walks along four more spaces. Where does she end up? or
Kahu the kiwi starts on number waru and walks along whā more spaces. Where does she end up?
How can we find out where Kahu will end up without counting?
How many spaces will Kahu need to go to get to number 10?
Now how many spaces has she got left to go?
Kahu the kiwi is on number 9 and walks another 4 places, where will she end up?
Kiri the kea is on number 13 and flies backwards 5 spaces. Where does he end up?
Have the students predict where they think they will end up before getting students to come out and share their strategies on the number line.
Kahu has been walking for some time now. She is on number 27 and walks another 5 spaces. Where do you think she will end up?
Ask students to talk to their partner and discuss how they would work the problem out.
Challenge students to see if they can solve the problem without counting on:
See if you can solve the problem another way?
What is the nice friendly number that Kahu is going to pass through?
How far is it from 27 to 30?
Now how much further does she have to go?
Kiri the kea starts on 49 and slides another 8 spaces. Where does he end up?
Tāne the takahe starts at number 87 and wanders on another 8. What number does he end up on?
Session 2 – Marble Collections
Over the next three days the aim is to slowly remove the number lines and bead strings and encourage students to visualise what would happen on the bead string or bead frame. This is called imaging.
Begin by using a bead string 1-20 coloured in 5’s like this.
Where is number 8?
Find number 11.
Where would number 16 be?
Moana has a marble collection. It starts with 9 marbles. Show me where 9 is on the bead string.
Moana is on a winning streak and wins 6 more marbles. How many does she have in her collection now?
Use the bead string to demonstrate putting one marble onto the 9 to make it 10 like this:
9 + 1 = 10; there were 5 left; 10 + 5 = 15.
Kauri has 8 marbles and she wins 6 more. How many does she have now?
George has 15 marbles and wins 6 more. How many does he have now?
Hemi has 15 marbles and loses 6. How many does he have left?
Session 3 – Do and Hide Number line
This session is to use the number line (Copymaster 3) and bead string to solve problems and then the number lines and bead strings are taken away to encourage students to start imaging.
Ask a couple of students to take the number line and pegs away and work out the answer. Ask the students remaining to visualise what the others will be doing on the number line. The following questions may prompt the students to image the number line.
Where did the Tūi start?
How far does the Tūi have to fly to get to 10?
Encourage the students to visualise what they would do on either the number line or bead string. Extend some of the problems to numbers beyond 20.
Start Unknown
? + 4 = 10
Giana the giant wētā jumps 4 more spaces and ends up on 10. What number did she start on?
Change unknown
3 + ? = 8
Tama the tuatara starts on 3 and crawls along the number line and ends up on 8. How many spaces did he go?
Session 4 – Problem Solving Bus Stops
In this session, problems are placed on the top of a large sheet of paper. Students move around each bus stop solving the problem. They record their working on each sheet.
Session 5 – Reflection
Use this session to share the solutions students came up with for each of the bus stop problems. Encourage students to act out the problems where appropriate and to remodel their answers on the number lines or bead strings.
Dear family and whānau,
This week we have been using a number line to do some addition and subtraction. Here is an example of a number line:
Ask your child to show you how they would solve this problem:
Kiri has 5 lollies. If she buys 8 more, how many does she have altogether?
Perhaps you can make up some more problems like that and work them out together. When your child gets really quick at coming up with an answer, put the number line away and ask them to try to figure out the problems by visualising the number line in their head.
Figure it Out Links
An activity from the Figure It Out series which you may find useful is:
Honeycomb
In this unit students sort and explore two-dimensional and three-dimensional geometric shapes, identify and describe their distinguishing features and come to appreciate the efficiency of the tessellating hexagon in meeting the needs of honeybees.
In level one, students have been learning to name some common two-dimensional and three-dimensional shapes and have started to become familiar with their features (e.g. side, corner). When students are given opportunities, they find their own systems for sorting shapes, justifying their categories and developing the important geometric language of attributes.
As they work with three-dimensional shapes, students become aware that these are made up of flat or plane shapes that have two dimensions. It is useful for students to see that two-dimensional shapes are like a print that technically cannot be ‘held’ because it has no thickness or depth. In understanding the way in which two dimensional plane shapes build three dimensional shapes, students need to have a clear understanding of the meaning and concept of ‘dimensions’. They should be able to explain in their own words, what the abbreviations 2D and 3D mean.
The change in language from ‘sides and corners’ for two-dimensional shapes, to ‘faces, edges and vertex/vertices’ is not an insignificant one. The language itself conveys the shape category and should be emphasised and well understood.
As students manipulate shapes that are the same, they ‘discover’ tessellation and come to understand that this is also an identifying characteristic of a shape. It is not expected that they will be able to explain this using the precise quantification of angle.
As shapes don’t exist in isolation it is important that students have opportunities to explore shapes in structures around them. In their exploration of the remarkable structure of the honeycomb, students have opportunities to apply their new learning.
Associated Achievement Objectives
Science
Life processes
Ecology
English
Processes and strategies
Purposes and audiences
Ideas
This unit can be differentiated by varying the scaffolding provided and altering expectations. This will make the learning opportunities accessible to a range of learners. For example:
The context of this unit can be adapted to address diversity, and appeal to students’ interests and experiences to encourage engagement. For example:
Whilst this unit is presented as a sequence of five sessions, more sessions than this will be required between sessions 3 and 4. It is also expected that any session may extend beyond one teaching period.
Session 1
This session is about exploring features of mosaic shapes and making a successful poster highlighting the special characteristics of one particular shape.
SLOs:
Activity 1
Begin by reading The Greedy Triangle.

Activity 2
Write ‘Clever shapes’ on a class chart. Explain that the students will be making their own small poster about a clever shape. Ask what the purpose of a poster is (To capture people’s attention and to give a short clear message). This could be linked to writing instruction.
Together list the features of a good poster. It grabs the audience’s attention by using:
bold print, a simple and convincing message, interesting colours, a picture or diagram.
Activity 3
Make available mosaic pattern blocks, (omit hexagons), paper, pencils, crayons or felt pens.
Use this time to model and record the language of the shapes, including writing and discussing ‘tessellation’.
Activity 4
Explain that to make their posters, the students will need to draw around their ‘clever shape’ (as many times as necessary).
Set a time limit and have students complete their ‘clever shape’ posters.
Activity 5
Conclude the session by having students share their work in pairs. Display the list of criteria for a successful poster and have students self evaluate, then give partner feedback about each of the criteria. Model how to give and receive feedback with a partner, making explicit reference to the criteria listed.
Activity 6
Share clever shape posters as a class, highlighting geometric language.
Session 2
This session is about understanding that a 2D shape is like a footprint, a 3D shape is something you can hold or feel, and that we use different language for each.
SLOs:
Activity 1
Ask, ‘Can you hold or feel an outline (‘footprint’) with your hand?’ (No. It has only 2 dimensions.). Discuss, highlighting the fact that we can say how long the outline is and how wide it is.
Record ‘width’ ‘length’ ‘dimensions’, explaining why these outlines are called two-dimensional shapes and that this is sometimes referred to as 2D (i.e. because the two-dimensions are width and length).
Ask, ‘What ‘dimension’ can’t we measure?’ (How deep it is.)
Activity 2
Make available hexagonal mosaic blocks, pencils and paper.

Have students each draw around one block creating an outline, identify and record ‘6 sides’ and ‘6 corners’ and write a statement about the outline. For example: “This is a 2 dimensional or 2D shape because we can only say how long it is and how wide it is.”
Activity 3
Discuss, conclude and record that the mosaic block is a 3D shape because it has width, length, and thickness (depth) and we can hold it in our hand.
Have students label their drawings using these words. Have all students touch and name those parts on their hexagonal mosaic block.
Activity 4
Return to the language listed in Session 1. Highlight the word tessellate.
Pose the task: Use your shape, a pencil and paper and show how you know whether or not a hexagon tessellates.
Activity 5
As they describe their drawings they should use the language of side and corner.
Activity 6
Conclude the session by having students each make a small poster, or spoken or digital presentation about 2D and 3D shapes that they know. Encourage them to think about the feedback they received about their posters in Session 1. Model this explicitly.
Session 3
This session is about consolidating understanding of, and using language associated with, 2D and 3D shapes, understanding and making a hollow prism to create a model bees’ honeycomb.
SLOs:
Activity 1
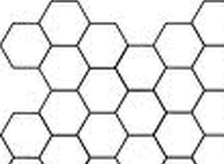
Have students explain why the hexagons in the drawing are two-dimensional.
Ask , “What does the drawing remind you of?”
Elicit, ‘a bees’ honeycomb’.
Have students discuss and agree whether the honeycomb is two-dimensional or three-dimensional. Have them explain their thinking.
Have several students hold it and describe its features. Record these.
Highlight the plane (two-dimensional) shapes, the hexagon and rectangle that make up the three-dimensional prism.
Activity 2
Pose: Can you work in pairs, using this card and tape, to make a hollow hexagonal prism?
Give students time to explore and create their hexagonal tubes.
Have students talk about the process using the language of faces, edges and vertices.
Recognise the bee’s skill in making perfect hexagonal prisms.
If necessary, have students make their prisms with greater precision to achieve a ‘perfect’ honeycomb such as the bee produces.
Activity 3
They might also like to make their own model bees to inhabit the class honeycomb.
Session 4
This session is about giving students opportunities to find and share information about honeybees, their honeycombs and the importance of the hexagon.
SLOs:
Activity 1
Have students share the results of their research and, if any students have made their own model bees, to locate these in the honeycomb.
http://www.npr.org/blogs/krulwich/2013/05/13/183704091/what-is-it-about-bees-and-hexagons
http://www.nature.com/news/how-honeycombs-can-build-themselves-1.13398
You may need to structure this task to ensure the engagement and success of your students (e.g. pair up students who would benefit from a tuakana-teina relationship and direct them to research one thing - such as where honey bees live). It may be effective for you to provide the different resources for the students to use in their research, to ensure the language and content is age appropriate and accessible.
Activity 2
Write on the class chart:
What do honeybees need to stay alive?
How does the honeycomb ‘suit’ the bees?
Discuss each, with reference to the research information, and record the students’ understanding of the key ideas.
Recognise that:
Activity 3
Conclude the session by reading A cloak for the dreamer:
Highlight the way in which the circle shapes which did not tessellate were changed into the hexagon shapes which do tessellate and the way this is like the process in the honeycomb where the cells are thought to begin as circles. Encourage students to share their reflections about this.
Session 5
This session is about synthesising the skills and learning in Sessions 1-4.
SLOs:
Activity 1
Review key learning over the past 4 sessions including referring to the clever shapes posters and feedback in Session 1.
Activity 2
Set an appropriate time limit and have students work in pairs to design and create a ‘presentation’ (poster, powerpoint, other) combining the key ideas about a clever shape and a clever creature (the honeybee).
Activity 3
Challenge students to research other clever shapes (and creatures) found in nature.
Dear parents and whānau,
We have been learning that a two dimensional shape is a bit like a footprint, with width and length as the two dimensions, and that other shapes are three dimensional.
Your child would like your help to find out more about the way in which honeybees create hexagonal honeycombs, and to learn more about other ‘clever’ shapes in nature. They will be sharing their information with their peers.
Thank you.
Popcorn
This unit includes a number of popcorn investigations, which provide both a purposeful and enjoyable measuring context. The focus of the unit is introducing the students to the need for a standard unit for measuring volume.
When students can measure effectively using non-standard units, they are ready to move to the use of standard units. The motivation for moving to this stage often follows from experiences where the students have used different non-standard units for the same volume. This allows them to appreciate that consistency in the units used allows for easier and more accurate communication.
The usual sequence used in primary school is to introduce the litre as a measurement of volume before using cubic centimetres and cubic metres.
Students’ measurement experiences must enable them to:
The standard units can be made meaningful by looking at the volumes of everyday objects. For example, the litre milk carton, the 2-litre ice-cream container and the 100-millilitre yoghurt pottle. Students should be able to use measuring jugs and to say what the measuring intervals on the scale represent.
This unit can be differentiated by varying the scaffolding provided or altering the difficulty of the tasks to make the learning opportunities accessible to a range of learners. For example:
Including the process of making popcorn in a broader context within the class or school will encourage engagement and ensure the usage of food is meaningful. For example, the popcorn could be used as part of a shared lunch for the class, a popcorn stall fund-raiser as part of a school fair or gala, or shared at a community event.
Te reo Māori vocabulary terms such as, ine (measure), rita (litre), ritamano (millilitre), haurua (half) and hauwhā (quarter) could be introduced in this unit and used throughout other mathematical learning. Another term that may be useful in this unit is kānga pāhu (popcorn).
Session 1-2
In these sessions we investigate the volume of corn kernels before and after popping. The amount of popcorn to be made is based on the batch size using a popcorn maker, which is usually about 1/2 a cup of kernels. We use non-standard units to measure the volume of both kernels and popped corn. We think about why the measurements vary (because the units being used vary) and what could be done to improve the consistency of the measurements (use a standard unit).
Ask: Why are we coming up with different numbers of spoonfuls needed to fill the container?
Record students’ responses, encouraging them to compare the sizes of spoons.
Session 3
In this investigation the students revisit the results from the previous investigation, and the idea of measuring the popcorn using a litre measure is explored.
Session 4
In this investigation the students think about a standard serving size for the popcorn. The students will find out how many litres of popcorn will be needed for everyone in the class to get one serving.
Session 5
On the final day of the unit the students make cones to fit one serving of popcorn into. The batches of popcorn will be made and the students will be able to measure out their serving to eat.
What volume of corn kernels have been used?
How many batches of popcorn have been made?
How many servings were made?
How many litres of popcorn have been made?
How much is left over?
If you were making some popcorn for your whānau how many batches would you need to make?
Family and whānau,
This week we have been investigating the volume of popcorn. Do you know how many litres of popcorn half a cup of corn makes when it is popped?
We designed containers at school to hold our popcorn. Ask your child to tell you about the one that they made. Together you could design another shaped container to hold the popcorn and make some at home.
Multiplication stories
In this unit students explore the different situation types to which multiplication can be applied. Particularly, they engage with rate, comparison and array problems.
The basic concept of multiplication is an important one because of its practicality (how much do 4 ice creams cost at $2 each?) and efficiency (it is quicker to determine 4 x 2 than to calculate 2 + 2 + 2 + 2). Multiplication is used in many different situations. In this unit, students think about multiplication as a short way to find the result of repeated addition of equal sets. They do so by solving rate problems, comparison problems and array problems.
A rate problem involves a statement of "so many of one quantity for so many of another quantity". All multiplication situations contain some form of rate but at this level, the problems are usually about equal sets or measurement. For example:
“Lena buys six bags of biscuits. Each bag contains four biscuits. How many biscuits does she buy altogether?”
This is an equal sets problem that contains the rate "four biscuits for every bag". A measurement rate problem is usually something like this:
“Hone’s kumara plant grows five centimetres each week after it sprouts. How long will his plant be after six weeks?”
The rate in Hone’s problem is “five centimetres for every week". Comparison problems involve the relationship between two quantities, for example:
“Min’s apartment block has three floors. Anshul’s block has 12 floors. How much taller is Anshul’s block than Min’s?”
An additive answer is 12 – 3 = 9 floors. A multiplicative answer is 4 x 3 =12 so Anshul’s block is four times higher than Min’s. An array is a structure of rows and columns. For example, this chocolate block has two rows of five pieces (2 x 5 or 5 x 2).
Array problems can help students to see the commutative property of multiplication, for example, that 5 x 2 = 2 x 5. In other words, the order of the factors does not affect the product (answer) in multiplication.
As well as thinking about multiplication in a variety of situations, students are encouraged to use a variety of materials to solve the problems. Using a variety of materials can help students see the multiplicative structure that is common to a variety of problems and assist them to transfer their understanding to situations which are new to them.
This unit can be differentiated by varying the scaffolding provided to make the learning opportunities accessible to a range of learners. For example:
The contexts for this unit can be adapted to suit the interests and experiences of your students. Focus on familiar contexts which include multiplicative situations to appeal to students’ interests and experiences and encourage engagement. Examples may include:
Getting Started
Introduce the session by asking the students to work through several equal group (set) problems first and then ask them to pose their own problems. For example:
When writing these problems, consider what times tables your students are confident in applying to word problems. Also consider how students might benefit from working in pairs (tuakana-teina).
The students can represent these and similar ‘equal sets’ problems with:
Note: It is important to link the examples (where possible) to the structure of repeated addition of equivalent sets as multiplication. For example: 4 + 4 + 4 + 4 + 4 + 4 + 4 = 28 or 7 x 4 = 28. Discuss what the numbers 4, 7, and 28 refer to and what the operations symbols + and x refer to. The multiplication symbols can be thought of as meaning ‘of’. For example, 7 x 4 = 20 means seven sets of four.
Use several sets of ice-cream containers (all with the same number of items in them) with the contents of each covered except for one. Ask the students to write story problems for each example.
Be aware that students’ choice of strategy depends on the connection between the conditions of each problem and the number resources that they have available. Expect that the strategies used by individual students will vary.
Exploring
Over the next three days the students are exposed to a variety of different types of story problems. They are encouraged to model the problems using different equipment and explain their answers to others. They think about the most efficient ways of solving the problems. It is important that students are provided with opportunities to build up multiplication facts to 10 and then to 20. Some students may solve these problems without equipment, using the number knowledge they have available.
Rate problems
[Name] can write their name in 10 seconds. How long does it take to write their name four times?
You might select a student to role play writing their name and use an analogue clock (less battery) and/or stacks of cubes to track the time in seconds
[Name] drinks four cups of water each day. How many cups does he/she drink in one week?
Use plastic cups to build up the equal sets of four cups that are involved in this problem. Use another material to track the number of days.
[Name] puts five pieces of harakeke into every bundle. How many pieces of harakeke does he/she need for eight bundles?
[Name] puts three spoons of Milo in each cup. How many spoons of Milo does he/she need for 10 cups?
These problems are more accessible than the time related tasks. Shirts can be cut out of paper and buttons represented by counters. Cups and plastic spoons can be used to model the Milo problem. Both quantities in each rate are tangible.
The students can create similar types of problems with pictures and pose the problems to each other. Encourage them to explain their strategies to each other.
Discuss what is the same about all the problems you have just worked on.
Do students express the idea of a rate as being a “for every” relationship?
Now ask the students to make up similar word problems and to pose their problems to each other. Encourage them to explain their answers to each other.
Multiplicative comparison
How much taller is Jill’s apartment block than Jack’s apartment block?
S: Jill’s apartment block has 12 floors and Jack’s has four floors. Jill’s block is eight floors higher.
Students may not offer a ‘times as many’ multiplicative answer. If that occurs pose this problem:
Jill says that her apartment block is three times higher than Jack’s block. I wonder what she means?
Look for students to note the inverse relationships:
S: Jack’s apartment block is eight floors less (shorter) than Jill’s.
S: Jack’s apartment block is one third of the height of Jill’s.
Do your students:
Arrays
Pose problems such as:
The students are lined up in 3 teams for sport. Each team has 6 members. How many students are there altogether?
Encourage the students to draw representations of problems like this using three rows (one for each team) and six columns (one for each team member). Alternatively, use the students as the objects in the problem. If students draw the situation as three columns of six it opens discussion of the commutative property since 6 x 3 = 3 x 6.
For the problem above this could be talked about as 3 rows of 6 pegs or 3 sixes,
or 3 rows of 6, or 3 x 6 = 18
By turning the pegboard a quarter turn, the array still has a total of 18 pegs.
This could be talked about as 6 columns of 3 pegs or 3 rows of 6 pegs or 6 threes or 6 columns of 3 or 6 X 3 + 18.
Reflecting
On the final day of the unit we play a game called 'Array Trap' in which the students use graph paper to plot arrays.
For this activity you will need:
Players take turns to:
Discuss strategies for the game such as:
Dear Family and Whānau,
At school this week we have been solving multiplication problems. Here is an example of one we have worked on:
There are 6 bags of shellfish (kaimoana). Each bag contains 4 pipi. How many pipi are there altogether?
At home this week I would like your child to make up two more multiplication problems for us to solve in maths.
Figure it Out Links
Some links from the Figure It Out series which you may find useful are:
Planning a statistical investigation (Level 2)
In this unit students will identify how to plan and carry out a statistical investigation, looking at facts about their class as a context.
It is vital when planning statistical investigations that the students understand the importance of the way that they plan, collect, record and present their information. If they are not consistent in the way they carry out any of these steps, they could alter their findings, therefore making their investigation invalid.
In this unit the students will first look at choosing investigative questions to explore, making sure that the topic lends itself to being investigated statistically. They will collect their data using structured recording methods. Once they have collected and recorded their data, they will present their findings, using appropriate displays, and make descriptive statements about their displays to answer the investigative question.
Dot plots
Dot plots are used to display the distribution of a numerical variable in which each dot represents a value of the variable. If a value occurs more than once, the dots are placed one above the other so that the height of the column of dots represents the frequency for that value. Sometimes the dot plot is drawn using crosses instead of dots.
Investigative questions
At Level 2 students should be generating broad ideas to investigate and the teacher works with the students to refine their ideas into an investigative question that can be answered with data. Investigative summary questions are about the class or other whole group. The variables are categorical or whole numbers. Investigative questions are the questions we ask of the data.
The investigative question development is led by the teacher. Through questioning of the students, the teacher identifies the variable of interest, and the group identifies what the investigative question is about. Within this, the teacher forms the investigative question but with student input.
Survey questions
Survey questions are the questions we ask to collect the data to answer the investigative question. For example, if our investigative question was “what ice cream flavours do the students in our class like?” a corresponding survey question might be “what is your favourite ice cream flavour?”
As with the investigative question, survey question development is led by the teacher, and through questioning of the students, suitable survey questions are developed.
The learning opportunities in this unit can be differentiated by providing or removing support to students and by varying the task requirements. Ways to support students include:
The context for this unit can be adapted to suit the interests and experiences of your students.
For example:
Te reo Māori vocabulary terms such as raraunga (data), tauanga (statistics), tuaka (axis), and āwhata (scale) could be introduced in this unit and used throughout other mathematical learning.
Although this unit is set out as five sessions, to cover the topic of statistical investigations in depth will likely take longer. Some of the sessions, especially sessions 4 and 5 could easily be extended as a unit in themselves. Alternatively, this unit could follow on from a unit on data presentation to give students an appreciation of practical applications of data display.
Session 1
Session 1 provides an introduction to statistical investigations. The class will work together to answer the investigative question – How many brothers and sisters do people in our class have? Be sensitive to the needs of your class - if this context is inappropriate for your students , then it may need to be altered.
Explain that statistics concerns the collection, organisation, analysis and presentation of data in a way that other people can understand what it shows.
How many brothers and sisters do people in our class have?
Students might suggest that we ask how many siblings they have, or they might suggest we ask how many brothers, how many sisters and how siblings they have altogether.
The idea of asking about brothers and sisters separately allows for a deeper exploration of the data and a more in depth answer to our investigative question.
Sticky notes could be a good way to collect this information from the students as it will allow rearrangements of the data quickly.
For example:
Pip records the following information about her brothers and sisters. She gives it to her partner. Her partner, Kaycee shares this information with another student. Kaycee says that Pip has three brothers and one sister. Altogether Pip has four siblings.
How can we use the pieces of paper (or sticky notes) to show someone else how many brothers and sisters people in the class have?
How can we show the information so that people can easily understand what it is showing?
Hopefully, someone will suggest a more organised list, or counting the number of 0s, the number of 1s etc and writing sentences to explain how many there are of each.
Session 2
This session is ultimately about choosing an appropriate topic to investigate about the class. There will be a real need for discussion about measurable data and realistic topics that can be investigated in the given time frame. It would be a good idea to provide the students with a list of topics if they get stuck, but they should be encouraged to try and come up with something original where possible.
PROBLEM: Generating ideas for statistical investigation and developing investigative questions
If groups are having trouble thinking of ideas, you could try writing a list of suggestions on the board but limiting groups to using one of your ideas only, to encourage them to think of their own. Some ideas could be:
PLAN: Planning to collect data to answer our investigative questions
Explain that these questions are called survey questions and they are the questions we ask to get the data. Work with groups to generate survey questions. For example:
Possible survey questions are:
In these examples you can see that the survey question and investigative question are very similar, but there are key differences that make it an investigative question (What are Room 30’s favourite native birds? – overall about the class data) rather than a survey question (What is your favourite native bird? – asking the individual).
Session 3
Data collection is a vital part of the investigation process. In this session students will plan for their data collection, collect their data and record their data and summarise using a tally chart or similar for analysis in the following sessions.
PLAN continued: Planning to collect data to answer our investigative questions
DATA: Collecting and organising data
Session 4
In this session the students will work on creating data displays of the data collected in the previous session.
ANALYSIS: Making and describing displays
Numerical data – displaying count data e.g. “How many…” investigative questions
Categorical data – displaying data that has categories e.g. “What…” investigative questions
Session 5
Session 5 is a finishing off session. Students should be given time to complete their graphs if they have not already, and to write statements about what the graphs show.
Dear parents and whānau,
During the next week we will be working on statistical investigations in maths. Over this time, your child will be gathering data on the class and presenting it using data displays such as dot plots and bar graphs. If you know of any graphs or tables of information suitable to discuss with your child, either in the newspaper, or in a book, or perhaps on some advertising material, this week would be a good time to do so.
Figure it Out Links
Some links from the Figure It Out series which you may find useful are:
Pede patterns
This unit is about generating number patterns for certain creatures from the mythical planet of Elsinore. Each ‘Pede’ is made up of square parts and has a number of feet. The patterns range from counting by 2s and 3s, to being the number of feet plus three.
Patterns are the basis of much mathematics. There is always a need to find a link between this variable and that variable. This unit provides an introduction to pattern in the context of mythical creatures. Ākonga are given practice in finding the next creature in a sequence. This leads to the main aim, which is for the ākonga to begin to see the link between the number of feet that certain creatures have and the number of squares that make them up.
One of the things that is deliberately attempted here is for ākonga to see the link above in both directions. Not only do ākonga get practice in linking squares to the number of feet, but they also are asked to try to find the number of feet that a creature with a certain number of squares has.
This unit provides an opportunity to develop number knowledge in the area of Number Sequence and Order, in particular development of knowledge of the forward number word sequence and skip counting patterns.
This unit can be differentiated by varying the scaffolding provided or altering the difficulty of the tasks to make the learning opportunities accessible to a range of learners. For example:
The context of this unit can be adapted to address diversity, and to appeal further to the interests and background experiences of ākonga. For example, ākonga may like to colour their pede with their favourite colours or decorate them with culturally significant patterns that you have learnt about. Picture books such as Taniwha by Robyn Kahukiwa could be used to introduce the idea of a mythical creature, and could lead to further learning about myths and legends from cultures relevant to your ākonga. If the context of mythical creatures is inappropriate for your āklonga, then the context of native animals could be used instead.
Te reo Māori vocabulary terms such as tauira (pattern) and tau (number) could be introduced in this unit and used throughout other mathematical learning.
As each pede is developed, help ākonga focus on the number patterns involved by creating tables as below. Similar tables can be drawn for each type of pede.
Use of a hundreds board may help ākonga visualise the number patterns more easily and help them to predict which numbers will be part of the patterns.
The conclusion of each session is an ideal time to focus on the number patterns involved. Questions to develop number knowledge include:
Which number comes next in the number pattern for this pede? How do you know?
Which number will be before 20 in this pattern? (or another number as appropriate)
How do you know?
What is the largest number you can think of in this pattern? How do you know?
Could a pede with 20 squares be a Spotted Pede? Why / Why not?
Could a pede with 32 squares be a 2-pede? Why / Why not?
Are there any numbers that could be Spotted Pedes and Humped Back Pedes? What are they? How did you work that out?
Session 1
Here we explore number patterns related to the mythical creatures that live on the planet Elsinore. The patterns involve skip counting by 2s.
Introduce the idea of a mythical creature with a picture book like Taniwha by Robyn Kahukiwa, or Zog by Julia Donaldson. Consider whether a local iwi member could come to talk to your class about the history of taniwha in your local area. On planet Elsinore there lives a strange collection of creatures. There is the Humped-Back Pede. The Humped Back 1-pede looks like this. Can you see their eye? And the Humped Back 2-pede looks like this. They have an eye too. (Show your ākonga the pictures below.) Ask ākonga to work individually or in pairs (tuakana/teina model) to make a Humped Back 3-pede with the green tiles, or draw a picture.
Can you work out how many squares a Humped Back 4-pede has?
Gather ākonga together to talk about the creatures that they drew. Explore the number pattern of counting in 2s that comes from the Humped-Back Pedes. Also ask questions like:
Can you tell me how many green squares a Humped Back 5-pede will have?
Can you tell me how many green squares a Humped Back 7-pede will have?
Can you tell me how many green squares a Humped Back 10-pede will have?
How many feet has a Humped-Back Pede with 12 squares?
How many feet has a Humped-Back Pede with 18 squares?
How many feet has a Humped-Back Pede with 20 squares?
Can you tell me how to get the number of squares that a Humped-Back Pede with a particular number of feet has?
Can you tell me how to get the number of feet that a Humped-Back Pede with a particular number of squares has?
Session 2
Here we investigate some more mythical creatures that live on planet Elsinore. The patterns here involve skip counting by 3s.
How many feet would a 4-pede have? What about a 5-pede?
Can you tell me how many squares a 1-pede has?
How many squares does a 2-pede have?
What about a 3-pede?
(Put the numbers of squares beside the creatures as ākonga answer the questions, or create a table)
How many feet will it have?
How many squares will it have?
Can someone make one for me with these square tiles?
Does everyone agree with that?
(Write 11 under the 4-pede.)
I wonder what sort of Pede comes next? (5-pede.)
How many squares does a 5-pede have? (14)
I wonder what sort of Pede comes next? (6-pede.)
How many squares does a 6-pede have? (17)
Is there any pattern in the number of squares that Pedes have? (Add on 3 for each extra foot. Talk about skip counting by 3s.)
Session 3
Here we explore patterns further. Where we are particularly interested in linking the number of squares on a creature and the number of feet it has.
How many red squares does a Spotted 4-pede have?
How many blue squares does a Spotted 4-pede have?
How many squares are all together? How did you work that out?
Why are there more blue squares than red squares? How many more?
How many red squares does a Spotted 5-pede have?
Can you tell me how many blue squares a Spotted 5-pede has? Draw it.
How many red squares does a Spotted 6-pede have?
How many more blue squares does a Spotted 6-pede have? Draw it.
These ākonga could also be encouraged to make a table of there mathematical thinking.
How many red squares does a Spotted 10-pede have?
How many blue squares does a Spotted 10-pede have?
What did you find out about the Spotted Pedes?
What patterns did you find?
(Try to get them to see that they have as many red squares as they have feet. This means that it is very easy to find out how many red squares they have.)
Session 4
How many yellow squares does a Big-Headed Pede 4-pede have?
How many yellow squares does a Big-Headed Pede 5-pede have?
How many yellow squares does a Big-Headed Pede 6-pede have?
Do you need to draw the creatures to work out how many squares they have? Why or why not?
Could you work out how many yellow squares a Big-Headed Pede 10-pede would have?
What did you find out about the Big-Headed Pedes?
What patterns did you find?
(Try to get them to see that they have three more yellow squares than they have feet. This means that it is very easy to find out how many yellow squares they have.)
I saw a Big-Headed Pede with 16 yellow squares. How many feet did she have?
Session 5
Discuss the Pedes, the Humped-Back Pedes, the Spotted Pedes and the Big-Headed Pedes.
How many squares does one of your 5-pedes have?
Can you tell me the number of squares an X Pede with 10 feet (or some other relatively large number) has?
If I had 15 squares, what is the Pede with the largest number of feet that I could draw?
Dear parents and whānau,
In maths this week we have been working on patterns. We have looked at some mythical creatures from the planet Elsinore. We have seen the patterns that their numbers of squares have. Here is a creature from Elsinore. Together you could explore the links between its number of legs and the number of squares that make up its body.
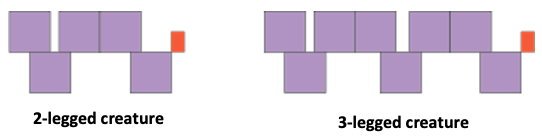
Discuss with your child how many squares does a 2-legged creature have?
How many squares does a 3-legged creature have?
How many squares does a 4-legged creature have?
How many legs does a creature with 20 squares have? Talk together about how you know? What do you have to do to work this out?
We would also like you to help us come up with a name for our creature. Write your ideas here.
We hope that you enjoyed working together on this algebra patterning task.
Matariki - Level 2
This unit consists of mathematical learning, at Level 2 of the New Zealand Curriculum, focused around celebrations of Matariki, the Māori New Year. The sessions provide meaningful contexts that highlight Māori culture and provide powerful learning opportunities that connect different strands of mathematics.
Session One
Session Two
Session Three
Session Four
Session Five
Specific Teaching Points
Session one involves subtracting single digit and two digit numbers starting at 200. As students take handfuls or counters from their "waka" they should anticipate how many counters remain. Students should use place value to calculate, as opposed to counting back. The use of a linear model for representing the calculations is recommended. A bead string is ideal and can be mounted along the edge of a whiteboard. Jumps can then be recorded on the whiteboard.
The session notes recommend linking two strings end on end to form a line of 200 beads. An important strategy in this activity is ‘back through ten’. For example, a student has 93 counters left and removes a handful of 17 counters. How many do they have left?
On the bead string, this calculation can be modelled like this:
In this diagram, 93 – 7 is calculated in two steps. First, the seven in 17 is imaged as 10 and 7. Three is subtracted from 93 to get to 90 and then four is taken away to get 86. Thus, the seven from 17 has been subtracted, leaving only the 10 to be taken away next. This is a ‘back through ten’ strategy, meaning it uses a decade number (i.e. 90) as a benchmark. Alternatively, a student might take away the ten in 17 first, and then the 7.
Session three involves dealing with "like" measures, e.g. dividing or multiplying weights. Measuring objects with devices like kitchen scales is important to the development of students’ understanding of the measurement system. For example, students will need to find out how many kilograms of kūmara need to be ordered for the hāngī. If possible, bring a few kūmara along so students can experiment and find out how many kūmara make up one kilogram in weight. They will then need to use division or multiplication to calculate how many kūmara they need in total for the hāngi. If 24 kūmara are needed and four kūmara weigh one kilogram then 26 (24 ÷ 4) kilograms of kūmara will need to be purchased.
Session four develops important geometry ideas out of whai (string figures). A common issue with the learning of geometry is that students form prototypical views of shapes. For example, they might consider an equilateral triangle to be the only shape that is a triangle. All of the shapes below are triangles:
The issue of prototypical ideas will also apply to other polygons such as hexagons and octagons.
These three shapes are all hexagons. Note that the bottom hexagon is concave as it has two internal angles greater than 180°. It is important to discuss the defining characteristics of a class of shapes like hexagons. The only required property is that the shape is closed by six sides.
Session five also involves an important mathematical idea, distinctness. Rotating or reflecting a shape does not change its properties, except orientation (direction it is facing). The idea is fundamental to determining if given shapes are similar or different. For example, all of the shapes below are similar even though they look different. They can all be mapped onto each other using translation (shifting), reflection (flipping), and rotation (turning).
Similarity is applied in Session Five by looking for different winning positions. If the positions are reflections or rotations of one another then they are not considered to be distinct.
The learning opportunities in this unit can be differentiated by providing or removing support to students, or by varying the task requirements. Ways to support students include:
Tasks can be varied in many ways including:
Although the context of Matariki should be engaging, and relevant, for the majority of your learners, it may be appropriate to frame the learning in these sessions around another significant time of year (e.g. Chinese New Year, Samoan language week). This context offers opportunities to make links between home and school. Consider asking family and community members to help with the different lessons. For example, members of your local marae may be able to share local stories and traditions of matariki with your class.
Te reo Māori language is embedded throughout this unit. Relevant mathematical vocabulary that could be introduced in this unit and used throughout other learning include āhua (shape), shape names (e.g. whetū - star), tātai (calculate, calculation), tāpiri (add, addition), ine (measure), taumaha (weight), huri (rotate, rotation), whakaata (reflect, reflection), and neke (translate, translation, move)
Prior Experience
The activities are mostly open ended so they cater for a range of achievement levels. It is expected that students have some experience with naming and classifying basic geometric shapes, with measuring weight in kilograms, and with translating, reflecting and rotating shapes. They should also have place value knowledge to at least 200.
Session One
What the legend does not tell you is that Tamarereti collected 200 bright shiny stones and put them at the bottom of the waka.
Have a ‘waka’ with 200 counters ready for the student to act out the story. Any narrow container will make a good waka.
Look for students to suggest ways to group the counters. Combinations that add to ten are especially useful.
Session Two
How do we find out the date of the full moon from this calendar?
So when will the last quarter start?
When are the good days for fishing?
When will the new moon appear?
So when does the New Year start?
Session Three
Matariki is a time of cultural pursuits and feasting to celebrate the New Year ahead. The hāngī or earth oven has particular significance at the time of the new moon after the rise of Matariki in the eastern pre-dawn sky. Matariki is the star at the bow of Te Waka o Rangi and her travels around the sky for eleven months of the year are exhausting. It is said the steam of the first hāngī in the New Year rises into the sky and replenishes the strength of Matariki. From the offerings she gathers strength to lead the giant canoe for another year. Without Matariki at the bow the canoe cannot travel and Taramainuku cannot cast his net to gather the souls of the departed. At the New Year the names of the dead are called out so the souls of the departed may be cast into the heavens as stars.
There are many resources already available about hāngī.
“Preparing for the hāngī” is a Level 3 activity from the Figure It Out series.
“Hanging out for hāngī” is a unit at Level 3 that develops a statistical investigation around deciding which foods to cook.
The notes below are an adaptation more suitable for Level 2 students.
Students might mention that people should not eat every meat and every vegetable. Agree on some restrictions like one or two meats and up to three vegetables. Point out that stuffing is a yes or no choice.
Session Four
Matariki was a time when food was already stored, and it was cold outside. So whānau (families) spent time together engaging in cultural pursuits such as storytelling, arts and games. Whai (string games) were popular with tamariki (children) and adults alike, especially when they involved co-operation. Whai has a long history and is common to many indigenous cultures around the world, including the indigenous tribes of North America. Traditionally whai was played with twine made from flax. The best man-made fibre to use for whai is nylon since it slides and flexes, and is soft on your hands. It is commonly used to form lines for brickwork so is available at most hardware stores in a variety of colours. Nylon string is usually available in craft shops.
At 1:08 it is easier to think of going over two strings and ‘picking up the third string’ in that move. Note that the move where you use your mouth to shift the bottom of two strings over your thumbs (2:00 - ) is called ‘Navajoing your thumbs’ and is another algorithm common in whai.
Session Five
In this session students learn to play the traditional Māori game Mū Tōrere which is like a form of draughts. The original game is sometimes referred to as the wheke (octopus) game or the whetū (star) game due to the shape of the board. It is appropriate that students learn to play the game at the time of Matariki, since the Māori New Year is a time of engaging in cultural pastimes. The board (see Copymaster 5) has been altered to include the nine or seven stars of Matariki, depending on the version of the game that is played. A digital version of this game is available online - search for “Mū Tōrere - HEIHEI Games”.
The winner must occupy the centre circle, the opponent’s stones must be clustered together around the hexagon and the winner must have the ends of the cluster blocked off. You might try to find a winning arrangement by separating the loser’s stones into a group of two and one but there is no way for the other player to stop them moving.
Dear parents and whānau,
This week we are exploring some mathematical ideas with activities to celebrate Matariki, the Māori New Year. We will be learning the legend of Tamarereti and using that story to learn about numbers of bright stones. We will look at the phases of marama (the moon) to find the best days to go fishing in the New Year period, plan and cost a hāngī, and discover geometry in whai (string patterns). Lastly we will learn to play Mū Tōrere, a traditional Māori game that takes a lot of strategy to win.
These activities involve number, algebra, geometry, measurement and statistics so we will be very busy and doing a lot of mathematical thinking.
Robots
In this unit students explore movement and direction concepts in the context of programming a robot to move. They will be developing sets of instructions to accomplish tasks, focusing on the use of right, left, forward, backwards and quarter turns.
At Level 2 the position and orientation element of Geometry builds on work started at Level 1. Students continue to develop the ability to describe position and the direction of movement, and interpret others’ descriptions of position.
The ability to give clear instructions that describe direction and movement clearly is an important skill, which is useful in a wide variety of situations. The context of programming a robot in this unit requires students to think in a logical and systematic way. Finding mistakes, identifying the cause and fixing them will be a feature of the thinking prominent during this unit. This unit also allows skills to be developed that will be useful as students work with computers.
This unit can be differentiated by altering the difficulty of the tasks to make the learning opportunities accessible to a range of learners. For example:
Focus on contexts for giving and following instructions which will appeal to students’ interests and experiences and encourage engagement. Examples may include:
Authentic links could be made to digital technology, and the use of coding programmes. Links could also be made to explanation and procedural writing.
Te reo Māori vocabulary terms such as whakamua (forwards), whakamuri (backwards), mātau (right), maui (left) and kua mutu (end) could be introduced in this unit and used throughout other mathematical learning. Other te reo Māori that could be used for this unit include karehiko (robot) and ngā tohutohu (instuctions).
Getting Started
What is a robot?
What are they used for?
Why are they used?
Can robots think?
Do they have a brain like a human brain?
If not, how do they know what to do?
What sort of instructions do robots need to follow?
What is the name of a person that writes instructions for robots? (programmer)
F means move forward (haere whakamua) one square.
B means move backwards (haere whakamuri) one square.
R means turn to the right (huri whakamatau) 1/4 turn (90°).
L means turn to the left (huri whakamaui) 1/4 turn (90°).
End (kua mutu) means the set of instructions is finished.
If the robot had the cards, F F F F end, what would it do?
What would the instructions, R L R L end, do?
F F F F R F F F F end
What would happen if we changed the L to an R in the set of instructions above?
Where would the robot end up?
Would we end up at the same place if we used the same set of instruction cards but the robot started in a different place?
Where would the robot end up if we started here, but kept the same set of instruction cards?
Starting here, where do you think the robot would end up with this set of instruction cards?
F F F F F B B B B B end
Starting here, where do you think the robot would end up with this set of instruction cards?
Which direction will the robot be facing at the end?
B B B L B B B L B B B L B B B end
Exploring
Over the next 2 or 3 days the students will work in pairs, using the instruction cards to programme the robot to do a series of tasks. The number of tasks and the choice of tasks, need to be worked out by the teacher to ensure all students are challenged and engaged. The tasks do not need to be completed in order, although they do get progressively more difficult going down the page.
The tasks are designed for an 8 x 8 grid with the following headings.
An important part of this unit is developing the students' ability to debug. “Debugging” is the process of finding a mistake, identifying the cause and fixing it. To help students think through the mistake they will make, a counter with an arrow on it to show direction moved over a paper grid may help. Others may need to walk through their instruction cards on the walk-on grid. Working out the set of instructions away from the walk-on grid is important.
Getting the students to place their set of instruction cards onto a ring, a length of string or a pipe cleaner will keep their cards in order when dropped.
Task 1
Start the robot at 7, facing into the grid. Move around the grid and leave at D.
Task 2
Start the robot at 5, facing into the grid. Move around the grid and leave at G. There must be more than one direction cards used, i.e. more than one L or R.
Task 3
Start the robot at F, facing into the grid. Move around the grid and leave at 8. Each type of instruction card, L, R, F, B must be used at least two times.
Task 4
What is the least number of instruction cards needed to start the robot at E, facing into the grid and move around the grid and leave at 6?
Task 5
Start the robot at F, facing into the grid. Move around the grid and leave at 8. Each type of instruction card, L, R, F, B must be used at least two times. For the next two tasks two new instruction cards need to be introduced.
PD means to put down the object the robot is carrying in the square the robot is in. PU means to pick up the object in the square the robot is in. The robot doesn’t move or change directions as it picks up the object.
Task 6
Start the robot at F, facing into the grid. Move around the grid and pick up the object from the diamond and place it at the cross. Leave at F
Task 7
What is the least number of instruction cards needed to start the robot at A, facing into the grid and move around the grid, picking up an object at the star and putting it down at the circle, then leaving the grid at 1?
Task 8
Challenge each other by designing a task for others in your class.
Reflecting
Ask students to think about the things they have learnt this week and discuss. Giving each student a blank piece of paper, ask them to write down one or two important things they have learned, as well as to write down their favourite set of instruction cards. Conclude the week with each team selecting one set of instruction cards, i.e. a completed task, the teacher reads out the instruction task as a student, not the developers, follows the instructions.
Dear family and whānau,
At home this week the homework task is to talk to your family about robots. Find as many situations as you can where robots are used. Think into the future and predict the jobs robots may do in the future or jobs you wish you could programme a robot for.
Number families and relationships
The purpose of this unit of three lessons is to develop an understanding of how the operations of addition and subtraction behave and how they relate to one another.
Algebra is the area of mathematics that uses letters and symbols to represent numbers, points and other objects, as well as the relationships between them. We use these symbols,=, ≠, <, >, and later ≤ and ≥, to express the relationships between amounts themselves, such as 14 = 14, or 14 > 11, and between expressions of amounts that include a number operation, such as 11 + 3 = 14 or 11 + 3 = 16 – 2.
These relationships between the quantities are evident and clearly stated within an equation or expression. This highlights the purpose of an equation or expression, which is to express relationships.
The relationships between the number operations, and the way in which they behave, can be less obvious. Often these operations are part of arithmetic only, as computation is carried out and facts are memorised. However, recognising and understanding the behaviours of, and relationships between, the operations is foundational to success in algebra and arithmetic.
Early on, the relationship between addition and subtraction is explored by connecting the members of a ‘family of facts.’ These ‘fact families’ can be used to facilitate learning of basic facts and to develop a deeper understanding of the relationship between addition and subtraction.
Students often encounter conceptual difficulties in understanding the nature of the operational relationships that exist between three numbers. It is not unusual for students, when asked to write related facts, to write, for example, 3 + 4 = 7, 4 + 3 = 7, 10 – 3 = 7, 10 – 7 = 3. In these statements, equations are correct, but the relationship between 3, 4 and 7 is not understood.
As students encounter more difficult problems, and are required to develop a range of approaches for their solution, having an understanding of the inverse relationship that exists between operations is critical. To ‘just know and understand’ that subtraction ‘undoes’ addition, and that addition ‘undoes’ subtraction becomes very important. For example, it is important to know how and why problems such as 61 – 19 = ☐ can be solved by addition, saying 19 + ☐ = 61, or that the value of n can be found in 12n + 4 = 28, by subtracting 4 from 12n + 4 and from 28. By having a sound understanding of the inverse relationship between addition and subtraction (for example) students are better placed to solve equations by formal means, rather than by simply guessing or following a memorised procedure.
It is important to consider this larger purpose, as we explore ‘families of addition and subtraction facts’. Within this, an equal emphasis must be placed on both operations.
The activities suggested in this series of three lessons can form the basis of independent practice tasks.
Links to the Number Framework
Advanced counting (Stage 4)
Early Additive (Stage 5)
This unit can be differentiated by varying the scaffolding provided or altering the difficulty of the tasks to make the learning opportunities accessible to a range of learners. For example:
Situating the families of facts in familiar additive contexts will appeal to students’ interests and experiences and encourage engagement. Examples may include:
Session 1
SLOs:
Activity 1
Ask students to think of three numbers that they like, between and including 1 and 10. Accept all groups of three numbers, and record them on a class chart.
For example:
1, 2, 3
3, 4, 5
2, 4, 6
4, 7, 10
1, 5, 9
3, 5, 8
Ensure, without pointing this out to the students, that there are some sets that include ‘family of fact’ numbers, For example. eg. 1, 2 ,3, or 3, 5, 8 or 4, 6 10.
Have each pair of students select a set of three numbers for their investigation.
Students take at least four digit cards for each of their chosen numbers, symbol cards, an empty tens frame and counters of two colours.
Pose, “What equations can you make with your numbers? Make a display or record digitally.” (The students with an ‘unrelated’ set of numbers, for example 3, 4, 5 will quickly discover that no equations can be made using all three digits at the same time.)
Discuss their observations, eliciting observations such as, “there are four equations”, “there are two subtraction equations and two addition equations”, “the addition equations are just the other way around (commutative property).”
Activity 2
1, 2, 3
3, 4, 5
2, 4, 6
4, 7, 10
1, 5, 9
3, 5, 8
Ask, “Can you see what we could do to the other groups of numbers to make each of them into a family?” (Change one of the numbers) Accept suggestions and explore ideas.
Take one of these groups, for example 3, 4, 5. Have a student model with counters on a tens frame, 3 + 4. This will show that the third number is 7.
Conclude that 5 can be changed to 7. Explore the other options of changing one of the numbers: 4 to 2, or 3 to 1.
Explore one more example, for example 4, 7, 10. Discuss that instead of 10 this number should be 11. Alternatively, model seven
and highlight the fact that the 4 could be changed to 3. Ask, is there a third thing we could do? (Change 7 to 6).
Have students choose to work in pairs or on their own, to explore the other sets of ‘unrelated numbers’ on the list. They should make a change and write the four equations (+-) which result.
Activity 3
Conclude this session by summarising on the class chart, the features of a family of related facts: three number members of the family, and four equations, two of addition and two of subtraction.
Session 2
SLOs:
Activity 1
(Purpose: To recognise related addition and subtraction equations)
Explain how to play.
Each student has one set of 16 shuffled cards. These are dealt out, face up, in a four-by-four array. Two cards (any) are removed from the array and set aside, creating two empty spaces in the array. Individual cards can be slid across or up and down within the array space, but not lifted, till the array shows one complete ‘family’ in each line or a column. The two cards that were set aside are replaced to complete the array.
To increase the challenge of the task, remove one card only, and/or place each ‘family’ in the same order. (eg. two addition equations then two subtraction equations). Students can swap sets and explore other ‘families’.
Students could write their own sets to create alternative puzzles.
Activity 2
14 + 5 = 19, 5 + 14 = 19, 19 – 14 = 5, 19 – 5 = 14.
Ask students what they notice about what is happening with the numbers.
Record observations such as, “you can add the numbers both ways without changing the result”, “when you subtract you write the biggest number first”, “when you take one of the numbers away you get the other number.”
“Sam helped his Gran with lots of jobs. He earned $5. He helped Grandpa too and he gave Sam $1. Unfortunately Sam lost the $1 on his way home.”
Record, or ask a student to write, the equations that express the scenario on the class chart. (5 + 1 – 1 = 5 and 5 + 1 = 6, 6 – 1 = 5).
Discuss what is happening in these equations. Elicit the observation that subtraction is ‘undoing’ addition.
Record several of these in words and in equations on the class chart.
“Sam had $6 and lost $1 on his way home. He did some extra jobs for his Mum and she gave him $1.”
Record, or ask a student to write, the equations that express the scenario on the class chart. (6 -1 + 1 = 6 and 6 - 1 = 5, 5 + 1 = 6).
Once again, discuss what is happening in these equations. Elicit the observation that addition is ‘undoing’ subtraction.
Explain that we say this relationship between addition and subtraction is known as an inverse relationship. Record this in answer to the question posed in Step 2 above. Have students suggest a meaning for inverse, then confirm this with a dictionary.
Each student could write their own scenario, including a picture or diagram to show what is happening, writing related equations, and an explanation in words of ‘inverse relationship.’
Activity 3
Conclude by sharing and discussing student work.
Session 3
SLOs:
Activity 1
Ask “Why is knowing about families of related facts useful?”
List student suggestions. In particular highlight the commutative property of addition. For example: If you know 17 + 5 = 22, you will also know 5 + 17 = 22. Also highlight the related subtraction facts.
Highlight the importance of the students writing their observations about each grid once they are completed. These observations should include number patterns and the fact that the subtraction grid cannot be fully completed.
For example, 2 + 1 = 3 and 1 + 2 = 3, 2 + 3 = 5 and 3 + 2 = 5.
(Discuss the pattern and also notice the pattern of doubles)
Write this statement on the class chart and read it with the students:
We can carry out addition of two numbers in any order and this does not affect the result. Introduce the word commutative.
Activity 2
Activity 3
(Purpose: to identify three fact family members and to record four related equations.)
The game is played in pairs. The players have one Hundreds Board, 25 counters of one colour each, pencil and paper.
Tens frames showing ten, blank tens frames, and extra counters should be available to the students to model or work out equations if appropriate.
Round one: The Hundreds Board is screened so that numbers 1 – 20 only are visible. Students take turns to place 3 counters on three related numbers. Counters cannot all be placed in the same row.
For example: students cannot cover 3, 4 and 7 because they are all in the same row.
As they place their counters they say and write the four related equations. Students can use tens frames, if needed, to work out or demonstrate the equations and their relationship.
For example:
Player 1
Player 2
Turns continue.
The challenge is to complete the task between them, leaving only two numbers uncovered. If they have more than two uncovered on the first try, they try again with different combinations.
Round two:
The Hundreds Board is screened so that numbers 1 – 30 only are visible. Students take turns to place 3 counters on three related numbers. Counters cannot all be placed in the same row. As they place their counters they say and write the four related equations, using tens frames if needed.
The challenge is to complete the task between them, leaving no more than three numbers uncovered by counters.
Round three:
Numbers 1-50 are made visible. The task is completed. The challenge is to leave just two numbers uncovered by counters.
Dear parents and whānau,
In maths this week, the students have been learning about the relationship between addition and subtraction. They have been exploring fact “families” with three numbers, such as 8 + 6 = 14, 6 + 8 = 14, 14 - 6 = 8 and 14 – 8 = 6. They have found out that subtraction “undoes” addition. (Subtraction is known as the inverse operation of addition, and vice versa).
They have played a game called Family Shuffle. Your child can show you how they have played this. You might like to have a turn, then make up your own fact family together and try the game again.
We hope you enjoy the game, and your discussions, as you make up and talk about new number fact families.
Thank you.
You Don't Need the Number from Book 8: Teaching Number Sense and Algebraic Thinking
How long does it take?
This unit involves students in looking at the lengths of time various activities take and calculating how long is spent on these activities in a week.
Two aspects of mathematics are explored in this unit on time:
This unit can be differentiated by varying the scaffolding provided and altering the difficulty of the tasks to make the learning opportunities accessible to a range of learners to a range of learners. For example:
The contexts in this unit can be adapted to recognise diversity and encourage engagement. For example, ask ākonga to share activities that happen regularly in their families, or activities that they regularly enjoy (for example, going to church, kapa haka practice, sports practice). Adapt the investigations to include these familiar and enjoyable activities.
Te reo Māori vocabulary terms such as wā (time), meneti (minute), and haora (hour) could be introduced in this unit and used throughout other mathematical learning.
Getting Started
How could we work out what seven lots of 2 are all together?
How do you know 5 lots of 5 minutes is 25 minutes altogether?
How could you check?
If we know 2 lots of 5 are ten is it reasonable for 5 lots of 5 to be 8 which is less than that?
How long do you think you would spend brushing your teeth in a week? What did your group find out?
From our calculations which activity takes the most of our time over the course of a week? Which takes the least?
Exploring
How many minutes in an hour? In half an hour?
How did you work out how long she spends each day?
How could you check your calculations?
Is it reasonable to spend that long to brush your teeth? How long do you think it takes you?
Who takes the longest?
How much longer do they take?
How does this compare with how long you would take to do that?
Copymaster 5 can help in these comparisons.
Reflecting
Did you find the statement that was unreasonable? How?
What made you think it was the unreasonable one? How did you check?
Dear parents and whānau,
In maths this week we are focusing on time and on the duration of activities.
This week your child will be timing how long various personal routines take to do. Your assistance and encouragement with the following task is appreciated. You are welcome to add some other activities to the bottom of this table.
Time yourself one day and write down how long it takes to:
Cube and spinner challenges
In this unit we play several games based on coloured cubes and spinners. The purpose is to investigate chance and think about the concept of a fair game.
A fair game is a game in which there is an equal chance of winning or losing. We say that a game is fair when the probability of winning is equal to the probability of losing. Changing the rules of a game can affect the likelihood of winning or losing, and therefore whether the game is fair.
This unit can be differentiated by altering the difficulty of the tasks to make the learning opportunities accessible to a range of learners. For example:
The challenges in this unit can be adapted to recognise diversity and student interests to encourage engagement. For example:
Te reo Māori vocabulary terms such as tōkeke (fair) and tūponotanga (chance) could be introduced in this unit and used throughout other mathematical learning.
The first four sessions of this unit are structured around a number of challenges. The cube challenges involve randomly taking one cube from a bag of coloured cubes. To win the challenge you need to take a cube of a particular colour from the bag. Similarly, the spinner challenges involve one spin on a spinner and are won by landing on a particular colour.
For each challenge:
When discussing whether each challenge is fair, support ākonga to consider the probability of all possible events in a challenge, ordering them from most likely to least likely and identifying events that have the same likelihood of occurring. Ākonga do not need to know the theoretical probabilities involved. However, they should be able to explain their reasoning.
Session one challenges
Cube Challenge I:
Bag contents: one red and one blue multi-link cube
Choose one cube
To win the challenge: take a red cube
This challenge is fair, because there is an equal likelihood of winning (by selecting a red cube) or losing (by selecting a blue cube).
Cube Challenge II:
Bag contents: one red and two blue multi-link cubes
Choose one cube
To win the challenge: take a red cube
This is not a fair challenge because it is more likely that a blue cube will be taken than a red cube. In fact, players are twice as likely to lose the challenge as to win it.
The challenge will be fair if there are an equal number of red cubes and blue cubes. The easiest way to change the challenge so that you win more often, is to add more red cubes. The more red cubes you add, the more likely you are to win the challenge.
Session two
Cube Challenge III:
Bag contents: one red, one blue and one green multi-link cube
Choose one cube
To win the challenge: take a red cube
This is not a fair challenge. There are three equally likely events: take a red, take a blue, or take a green. In terms of the challenge, players are more likely to lose by taking a blue or a green cube, than they are to win by taking a red cube.
The challenge will be fair if there are an equal number of red cubes and cubes that are not red. The easiest way to change the challenge so that you win more often, is to add more red cubes. The more red cubes you add, the more likely you are to win the challenge.
Cube Challenge IV:
Bag contents: three red and two blue multi-link cubes
Choose one cube
To win the challenge: take a red cube.
This is not a fair challenge. There are two events: take a red, or take a blue, and taking a red is more likely than taking a blue. As far as the challenge is concerned players are more likely to win by taking a red (three out of five times) than they are to lose by taking a blue (two out of five times).
The challenge will be fair if there are an equal number of red cubes and cubes that are not red, so the easiest way to change this into a fair challenge is to add one blue cube.
Session three
Spinner Challenge I:
Spinner:

Spin the spinner once
To win the challenge: spinner lands on green
This a fair game as there is an equal likelihood of winning by landing on a green segment, and losing by landing on a red segment.
Spinner Challenge II:
Spinner:

Spin the spinner once
To win the challenge: spinner lands on green
This is not a fair game. There are three equally likely events: land on green, land on red, or land on blue. In terms of the challenge, players are more likely to lose by landing on red or blue, than they are to win by landing on green.
The challenge will be fair if there are an equal number of green segments and segments that are not green. One way to make the challenge fair is to divide the blue segment in half, and colour half of it red, and half of it green.
Session four
Work with Spinner Challenge III and Spinner Challenge IV. For each challenge have ākonga play the game, suggest adaptations to the rules to make the game more fair, and try the new rules out. Discuss their ideas about whether the game is fair and why, throughout.
Spinner Challenge III:
Spinner:

Spin the spinner once.
To win the challenge: spinner lands on green.
This is not a fair challenge. There are two events: land on red, or land on green, and landing on green is less likely than landing on red. As far as the challenge is concerned players are more likely to lose by landing on green (two out of five times) than they are to lose by landing on red (three out of five times).
The challenge will be fair if there are an equal number of green segments and segments that are not green. The easiest way to change this into a fair challenge is to divide one of the red segments in half, and colour half of it green.
Spinner Challenge IV:
Spinner:

Spin the spinner once.
To win the challenge: spinner lands on green.
This is a fair challenge because there is an equal likelihood of winning (by landing on green) or losing (by landing on a colour other than green).
Session five
Dear parents and whānau,
This week we have explored the fairness of different games. The games, or "challenges", we have played involved using coloured cubes and spinners to test out the probability of winning each game. Here is an example.
Cube Challenge: One red and two blue cubes are in a bag. One person chooses one cube. To win the challenge the person must take out a red cube.
This is not a fair 'challenge'. The most likely event is that a blue cube will be taken. Choosing red is less likely. In fact players here are twice as likely to lose the 'challenge' as to win it.
Ask your child to tell you more about the games. It would be good if you and your child could invent and play a 'challenge' of your own. Is it a fair 'challenge'? In other words is it equally likely that you would win or lose this 'challenge'?
Enjoy the challenge!
Fun and fitness
The purpose of this unit is for students to design a PE/fitness game, use standard measures of length, and conduct a statistical investigation into the safety factors and the health benefits of their game.
This unit of work assumes prerequisite knowledge gained at level one: the students can recognise the attribute of length, knows that measurement units are countable and that they can be partitioned and combined. When measuring length they realise that there should be no gaps or overlaps.
In these lessons the students are developing an understanding of a linear scale. They recognise that such a scale is made up of units of equal size that are known as ‘standard units’, because they are able to be easily understood by everyone.
The students learn to accurately reposition a metre ruler when required to measure a length longer than the ruler. In becoming familiar with metre and centimetre units of measure, the students learn to express parts of metres as centimetres and to use the abbreviations m and cm when recording length measures. They come to understand that 1000 metres are equal to 1 kilometre, and develop a personal benchmark for one metre and one kilometre.
Further to the development of measurement skills and knowledge, the students participate in planning and collecting appropriate data to answer a question that has been composed with the support of the teacher (as required). The students sort the data and presents these using a dot plot, whilst refining their understanding of the investigative process. They can answer the investigative question and can suggest consequences of their findings.
Associated Achievement Objectives
Health and Physical Education
Positive attitudes
Safety management
This unit can be differentiated by varying the scaffolding or altering the difficulty of the tasks to make the learning opportunities accessible to a range of learners. For example:
The focus of this unit is designing a PE/fitness game. Encourage students to consider their friends and classmates when planning, and to create a game that will appeal to them and be fun to play. This could be achieved by incorporating favourite elements from other games, or items of current interest. Elements of traditional Māori games such as Kī-o-Rahi, Tapuae and Mā Whero could be used as well.
Te reo Māori vocabulary terms such as inea (to measure), rūri (ruler), and tākaro (game) could be introduced in this unit and used throughout other mathematical learning.
Whilst this unit is presented as a sequence of five sessions, more sessions than this will be required between sessions 3 and 4. It is also expected that any session may extend beyond one teaching period.
Session 1
This session is about playing a familiar game and evaluating its health benefits and safety considerations.
Students of this age may be challenged to accurately measure their pulse rate. Therefore these lessons use an alternative ‘indicator’ of the effects of exercise: that is that the intensity of worthwhile exercise should prevent you from singing, but should not prevent you from talking.
SLOs:
Activity 1
Begin the lesson by singing a favourite waiata. The aim of the lesson is not to learn a new waiata, so consider using one your ākonga are already familiar with.
Activity 2
Explain that today, when they each return from their run they should (individually) immediately sing the waiata from activity 1 (above), and then talk to a classmate about their run.
‘Who was able to talk to their classmate?’
Count the responses for each and record these on the class chart. Discuss the results, explaining that being unable to sing immediately shows that they exercised well and their bodies will benefit.
Activity 3
Ask, “How far did you run today?” and “How can we find out?”
Make available 1 centimetre cubes, meter rulers, a 10 metre + tape measure and a measuring wheel.
Have the students share what they know about the metre ruler. Establish that it is called a metre ruler. It is 1 metre long. If centimetres have already been introduced and used, have students line up 1 cm cubes along the ruler to confirm that 1 metre = 100 centimetres.
Activity 4
Develop a personal benchmark by asking: “Who can jump 1 metre?”
Have student pairs measure a 1 metre length on the carpet/floor, marking this with chalk.
Highlight that the measure begins at 0 and ends at 100. Discuss the ‘extra’ space at each end of the ruler.
In their pairs, have students check if each person can jump 1 metre. A tuakana/teina model could work well here.
Agree that when we think about how big 1 metre is, we can think of it as one big personal jump.
Activity 5
Highlight the 1 metre personal benchmark by asking:
If the tape measure is 10 metres, about how many of your jumps is that?
If we measured 100 metres with the wheel, about how many of your jumps is that?
Explain that the standard units used in New Zealand, and in most countries in the world, are metric units. Some students may be familiar with the use of feet and inches, and could share their knowledge at this point. Discuss possible situations in which a standard measure might be useful (e.g. travel, building). You might be able to make links to community members (e.g. builders) or favourite hobbies (e.g. sprinting). Consider also how links might be made to your cultural context.
Activity 6
Have a student model both the correct and an incorrect way to measure using a metre ruler. This could be completed in pairs. Highlight how to mark the beginning and end of the measure and how to correctly replace the metre ruler, when measuring a distance greater than 1 metre.
Have several students measure a length that is more than a metre, read the measure aloud, and record this on the class chart.
Model examples of parts of a metre as well, for example 2 ½ m.
Activity 7
Explain that students will pair up (tuakana/teina) and participate in two measuring tasks to become familiar with the measuring tools. Emphasise that their recording should use the correct abbreviations.
Show and have students make a recording sheet, as demonstrated below. Alternatively, you may feel it would be more effective to provide some, or all, of your students with a graphic organiser to be used in this activity.
from ... to
Have students measure at least three different lengths around the classroom, hall, or other designated area, using a metre ruler and a measuring tape. They should that they get the same measure using each tool.
Activity 8
Conclude the session by sharing measurement results and reviewing the fitness course distance. Discuss how many metres in 1 kilometre. Estimate and calculate together the number of times they would need to run around the fitness course to cover a 1 kilometre distance. Establish a rough benchmark for 1 kilometre. (For example, 1 kilometre is 5 times around the fitness course.)
Session 2
This session is about recognising that rules that address fairness and safety, help to ensure that a PE/fitness activity is enjoyable. As students design a PE/fitness activity, they learn more about accurately measuring outdoor spaces.
SLOs:
Activity 1
Begin with a fitness run.
Activity 2
Explain that the class is going to play a favourite PE game (for example: Ki-o-Rahi, Tunnel ball, Scatter Ball). Together, list the rules on the class chart.
Ask: Which of the rules are about making the game fair? Write F beside these. Discuss that fairness makes the game more enjoyable for everyone.
Ask: Which of the rules are about making the game safe? Write S beside these. Discuss any anomalies. If there are no specific safety rules, list some generic ones.
Activity 3
Return to the class, review the enjoyment of the game and ask if playing the game will make them fit. Discuss why/why not. Refer to the “talk/sing measure” from session 1.
(The response may be, “No, because it didn’t make me puff and I could sing.”)
Review the list of rules and confirm the fairness (F) and safety (S) decisions made earlier.
Highlight the importance of games and activities being safe and enjoyable. Ask if any other safety rules should be added and why.
Activity 4
‘Can we design a game or activity that keeps us fit, is enjoyable and is safe?’
Record this on the class chart/modeling book.
Activity 5
Have groups swap game instructions with another group. Have them read, critique, seek clarification and suggest refinements or improvements to the other’s game design. You may wish to come up with guidelines and/or a rubric for students to use during this. The groups may wish to play each other’s games as well.
Give time for these adjustments to be made.
Activity 6
Review pair measurements for the outdoor space. Tennis courts are about 23.8m x 8.2m. Remind students that 1000m = 1 km. Estimate together the number of times the length of the court would need to be run to achieve the length of 1 kilometre. (eg. Round up to 25m. 25m x 40 = 1000m) Together calculate the number of lengths of the tennis court needed to run 1km.
Students may use this as a 1 kilometre benchmark. You could also consider other known lengths such as from the school gate to the walking pou, or other local community locations.
Session 3
This session is about creating a simple questionnaire to evaluate each group's activity, and learning about dot plots.
SLOs:
Activity 1
Begin with a fitness run.
Activity 2
Ask the students how they should gather the data to answer the question. Guide discussion and agree on a simple evaluation form to be completed by the class after playing each game. For example:
The name of the game: ________________________________
Circle for each: 1 (not so good) 2, 3, 4 or 5 (excellent),
Enjoyment: 1 2 3 4 5
Fitness: 1 2 3 4 5
Safety: 1 2 3 4 5
Activity 3
Working together (mahi tahi model), collate and present the data using three dot plots. For example:
Discuss the dot plot features, the results, and draw conclusions.
Activity 4
For the remainder of the session, and for sessions to follow, have students participate in and evaluate each other’s games. Each group of students will collect the data for their game to analyse and present in Session 4.
Session 4
This session is about student groups sorting the data from their classmate’s evaluations of their activity and presenting the findings.
SLOs:
Activity 1
Begin with a fitness run.
Activity 2
Make available pencils, paper, and sets of data for each pair activity.
Have students work in their groups to sort their data and to discuss their findings. Each student should create three dot plots to present their data, record their own findings and should answer the investigative question in their own way.
As students work, have them record on a small poster, their knowledge of centimetres, metres and kilometres, the relationship between them, and explain why we have standard measures.
Session 5
This session is about communicating investigation findings to others and sharing their understanding of standard measures of length.
SLOs:
Activity 1
Begin with a fitness run.
Activity 2
Activity 4
Arrange the length measurement tools in front of the students.
Have individual students share their learning about each of the tools.
Ask which tool would be used to measure small lengths.
Introduce the millimetre measure for tiny lengths.
Conclude by reviewing personal benchmarks for (1cm), 1m and 1km.
Dear parents and whānau,
In mathematics we have been measuring distances and learning about metres and kilometres in particular. Ask your child to show how big a centimetre and a metre is, and to tell you about how big a kilometre is.
Please take opportunities to talk about and use these measurements: for example, measure and mark in pencil on a door frame, the height in metres and centimetres of each family member, or, when you are next travelling in the car, point out the speedometer and explain to your child how you know when the car has travelled 1 kilometre.
Letter patterns
In this unit we look at number patterns from letters and numbers. We use a table of values to help record our thinking. It’s important here to look for the pattern and see how the number of tiles changes from letter to letter.
Patterns are an important part of mathematics. It is valuable to be able to tell the relation between two things in order to predict what will happen and understand how they interrelate.
Patterns also provide an introduction to algebra. The rules for simple patterns can be first discovered in words and then be written using algebraic notation.
Links to Numeracy
This unit provides an opportunity to develop number knowledge in the area of Number Sequence and Order, in particular development of knowledge of skip counting patterns.
Help ākonga focus on the number patterns by discussing the tables showing the numbers of tiles used in each successive letter pattern. Look at those patterns that are made by adding a constant number of tiles onto each successive letter. Highlighting numbers on a hundreds board or using a number line may also be helpful.
Questions to develop strategic thinking could include:
Which number comes next in this pattern? How do you know?
Which number will be before 36 in this pattern? (or another number, as appropriate). How do you know?
What is the largest number you can think of in this pattern? please can you explain your thinking?
Could you make a letter T with 34 tiles? How do you know?
This unit can be differentiated by altering the difficulty of the tasks to make the learning opportunities accessible to a range of learners. Specifically, some ākonga may explore the patterns and describe how the shape and number patterns are growing, but may not be ready to predict the next number in the pattern, or how many tiles would be needed to make the nth shape in the pattern. Ākonga could be challenged with number patterns that involve larger numbers. This will encourage them to use a table to explain the number pattern, as drawing or constructing the pattern becomes impractical.
The context of letter patterns can be adapted to recognise diversity and ākonga interests to encourage engagement. Support ākonga to identify and explore other growing patterns in their environment. For example, tukutuku patterns on the walls of the wharenui, or the number of seats on the bus that are occupied as ākonga get onto the bus in pairs.
Te reo Māori vocabulary terms such as letter (reta), tau (number) and tauira (pattern) could be introduced in this unit and used throughout other mathematical learning.
Getting started
Starting with a simple pattern, we build up the level of difficulty and see that it’s necessary to use a table to record what is happening.
Build up the letter ‘I’ using coloured tiles or paper (see the diagram below).
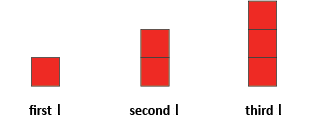
How many tiles do we need for the first ‘I’? The second? The third?
Who can tell me how many tiles we’ll need for the fourth ‘I’?
Can someone come and show us how to make the fifth ‘I’?
How many tiles will we need for the tenth ‘I’? Make it.
What is the number pattern that we are getting?
If we had 11 tiles, which numbered ‘I’ could we make?
Now let’s make it a bit harder. Let’s make an ‘I’ by adding a tile to the top and the bottom each time (see diagram).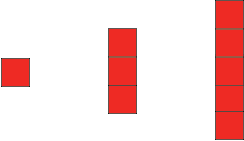
Repeat the questions from the last ‘I’ problem.
How many tiles do we need for the first ‘I’? The second? The third?
Who can tell me how many tiles we’ll need for the fourth ‘I’?
Can someone come and show us how to make the fifth ‘I’?
How many tiles will we need for the tenth ‘I’? Make it.
What is the number pattern that we are getting?
How many tiles do we add on at each step?
If we had 11 tiles, which numbered ‘I’ could we make?
After korero, suggest the idea of a table.
The original ‘I’ problem would give us an easy table. It would look like this:
‘I’ number
1
2
3
4
5
Number of tiles
1
2
3
4
5
What would the table look like where we added two tiles at a time?
Draw up the table with help from the ākonga
How did you know how many tiles to use on the fourth ‘L’?
What is the pattern (tauira) here?
Which ‘L’ in the sequence will use 27 tiles?
Tell me what numbers you used to fill the table. (Check that they are correct by counting the tiles.)
What patterns can you see here?
How did you get the number of tiles for one ‘L’ from the one before?
How many tiles would you need for the 10th ‘L’?
If you had 23 tiles, what numbered ‘L’ could you make?
Exploring
For the next three days the ākonga work at three stations continuing different number patterns and building up the corresponding tables. In the first station, the ākonga complete a similar problem to the one in ‘Getting Started’. In the second station the ākonga find a missing shape in the pattern sequence. Finally in the third station ākonga make their own pattern that fits the given table of values. Ākonga could work in three groups that provide tuakana/teina support. At the end of each day, bring them back together to discuss their thinking. Ask them the kind of questions that were used in ‘Getting Started’. Use the tables to discuss the patterns involved and the relation between successive numbers in the sequence.
Day 1
The material for these stations is on Copymasters 1.1, 1.2, 1.3, 1.4. The ākonga continue the pattern and complete the table. Ākonga could continue to use tiles to support their learning.
Day 2
The material for these stations is on Copymasters 2.1, 2.2, 2.3, 2.4. The ākonga find the missing element of the pattern and complete the table. Tiles could be provided for some ākonga who may need to construct the missing element before drawing it.
Day 3
The material for these stations is on Copymasters 3.1, 3.2, 3.3, 3.4. The ākonga make up their own pattern to fit the values in the table. Ākonga could use the tiles to create patterns and count to check that they match the numbers in the table before drawing them on the sheet.
Reflecting
On the final day let the ākonga make up their own patterns using numbers or shapes, instead of letters. They could construct these with tiles first, or by drawing. Encourage ākonga to think of patterns in their environment, for example, tukutuku patterns in the local wharenui or museum. Ākonga should also provide a table to show the number pattern of their number or shape. Some ākonga might want to leave gaps in the patterns of their numbers or shapes. Other ākonga could fill this in when they share their pattern with the class.
When ākonga are sharing their patterns with the class, point out the importance of the table in seeing what the number pattern is.
Dear parents and whānau,
This week in maths we have been exploring number patterns that come from letters, numbers and shapes. Work with your child to fill in the table below for the plus sign shape in the diagram.
How many tiles would there be in the 4th ‘plus’ shape?
How about the 10th ‘plus’ shape?
Which ‘plus’ in the sequence would you be able to make with 25 tiles?
Exploring and understanding patterns is an important and interesting part of maths. Perhaps you and your child could create another letter, number or shape and explore what number patterns could occur when it is added to. We hope you enjoy doing this. Thank you for your help.
Figure it Out Links
Some links from the Figure It Out series which you may find useful are:
Voting vitality
In this unit, which explores the context of voting, students will become familiar with and apply the five key steps of carrying out a statistical investigation.
In this unit which explores the context of voting, students will become familiar with and apply the five keys steps of carrying out a statistical investigation:
These five are closely linked, as what data is collected can dictate the way that it is displayed and the conclusions that can be reached from the investigation. On the other hand, if some restrictions have been placed on the means of display, only certain types of data collection may be relevant.
At Level 2, you can expect students to be posing (with teacher support) a greater range of questions, including investigative questions and survey questions. They will also be helped to understand some of the issues involved in conducting surveys and learn new methods for collecting data. While at Level 1 students collected data and chose their own ways to display their findings, at Level 2 they will be introduced to pictographs, tally charts and bar charts. More emphasis here will also be placed on describing the data and the making of sensible statements from both the student’s own displays and the displays of others.
Investigative questions
At Level 2 students should be generating broad ideas to investigate and the teacher works with the students to refine their ideas into an investigative question that can be answered with data. Investigative summary questions are about the class or other whole group. The variables are categorical or whole numbers. Investigative questions are the questions we ask of the data.
The investigative question development is led by the teacher, and through questioning of the students identifies the variable of interest and the group the investigative question is about. The teacher still forms the investigative question but with student input.
Associated Achievement Objective
Social sciences AO2: understand that people make choices to meet their needs and wants.
The learning opportunities in this unit can be differentiated by providing or removing support to students and by varying the task requirements. Ways to support students include:
The context for this unit can be adapted to suit the interests and experiences of your students. For example:
Te reo Māori vocabulary terms such as, raraunga (data), kauwhata tāhei (strip graph) and kauwhata pou (bar graph) could be introduced in this unit and used throughout other mathematical learning.
The teaching sequence is designed for teachers to guide students through the five key stages of a statistical investigation. The context used is voting for a native tree which is to be planted in the school. You may choose to conclude the unit by buying and planting the chosen tree, or you may prefer to simply vote on students’ favourite tree. At the end of this unit other possible statistical investigations are provided as examples of what students might further investigate in pairs or small groups. This would allow for the unit to be extended beyond a week.
Session 1
This session is about framing the context for an investigation, and deciding on an investigative question, a sample, and a method of investigation.
Session 2
This session is about going through the voting process and collecting the data in a systematic way.
Session 3
In this session students will see how a strip graph (kauwhata tāhei) can be transformed into a bar graph (e.g. How are we going to display our results? In tables? What is the best graph to use?).
What would be an appropriate title for our graph?
What labels could you use for this graph and where would you write them?
Is this a helpful way of presenting this information?
It is easier to make statements from a bar graph or from a strip graph?
Which completed graph shows our results most clearly?
The questions could be asked in a whole class situation or students could complete a bus stop activity with the questions being posed on the top of a large piece of paper and students visiting each station to record their ideas. Small groups would also be a valuable way for ideas and responses to the questions to be discussed and explored.
Ask the students what they notice about the information shown on the bar graph. Use the prompt “I notice…” to start the discussion. These “noticings” could be recorded as speech bubbles around the bar graph.
Session 4
In this session students discuss the types of things that are worth investigating and carry out their own investigation.
What game should we play at the end of the week?
What should we spend the fundraising money on?
What should we plant in the school/community garden?
Dear parents and whānau,
In mathematics, we have been voting for a tree to plant. We have been using this information to make strip graphs and bar graphs. We have also developed our own statistical investigations.
Please talk with your child about what they have been doing in maths and take any opportunities that arise to discuss with them any simple statistical information that may be presented in the newspaper or on television.
Thank you.
Fraction bits and parts
This unit explores the beginnings of proportional thinking by introducing fractions and associated language. The purpose for this unit is to make, name, and recognise wholes, halves, third parts, fourth parts and fifth parts of a variety of objects.
This unit is based on the work of Richard Skemp. His ideas for teaching fractions can be used successfully with year 2 students, and also with students up to year 8 who are having difficulty understanding fractions. Skemp’s use of the word ‘parts’ is deliberate in that he uses it to refer to ‘equal parts’ whereas 'bits' refers to non-equal parts.
The use of two different physical representations, the whole and parts of a whole, are used to develop the concept of a fraction. Language also plays an important role. Being able to count in fractions helps students understand that you can have 5 thirds or 6 halves.
Using denominators that are the same, students need to know:
This unit can be differentiated by varying the scaffolding provided and altering the difficulty of the tasks to make the learning opportunities accessible to a range of learners. For example:
The context of equal shares can be adapted to recognise diversity and student interests to encourage engagement. Support students to identify and explore other situations in their lives where equal sharing occurs. For example, sharing kai at home or sharing cards to play a game (the pack of cards represents one whole). Rēwena bread modelled out of playdough could be used as another context for eels.
Prior Experiences
Although the unit is planned around 5 sessions it can be extended over a longer period of time.
Session 1
The purpose of this session is to develop students' understanding of equal parts (the denominator).
Resources:
Hoepo and his brothers and sisters are at their Poua’s tangi and although they are sad they are looking forward to the hakari because shortfin eel is always on the menu.
Hoepo is planning to go early to the marquee because he wants one eel all to himself. He is given one whole eel. Hoepo doesn’t know it but he is going to be one sick boy!
The twins appear and they are told they have to share one eel evenly between the two of them. There are now two half parts.
The triplets come next and Aunty Wai says we will have to cut another eel into three equal parts. There are now three third parts.
Hoepo’s sister has come with her three friends. Aunty Wai says that they will have to cut the eel into four equal parts. There are now four fourth parts. Aunty Wai says they are also known as quarters.
Hoepo’s five baby cousins are only allowed to eat small portions so Aunty Wai cuts the last eel into five equal parts. There are now five fifth parts.
I want you to look at one of the third parts and one of the fifth parts. Which is bigger?
Have the students take one of each of the equal parts and put them on another blank board.
Order the equal parts from smallest to biggest.
Let’s say the names.
Students should order from 1/5 – 1
Put them back on the original board.
How many halves are equal to the whole?
How many fourths are equal to the whole?
How many thirds are equal to a whole?
How many wholes are equal to a whole?
Depending on the age of the students symbolic notation can be introduced, using the terms like 1/2 and one half part interchangeably.
Session 2
The purpose of this session is to develop the idea that parts of the same kind may not look alike. In Activity 1 this arose from the use of different objects. Here we see that this can be so, even with the same object.
Resources:
Revise knowledge about equal parts.
What can we remember from yesterday? Write students’ comments in your modeling book.
The three straightforward ways are:
Session 3
The purpose of this session is to consolidate the concepts formed in Sessions 1 and 2, moving onto a pictorial representation.
Resources:
Mix and Match: Rules of the Game
This game is best played by groups of 2-4 people (a tuakana/teina model could be used here).
Session 4
The purpose of this session is to develop students' understanding of a number of like parts (the numerator).
This is the next step towards the concept of a fraction. It is much more straightforward than that of session 1 -3 which involved (i) separating a single object into part objects (ii) of a given number (iii) all of the same amount. Here we only have to put together a given number of these parts and to recognise and name the combination.
Resources:
Warm up
1/2, 2/2, 3/2, 4/2, 5/2, 6/2 (be prepared for students to carry on counting and not realise that 6/2 is equal to 3).
How many halves did we count (six halves = three wholes, write on the board)
How many halves do you think would equal 6? Write on the board
How many halves do you think would equal 9? Write on the board
A Number of Like Parts
This is an activity for up to six students working in two teams (mahi tahi). Its purpose is to introduce the concept described above.
Set the scene for your students:
Yesterday we went to the zoo and saw the zoo keepers feeding some of the animals. We are going to pretend that some of us are the animal keepers feeding the animals and some of us are the zoo kitchen staff, preparing and cutting up all the food.
The animal keepers, one at a time, come to the kitchen and ask for food for each kind of animal in turn. The kitchen staff cut the hay as required (using the shaped playdough, plastic knives and cutting boards), e.g.
Note that the eels, slabs, and hay should be of a standard size.
Note also that the eels, after their head and tails are removed, resemble the eels in a cylinder shape and the slabs of meat and hay are oblongs.
Session 5
So far we have covered denominator and numerator without mentioning their names. Students need to understand that the denominator names the equal parts and numerator names the number of like parts.
Resources:
Revise some of the ideas from sessions 1-4, selecting from these activities:
I want you to give me one fourth + one fourth (write on the board). Can anyone give me cards that mean the same but are written in a different way? (1/4 + 1/4)
I want you to find one fifth and one fifth and one fifth. How many fifths are there? Can anyone give me cards that mean the same but are written in a different way? (1/5 + 1/5 + 1/5)
What happens if we had to feed 5 giraffes and they were allowed 1/3 of a bale of hay each?
What happens if we had to feed 5 rhinos and they are allowed 1/2 a bale of hay each?
What happens if we had to feed 6 zebras and they are allowed 1/4 of a bale of hay each?
To conclude the session, ask the students to work in pairs and complete a think board (Copymaster 7 provides a blank think board and Copymaster 8 shows a completed example.) Suitable fractions for think boards include 2 halves, 3 fourth parts, 2 fifth parts, 4 third parts, 2 quarters. Show and discuss the example of a completed think board for 3/5.
Dear family and whānau,
This week we have been learning about dividing things into equal parts so people get fair shares. Please draw your child's attention to any fractions you use over the week in cooking or when sharing kai or meals. For example if you are having pizza, show them how it is sliced into 4 or 6 or 8 equal sliced parts. Ask them to help share out food when dishing up dinner or making lunches. They can draw pictures or take photos of the things you talk about and bring these to class to share.
In the garden
This unit uses the context of a garden to explore the line and rotational symmetry of shapes.
This unit addresses two areas of geometry: transformation (rotation, reflection, and translation) and the reflective and rotational symmetry of shapes. The key ideas introduced are:
When possible, use mathematical vocabulary to explain the type of symmetry that is being shown or created.
This unit can be differentiated by varying the scaffolding provided or altering the difficulty of the tasks to make the learning opportunities accessible to a range of learners. For example:
The activities in this unit can be adapted to make them more engaging by adding contexts that are familiar or unique to Aotearoa, for example:
Ignite children’s prior knowledge by discussing home or local community gardens that they are familiar with. It may also be helpful to introduce this unit by reading a book about garden settings or viewing images of garden settings online. The overall aim of the unit is to create a classroom display of a garden using the activities as starting points. Be as creative as you can!
Session 1: Up the garden path
In this session students will explore shapes that tessellate or repeat to cover the plane without gaps or overlaps. Although the students will only be covering a strip (path) any covering of a path can be used to tessellate the plane simply by putting paths together.
Session 2: Bugs, Beetles and Butterflies
In this session students will be investigating line symmetry by making butterflies out of coloured paper.
Session 3: Butterfly Painting
In this session students will make symmetrical butterflies with paint. Refer to the pictures of native butterflies from the previous session as inspiration.
Session 4: The Flower Garden
In this session students will be introduced to making symmetrical patterns with shape blocks. The theme for this lesson is flowers for the garden, so showing the students images of flowers and reading or viewing a story about flowers would be beneficial. Sunflowers would be a great example of a flower to use in this session.
Session 5: The Garden Wall
In this session introduce students to the idea of translation. Students will be making tiles for the garden wall. Introduce the activity by showing them examples of some wall tiles from the local area.
Session 6: Wind Catcher in the Garden
In this session students will make a wind catcher, which illustrates rotation, as an ornament for the garden .
Cut along lines in first image
Note: The wind catcher has rotational symmetry but not reflective symmetry. This is because it can be rotated around onto itself but it doesn't have a line of symmetry in the plane.
Other Ideas
This week in maths we have been doing a unit on symmetry using things that we might find in a garden. We identified objects that had reflective symmetry by finding the line or lines of symmetry in the object.
At home this week I would like your child to find three things outside that have a line or lines of symmetry and to draw a picture, take a photo or bring them along to school to share.
Figure it Out Links
Some links from the Figure It Out series which you may find useful are: