In this unit students explore movement and direction concepts in the context of programming a robot to move. They will be developing sets of instructions to accomplish tasks, focusing on the use of right, left, forward, backwards and quarter turns.
- Describe the difference between movement and direction.
- Order a set of movement and direction instructions.
- Create a set of instructions.
At Level 2 the position and orientation element of Geometry builds on work started at Level 1. Students continue to develop the ability to describe position and the direction of movement, and interpret others’ descriptions of position.
The ability to give clear instructions that describe direction and movement clearly is an important skill, which is useful in a wide variety of situations. The context of programming a robot in this unit requires students to think in a logical and systematic way. Finding mistakes, identifying the cause and fixing them will be a feature of the thinking prominent during this unit. This unit also allows skills to be developed that will be useful as students work with computers.
This unit can be differentiated by altering the difficulty of the tasks to make the learning opportunities accessible to a range of learners. For example:
- having students work with a smaller grid to limit the scope of the instructions that can be given. A 3 x 3 grid, or a 4 x 4 grid may be a useful starting point for some students
- limiting the number of commands available for students to work with. For example, start by working with just two commands F (move forward one square) and B (move backward one square)
- limiting the number of commands in a set of instructions. For example, start with just two or three cards
- removing the expectation that students will predict the outcome of the set of instructions, focusing instead on following the instructions correctly.
Focus on contexts for giving and following instructions which will appeal to students’ interests and experiences and encourage engagement. Examples may include:
- pretending there is buried treasure at a particular location on the school grounds, and the instructions describe how to find the treasure
- adding a map of a familiar area to the grid. For example, the school grounds, the local marae, or the skatepark
- using the grid to represent an ocean, and the instructions to guide waka to the correct location
- using the grid to represent a car park, and giving instructions to guide cars to the best place to park.
Authentic links could be made to digital technology, and the use of coding programmes. Links could also be made to explanation and procedural writing.
Te reo Māori vocabulary terms such as whakamua (forwards), whakamuri (backwards), mātau (right), maui (left) and kua mutu (end) could be introduced in this unit and used throughout other mathematical learning. Other te reo Māori that could be used for this unit include karehiko (robot) and ngā tohutohu (instuctions).
- Square grid
- Instruction cards A
- Instruction cards B
Getting Started
- This unit of work starts with a class discussion about robots. Find out what the students know about robots and their uses. The main point of the discussion is that the students start to understand that robots do not think for themselves. They move because someone has given the robot a set of instructions. Without these instructions the robot can not do anything. The following questions could be used:
What is a robot?
What are they used for?
Why are they used?
Can robots think?
Do they have a brain like a human brain?
If not, how do they know what to do?
What sort of instructions do robots need to follow?
What is the name of a person that writes instructions for robots? (programmer) - Explain to the students that they are going to be writing some instructions to see if they can get a robot to do things for them. Show the students the instruction cards and explain what each card instructs the robot to do.
- Have the class sit around the outside of an 8 x 8 grid. This could be marked in chalk on concrete outside, in marker on a large piece of fabric, or with masking tape on the carpet. This is called the walk-on grid later in the unit. This grid will be used throughout the unit.
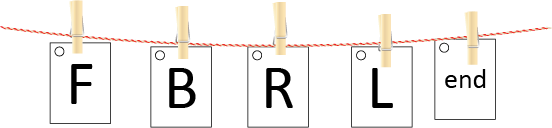
F means move forward (haere whakamua) one square.
B means move backwards (haere whakamuri) one square.
R means turn to the right (huri whakamatau) 1/4 turn (90°).
L means turn to the left (huri whakamaui) 1/4 turn (90°).
End (kua mutu) means the set of instructions is finished.
If the robot had the cards, F F F F end, what would it do?
What would the instructions, R L R L end, do? - Explain to the students that we will be getting the robot to move and do things for us on an 8 x 8 grid. The squares in the grid need to be large enough for a student to stand in them, e.g. 50cm x 50cm. Also explain that they will sometimes be the programmer, writing the instructions, and sometimes the robot, following the instructions.
- Place the following set of instruction cards, so the students can see them. Pegging the instruction cards onto a line would be a good way to display them. This way the teacher can change the order easily and the students can clearly see the instructions are a set of individual instructions.
F F F F R F F F F end - Get one student to be the robot while the teacher calls out the instructions. Before starting, have the students predict where the robot will end up.
- Work through the instruction cards, one at a time, to see where the robot ends up. Reinforce the idea of “One card, one action” with the robot only doing what the instruction cards say, nothing more, nothing less. L means 1/4 turn to the left staying within the square the robot is in, it does not mean turn left then move into the next square.
- Continue this discussion exploring how the robot works and the meaning of each instruction card. The impact of changing the cards, the order of the cards and the starting point of the robot need to be considered. The following questions could be used to facilitate this discussion.
What would happen if we changed the L to an R in the set of instructions above?
Where would the robot end up?
Would we end up at the same place if we used the same set of instruction cards but the robot started in a different place?
Where would the robot end up if we started here, but kept the same set of instruction cards?
Starting here, where do you think the robot would end up with this set of instruction cards?
F F F F F B B B B B end
Starting here, where do you think the robot would end up with this set of instruction cards?
Which direction will the robot be facing at the end?
B B B L B B B L B B B L B B B end
Exploring
Over the next 2 or 3 days the students will work in pairs, using the instruction cards to programme the robot to do a series of tasks. The number of tasks and the choice of tasks, need to be worked out by the teacher to ensure all students are challenged and engaged. The tasks do not need to be completed in order, although they do get progressively more difficult going down the page.
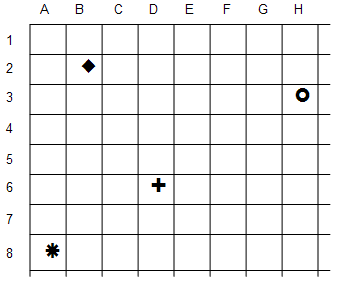
The tasks are designed for an 8 x 8 grid with the following headings.
An important part of this unit is developing the students' ability to debug. “Debugging” is the process of finding a mistake, identifying the cause and fixing it. To help students think through the mistake they will make, a counter with an arrow on it to show direction moved over a paper grid may help. Others may need to walk through their instruction cards on the walk-on grid. Working out the set of instructions away from the walk-on grid is important.
Getting the students to place their set of instruction cards onto a ring, a length of string or a pipe cleaner will keep their cards in order when dropped.
Task 1
Start the robot at 7, facing into the grid. Move around the grid and leave at D.
Task 2
Start the robot at 5, facing into the grid. Move around the grid and leave at G. There must be more than one direction cards used, i.e. more than one L or R.
Task 3
Start the robot at F, facing into the grid. Move around the grid and leave at 8. Each type of instruction card, L, R, F, B must be used at least two times.
Task 4
What is the least number of instruction cards needed to start the robot at E, facing into the grid and move around the grid and leave at 6?
Task 5
Start the robot at F, facing into the grid. Move around the grid and leave at 8. Each type of instruction card, L, R, F, B must be used at least two times. For the next two tasks two new instruction cards need to be introduced.

PD means to put down the object the robot is carrying in the square the robot is in. PU means to pick up the object in the square the robot is in. The robot doesn’t move or change directions as it picks up the object.
Task 6
Start the robot at F, facing into the grid. Move around the grid and pick up the object from the diamond and place it at the cross. Leave at F
Task 7
What is the least number of instruction cards needed to start the robot at A, facing into the grid and move around the grid, picking up an object at the star and putting it down at the circle, then leaving the grid at 1?
Task 8
Challenge each other by designing a task for others in your class.
Reflecting
Ask students to think about the things they have learnt this week and discuss. Giving each student a blank piece of paper, ask them to write down one or two important things they have learned, as well as to write down their favourite set of instruction cards. Conclude the week with each team selecting one set of instruction cards, i.e. a completed task, the teacher reads out the instruction task as a student, not the developers, follows the instructions.
Dear family and whānau,
At home this week the homework task is to talk to your family about robots. Find as many situations as you can where robots are used. Think into the future and predict the jobs robots may do in the future or jobs you wish you could programme a robot for.