This unit provides you with a range of opportunities to assess the entry level of achievement of your students.
- Classify whole numbers as even or odd and generalise the nature of sums when even and odd numbers are added.
- Recognise that sums remain the same if the same amount is added and subtracted to the two addends, e.g. 17 + 19 = 27 + 9.
- Create and follow instructions to make a model made with shapes.
- Recombine parts of one shape to form another shape.
- Extend a repeating pattern to predict further members, preferably using repeated addition, skip counting or multiplication.
- Order the chance of simple events by looking at models of all the outcomes.
This unit can be differentiated by altering the difficulty of the tasks to make the learning opportunities accessible to a range of learners. For example:
- in session one, have students predict the total number of hidden dots on the dice, and check by counting
- in session two, have students work with a total of 10 or 20 on the hundreds board, rather than the full 100.
Some of the activities in this unit can be adapted to use contexts and materials that are familiar to students. For example:
- in session two, instead of 100 kiwi, provide other native birds or animals
- in session four, instead of cups and treats provide kete and shells for the magic trick
- in session five, create repeating patterns like the ones shown with environmental materials such as leaves, shells, and sticks, or items that are currently of interest to students.
Counting and colours in te reo Māori could be introduced in this unit and used throughout other mathematical learning.
- Digital camera to record students’ work.
- Session One – Two large dice, standard 1-6 dice, squares of paper or card for students to construct cards (file cards are ideal)
- Session Two – Hundreds Board and Slavonic Abacus (physical or virtual versions), Video 1.
- Session Three – Squares of paper, scissors, Copymaster 1, Copymaster 2.
- Session Four – Plastic cups, objects to act as ‘treats’, Am I Magical 1, Am I Magical 2, Am I Magical 3.
- Session Five – Objects to form patterns, e.g. natural materials like acorns, shells, stones, or toy animals, geometric shapes, blocks, Copymaster 3, PowerPoint 1, PowerPoint 2, PowerPoint 3.
Prior Experience
It is expected that students will have a range of prior experiences working with numbers, geometric shapes, measurement, and data. Students are expected to be able to use simple addition and subtraction in situations where sets are joined, separated, and compared.
Session One
Talk to your students about the purpose of the unit, which is to find out some information about them, so you can help them with their mathematics. In the first session students explore a ‘magic trick’ about dice and extend what they find to develop their own magic trick. Look for your students to generalise, that is, explain why the method works every time.
Dice Faces
- With the whole class, demonstrate a dice magic trick. Shake two dice in your hands and then present them to the class with two sides held together so you can't see the numbers on them. Explain that you can predict the total of the two joined faces. Act out the same trick a couple of times inviting individual students to join the dice for you to prove that you are not cheating.
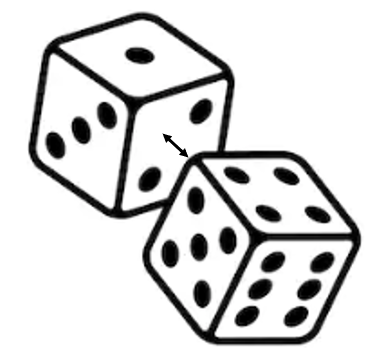
- The key to the trick is that opposite faces of a die add to seven. For any pair of joined dice look at the end faces. The opposite faces that are hidden will be the complements of seven. For example, if three dots are at one end the opposite meeting face will have four dots (3 (toru) + 4 (wha) = 7 (whitu)). If one dot is at the other end, then the opposite meeting face will have six dots. The total number of dots meeting will be four (wha) plus six (ono) equals ten (tekau) dots.
- After several examples, put the students into pairs with two dice and encourage them to discover how the trick works. After a suitable period, bring the class back together to discuss students’ ideas.
- Some students may say that you figure out the missing face on each dice by looking at the five you can see, then add those dot numbers together. That works but it is quite hard to do in your head and seems to take a lot of time. Others may say that there are 21 dots on each dice, so the total is 42 dots. By adding up the dots that are showing you can find out how many dots are hidden. This also works but is very slow and requires a lot of work.
- The ‘adds to seven’ feature of opposite faces on a dice is the key bit of noticing. You may need to bring this to students’ attention. Challenge them to consider three dice joined together. Is it still possible to work out the dot total of the hidden faces? (There will be four faces to consider) Ask your students to work out a rule for three dice.
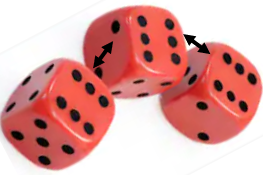
- Whatever way the centre dice is orientated the two hidden faces add to seven. The two hidden faces of the end dice can also be worked out using the ‘opposite faces add to seven’ rule. Therefore, the dot total will be just like that for two dice plus seven.
Card Sums
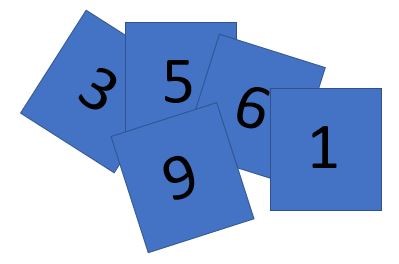
- Tell your students that you are going to continue the theme of mathematical magic. While students are watching, create five cards. The image below shows the numbers to go on the front and back of each card. You can use square pieces of paper if you want, such as those found in a memo pad.

- Toss the five cards on the ground so they land randomly. Tell students that you know the total of the five numbers without needing to add them up. Do not tell the students how you are doing it. Look at the number of odd numbered cards. Add that number to 20. Say there are four odd numbers. Add four to 20. The total is 24. Here is an example, 1, 3, 5, and 9 are all odd.
In this example below only 5 is odd so the total is 20 + 1 = 21.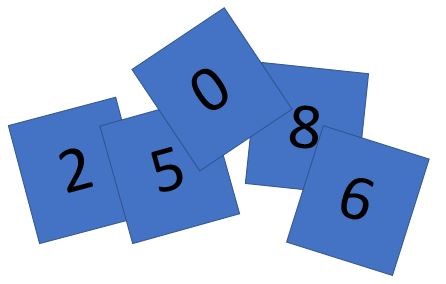
- Get the students to make their own set of cards and ask them to work in pairs to figure out how you know the total without adding the numbers. Look for students to:
- carry out some trials of tossing the cards to get an idea of how the activity works
- systematically record the sums (totals) that come up. What sums are possible? What is the lowest possible sum? What is the highest possible sum?
- classify the numbers on the cards as odd and even numbers
- consider the effect on the total of turning over one card, two cards, three cards… Is the effect different if the number showing on the card is odd or even?
- Can the students develop a way to know the sum without adding all five numbers?
- After a suitable time of exploration, talk about the questions above. Do students generalise a strategy that works every time?
Note that students may find variations on a general rule:
The highest sum possible is 25, if all the odd numbers show up. Each time an odd card is turned over one is lost from the sum. The even number is always one less than the odd number. If you see how many even numbers there are you take that number from 25. For example, below there are three even cards, 0, 2, and 8, so the sum is 25 – 3 = 22.
Possible extension:
Suppose you wanted to make the trick look even more impressive by making 10 cards; 0-1, 2-3, 4-5, …,16-17, 18-19.
How could you work out the total without adding all the numbers then?
Session Two
In this session, the theme of mathematical magic is continued as students look for patterns in the place value structure of 100. Begin with a Slavonic Abacus and a Hundreds Board.
Slavonic abacus
- Choose a two-digit number on the hundreds board and ask a student to make the number on the left side of the abacus. For example, suppose you choose 45:
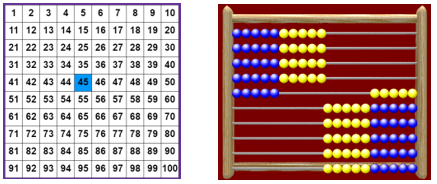
Does the student use the tens and ones structure of the abacus or attempt to count in ones?
- You may need to revisit the meaning of ‘forty’ as four tens, and ‘forty-five’ as four tens and five.
How many beads are on the whole abacus? How do you know?
If 45 beads are on the left side, how many beads are on the right side?
- Do your students use the place value structure of ten and ones, even if counting by tens and ones?
You might revisit the fact that five tens are fifty. Fifty mean five-ty or five tens.
- Record the result as an equation 45 + 55 = 100. Talk through two more examples, like 29 + 71 = 100 and 84 + 16 = 100.
- Ask students: Do you know where kiwi live?
- Tell the students that there were 100 kiwi living in a burrow in the local reserve. The kiwi were very inquisitive and got lost all the time. The carer for the kiwi made up some mathematical magic to tell straight away how many kiwi were missing. Act out being the kiwi carer.
(Student A), please move some of my kiwi to the left side and cover up the rest so I cannot see them (using an A4 sheet of paper).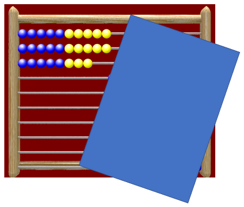
- Role play working out the number of kiwi you can see, then recording the number. For example, “Two tens, that’s twenty, five and three, that’s eight. I can see 28 kiwi.”
- Write 28 + 72 = 100 on the board, pausing a little at the 72 to show a bit of working out. Confirm that 72 is correct on the Slavonic Abacus.
- Have the students work in pairs. Can you work out how the kiwi carer did it? How could they know 72 kiwi were missing so quickly?
- Give the students time to work on the task. Students may use a Slavonic abacus to support them if needed and, later, to explain and justify their strategy. Listen to the discussions of your students:
- Do they use the tens and ones structure of two digit numbers?
- Are they aware that ten tens are 100?
- Do they look for relationships in the digits of the two-digit numbers that make 100?
- After a suitable time, bring the class together. Look for ways to capture what students say in ways that support other students to understand. For example:
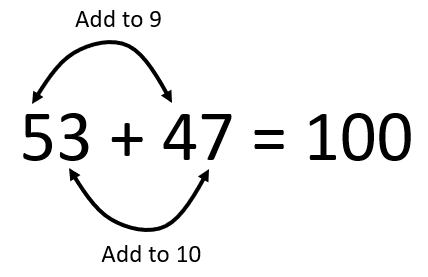
- Invite the students to justify why the method works and any exceptions to it. Look for responses like, “Three and seven makes the other ten. Then you have ten tens and that is 100,” and “It is different for numbers like 40 + 60 because they already make ten tens.” If your students prove to be competent with two digits you might consider extending the task to two addends that make 1000.
Crosses Pattern
In this task students apply place value to explain why a pattern on the hundreds board works every time.
- Play Video 1, pausing at appropriate points to allow students to calculate the sums of the top and bottom and left and right numbers separately. For example:
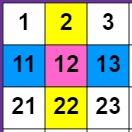
2 + 22 = 24 (top and bottom numbers) and 11 + 13 = 24 (left and right numbers).
- See if students notice that the two sums are always equal and are the double of the middle number. You might invite students to use a hundreds board to try crosses of their own to see if the trick works. Ask your students to try to explain why the trick works every time.
- After some discussion time, bring the students together to share their ideas. Look for students to apply the place value structure of the numbers in the cross. Attendance to place value can be supported by using materials to model each number in the cross. Any proportional place value representation will work.
- Look for ideas of balance like:
- “The ones digits are one more and one less. Two is one less than three and four is one more. So the numbers balance to make the same as three plus three.”
- “Both sums have six tens. Two tens and four tens equal six tens and three tens and three tens equals six tens.”
- “Look at the middle number. The top number is ten less and the bottom number is ten more than that. The left number is one less and the right number is one more than the middle number.”
Possible extension:
Any square on the hundreds board is magic. The numbers along each axis have the same sum. Why?
Below 12 + 23 + 34 = 69, 13 + 23 + 33 = 69, 14 + 23 + 32 = 69, 22 + 23 + 24 = 69.
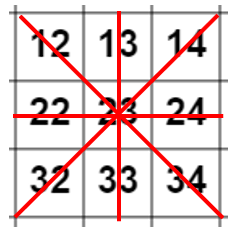
Hopefully more able students can see that this works for the same reason that the cross pattern works. For each line, the sum is three times the centre number, with one of the end numbers the same amount more than that number as the other is less.
Other units that will support the development of Place Value at level 2 include:
- Place value with two digit numbers
- Building on two digit place value
- Place Value People
- Place Value to four digits
Session Three
In this session students explore simple two-dimensional dissections in which a shape is cut up into smaller pieces and those pieces are put together to form a different shape. They will need square shaped pieces of paper or card.
- Tell students: Magicians can change objects into different shapes. We are going to see if you can be a magician.
- Ask your students to cut their square into three pieces as shown below. You may need to discuss the meaning of diagonal. When they are finished ask the students to put the square back together.
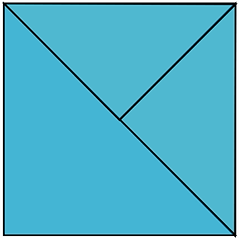
- Now tell students: There are four challenges for you to start. You need to use all the pieces of the square and change it into each of these shapes.
Copymaster 1 contains the target shapes. Either provide students copies of the Copymaster or display it on screen. Ask the students to work out how to form each shape using all the pieces from the square. Look for your students to:- attend to properties of the target shapes, in particular, angles and side lengths?
- align sides that are of equal length?
- visualise pieces within the target shapes?
- After a suitable time, bring the class together to discuss the strategies they used. Ask them how they might record a solution. Usually students suggest drawing the pieces in the completed position.
- Extend the task by cutting the largest triangle in half to form two right angled triangles that are the same size as the other two. The resulting pieces are quarters of the original square.
Copymaster 2 has some target shapes that can be made by connecting all four pieces. Challenge your students to make each target, record the solution, and make up their own target for someone else in the class. Be aware of the need to check for uniqueness. Is the target really the same as another? This brings in ideas about reflection and rotation.
- Many dissection puzzles were created by magic mathematicians. Ask your students to find other ways to dissect a square then create target puzzles. Here is a simple example:
Can you use these four pieces to create a hexagon?
Session Four
In this session students consider the likelihood of magic happening. Students will consider whether the trick is really magic or if something else is involved.
- Begin with two plastic cups, one of which is marked in a barely discernible way (e.g. pencil mark or a smile sticker). Tell a student to hide a treat under one cup while you are watching. The treat might be a small toy or a packaged food item. Small kete and shells could be used here instead of plastic cups and treats.
- Tell the student: I am closing my eyes now and you can move the cups around while I cannot see. Then I will guess which cup the treat is under.
- After the student has moved the cups around, choose the correct cup knowing from the subtle marking. Simulate this trick three times choosing the opposite position to the one before. You might record wins and losses, i.e. 3-0.
Am I magic or is something else going on?
- Expect students to express their beliefs about the trick.
Their beliefs might be deterministic: "You are a teacher, so you are clever."
Some beliefs might acknowledge chance: "There are only two cups. You have a good chance of being right each time."
A student might spot that the cups are marked. If not, reveal the trick to them.
- Ask students: What would happen if the cups were not marked?
- Repeat the simulation with unmarked cups. Choose the cup that is in the other position to where the treat was originally located. In most cases the student will randomly allocate the treat position and you will ‘magically’ choose the right cup only some of the time. Repeat the simulation three times and record the wins-losses, e.g. 2-1.
- Ask the students: Am I magical or is it just luck?
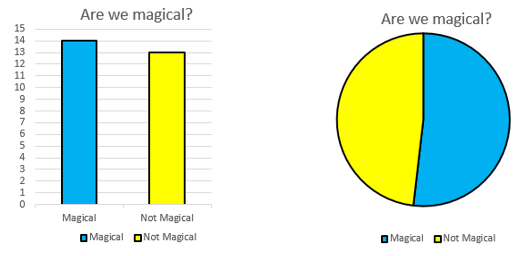
- After a brief discussion you could get your students to trial the two cup one treat situation. You might gather data about the number of students who are magical (correct) or not magical (incorrect) and graph the data quickly, possibly using a spreadsheet. It is interesting to compare bar chart and pie representations.
- Expect your students to consider that the chances of being correct by luck are 50:50.
- Extend the problem:
Magicians like to disguise their tricks so the two cups might be a bit simple. Let’s try the same idea but have three cups and one treat. Can you figure out a way to get a treat each time?
- Am I Magical 1, Am I Magical 2, and Am I Magical 3 can be used to put students in the position of magician. Students close their eyes as the cups are moved then guess where the treat is hidden. Later in the video the treat cup position is revealed. You might ask the students each time, who were magicians and guessed correctly (with a show of hands)?
- Tell the students: Being magical in this situation seems a bit hard. Let’s keep the three cups but add another treat.
- Let students trial the three cups, two treats situations. Ask them to gather data about the times they were magic, chose a treat cup, and the time when their magic deserted them.
- After a suitable time of exploring bring the class back to discuss their conjectures:
S: I always choose the position where a treat didn’t go at first.
T: Did that always work? Did anyone else try that idea? What happened? Why do you think that happened?
Other students might always choose a position where a treat was first located, or randomly select a position.
- Discuss with your students:
- Is there a best cup to choose? Why?
- What are the chances of being magical by luck?
- Encourage students to create models of the situation, such as, “There are two ways of being magical and only one way of not being magical.”
- Can your students compare the two cup and three cup situations? Do they assign descriptive words to the likelihoods, such as more likely, less chance, etc.?
- Am I more likely to be magical in this game compared to the two-cup game? Why?
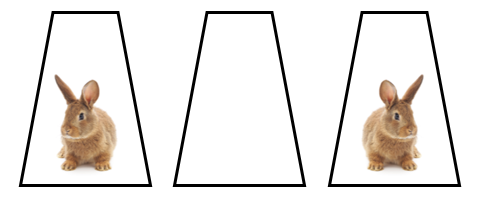
- What if there was only one rabbit in the three-cup game?
- Can we change the game so it is impossible to be magical? (no treats)
- Can we change the game so you are certain to be magical? (treats in every cup)
Extend the activity:
You might extend the task by varying the number of cups and treats, e.g. four cups and one, two, or three treats.
Session Five
In this session, students look for repeating patterns and connect elements in the pattern with ordinal numbers.
- Tell your students: Mathematical magicians can think ahead. They can predict the future. Can you?
- PowerPoint 1, PowerPoint 2, and PowerPoint 3 relate to repeating patterns of increasing sophistication. The animations guide you with prompting questions for your students to discuss.
- Look at the way your students anticipate further members of each pattern.
- Do they fail to see any repeating element? In that case reading the pattern like a poem or chant can help.
- Do they recite the repeating element one after the other and try to track the ordinal counting? For example, “kiwi (One), tuatara (two), kiwi (three), tuatara (four), ….”
- Do they use skip counting to anticipate which animal will be in given positions? For example, “The weta comes every three animals. 3, 6, 9, 12… so the weta will be in number 12.”
- Provide students with a range of materials to form sequential patterns with. The items should be locally sourced and might include shells, leaves, pebbles, etc. Give them a copy of the strip that can be made from Copymaster 3 after it is enlarged onto A3 size (x 1.41).
Let students create their own patterns. Look for students to:
- create and extend an element of repeat
- use one or more variables in their pattern
- predict ahead what objects will be for given ordinal numbers, e.g. the 16th object.
- Take photographs of the patterns to create a book, and ask students to pose problems about their patterns. Students can record the answers to their problem on the back of the page.
- Discuss as a class how to predict further members of a pattern. Strategies might include:
- Create a word sequence for each variable, e.g. blue (kikorangi), yellow (kōwhai), red (whero), blue, yellow, red, …
- Use skip counting sequences to predict further members, e.g. If the colour sequence is blue, yellow, blue, yellow,… then every block in the ordinal sequence 2, 4, 6, … etc. is yellow.
- Some students may be able to apply simple multiplication knowledge to the patterns. For example, if the element that is repeated is made of five objects, e.g. kiwi, tuatara, ruru, weta, piwakawaka,… then the five times tables might be used. For each position, 5, 10, 15, 20, … the animal is a weta. Other ordinal positions can be worked out by adding and subtracting from multiples of five. For example, position 23 must be a tuatara since 25 was a weta.
Extend the activity:
There are many ways to increase the difficulty of repeating pattern prediction:
- Use a longer unit of repeat, especially a number of objects that produce a difficult sequence of multiples. For example, ○, □, →, ∆, ○, □, →, ∆, ○, □, →, ∆, … has four shapes in the unit of repeat so multiple of four will be needed for prediction.
- Use more than one variable in the unit of repeat, such as colour, position and size.
- Leave missing shapes or objects in the repeating pattern, e.g. ○, □, _, ∆, ○, _, →, ∆, …
Dear parents and whānau,
For the first week of school our mathematics unit is about mathematical magic. We will investigate number tricks, magically change a square into other shapes, predict the future of a pattern, explain and justify why things work.
Ask your child about their magical abilities and have them share some of the magic tricks they have done in class with you.