In this unit students sort and explore two-dimensional and three-dimensional geometric shapes, identify and describe their distinguishing features and come to appreciate the efficiency of the tessellating hexagon in meeting the needs of honeybees.
- Identify distinguishing features of 2D (plane) shapes using the language of sides and corners.
- Identify distinguishing features of 3D shapes using the language of faces, edges, vertex/vertices.
- Explore hexagons, recognising that they tessellate.
- Make hollow prism shapes and describe their features.
- Research and present information about honeybees.
- Recognise that bees always use hexagons because they are ‘perfect in saving on labour (effort and energy) and wax’.
- Recognise that there are many more ‘clever’ shapes occurring in nature.
In level one, students have been learning to name some common two-dimensional and three-dimensional shapes and have started to become familiar with their features (e.g. side, corner). When students are given opportunities, they find their own systems for sorting shapes, justifying their categories and developing the important geometric language of attributes.
As they work with three-dimensional shapes, students become aware that these are made up of flat or plane shapes that have two dimensions. It is useful for students to see that two-dimensional shapes are like a print that technically cannot be ‘held’ because it has no thickness or depth. In understanding the way in which two dimensional plane shapes build three dimensional shapes, students need to have a clear understanding of the meaning and concept of ‘dimensions’. They should be able to explain in their own words, what the abbreviations 2D and 3D mean.
The change in language from ‘sides and corners’ for two-dimensional shapes, to ‘faces, edges and vertex/vertices’ is not an insignificant one. The language itself conveys the shape category and should be emphasised and well understood.
As students manipulate shapes that are the same, they ‘discover’ tessellation and come to understand that this is also an identifying characteristic of a shape. It is not expected that they will be able to explain this using the precise quantification of angle.
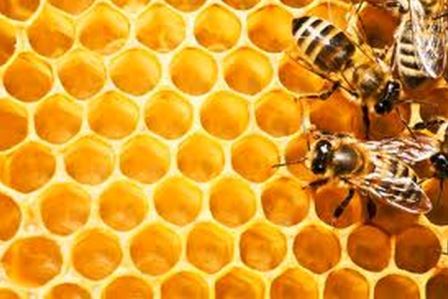
As shapes don’t exist in isolation it is important that students have opportunities to explore shapes in structures around them. In their exploration of the remarkable structure of the honeycomb, students have opportunities to apply their new learning.
Associated Achievement Objectives
Science
Life processes
- Recognise that all living things have certain requirements so they can stay alive.
Ecology
- Recognise that all living things are suited to their particular habitat.
English
Processes and strategies
- Select and use sources of information, processes and strategies with some confidence to identify, form and express ideas.
Purposes and audiences
- Show some understanding of how to shape texts for different purposes and audiences.
Ideas
- Select, form and express ideas on a range of topics.
This unit can be differentiated by varying the scaffolding provided and altering expectations. This will make the learning opportunities accessible to a range of learners. For example:
- spending multiple lessons on each session, giving students additional time to consolidate their understandings before moving on
- supporting students to explore shapes in structures around them to identify how shapes are “clever”. What squares can they find in the structure of the classroom or the playground? What about other shapes?
- grouping and pairing students so they can support each other and share their thinking (therefore encouraging mahi tahi and tuakana-teina).
The context of this unit can be adapted to address diversity, and appeal to students’ interests and experiences to encourage engagement. For example:
- ask students to identify shapes at home, or in the community. What 2D shapes do they have at home, in the community centre, at the skatepark, or on the marae? What 3D shapes? Encourage students to bring photos of these to share, if possible. If possible, venture outside the classroom and explore these shapes in the school grounds or local community.
- focus on other items that students may experience that include tessellating shapes. Examples include fishing nets made up of hexagons or diamonds, diamonds in tukutuku panels, pentagons and hexagons in footballs, and tiling and brick patterns. Students can bring examples of these to school, or pictures from home.
- The Greedy Triangle, by Marilyn Burns (available being read aloud on YouTube)
- Pattern mosaic blocks
- Picture(s) of a bees honeycomb (or a piece of honeycomb)
- Paper and pencils
- Poster paper
- Cardboard
- Cellotape
- Glue
- A cloak for the dreamer, by Aileen Friedman (available being read aloud on YouTube)
- Bees wax or a piece of honeycomb
Whilst this unit is presented as a sequence of five sessions, more sessions than this will be required between sessions 3 and 4. It is also expected that any session may extend beyond one teaching period.
Session 1
This session is about exploring features of mosaic shapes and making a successful poster highlighting the special characteristics of one particular shape.
SLOs:
- Sort mosaic blocks by shape and colour.
- Identify and describe the distinguishing features of mosaic block shapes, using the language of sides and corners.
- Form and express mathematics ideas in poster form, considering audience impact.
Activity 1
Begin by reading The Greedy Triangle.
Activity 2
Write ‘Clever shapes’ on a class chart. Explain that the students will be making their own small poster about a clever shape. Ask what the purpose of a poster is (To capture people’s attention and to give a short clear message). This could be linked to writing instruction.
Together list the features of a good poster. It grabs the audience’s attention by using:
bold print, a simple and convincing message, interesting colours, a picture or diagram.
Activity 3
Make available mosaic pattern blocks, (omit hexagons), paper, pencils, crayons or felt pens.
- Have students in pairs take a selection of shapes, sort them into groups and explain these using the language of colour or shape. Consider modelling this first, e.g. explaining the colour and number of sides of a triangle as a “think-aloud”. If necessary, revise the shape names using a song, chart, or game. Consider integrating māori kupu for colours and 2D shape names.
- Have each student select one of the shape groups, working with these to come up with a reason for their ‘cleverness’. (For example: ‘they fit together with no gaps’.)
- Record on the class chart the students’ ideas as they each first describe the features of the shape they have chosen, giving the number of sides and corners, and share their creative reasons with the class: for example, ‘circles are clever because they are wheels’, ‘squares are clever because they fit together with no gaps and can be used as tiles’, ‘triangles are clever because they can stand on their heads and fit together’, etc.
Use this time to model and record the language of the shapes, including writing and discussing ‘tessellation’.
Activity 4
Explain that to make their posters, the students will need to draw around their ‘clever shape’ (as many times as necessary).
Set a time limit and have students complete their ‘clever shape’ posters.
Activity 5
Conclude the session by having students share their work in pairs. Display the list of criteria for a successful poster and have students self evaluate, then give partner feedback about each of the criteria. Model how to give and receive feedback with a partner, making explicit reference to the criteria listed.
Activity 6
Share clever shape posters as a class, highlighting geometric language.
Session 2
This session is about understanding that a 2D shape is like a footprint, a 3D shape is something you can hold or feel, and that we use different language for each.
SLOs:
- Understand the difference between 2D and 3D shapes.
- Identify distinguishing features of 2D shapes using the language of sides and corners.
- Identify distinguishing features of 3D shapes using the language of faces, edges, vertex/vertices.
- Explore hexagons, recognising that they tessellate.
Activity 1
- Display the posters from session one. Ask several students to describe the process of drawing around the shape and have them model this on the class chart.
- Explain that what they have drawn is like a ‘footprint’ of the shape. Write the words ‘side’ and ‘corner’ beside these features on each shape outline.
Ask, ‘Can you hold or feel an outline (‘footprint’) with your hand?’ (No. It has only 2 dimensions.). Discuss, highlighting the fact that we can say how long the outline is and how wide it is.
Record ‘width’ ‘length’ ‘dimensions’, explaining why these outlines are called two-dimensional shapes and that this is sometimes referred to as 2D (i.e. because the two-dimensions are width and length).
Ask, ‘What ‘dimension’ can’t we measure?’ (How deep it is.) - Have students write 2D beside their outlines on the class chart, explaining what this means as they do so.
Activity 2
Make available hexagonal mosaic blocks, pencils and paper.
Have students each draw around one block creating an outline, identify and record ‘6 sides’ and ‘6 corners’ and write a statement about the outline. For example: “This is a 2 dimensional or 2D shape because we can only say how long it is and how wide it is.”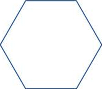
Activity 3
- Have students discuss in pairs and decide whether the foam mosaic shape itself is a two-dimensional or three-dimensional shape.
- Have them physically take up positions in the classroom to indicate their thinking (for example: 2D on one side of the mat, 3D on the other).
Discuss, conclude and record that the mosaic block is a 3D shape because it has width, length, and thickness (depth) and we can hold it in our hand. - Have several students draw the foam mosaic hexagon shape (hexagonal prism) on the class chart, capturing the third dimension (thickness) in their own way. Have all students complete this on their own paper.
- Write face, edge and vertex on the class chart. Have students locate and identify each feature on their drawing. Write the plurals of each word beside the singular, highlighting the word vertices. Make the connection between the 2D language of sides and corners and the 3D terms.
Have students label their drawings using these words. Have all students touch and name those parts on their hexagonal mosaic block.
Activity 4
Return to the language listed in Session 1. Highlight the word tessellate.
Pose the task: Use your shape, a pencil and paper and show how you know whether or not a hexagon tessellates.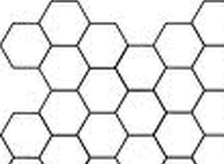
Activity 5
- Ask students to share their results and talk about why hexagons tessellate.
As they describe their drawings they should use the language of side and corner. - Students form groups of four, tessellating their hexagonal mosaic blocks together. Ask them to locate and identify faces, edges and vertices on the mosaic block, and explain to each other using this language, exactly how the tessellation is formed with 3D objects. (For example, ‘the small rectangular faces around the ‘edge’ of each block are up against each other’, ‘the edges and vertices touch’, etc.) These ideas could be recorded on digital devices for sharing.
Activity 6
Conclude the session by having students each make a small poster, or spoken or digital presentation about 2D and 3D shapes that they know. Encourage them to think about the feedback they received about their posters in Session 1. Model this explicitly.
Session 3
This session is about consolidating understanding of, and using language associated with, 2D and 3D shapes, understanding and making a hollow prism to create a model bees’ honeycomb.
SLOs:
- Recognise that hexagonal prisms make up bees’ honeycomb.
- Understand that the two-dimensional hexagon shape is a plane or face of the three-dimensional prism.
- Make hollow prism shapes and describe their features.
Activity 1
- Begin by displaying a tessellation drawing from Session 2, Activity 4.
Have students explain why the hexagons in the drawing are two-dimensional.
Ask , “What does the drawing remind you of?”
Elicit, ‘a bees’ honeycomb’.
- Display a picture of bees' honeycomb. You could also watch a video about honeycomb, draw on local community expertise, or read a picture book (e.g. The Beeman by Laurie Krebs) to engage students in this context.
Have students discuss and agree whether the honeycomb is two-dimensional or three-dimensional. Have them explain their thinking. - Write ‘hexagonal prism’ on the class chart and show the students a model.
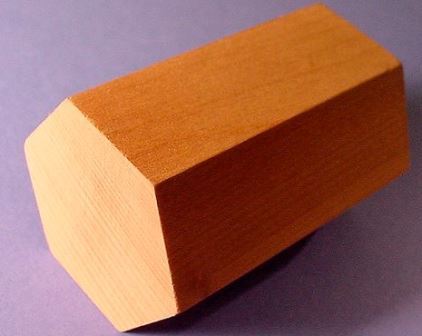
Have several students hold it and describe its features. Record these.
Highlight the plane (two-dimensional) shapes, the hexagon and rectangle that make up the three-dimensional prism. - Have several students make art prints of a hexagonal face and of a rectangular face. You could use ink or paint, and create 3D cardboard stamps. Recognise that these prints are two-dimensional.
- Refer to the chart made in Session 2, Activity 5. Once again have students explain the connection between the 2D language of sides and corners and the 3D terms, in so doing highlighting the fact that plane shapes (2D) build (or make up) 3D shapes.
Activity 2
- Make available rulers, rectangular pieces of card 24cm x 15cm and cellotape.
Pose: Can you work in pairs, using this card and tape, to make a hollow hexagonal prism?
Give students time to explore and create their hexagonal tubes. - Have students suggest how they could make a honeycomb model using their hollow prisms. Fit the cubes together and glue the faces together to create a model honeycomb.
Have students talk about the process using the language of faces, edges and vertices. - Notice and discuss how important it is to be precise in the measurements and their folding, ensuring that their hexagons are regular, not irregular. Define these (e.g. a regular hexagon has six sides that are all the same length, an irregular hexagon has six sides that are of different lengths). You could investigate this further by drawing up a T chart on the board and getting students to draw regular hexagons (by tracing around their hexagonal prisms) and irregular hexagons (by drawing a closed, 2D shape with six sides of different lengths). Alternatively, you could create the T chart and 5 regular and irregular hexagons on a Powerpoint. The students could direct you to drag the different hexagons into the different columns, depending on whether they were a regular or irregular hexagon.
Recognise the bee’s skill in making perfect hexagonal prisms.
If necessary, have students make their prisms with greater precision to achieve a ‘perfect’ honeycomb such as the bee produces.
Activity 3
- Conclude the session by listing student’s questions about bees (including why they use the hexagonal shape for their honeycombs). Ask students to suggest possible answers and record these.
- Suggest they could research this, perhaps with the help of parents or whānau, before the next session.
They might also like to make their own model bees to inhabit the class honeycomb.
Session 4
This session is about giving students opportunities to find and share information about honeybees, their honeycombs and the importance of the hexagon.
SLOs:
- Research and present information about honeybees.
- Recognise that living things have certain requirements to stay alive.
- Recognise that all living things are suited to their particular habitat.
- Recognise that bees always use hexagons because they are ‘perfect in saving on labour (effort and energy) and wax’.
Activity 1
- Have wax or a piece of real honeycomb available. Display the class honeycomb.
Have students share the results of their research and, if any students have made their own model bees, to locate these in the honeycomb. - Together research, read, discuss and list a summary of information about honeybees and their honeycombs. Consider online sources, journal and early reading resources, and videos:
http://www.npr.org/blogs/krulwich/2013/05/13/183704091/what-is-it-about-bees-and-hexagons
http://www.nature.com/news/how-honeycombs-can-build-themselves-1.13398
You may need to structure this task to ensure the engagement and success of your students (e.g. pair up students who would benefit from a tuakana-teina relationship and direct them to research one thing - such as where honey bees live). It may be effective for you to provide the different resources for the students to use in their research, to ensure the language and content is age appropriate and accessible.
Activity 2
Write on the class chart:
What do honeybees need to stay alive?
How does the honeycomb ‘suit’ the bees?
Discuss each, with reference to the research information, and record the students’ understanding of the key ideas.
Recognise that:
- It takes a bee lots of energy to make wax.
- The hexagonal structure is more compact (efficiently and tightly arranged) than any other shape (such as equilateral triangles and squares).
- The hexagonal form of the honeycomb has been shown by scientists and mathematicians to be ‘perfect in saving on energy and wax’, suiting the bees and helping them to stay alive, as their honey (food) is stored.
- It is suggested that the hexagonal cells in the honeycomb begin as circles. The angles of the hexagons are pulled into shape at the point where three cells meet.
Activity 3
Conclude the session by reading A cloak for the dreamer:
Highlight the way in which the circle shapes which did not tessellate were changed into the hexagon shapes which do tessellate and the way this is like the process in the honeycomb where the cells are thought to begin as circles. Encourage students to share their reflections about this.
Session 5
This session is about synthesising the skills and learning in Sessions 1-4.
SLOs:
- Recognise the ‘cleverness’ of the honeybee.
- Recognise that there are many more ‘clever’ shapes occurring in nature.
Activity 1
Review key learning over the past 4 sessions including referring to the clever shapes posters and feedback in Session 1.
Activity 2
Set an appropriate time limit and have students work in pairs to design and create a ‘presentation’ (poster, powerpoint, other) combining the key ideas about a clever shape and a clever creature (the honeybee).
Activity 3
Challenge students to research other clever shapes (and creatures) found in nature.
Dear parents and whānau,
We have been learning that a two dimensional shape is a bit like a footprint, with width and length as the two dimensions, and that other shapes are three dimensional.
Your child would like your help to find out more about the way in which honeybees create hexagonal honeycombs, and to learn more about other ‘clever’ shapes in nature. They will be sharing their information with their peers.
Thank you.