This unit applies geometry and measurement concepts (tessellations, reflections, rotations, symmetry, circles, 3D shapes, nets) in the creation of bags, door stops and other fabric items.
- Identify translation, vertical and horizontal reflection (line symmetry), rotational symmetry, total symmetry, glide reflections, and half turn rotations.
- Use geometric concepts (translation, vertical and horizontal reflection and symmetry, glide reflections, and half turn rotations) create friezes, kōwhaiwhai rafter patterns, tivaevae patterns, and Escher type tessellations.
- Create tivaevae and other symmetric patterns and describe the lines of symmetry and rotational symmetry.
- Derive and apply formulae to find Pi and the area of a circle.
- Find and measure circumference, radius, and diameter.
- Apply knowledge of circles (perimeters, area and surface area) to create nets for cylinders.
- Design and construct nets for 3D shapes.
The idea of this unit is for students to develop their understanding of the mathematical concepts that will be applied to the creation of a geometric design. These designs will be used to create different items out of fabric. They will develop the pattern for a cylindrical item, for example a sports bag, pencil case or pillow; and they will develop the net to create a doorstop.
See the Level 3 unit, Tessellation, Transformation, and Art for further information around tessellations. Specific information about each mathematical concept is included, where relevant, throughout the unit.
Associated Achievement Objectives:
Technology:
Technological Knowledge
- Understand how different forms of functional modelling are used to explore possibilities and to justify decision making and how prototyping can be used to justify refinement of technological outcomes.
The learning opportunities in this unit can be differentiated by providing or removing support to students, and by varying the task requirements. Ways to differentiate include:
- providing physical manipulatives, regular polygons, or online tools (many are available), so that students can experiments with the transformation of different shapes
- directly modelling examples of transformations
- working alongside individual students (or groups of students) who require further support with specific areas of knowledge or activities
- providing extended opportunities for students to explore mathematical ideas and practices
- providing opportunities to record mathematical ideas using multiple means of action and expression (e.g. as written work, annotated diagrams, video diary, slide deck)
- providing opportunities for students to work collaboratively in partnerships, and to share and justify their ideas in small groups, and with the whole class.
The difficulty of tasks can be varied by:
- altering the complexity of shapes students are asked to use in their transformations
- displaying the work of students as models for others. Motivate students to add a new, undiscovered frieze to the class display.
Te reo Māori kupu such as rōpinepine (tesselate, tessellation, tiling, mosaic), neke (translate), huri (rotate), and whakaata (reflect) could be introduced in this unit and used throughout other mathematical learning. You could also encourage students, who speak a language other than English at home, to share the words related to transformation that they use at home. You should also consider inviting students to share patterns and friezes that are relevant to their diverse cultural backgrounds.
- Inkjet printer
- Resources for creating sewing projects
- Access to devices, the internet, and graphing software
- 5 cm x 5 cm card squares
- Examples of Escher and Escher-type tessellations
- Examples of kōwhaiwhai and tivaevae patterns
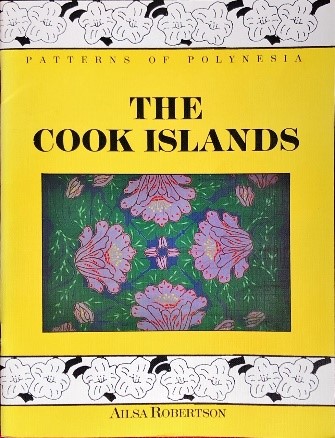
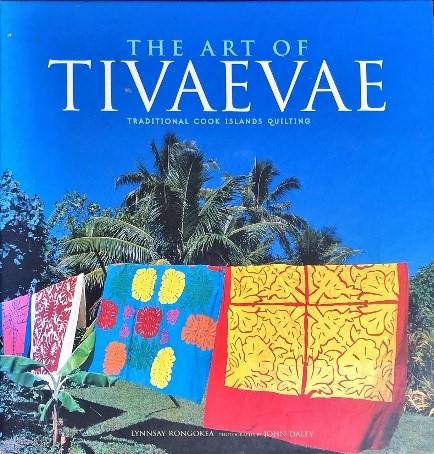
- Copies of The Cook Islands, Patterns of Polynesia by Ailsa Robertson and/or The Art of Tivaevae by Lynnsay Rongokea
- Copymaster 1, Copymaster 2, Copymaster 3, Copymaster 4, Copymaster 5.
Whilst this unit is presented as sequence of 7 sessions, more sessions than this may be required. It is also expected that any session may extend beyond one teaching period.
Session 1
This session introduces the topic and then focuses on exploring line, rotational and total symmetry. This knowledge is applied to the creation of tivaevae inspired designs. It is intended that it would take two to three lessons to complete.
Activity 1
- Introduce the unit and tell students that they will take part in three projects. You might show students some examples of outcomes that have been developed from previous iterations of this unit.
- Emphasise that all projects will require students to use their mathematics and technology knowledge and skills to create the final product. Outline the three projects:
- Creating geometric designs to transfer onto fabric as part of making a bag or for decorating a t-shirt or similar.
- Using their knowledge of circles, including surface area of cylinders to create a cylindrical fabric object e.g. sports bag, pencil case, pillow.
- Using their knowledge of the nets of pyramids to create a fabric door stop.
- Use the following activities to explore students' understandings of the following concepts:
- Translations, reflections and rotations can be used to create friezes and Escher type tessellations.
- Tivaevae and other symmetric patterns can be described using lines of symmetry and rotational symmetry.
- Knowledge of circles (perimeters, area and surface area) can be applied to create nets for cylinders.
Transformations
- Collect, or get the students to collect, a variety of relevant images (e.g. ones that could be included on tivaevae, culturally significant symbols, brand logos, block letters).
- Print these out and use them to demonstrate different transformations (translation, rotation and reflection) and to explore the line, rotational and total symmetry of figures. The notes below give ideas for exploring these concepts with a range of images. Ensure that you build on student's knowledge throughout this discussion.
What is a transformation?
Are there different types of transformations that you know of?
Can you see any examples of transformation in this classroom?
How could we transform these images?
Line symmetry
- Use the images shown below, and others you collect, to demonstrate line symmetry. Emphasise the following points:
- A figure has line symmetry if there is a mirror line such that each point in the figure can be reflected into the figure.
- In the picture below, the drawing is symmetric with respect to the line of symmetry, m.
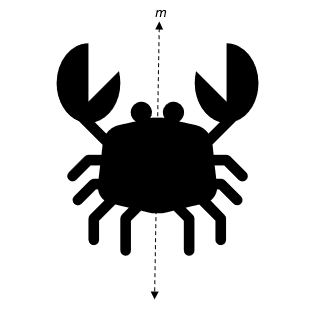
- There are a few ways to check if a figure has line symmetry. For example, you can fold the paper along the assumed line of symmetry. If each point of the figure on one side of the fold corresponds to the same point on the other side of the fold, then the figure is symmetric with respect to the fold line. Alternatively, you could place a mirror along the assumed line of symmetry. If the figure and its reflection are identical to the original figure, then the figure is symmetric with respect to the mirror line.
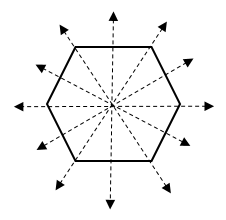
- Figures can have more than one line of symmetry. For example, if exploring regular polygons, an equilateral triangle has three lines of symmetry, a square has four lines of symmetry and a regular n-sides polygon has n lines of symmetry.
- For example, the regular hexagon below has six lines of symmetry.
- Many trademarks, logos and designs, such as the car logos shown below, have one or more lines of symmetry. In the images below, both the Toyota and the VW logo have one line of symmetry.


- Using the logos provided in Copymaster 1, explore which other logos have line symmetry. For some of the logos they might have symmetry in parts of the logo, and sometimes without the colour or shading the symmetry is present.

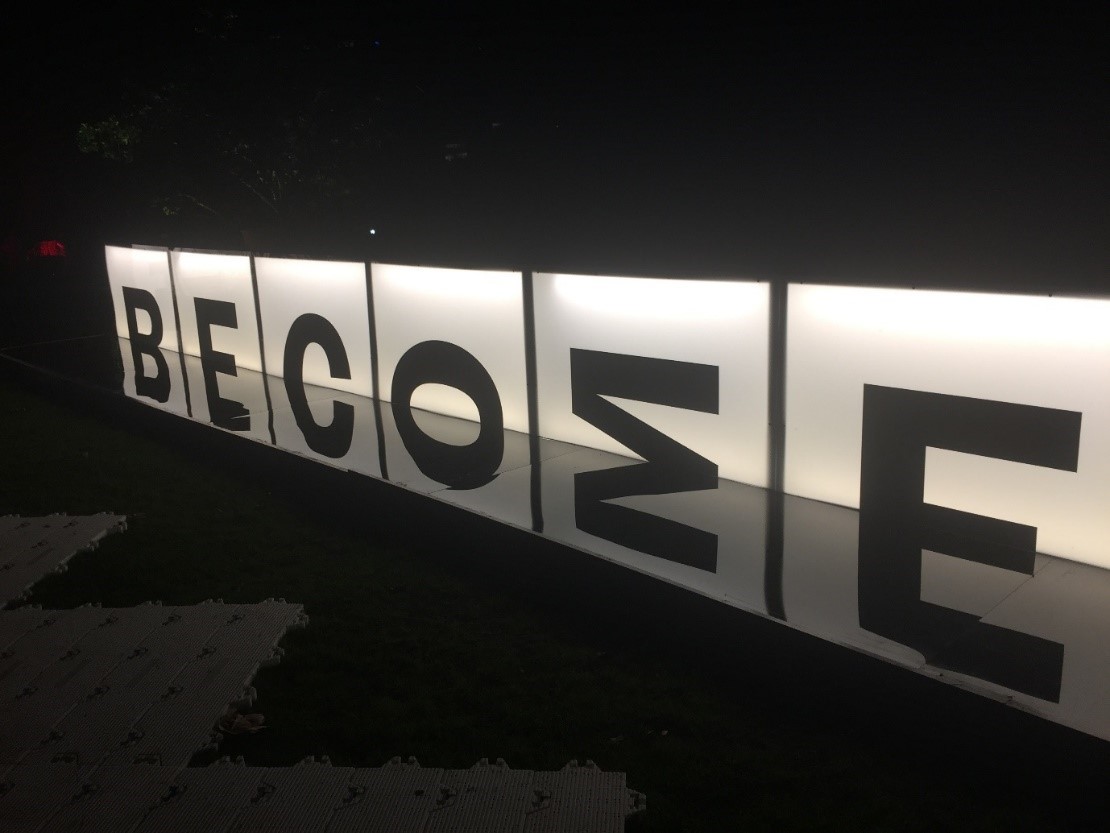
- Explore which of the capital letters have vertical symmetry (vertical mirror line), and which have horizontal symmetry (horizontal mirror line). If appropriate to the backgrounds of your students, you could extend this to looking at special characters from other languages.
Vertical symmetry: A, H, I, M, O, T, U, V, W, X, Y
Horizontal symmetry: B, C, D, E, H, I, O, X
- At the Vivid Light Festival in Sydney in 2017 one of the light installations used these symmetrical letters to make a display using motivational words, see below. You might get students to create their own words that could be used in a similar inspirational light and reflection show. Can they make words with only vertical symmetry letters or with only horizontal symmetry letters?


Rotational Symmetry
- Use the images shown below, and others you collect, to demonstrate rotational symmetry. Emphasise the following points:
- A figure has rotational symmetry if it can be rotated through less than 360o about a point to coincide with itself. For example, an equilateral triangle can rotate through 120o, 240o and 360o to coincide with itself. This means that an equilateral triangle has rotational symmetry of order three.
- Point symmetry is a special case of rotational symmetry. A figure has point symmetry if a half-turn makes the figure coincide with itself.
- The Mitsubishi logo, shown below, has rotational symmetry of order three and the Suzuki logo has rotational symmetry of order two.


Total order of symmetry
- Explain: By combining the line symmetry with the rotational symmetry, the total order of symmetry can be found. This is seen in the table below.
| Symbol | Line symmetry | Rotational symmetry | Total Symmetry |
| 1 | 1 | 2 |
| 1 | 1 | 2 |
| 3 | 3 | 6 |
| 0 | 2 | 2 |
Activity 2
The following activity is developed from the book The Cook Islands, Patterns of Polynesia by Ailsa Robertson – you may have this in your school or public library. Another good resource is The Art of Tivaevae by Lynnsay Rongokea. Understanding about tivaevae and the place they have in the daily and ceremonial life of Cook Islands society is as important as the geometry that we seek to understand.
This activity works well as a station and could be combined with other similar activities (e.g. Snazzy Snowflakes) that use the idea of paper folding to create designs with line and rotational symmetry.
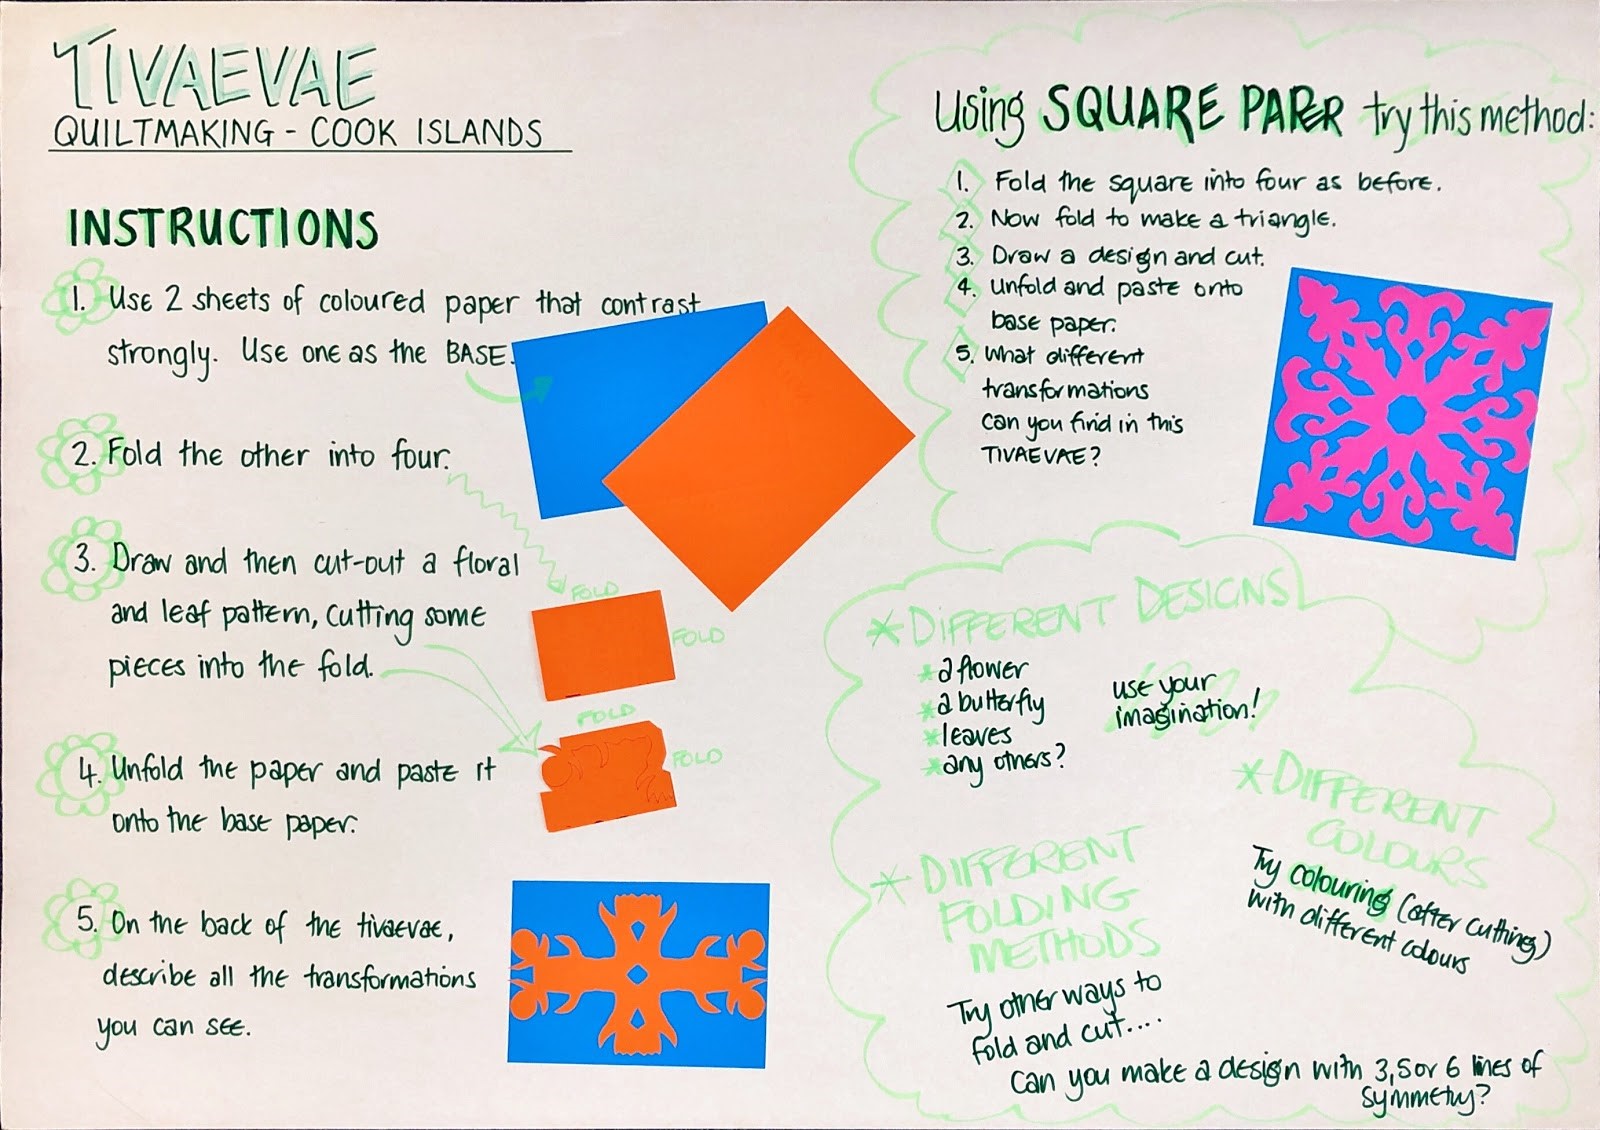
Instructions for making Tivaevae (display the image of instructions below for your students to refer to):
- Use 2 sheets of coloured paper that contrast strongly. Use one as the BASE.
- Fold the other into four.
- Draw and then cut-out a floral and leaf pattern, cutting some pieces into the fold.
- Unfold the paper and paste it onto the base paper
- On the back of the tivaevae, describe all the transformations you can see.
Instructions for using square paper:
- Fold the square into four as before.
- Now fold to make a triangle.
- Draw a design and cut.
- Unfold and past into base paper.
- What different transformations can you find in this tivaevae?
Suggestions for different designs:
- Flower, butterfly, leaves.
- Use different methods to fold and cut.
- Try colouring (after cutting) with different colours.
- Try to make a design with 3, 5, or 6 lines of symmetry.
Axes of Symmetry
Use Copymaster 2 to explore these concepts.
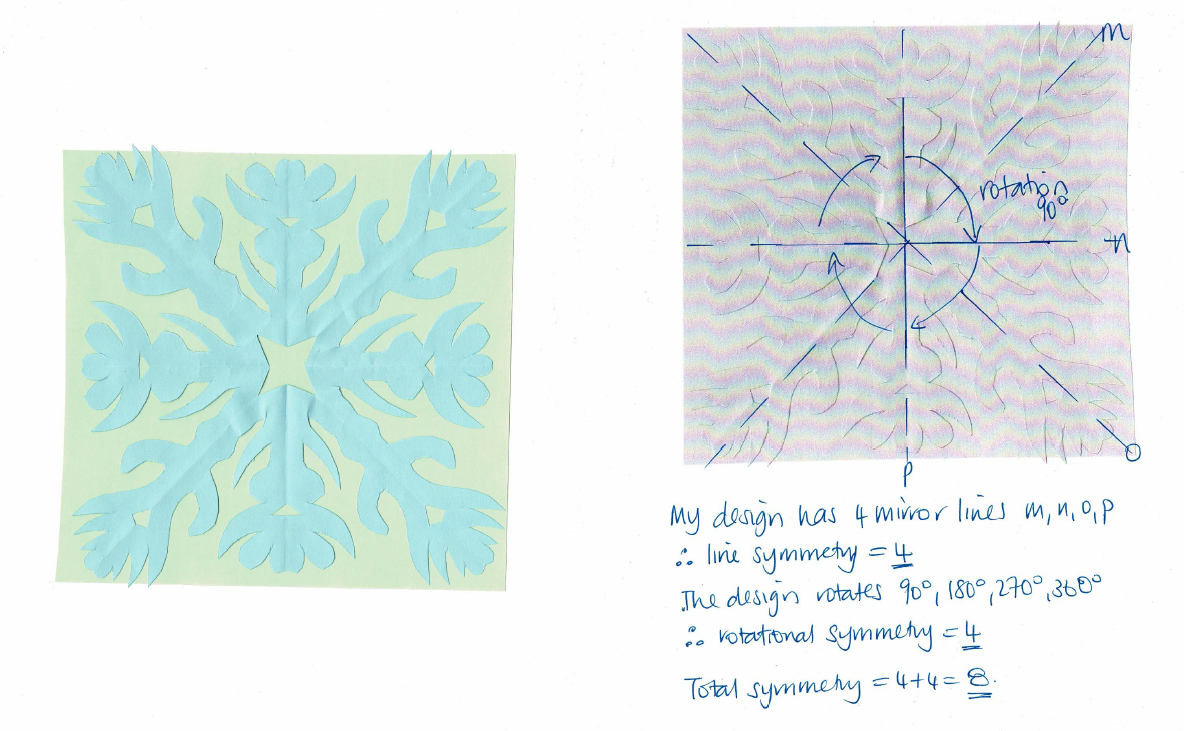
Regardless of the activity chosen to do with your students, it is important that as well as their design and creativity that the mathematics is identified within the design.
- Make a copy of students' finished designs and provide time for students to share these with their peers
- Support students to identify the lines of symmetry and the order of rotational symmetry on the copy of their design. Below is an example of what students might do to show their understanding of line, rotational and total symmetry.
Session 2
This session explores translations, reflections and rotations within the context of the seven frieze patterns. This knowledge is applied to the creation of kōwhaiwhai inspired designs. It is intended that it would take two to three lessons to complete. The activities explore translation, horizontal and vertical reflection, half-turn rotation and glide reflections.
The process within each activity is the same:
- Define the transformation
- Discuss how to describe the transformation
- Students practice using the transformation(s) to generate a frieze
- Students create a kōwhaiwhai rafter pattern for the frieze
Information about Translations
Translations involve a linear shift or slide of a figure in a plane.
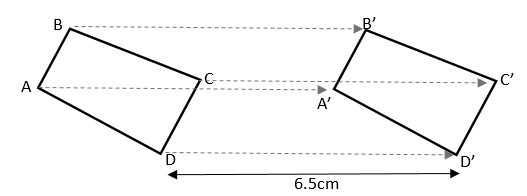
In the figure above quadrilateral ABCD has been translated to a new position in the plane (A’B’C’D’). Note that lines AA’, BB’, CC’ and DD’ are all parallel.
We would say quadrilateral ABCD maps to quadrilateral A’B’C’D’ under translation to the right of 6.5cm.
The properties of size, shape and orientation remain invariant (unchanged) under the operation of translation.
Translation allow us to repeat patterns.
Activity
- Using pre-prepared pattern blocks (Copymaster 3) demonstrate translation on the whiteboard. Print pattern blocks onto card and then use magnets to attach them to the whiteboard. Note that the teacher pattern block shown below has pre-reflected pattern blocks to use.
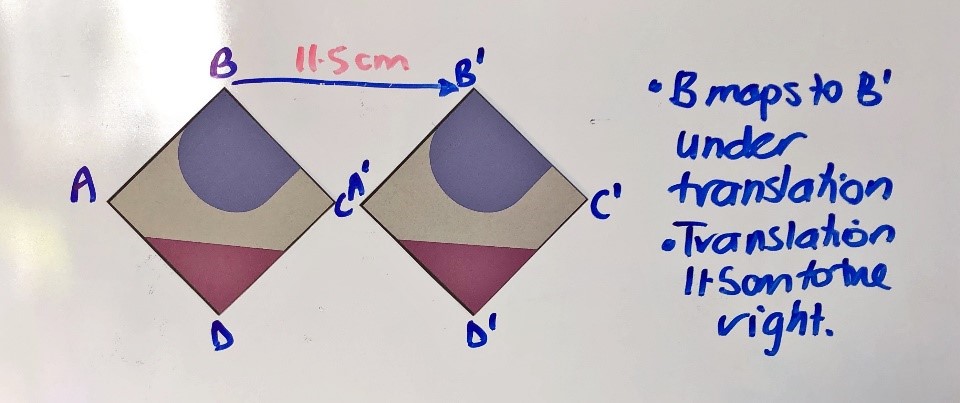
ABCD maps to A’B’C’D’ under translation 11.5cm to the right.
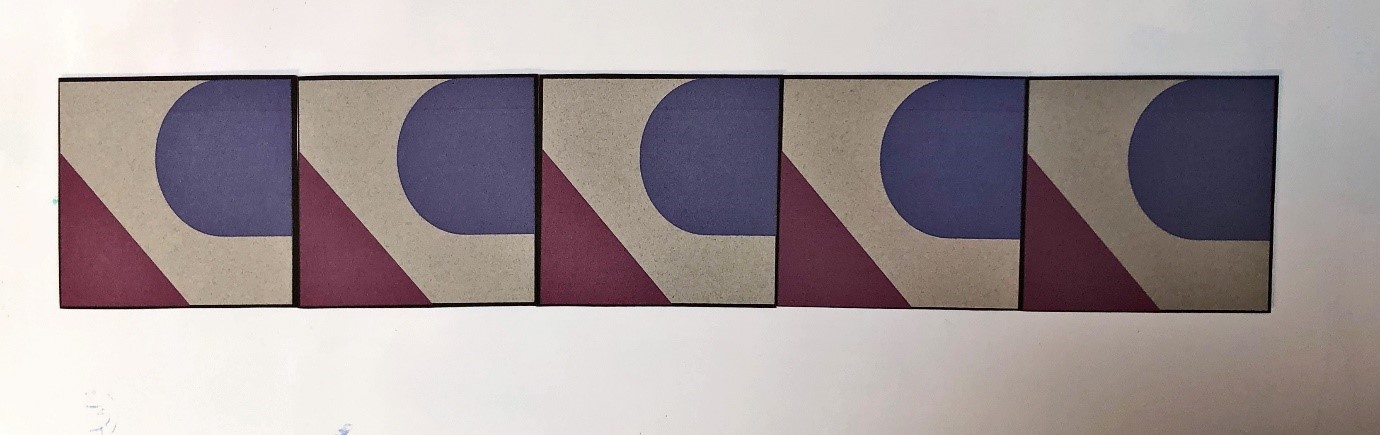
- Then show how a pattern piece (base pattern) can be repeated using translation in a single direction to create a frieze pattern (picture below).
- Provide students with Copymaster 4 part A and have them practise using translations.
- After a suitable time, ask students to share their work with a partner. They should describe the distance and the direction of the translation on their sheet.
Creating kōwhaiwhai rafter patterns
In this activity students will create their kōwhaiwhai base pattern shape most likely based on the koru. The station below is based on ideas from Kōwhaiwhai Geometry of Aotearoa by D F McKenzie. As with the tivaevae understanding about the historical aspects of kōwhaiwhai and the significance they have for local iwi will enhance students’ engagement with the craft. See the Auckland Museum resource kōwhaiwhai Tuturu Māori for background to the history and significance of kōwhaiwhai.
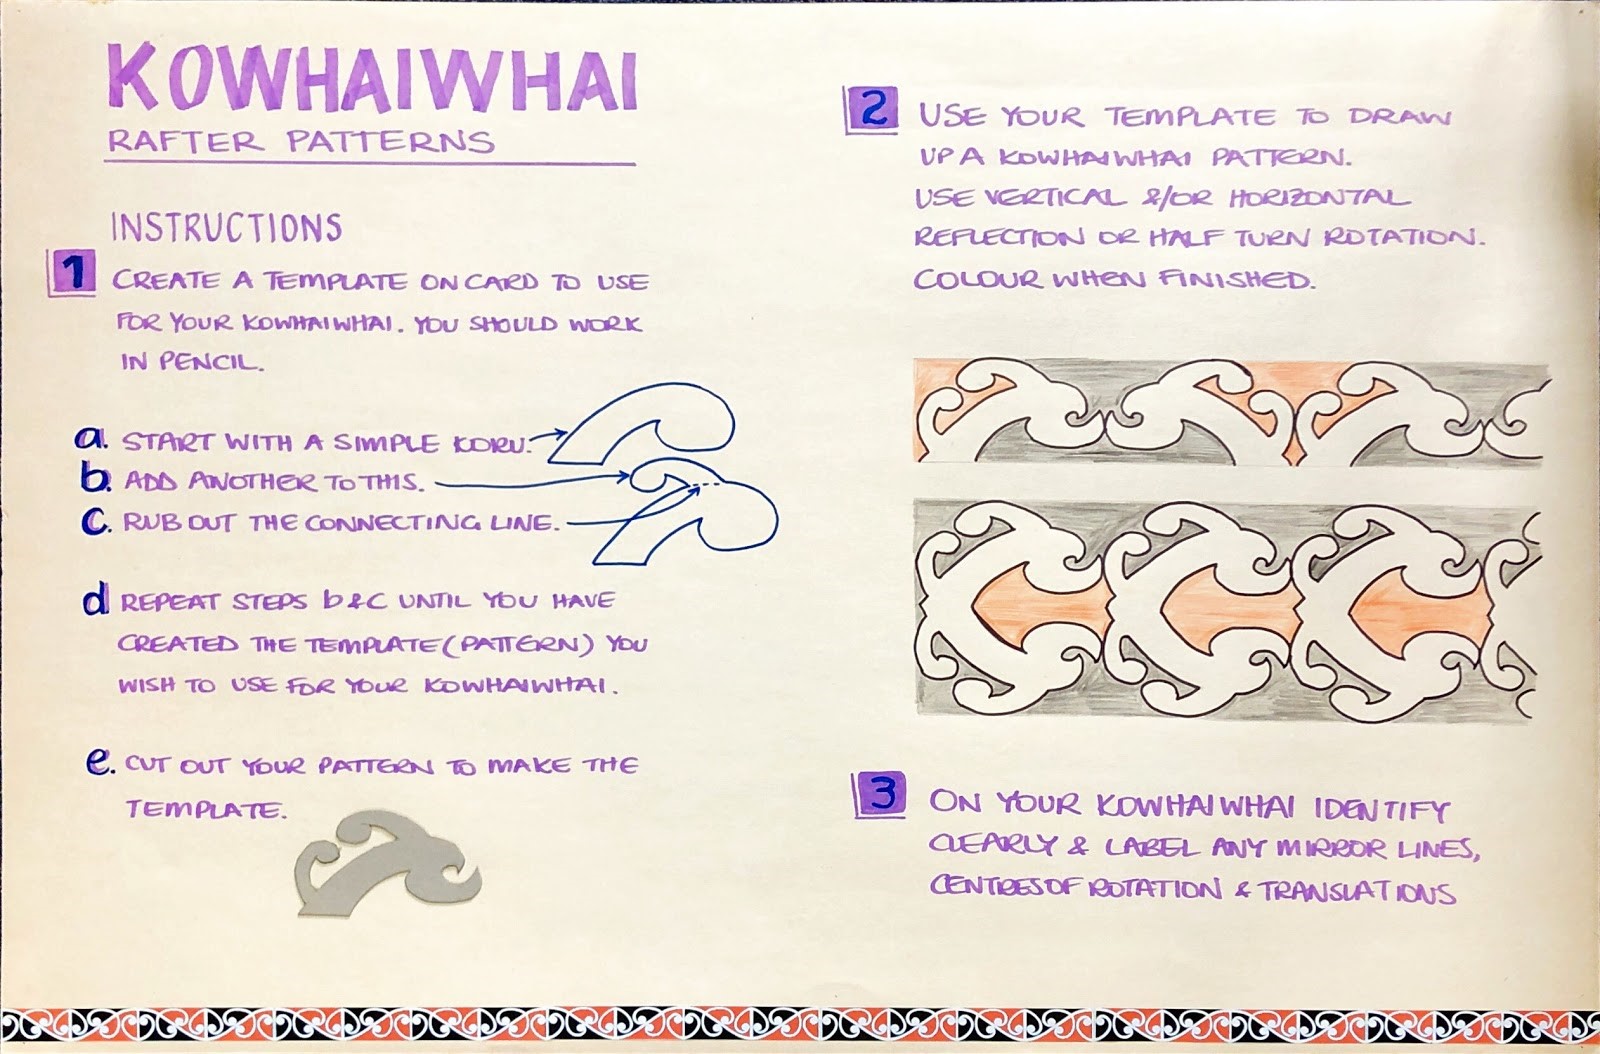
Instructions for making kōwhaiwhai rafter patterns (display the image of instructions below for your students to refer to):
- Create a template on card to use for your kōwhaiwhai. You should work in pencil.
- Start with a simple Koru.
- Add another to this.
- Rub out the connecting line.
- Repeat the first and third steps until you have created the template (pattern) you wish to use for your kōwhaiwhai.
- Cut out your pattern to make the template.
- Use your template to draw up a kōwhaiwhai pattern. Use vertical and/or horizontal reflection or half turn rotation. Colour when finished.
- On your kōwhaiwhai, identify and clearly label any mirror lines, centres of rotation, and translations.
Note: the stem part of the koru should be even.
Linked activity https://nzmaths.co.nz/resource/k-whaiwhai
In the third part of this activity students design a base template, that they can use in subsequent activities to generate their kōwhaiwhai rafter patterns, based on each of the seven friezes. As each activity is completed students will create a kōwhaiwhai rafter pattern for the frieze. At the end of the activities students pick one of their seven kōwhaiwhai friezes to complete fully with colour and then they notate a copy showing the different transformations involved.
The process for designing a base template based on the koru:
- Use robust card.
- Students cut out their base template.
- Students use the base template to generate a frieze using translation only into their maths book (or similar).
- Retain the base template for further use as the remaining six friezes are explored.
Information about reflections
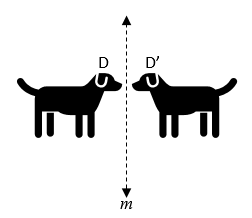
A reflection is the flipping of points of the plane about a line, called a mirror line. The properties of size and shape remain invariant (unchanged) under the operation of reflection. In the figure below, the figure is reflected through line m. D’ is the reflected image of D, and D is the reflected image of D’.
Mirror lines are usually labelled with small italic letters.
Horizontal and vertical reflections
A reflection is described by the direction of the mirror line. In the figure above the mirror line is vertical, so this would be an example of a vertical reflection. That is D is reflected in the vertical mirror line m.
Similarly, a horizontal reflection happens when a figure is reflected in a horizontal mirror line. In the example below D is reflected in the horizontal mirror line. D maps to D’ under reflection in mirror line n.

Activity
- Use pre-prepared pattern blocks to show the reflections described below on the whiteboard. Note that the teacher pattern block master has pre-reflected pattern blocks to use for reflections.
Horizontal reflection
ABCD maps to A’D’C’B’ under horizontal reflection in mirror line m.
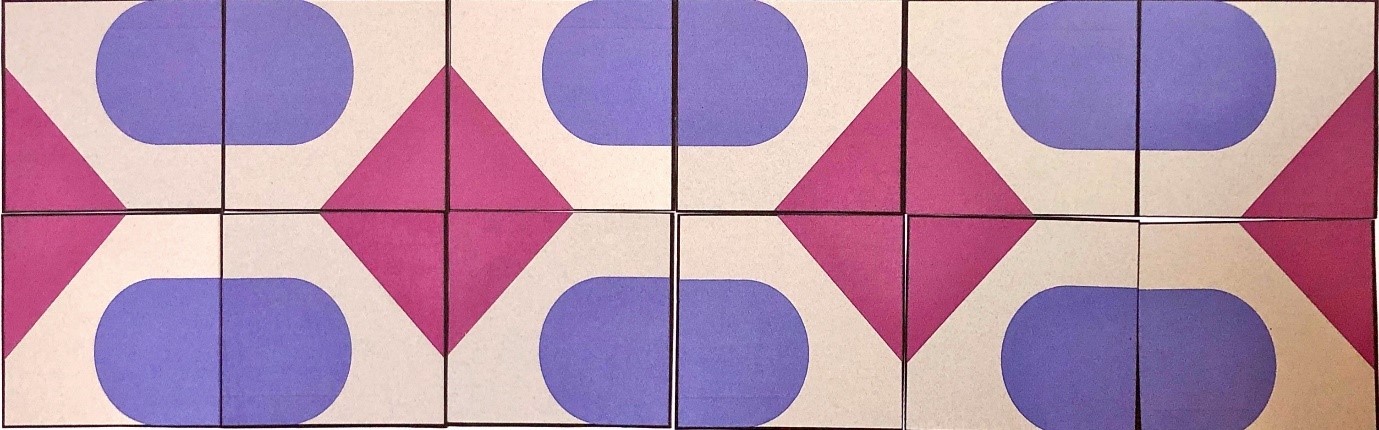
By making the horizontal reflection a new “base” pattern is generated. This base pattern is repeated using translation in a single direction to create a frieze pattern (picture below).
Vertical reflection
ABCD maps to A’D’C’B’ under reflection in the vertical mirror line n.
By making the vertical reflection a new “base” pattern is generated. This base pattern is repeated using translation in a single direction to create a frieze pattern (picture below).

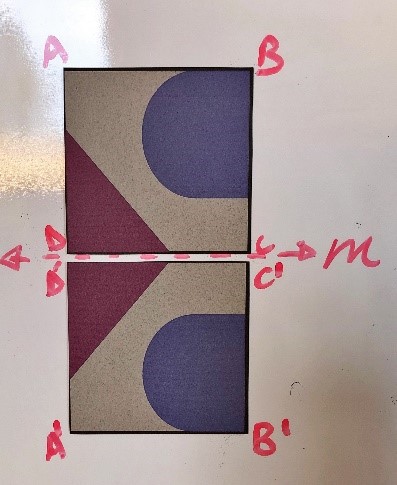
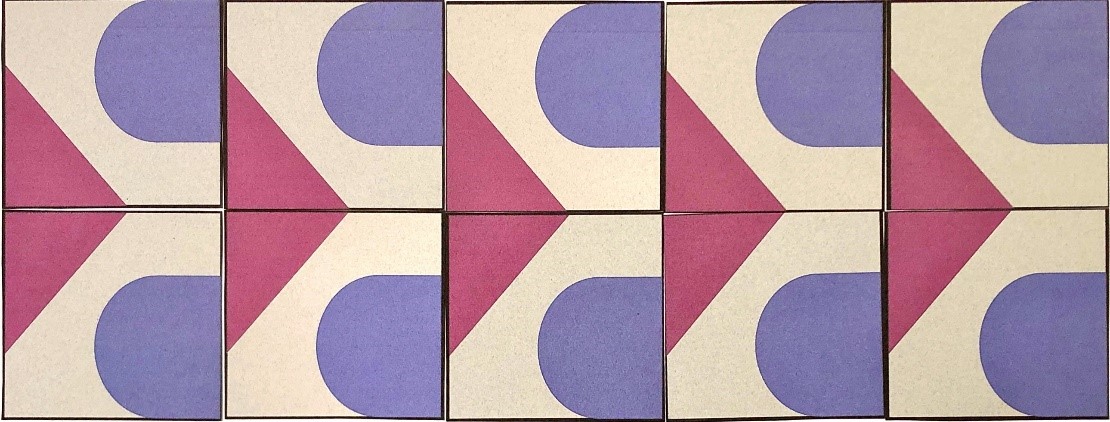
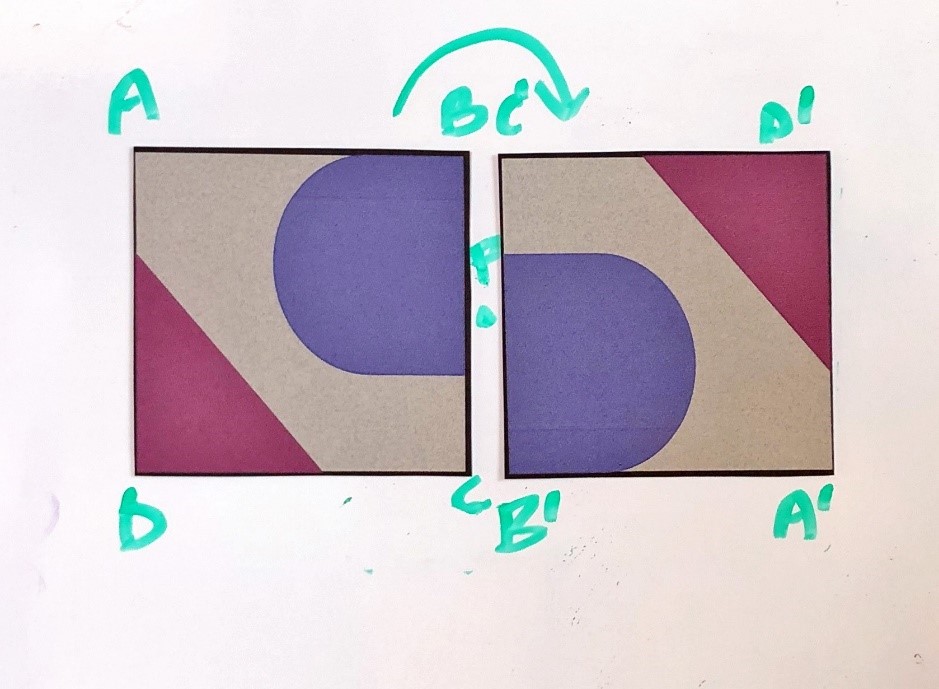
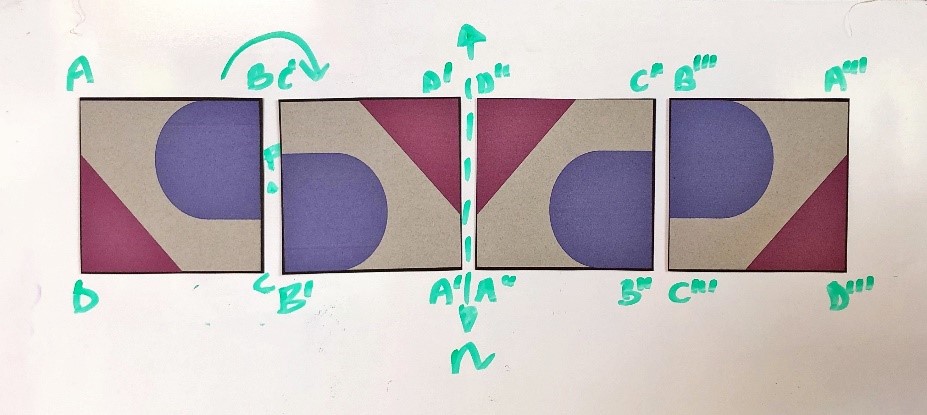
Horizontal and vertical reflection
ABCD maps to A’D’C’B’ under horizontal reflection in mirror line m. This gives a new shape ABB’A’.
ABB’A’ maps to B’’’A’’’A’’B’’ under vertical reflection in mirror line n.
By making the horizontal and vertical reflection a new “base” pattern is generated. This base pattern is repeated using translation in a single direction to create a frieze pattern (picture below).
- Provide students with time to practise using the student worksheet Copymaster 4 part B, C and D using horizontal reflections, using vertical reflections and using horizontal and vertical reflections.
- After a suitable time, have students share their work in pairs. They should describe the reflections on their sheet, identify and label the mirror lines, and show the distance and direction of the translation on their sheet.
Instructions for continuing the creation of kōwhaiwhai rafter patterns
- Have students use the base template to generate the three friezes generated by reflections and translation into their maths book (or similar).
Information about rotations
A rotation involves turning a figure in a plane about a given point in the plane, called the centre of rotation. The properties of size, shape and orientation remain invariant (unchanged) under the operation of rotation. In the picture below, the figure is rotated 90o clockwise about the point P. S has been rotated to a new position in the plane (object S’). Point P is the centre of rotation.
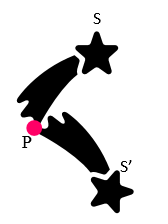
The centre of rotation may or may not be a point on the figure itself.
Half turn rotations
Half turn rotations are when the amount of the rotation is 180o. Only half turn rotations are used in frieze patterns.
Activity
- Use pre-prepared pattern blocks to show two further friezes on the whiteboard or similar. The teacher pattern block master has pre-reflected pattern blocks to use for reflections.
Half-turn rotation
ABCD maps to A’B’C’D’ under half turn rotation about point P.
By making the half turn rotation a new “base” pattern is generated. This base pattern is repeated using translation in a single direction to create a frieze pattern (picture below).

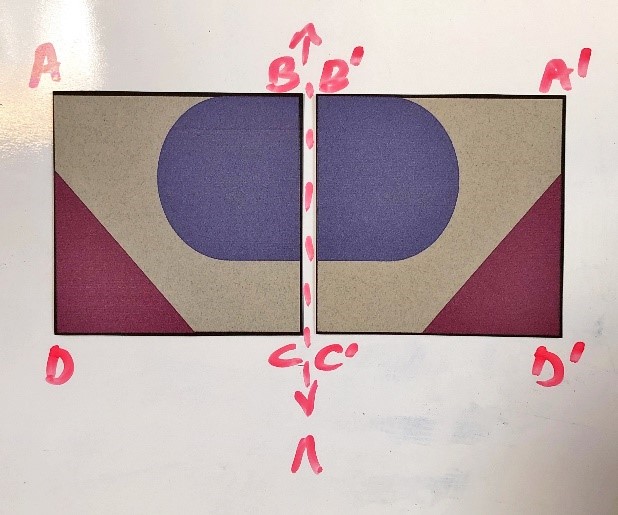
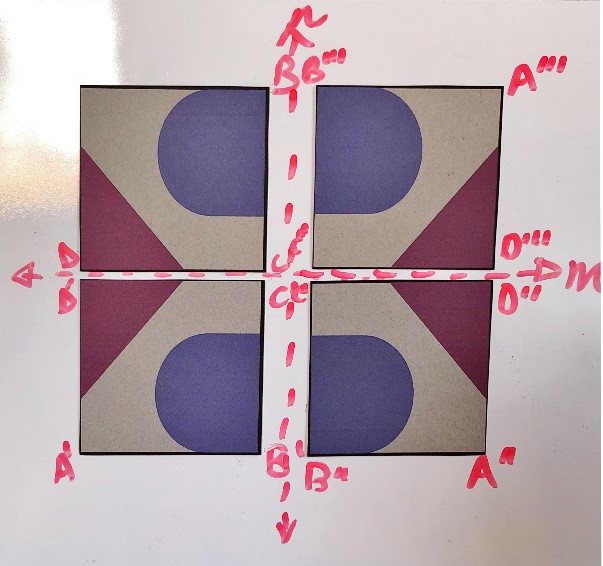
Half turn rotation and vertical reflection
ABCD maps to A’B’C’D’ under half turn rotation about point P creating figure AD’A’D. AD’A’D maps to D’’A’’’D’’’A’’ under vertical reflection in mirror line n.
By making the half turn rotation and vertical reflection a new “base” pattern is generated. This base pattern is repeated using translation in a single direction to create a frieze pattern (picture below).

- Students can practice using the student worksheet Copymaster 4 part E and F using half turn rotations and using half turn rotations and vertical reflections.
- Students describe the rotations on their sheet marking the centre of rotation, describe the reflections on their sheet, marking in the mirror lines and labelling them and showing the distance and direction of the translation on their sheet, marking the sheet to show the translation.
Instructions for continuing the creation of kōwhaiwhai rafter patterns
- Students use the base template to generate the two friezes generated by half turns and vertical reflections and translation into their maths book (or similar).
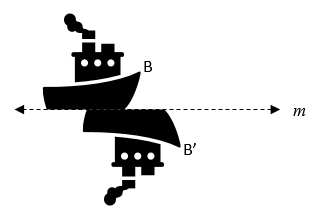
Information about glide reflections
A glide reflection involves both a reflection and a translation along the mirror line in a single operation. The properties of size and shape remain invariant (unchanged) under the operation of glide reflection. In the picture below, the figure is reflected in the horizontal mirror line m and then translated to the right.
Activity
- Use pre-prepared pattern blocks to show the final frieze on the whiteboard or similar. The teacher pattern block master has pre-reflected pattern blocks to use for reflections.
Glide reflection
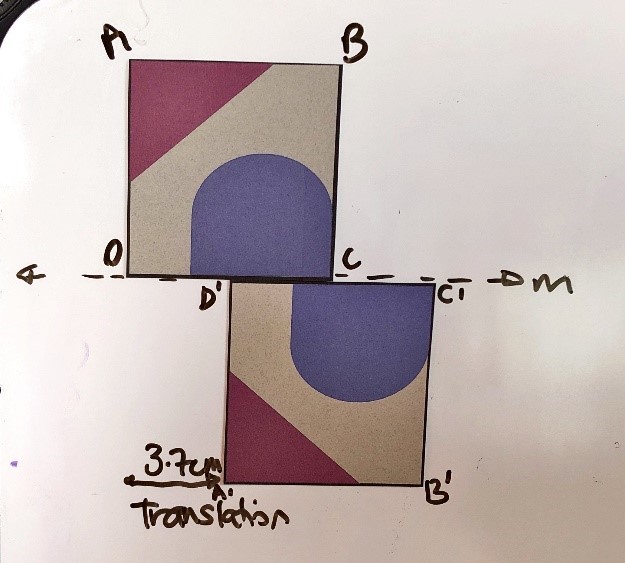
ABCD maps to A’D’C’B’ under horizontal reflection in mirror line m and translation to the right of 3.7cm.
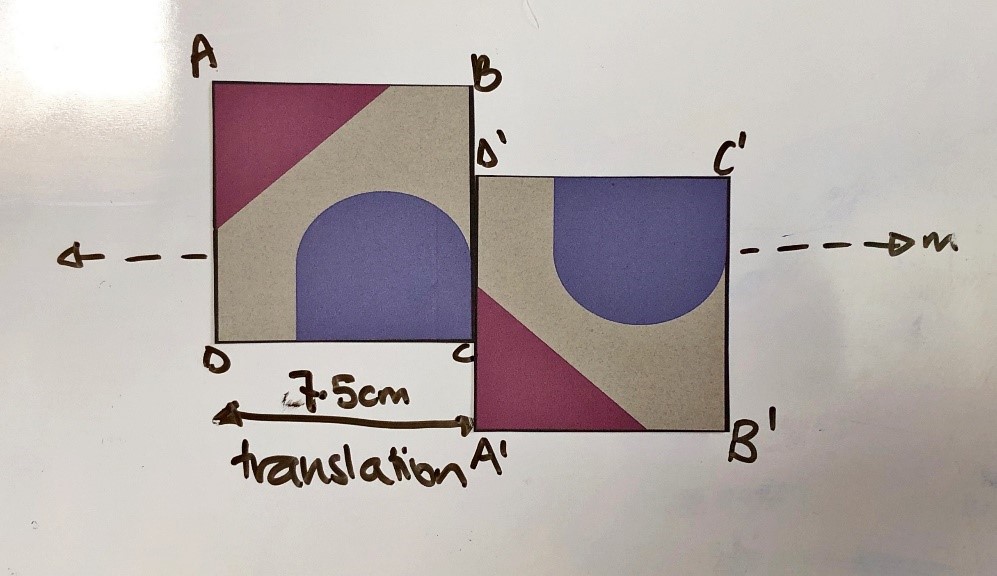
ABCD maps to A’D’C’B’ under horizontal reflection in mirror line m and translation to the right of 7.5cm.
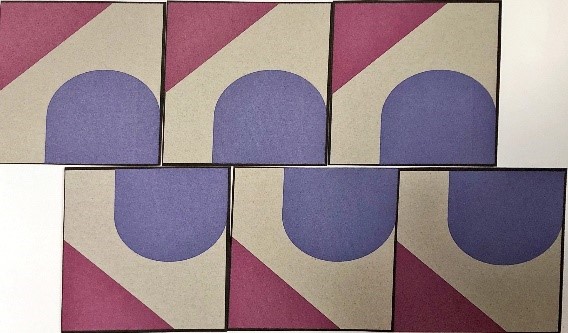
By making the glide reflection a new “base” pattern is generated. This base pattern is repeated using translation in a single direction to create a frieze pattern (two example pictures below).
- Students can use Copymaster 4 part G to practise using glide reflections.
- Students can describe the glide reflections on their sheet. They should mark in and label the mirror line, describe the translation for the glide reflection, then mark the sheet to show the distance and direction of the translation on their sheet.
Instructions for continuing the creation of kōwhaiwhai rafter patterns
- Students use the base template to generate the final frieze generated by glide reflections and translation into their maths book (or similar).
- Ask students to select one of the friezes and do a final design on paper, following the process specified below:
- Draw the frieze onto paper. Using strips of A3 paper cut longways works well.
- Draw a border to “contain” the frieze.
- Use the traditional colours of red and black to finish the kōwhaiwhai rafter pattern. Students should check that the transformations still hold with the colour.
- A copy of the student’s finished frieze can be made and used by students to demonstrate the various transformations.
- A follow up activity could be to find examples of kōwhaiwhai online, for example the national library (search national library + kōwhaiwhai), and to get the students to identify the different transformations in the kōwhaiwhai. They should show mirror lines, centres of rotation and the translation of the base pattern. Students can then identify which of the seven frieze patterns using Dr Gordon Knight’s classification for friezes. Knight used letters to show the differences between the seven patterns. Use the flow chart below.
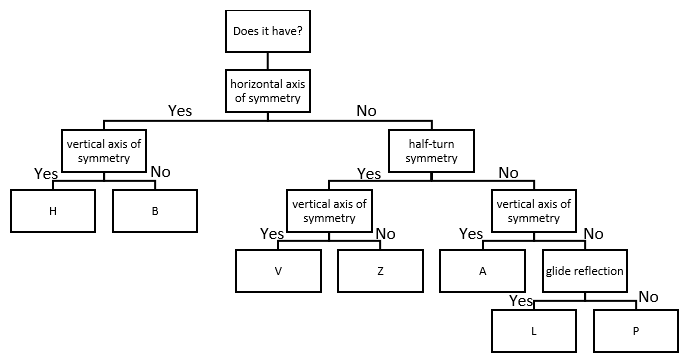
P – no special properties (translation only)
B – horizontal mirror line
A – vertical mirror line
H – vertical and horizontal mirror lines
Z – half-turn rotation
V – half-turn rotation and vertical mirror line
L – glide reflection
Session 3
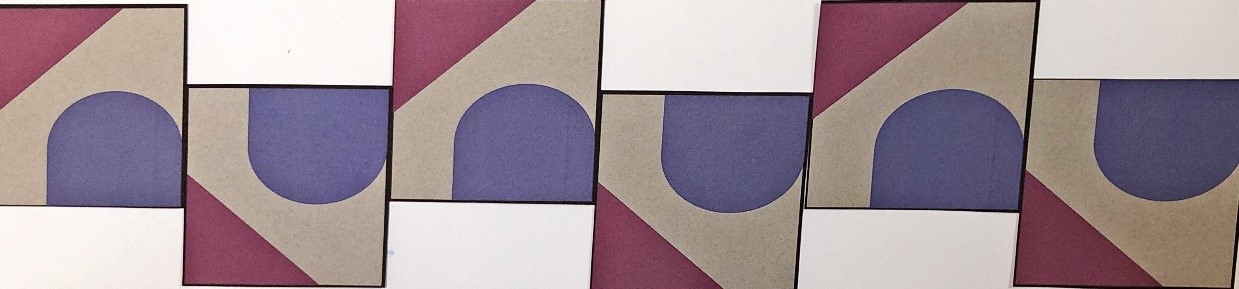
This session asks students to apply the knowledge of translations, rotations, reflections and symmetry that they have developed through sessions and 1 and 2 to the creation of Escher-type tessellation inspired designs. It is intended that it would take one to two lessons to complete. Note, students could use reflections in their designs, although this is a harder skill.
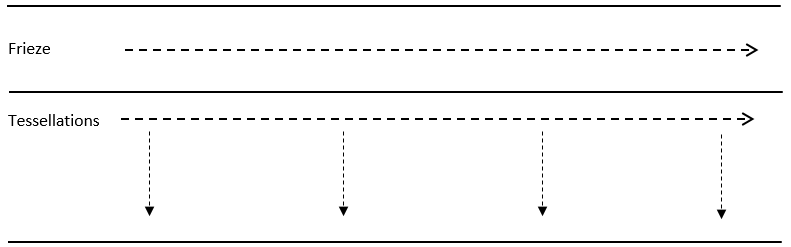
Information about Tessellations
Tessellations are like frieze patterns. They both repeat a base pattern using transformations. However, frieze patterns are one dimensional, meaning they repeat through translation in one direction, whilst tessellations repeat in two dimensions, through translation in two directions.
As with frieze patterns a base pattern is created that is then repeated. The resulting tessellation has different transformations present as with the friezes.
To create a base pattern for an Escher-type tessellation there are some techniques that are used:
- The “nibble” and slide
- The “nibble and rotate (at a corner, at the midpoint of a side)
- Combination of above
With tessellations the design covers the page. There are no gaps and all the pattern pieces fit together.
Activity
The main aim of this activity for students to create an Escher-type tessellation that they can add to their design pool of ideas for their fabric project. The Escher-type tessellations station below would provide enough to create Escher-type tessellations. Alternatively, teachers could work with each of the transformations before the students make their design piece. See the units Escher Envy and Tessellating Art for further teaching ideas.
- Show examples of Escher and Escher-type tessellations. These can be found by searching Escher tessellations.
- Read through the instructions (shown below) for making Escher type tessellations and model making one or more tessellations.
- Provide time for students to create their own tessellating template and use this to cover the page. If possible, they should look to see if an object or animal can be made from their template (see Escher examples). Encourage students to colour in their design, being aware of how colour might affect the transformations present.
- Make a copy of the finished designs, provide these to students to share and compare, and then get students to identify and note the transformations present in their design on the copy.
- Have students select one of their designs to take forward into their fabric project.
- Use copies of students' work for formative or summative assessment.
Instructions for making Escher type tessellations (display the image of instructions below for your students to refer to):
Creating a tessellating template
- Take a square of card 5 cm x 5 cm.
- Colour one side.
- Table a 'nibble' from one side of the square. Cut from corner to an adjacent corner.
- Slide the 'nibble' directly across to the other side of the square.
- Tape the 'nibble' securely to the other side.
- Do a second 'nibble' following steps 3-5. You now have a tessellating template.
Tessellating with your template
- On a sheet of paper, starting in a corner, trace around your template.
- Slide your template along and down, tracing around it each time.
- Take care in lining up the shapes.
- Be careful not to flip it over. Always keep the coloured side up.
Other Designs
- Rotation at a corner.
- Rotation at a midpoint: Use a rule to mark mid point. Take 'nibble'. Repeat on all four sides.
- Combination: Do a midpoint on 2 opposite sides. Do a slide (steps 3-5) for the other two sides.
- Try using an equilateral triangle.

Session 4
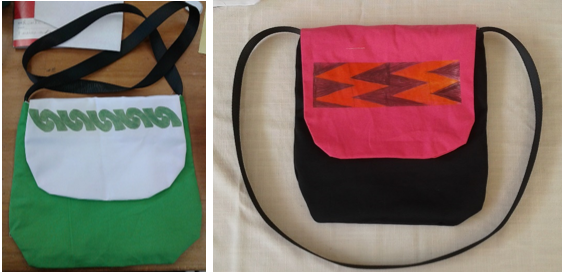
In this session students print their completed design onto t-shirt transfer paper to be ironed onto their fabric or t-shirt. An inkjet printer is needed for this. Some students chose to make a bag using their geometric design as a feature strip, others used their design for a pencil case. Allow three to four lessons in the sewing room to complete the project.
Examples of student work
Bags
Hanging picture and cushion cover
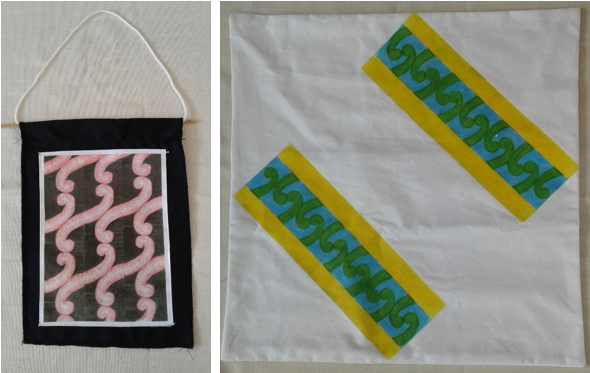
Pencil cases

Session 5
In this session students learn about circles and cylinders with a aim of making a cylindrical bag, pillow or pencil case. This could take three to four lessons.
- Revisit the concept of circles and introduce students to the process of finding the circumference of a circle. Check that students understand what it meant by circumference, radius, and diameter.
- Use a suitable activity, such as the one described below, or another (e.g. Around we go, Circle links from nzmaths), to find pi, π, and develop a formula for finding the circumference of a circle.These activities could be done in the sewing room alongside students finishing up their first project.
Activity 1: What is the ratio of diameter to circumference?
- Place circular items such as jar lids, wastebaskets, hula hoops, cans, circular containers around the room.
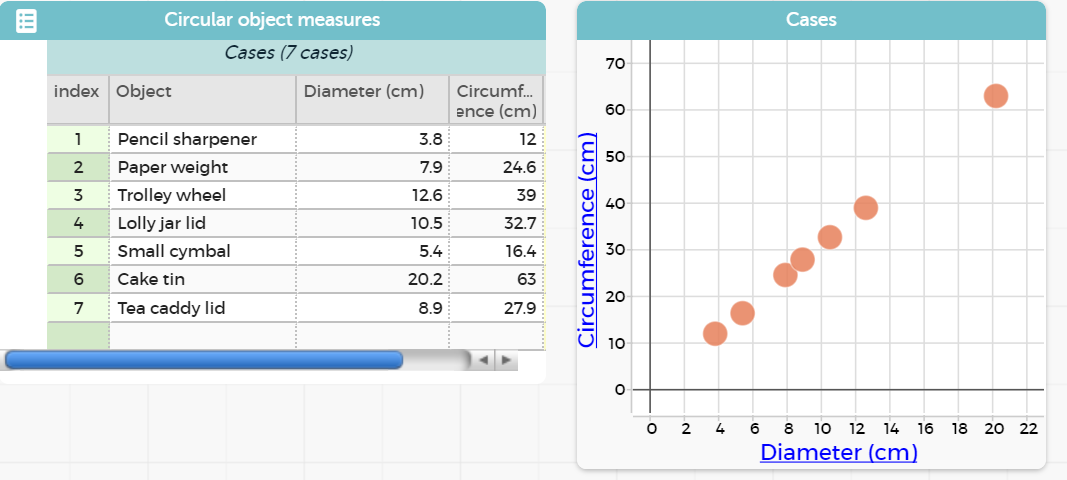
- Group students appropriately. Explain to students that they will measure the diameter and circumference of each object, and record these measurements in a table (see below). Each group will need string and a ruler or measuring tape. Model how to measure each attribute. Students should record the measurements for at least 10 objects.
| Object | Diameter of the circle (cm) | Circumference of the circle (cm) |
- As an extension, students could make a plot of diameter (x) and circumference (y). This could be done using CODAP or another form of graphing software. Put the information into a table and then graph diameter and circumference on the same graph. Encourage students to notice that the points are roughly in a line, which suggests that there is a relationship between the diameter and the circumference of a circle. This can be explored further by adding a new column and calculating the ratio of circumference to diameter.
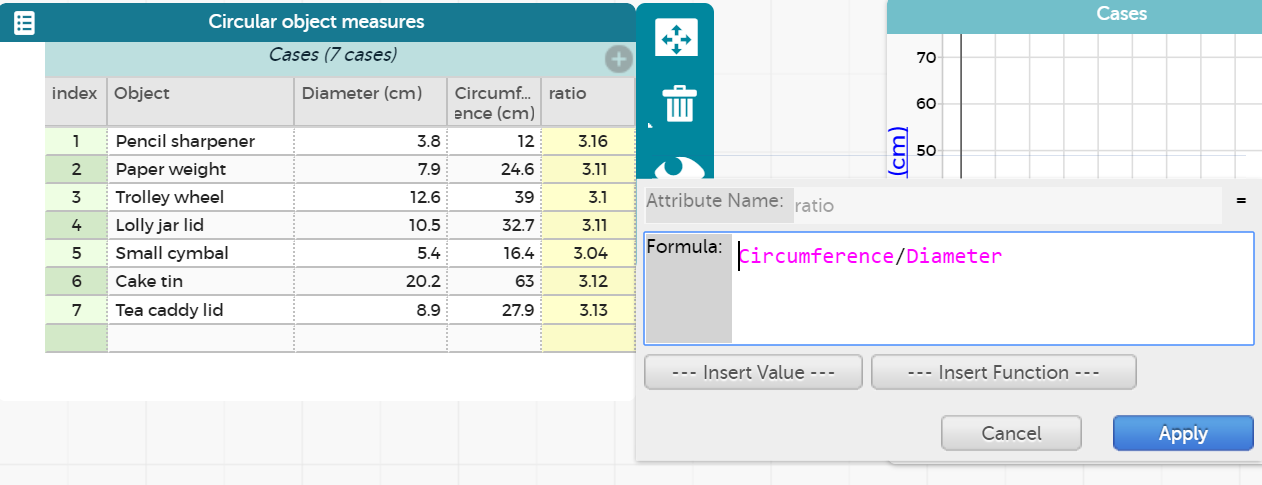
The picture above shows the formula to put in (RHS window). The yellow column in the table shows the calculations made.
Consider the following key ideas:
- The ratio found in the activity above is called pi and is represented by the symbol π.
- We have π = Circumference ÷ diameter. If we rearrange this, we get Circumference (C) = π x diameter (d) or C=πd.
- We also know that the diameter = 2 x radius so another formula for Circumference is 2 x π x radius (r) or C = 2πr.
- C = πd or C = 2πr
Appropriate, subsequent practice activities could include a mixture of diameter and radius problems with diameter/radius given, or circumference given to find diameter/radius. You could also include problems that require measuring diameter/radius to find the circumference. See the Figure It Out activity On the Right Track for a practical application of circumference.
Activity 2: Find the area of a circle.
In this activity students investigate the area formula for circles: A = πr2.
- Have students cover a circle with square units and see how many of these units cover a circle. The key to this approach is the students need to get a measure of the radius from the sides of the tiles. See the arithmetic approach in the area of a circle activity.
- Alternatively, have students cut the circle into sectors and rearrange them to look more like a parallelogram. The more sectors the closer the shape is to a parallelogram. See the conceptual algebra approach in the area of a circle activity. You can use Copymaster 5 for students to cut and paste to make their own parallelogram.
Activity 3: Connect ideas about the net of a cylinder to surface area of a cylinder.
- Tell students they Swill create their own cylindrical project (e.g. a sports bag, a pillow or a pencil case).
- Provide students with a variety of cylinders to look at.
- Pose the question: In order to design the pattern and get the dimensions right what do we need to know?
- Using the provided models of cylinders, have students describe the surface area and the shapes that make up the surface area.
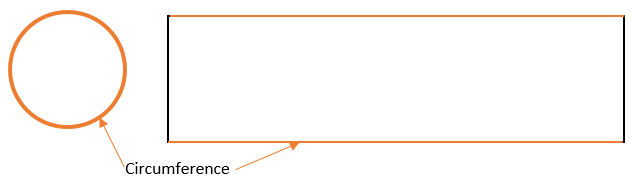
If we “unwrapped” the cylinder what would we see?
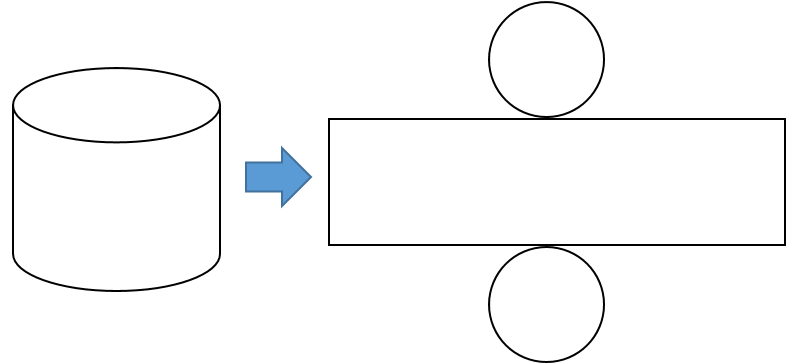
A cylinder when “unwrapped” has a circle at the top and the bottom and the wrap undoes to become a rectangle.
How do we know how big to make the rectangle if we have a fixed top/bottom (or end) circles?
How do we know what size to make the end circles if we have a fixed rectangle?
- Encourage students to see the connection between the circumference of the end circle and the length of the rectangle (they are the same).
- Model the following process, and support students to work through it:
- Circle to rectangle – find the circumference, this is the length (base) of the rectangle.
- Rectangle to circle – take the length of the rectangle, this equals the circumference. Circumference ÷ π = diameter of the circle. Diameter ÷ 2 = radius. The radius is the compass distance to draw the circle.
- Support students' understanding of surface area with further activities as required. Students ready for extension could investigate the volume of a cylinder.
- Support students to apply the connection between the rectangle and circle in a cylinder net to their own design for a cylindrical project. This should eventuate in students making their own pattern for their cylindrical project, remembering important sewing conventions such as allowing for seams, zips and other items.
- Use the following three to four lessons for students to create their cylindrical project, working through pattern design, construction, and evaluation of the success/nature of the technological outcome.
Session 6
This session explores 3D shapes over the course of two to three lessons.
- Together, explore 3D shapes, their properties and nets. Focus especially on the common properties of nets for prisms and pyramids and support students to create nets and construct solids. Activities might include:
Session 7
In this session students design nets for their last fabric project - design door stops. This builds on prior knowledge by asking students to identify which of the solids explored in session 6 would be suitable as door stops. Plan this session with reference to your students' knowledge and technical skills in sewing, their capacity for following technical instructions, and the resources you have available. If possible, invite a whānau, community member, or senior student to come and assist with the technical skills required.
- Have students design a door stop to be created using fabric. Students should consider the following:
- how they will adapt the solid to be made from fabric
- if any parts of the solid will need to be connected and folded up (and how this can be achieved)
- technical sewing issues: seam allowances, type of fabric, what they will fill their door stop with.
- Provide time, over the course of two to three lessons, for students to create their door stops from fabric, and tidy up any outstanding projects.
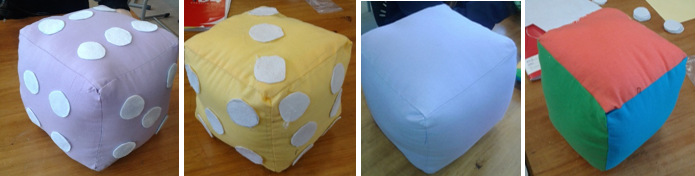
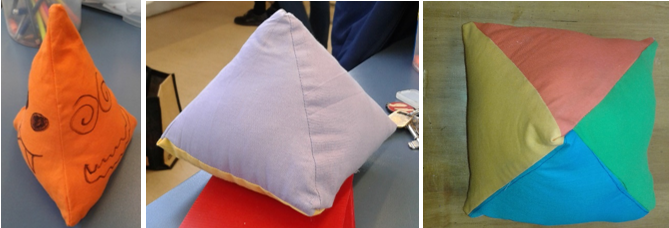
Examples of student work
Cubes
Pyramids
Dear families and whānau,
In class, we have been investigating geometry and measurement concepts (tessellations, reflections, rotations, symmetry, circles, 3D shapes, nets) in the creation of bags, door stops and other fabric items. With your child, explore which of these concepts you can see in your home and local area. Have your child share some of these to share with the class.