This unit examines the use of reflective and rotational symmetry in the design of plates. Traditionally, designers often used symmetry to make plates aesthetically pleasing, however, more modern designs are often asymmetric.
- Find all the lines of symmetry on a given shape.
- Identify the order of rotational symmetry for a given shape (how many times it "maps" onto itself in a full turn).
- Create designs which demonstrate reflection symmetry and rotational symmetry (orders 2, 3, 4, 6).
- Identify the invariant properties of a figure created using reflection and rotation.
This unit focuses on symmetry, particularly reflective and rotational symmetry. A shape has symmetry if it has spatial pattern, that is, it maps onto itself either by reflection about a line, or rotation about a point.
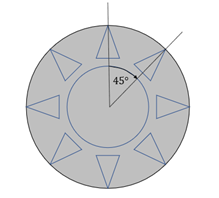
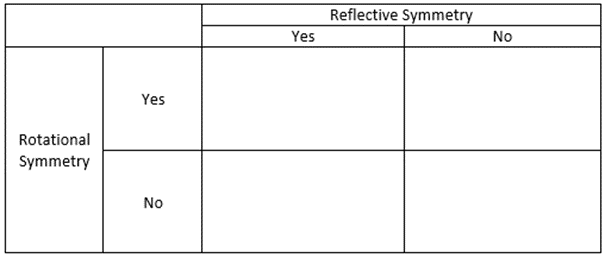
Consider the pattern on this plate. The whole figure is circular. Circles have infinite symmetry, so it is the arrangement of triangles within the circle that determines the symmetry of the whole design. There are eight lines where a mirror could be placed and the whole figure could be seen, with the image in the mirror forming the hidden half.
Four lines bisect opposite triangles:

Four lines bisect the space between opposite triangles:
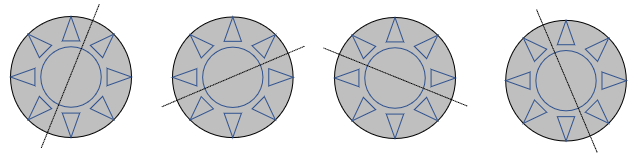
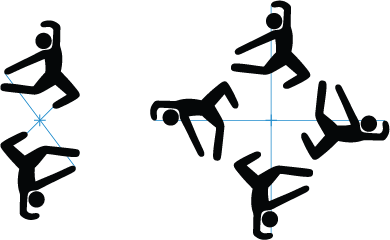
This pattern also has rotational symmetry about a point, with the point being the centre of the plate. In a full turn, the plate design maps onto itself eight times. Therefore, the design has rotational symmetry of order eight. Each turn of 45⁰ (one eighth of 360⁰, one full rotation) maps the design onto itself. This angle is referred to as the angle of rotation.
The mathematics of symmetry is found in decorative design, like kōwhaiwhai in wharenui, and wallpaper patterns, and motifs such as logos. Human beings are naturally appreciative of symmetry, possibly because it is prevalent in the natural world. Creatures are approximately symmetrical, and reflections in water are a common example of mirror symmetry.
The learning opportunities in this unit can be differentiated by providing or removing support to students, by varying the task requirements. Ways to support students include:
- ensuring that students have access to physical manipulatives that enable them to act out folds/reflections and turns of shapes
- explicitly modelling reflections and rotations, and expecting students to copy your actions in pairs and independently, before attempting problems independently
- helping students to represent reflections and rotations diagrammatically to ease memory load and support thinking, e.g. drawing lines of symmetry on a paper copy of a shape.
Tasks can be varied in many ways including:
- beginning with simple shapes with limited symmetry progressing to more complex shapes. In general, reflection symmetry is easier to see than rotational symmetry
- providing opportunities for students to work in collaborative groupings which allow them to scaffold, support, and extend each other
- reducing the demands for a product, e.g. diagrams with less reliance on writing sentences
- providing plenty of teacher support, modelling, question, and explicit teaching at each stage of the unit
- using digital technology, such as PowerPoint and drawing tools, to create symmetrical designs using a beginning element
The contexts for this unit can be adapted to suit the interests and cultural backgrounds of your students. Capitalise on the interests of your students. Symmetry is common across all cultures of the world. Kowhaiwhai patterns on the rafters of wharenui (meeting houses), and designs on Fijian tapa or Samoan siapo cloth usually involve symmetries. Look for examples of symmetrical design in the local community. Encourage students to capture symmetric patterns they see and use the internet as a tool for finding images. An internet search for symmetry reveals how prevalent geometric pattern is throughout the world.
Te reo Māori kupu such as hangarite whakaata (line symmetry, reflective symmetry), rārangi hangarite (axis of symmetry, line of symmetry), tau hangarite (order of symmetry), hangarite hurihanga (rotational symmetry), and hangarite (symmetry, symmetrical) could be introduced in this unit and used throughout other mathematical learning
- Design equipment (rulers, compasses, protractors, set squares)
- Circular lids
- Mirrors
- Scissors
- Paper plates or circles (easily cut out of newsprint in batches by stapling the centre of a traced circle)
- Copymasters One, Two and Three
- PowerPoint One
- PowerPoint Two
- PowerPoint Three
- Resources for creating plate designs
Session 1: Getting Started
- Show your students examples (or pictures) of ceramic plates. Discuss the patterns on the plates.
Why do plates have patterns?
How could we describe the patterns? (Note that many plates do not have symmetric patterns though translation (shifting) is common)
Can you think of any symmetrical patterns around your house, our school, our community? Students might take photos of examples of symmetrical patterns from their local environments and share these with the class.
This week our focus is on symmetry or non-symmetry of plate patterns. Encourage your students to take digital photographs of interesting plate designs from home, and/or collate a page of interesting plate designs from the internet, magazines, newspapers etc. Create a shared collection of plate patterns either online or as a classroom display. - Share the story of Crown Lynn, a New Zealand company that started as a maker of clay pipes, and changed into making crockery during World War 2. Your students might be interested in researching the history of Crown Lynn. Crown Lynn pottery is now very collectable, and some students might have relatives who collect and trade in the items.
Search online for “Crown Lynn” to find examples. - Share PowerPoint One, which has examples of Crown Lynn plates. Discuss the symmetry or asymmetry of each plate. Points to bring out in the discussion are:
- What symmetry, if any, does each design have?
- Where are the lines of reflection symmetry for the first plate design?
- What is true about both sides of a mirror line? (distance of points to the mirror, areas, angles, etc.)
- What symmetry does the Polynesian design have?
- What angles can the plate be rotated through and still appear the same? (multiples of 120⁰)
- How can you tell if a plate design is asymmetric (has no symmetry)?
- Give each student a copy of Copymaster One and ask them to complete the plate patterns as accurately as possible. Look to see if students apply the properties of reflection and rotation correctly. Rulers will be useful. Mirrors can be used to check the reflection patterns, and a cut out of the rotating element can be moved to check rotations. Roam and support students. You might work with a small group of students to provide more targeted support, whilst other students work in pairs and on their own
- Share the completed patterns as a class. Address issues such as length of image points from the line of reflection, and orientation of the image in both reflection and rotation.
Session Two: Creating patterns
- Use PowerPoint Two to introduce the use of reflection and rotation to create plate designs. Pay attention to the invariant properties that must be met, particularly distance from the mirror line and distance from the centre of rotation. Also consider orientation (direction) of the figure and its image for both transformations, reflection, and rotation. Develop important language around symmetry such as reflection, rotation, line of symmetry, centre of rotation, order of symmetry, angle of rotation.
- You may find that students need some work on the measurement of angle. Use targeted whole class and small group teaching to develop the knowledge necessary for the rest of the session. Refer to these units for ideas about teaching angles:
- Provide your students with a copy of Copymaster Two. This copymaster shows copies of the same figure. Note that the position of the arms and legs becomes important later in establishing whether or not an image is a reflection or rotation, or possible just a translation (shift). Students will also need rulers, mirrors, and protractors.
- Start simple with a single line of reflection symmetry. Ask students to draw the line horizontally or vertically in their book. Tell them to create a symmetrical picture of a single figure and its reflected image.
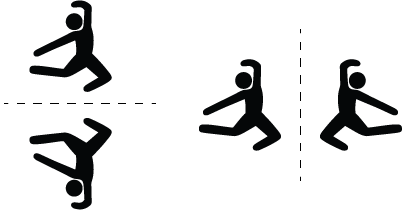
Look for students to attend to invariant properties, particularly distance from the mirror line and orientation of the figures. A mirror can be placed along the line to see if the visible image matches what is on paper. - Share students' ideas and confirm and model the drawing of the lines of symmetry.
- To make reflection more difficult, change the orientation of the mirror line. This will encourage students to pay more precise attention to the invariant properties.
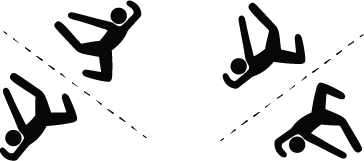
- Progress to rotational symmetry, starting with the simplest transformations, half, and quarter turns. Connect points on the original figure to corresponding points on the image to ensure both are the same distance from the centre of rotation. Measure with a ruler to check.
- Give students, either as individuals or pairs, opportunities to create their own symmetrical plate design using the human figure. Encourage them to experiment with the orientation of the line of symmetry, the angle of rotation, and to possibly combine reflection and rotation. Consider the needs demonstrated by your students throughout this session and provide small group or individualised teaching in response to these.
- Gather students together and provide time for them to share their plate designs. Discuss the symmetry demonstrated. Model, if necessary, and review the different kinds of symmetry introduced in this session.
Session Three: What symmetry, if any, do the plate patterns have?
- Use either digital photographs of plates from home, or PowerPoint Three, to classify designs by symmetry. Many plates are attractive yet have no symmetry. Discuss the symmetry of chosen designs and how symmetry can be found. You might use cut out figures from Copymaster 2 to demonstrate each of the following, useful points.
- Lines of reflection can be found by looking for a line that cuts the design exactly in half. If the line is correct, then a mirror can be placed on it, and the design will appear whole. The image in the mirror creates the other half of the design.
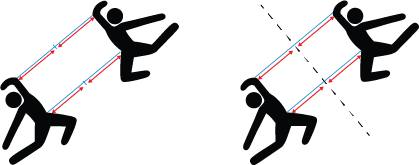
- The exact positioning of a line of symmetry can be found using measurement. The image of any point must be the same perpendicular (at 90⁰) distance from the mirror line as the point itself. If two measurements are taken the line can be drawn.
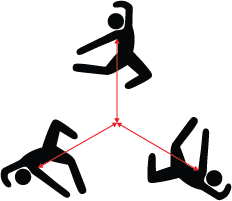
- At this level the centre of rotation of a plate design can be approximated. To find the exact position requires finding perpendicular bisectors which might be a topic of research for able students. A good check is to see if measures between the same points on each figure and the centre are equal. The centre point approximation can be adjusted until the distances are equal
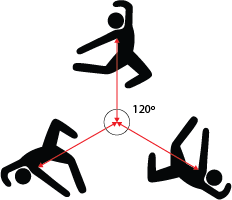
- Once the centre is found the angle of rotation can be measured using a protractor or by dividing 360⁰ by the order of rotation. Since the design below maps onto itself three times in a full turn, the angle of rotation equals 360⁰ ÷ 3 = 120⁰.
- Provide students with Copymaster 3 and ask them to find the lines of symmetry and centres of rotation as required. As students work look for them to apply the invariance properties you have discussed.
- Do they maintain the same perpendicular distance to the mirror line of corresponding points?
- Do they approximate the centre of rotation using equal distance?
- Can they find the angle of rotation by both measurement and dividing 360 degrees by the order?
- Bring the class together to discuss the points above and share answers.
- Students who finish Copymaster 3 early can set a similar challenge for their classmates using the figures from Copymaster 2. Support students as necessary to ensure all finish Copymaster 3.
- Set up a matrix for classifying the plate designs that have symmetry. Create a chart by pasting copies of the designs (photographs or images) in the appropriate cell. Designs with no reflection of rotational symmetry go outside the table. For example:
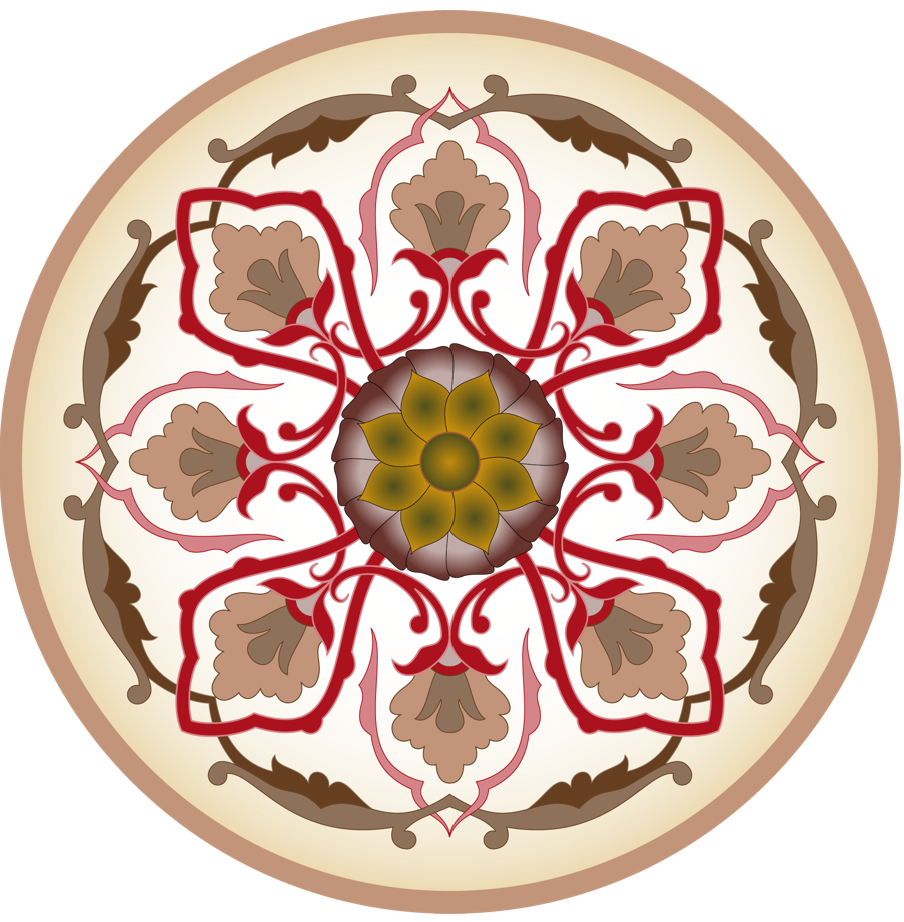
- This plate design has no reflective symmetry as the central motif of flowers has no lines of symmetry. The whole design has rotational symmetry of order eight. The design belongs in the upper right cell.
The design below has neither reflection or rotation symmetry so it belongs in the bottom right cell.
Session Four: Welcome back Crown Lynn
- Provide your students with the following scenario.
The Government decides to build on the popularity of Crown Lynn, both in New Zealand and overseas. Plans are made to re-open the historic Kelston Crown Lynn factory. In the 1960s Crown Lynn had competitions where people sent in their designs, and the best entries were produced at the factory. Imagine the dinner plate you created being on tables all around Aotearoa.
Some old designs are quite rare, and pieces are worth a lot of money. It would be unfair to collectors to start making the old designs again.
That is where you come in!
Create two new designs for Crown Lynn dinner plates. Use what you know about symmetry.
One design needs to have symmetry but the other should be asymmetric but still appealing. - Go online and look for Crown Lynn designs to refresh students’ memories. Note how translation is also used in Crown Lynn plates and is also a form of symmetry. Discuss how digital platforms like PowerPoint can be used to create the designs. Show students how they can access image libraries online to get attractive motifs. Preferably get students to design their own motif. You could make links to a more specific context (e.g. another curriculum area, student interests, cultural backgrounds) and challenge students to create a design that relates to this context. The task is more challenging if only pencils, coloured pens, rulers, and protractors are permitted.
- Allow students plenty of time to complete their designs. Create a “Crown Lynn Wall” of student designs.
- If time permits, have students create a short presentation (in a manner that is relevant and engaging for your students) explaining the design of their plate, and persuading the Government to choose their design for the new Crown Lynn plates. You could either hold a vote, and have students choose the winning design, or have teachers choose them, you choose them yourself etc.
- As an assessment task, students might be given two designs created by other students. Ask them to write a note about each design, including the symmetry or non-symmetry of each design. Have them comment on the accuracy of the reflections and rotations and how symmetry or asymmetry adds to the aesthetic appeal.
Dear family and whānau,
This week we are looking at symmetry using the context of dinner plates. We appreciate your help by working with your child to find examples of plate designs at home and on websites. Your child is asked to create two original plate designs and describe their symmetries. Ask your child to explain what reflective and rotational symmetries are, using the designs as examples.