This is a level 3 link geometry activity from the Figure It Out series.
Click on the image to enlarge it. Click again to close. Download PDF (586 KB)
investigate symmetry
FIO, Geometry and Measurement Link, Punch a Pattern, page 2
hole punch
classmate
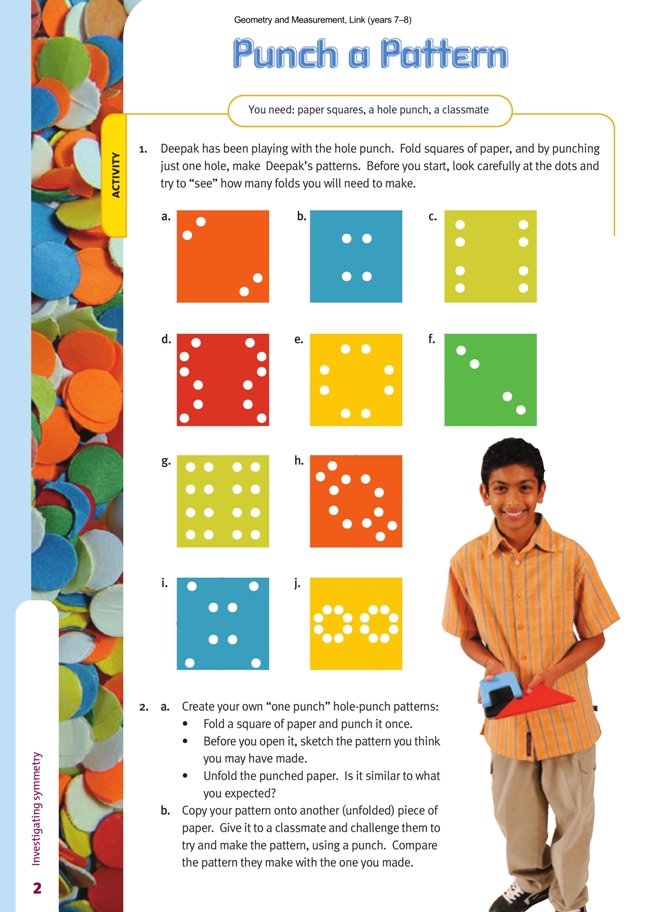
In this activity, students use symmetry to determine how to fold squares of paper and make a series of holepunch patterns.
It’s a good idea to precut lots of squares before setting a group to work on this activity because they will get through quite a few! If you cut the squares 10 cm x 10 cm (memo cube size), you will get 6 from a recycled A4 sheet. This size is fine for most of the problems, although students may prefer to work with larger squares
when trying to create the pattern in question 1g, which requires some tricky folding.
At first, let the students experiment and use trial and improvement to make each pattern. After they have made several, encourage them to look back at the holes and folds and see what they can observe. Ideas might include:
- “There is one hole in each folded section.”
- “Each hole has at least one symmetrical partner.”
- “There is a fold along each line of symmetry.”
- “The lines through pairs of holes are at right angles (perpendicular) to the folds.”
You could give the students a photocopy of the page in the student book and have them predict the folds by sketching the lines of symmetry. If they have problems with this, suggest that they draw dotted lines between each hole and its buddy and then draw the line that goes through the midpoint of the dotted line,
at right angles to it. This is the axis of symmetry or mirror line. They can check their predictions by folding a paper square, using the lines they drew as guides, then punching a hole in it.
Ask “What strategies are you using to help you work out where the folds go?” Ideas might include:
- “I try to make each fold divide as many of the holes as I can.”
- “I look for places where I can see that the hole patterns are symmetrical, and then I make a fold along the line of symmetry.”
Encourage your students to notice and explain relationships and to make predictions:
• If I fold a piece of paper in half, in half again, and in half again, and then punch a hole through all the layers, how many holes will I have? Can you convince me you’re right without using the paper and punch? (The answer is 8. See if the students realise that if they punch a hole through 8 layers, they will get 8 holes. So the number of holes tells them the number of layers.)
- How many layers can you get by repeatedly folding an A4 sheet? (64. But note that a typical hole punch will only go through about 16 layers.)
- If you fold the paper in half each time, what different numbers of layers can you get? Can you see a pattern in these numbers? (2, 4, 8, 16, 32, 64, 128, 256 … The number of layers doubles each time. These numbers are the powers of 2: 21, 22, 23, 24, and so on.) What do the powers tell us? (The number of times the square has been folded in half.)
- Do all of Deepak’s patterns have a number of holes that fits this pattern? (No, d and h have 12 holes each.)
- What might have happened if the pattern has 12 holes? (There are two possible reasons: 1. At some point, the paper has not been folded completely in half. If it is folded in half 3 times [giving 8 layers] and then just half of these layers are folded over for the final crease, there will be 12 layers. 2. The square could have been folded into thirds and then folded in half twice.)
- Is it possible to create a pattern with an odd number of holes?(Yes, by folding a single layer over at some stage after the initial fold or by leaving a single layer unfolded, like the triangular corner in this square with 7 holes.)
After the activity, encourage reflective thinking by asking questions such as:
- Which hole patterns were the hardest to make? What strategies did you use to help you?
- How did you use line (reflective, mirror) symmetry today?
- What tips would you give someone about to start this activity?
- Is it possible to create a pattern with an odd number of holes?
Answers to Activities
Activity One
1. Here are the folding lines you will need to make for each of the patterns:
2. a.–b. Practical activity