The purpose of this unit is to engage students in applying their knowledge and skills of measurement to investigate gradients, angles, elevation in a range of practical situations.
- apply measurement sense
- use problem solving methods to find unknown lengths and angles
- find angles of elevation and apply these to problem solving
- find gradients and apply these to problem solving
- find and apply angles of elevation
- compare and use gradients to find unknown lengths
- use maps, measuring tapes, and/or supplied measurements to find, describe, and use the steepness of a street in terms of a gradient or an angle of elevation.
This unit provides an opportunity for students to apply their skills and understanding of measurement to solve food technology problems involving the interdependence of variables when scaling the components of a recipe.
To ensure maximum engagement and participation in this unit, you should consider your students' prior knowledge in the following areas:
- measurement and algebraic skills
- investigating gradients, distances, and angles of elevation in the context of steep streets and access ways.
This cross-curricular, context-based unit has been built within a framework that has been developed, with input from teachers across the curriculum, to deliver the mathematics learning area, whilst encouraging differentiated, student-centred learning.
The learning opportunities in this unit can be further differentiated by providing or removing support to students, and by varying the task requirements. Ways to differentiate include:
- roaming and supporting students in a variety of groupings to ensure they understand the task at hand, the skills needed to succeed, and can apply these skills in a suitable process
- varying the amount of structured scaffolding and guided teaching you provide to students when investigating new tasks
- providing opportunities for students to create their own problems, ideally related to a familiar, relevant context
- providing extended opportunities for students to revise and apply learning from throughout the unit
- modelling the application of ideas at every stage of the unit
- strategically organising students into pairs and small groups in order to encourage peer learning, scaffolding, and extension
- allowing the use of calculators to reduce the cognitive load required in each task
- working alongside individual students (or groups of students) who require further support with specific areas of knowledge or activities (e.g. finding unknown lengths and angles).
With student interest engaged, mathematical challenges often seem more approachable than when presented in isolation. Therefore, you might find it appropriate to adapt the focused contexts presented in this unit. For example, you might investigate the elevation and steepness of streets in your local area, or in places that are of increased relevance to your students.
Structure
The first session is an introductory activity that is aimed to spark the imagination of students, to introduce the need for a particular idea or technique in mathematics that would enable them to explore deeper into that context. It is expected that rich discussion may be had around the context and around the nature of the mathematics involved.
Following the introductory session, each subsequent session in the unit is composed of four sections: Introducing Ideas, Building Ideas, Reinforcing Ideas, and Extending Ideas.
Introducing Ideas: It is recommended that you allow approximately 10 minutes for students to work on these problems, either as a whole class, in groups, pairs, or as individuals. Following this, gather the students together to review the problem and to discuss ideas, issues and mathematical techniques that they noticed during the process. It may be helpful to summarise key outcomes of the discussion at this point.
Building Ideas, Reinforcing Ideas, and Extending Ideas: Exploration of these stages can be differentiated on the basis of individual learning needs, as demonstrated in the previous stage of each session. Some students may have managed the focus activity easily and be ready to attempt the reinforcing ideas or even the extending ideas activity straight away. These could be attempted individually or in groups or pairs, depending on students’ readiness for the activity concerned. The students remaining with the teacher could begin to work through the building ideas activity together, peeling off to complete this activity and/or to attempt the reinforcing ideas activity when they feel they have ‘got it’.
It is expected that once all the students have peeled off into independent or group work of the appropriate selection of building, reinforcing and extending activities, the teacher is freed up to check back with the ‘early peelers’ and to circulate as needed.
Importantly, students should have multiple opportunities to, throughout and at the conclusion of each session, compare, check, and discuss their ideas with peers and the teacher, and to reflect upon their ideas and developed understandings. These reflections can be demonstrated using a variety of means (e.g. written, digital note, survey, sticky notes, diagrams, marked work, videoed demonstration) and can be used to inform your planning for subsequent sessions.
The relevance of this learning can also be enhanced with the inclusion of key vocabulary from your students' home languages. For example, te reo Māori kupu such as hoahoa āwhata (scale drawing, scale diagram), putu (degree - angle and temperature), koki rewa (angle of elevation), koki (angle), rōnaki (gradient, slope), mahere (map), roa (length), ōrau (percent), tau ā-ira (decimal number), and koki hāngai (right angle) might be introduced in this unit and then used throughout other mathematical learning.
- measurement tools (e.g. tape measure, protractor)
- resources to support the construction of scale diagrams
- calculators
- copies of relevant topographical and street maps, and satellite images.
Introductory Session
This activity is intended to motivate students towards the context and to inform teachers of students' understandings.
- Pose the following problem to students.
Stephanie lives on a very steep street. She says it feels steeper than 45° (from horizontal). At the steepest part there are steps in the footpath. These steps are shown in the image below. Use the tape measurements to decide whether Stephanie is correct in saying that her street has an elevation that is greater than 45°.
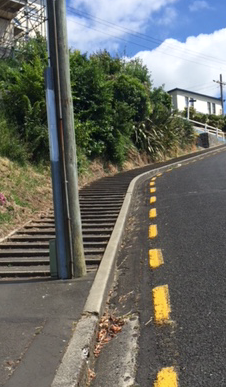 | 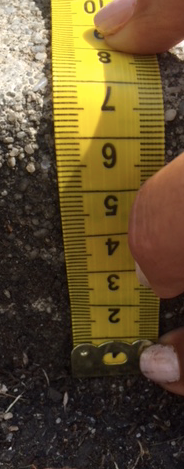 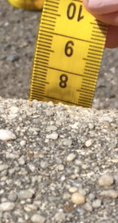 |  |
The street is so steep that it needs steps in the footpath. | The height of the step is difficult to determine measuring from the front, so the tape measure is photographed from the back as well. | The tape measure is laid out to find the depth of the step. |
Observe your students' use of problem solving methods when tasked with finding unknown lengths and angles. Use these observations to locate their position on the measurement sense learning progressions. Students might use purely practical techniques, techniques based on similar triangles, or utilise their knowledge of Pythagoras and trigonometry. This activity integrates mathematical skills and knowledge with the science learning area (the physical world).
- Follow this activity with discussion around the following points:
- How accurate did you need to be to answer just this question?
- What are some of the practical ways that you could solve this problem?
- How might your knowledge of similar triangles be useful in solving this problem?
- How could you calculate the angle required to solve this problem?
Session 2
This session focuses on finding angles of elevation and using these to solve problems.
Introducing Ideas
- Introduce the following problem to students: The steps on the footpath of a very steep street have a height of 7 cm and a depth of 51 cm. What is the angle of elevation of the footpath in that section of the street?
- Discuss, drawing attention to the following points:
- What are some of the practical ways you could solve this problem?
- How can this problem be solved purely by calculation?
Building Ideas
- Explain: A footpath is being designed for a 25 m section of roadside that has an elevation of 12°.
- Provide time for students to work through the following tasks:
- Construct a scale diagram of this section of the roadside to represent this problem. The diagram should be a right angled triangle.
- Use your diagram and the principle of similar triangles to find the depth the steps will need to be if they each have of height 10 cm.
- How many steps would be needed to cover this section of the footpath?
Reinforcing Ideas
- Provide time for students to work through the following tasks:
- What depth of steps with the height 10 cm would be needed for a street with an elevation of 12°?
- What depth of steps with the height 15 cm would be needed for a street with an elevation of 12°?
- What depth of steps with the height 15 cm would be needed for a street with an elevation of 8°?
- What depth of steps with the height 10 cm would be needed for a street with an elevation of 15°?
Extending Ideas
- Provide time for students to work through the following tasks:
- How many steps of height 10 cm would be needed for a 25 m section of a roadside that has an elevation of 12°?
- How many steps of height 15 cm would be needed for a 25 m section of roadside that has an elevation of 12°?
- How many steps of height 15 cm would be needed for a 25 m section of roadside that has an elevation of 8°?
- How many steps of height 00 cm would be needed for a 25 m section of roadside that has an elevation of 15°?
Session 3
This session focuses on finding gradients and using these to solve problems.
Introducing Ideas
Introduce the following problem to students: The steps on the footpath of a very steep street have a height of 12 cm and a depth of 42 cm. What is the gradient of the footpath in that section of the street?
Discuss, drawing attention to the following points:
- How can this problem be solved purely by calculation?
- What are some of the practical ways you could solve this problem?
- What are some of the different ways a gradient may be expressed?
Building Ideas
Introduce the following context to students: A footpath is being designed for a 25 m section of roadside that has a slope of ‘1 in 3’.
Provide time for students to work through the following tasks:
- Construct a scale diagram of this section of the roadside to represent this problem. The diagram should be a right angled triangle.
- Use your diagram and the principle of similar triangles to find the depth the steps will need to be if they each have of height 10 cm.
- How many steps would be needed to cover this section of the footpath?
Reinforcing Ideas
Provide time for students to work through the following tasks:
What depth of steps with the height 10 cm would be needed for a street with a gradient of ‘1 in 4’?
What depth of steps with the height 15 cm would be needed for a street with a gradient of 0.25?
What depth of steps with the height 15 cm would be needed for a street with a gradient of 0.3?
What depth of steps with the height 10 cm would be needed for a street with a gradient of 0.3?
Extending Ideas
Provide time for students to work through the following tasks:
- How many steps of height 10 cm would be needed for a 25 m section of a roadside that has a gradient of ‘1 in 4’?
- How many steps of height 15 cm would be needed for a 25 m section of roadside that has a gradient of 0.25?
- How many steps of height 15 cm would be needed for a 25 m section of roadside that has a gradient of 0.3?
- How many steps of height 10 cm would be needed for a 25 m section of roadside that has a gradient of 0.3?
Session 4
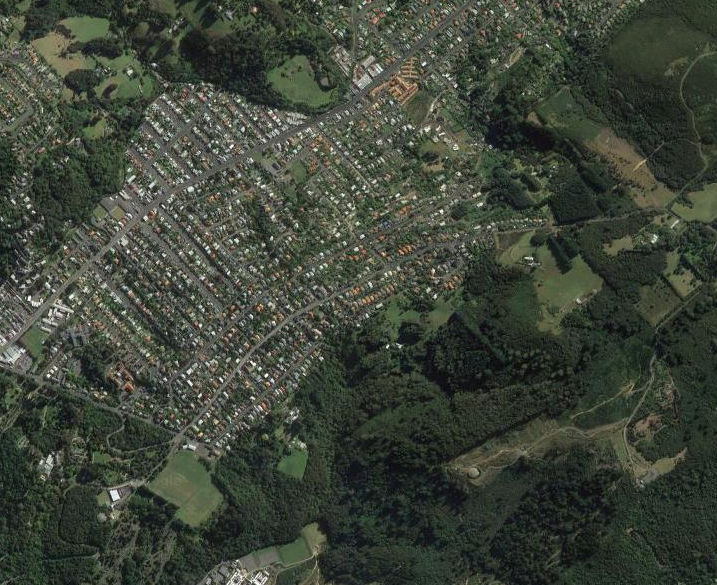
This session focuses on using the scale and contour lines of a topographical map to determine the slope or gradient of a street. The topographical map and satellite image are downloaded from www.topomap.co.nz.
Introducing Ideas
- Explain the following context to students and show them the relevant maps/images: The steepest street in the world is called Baldwin St. It is in North Dunedin.
- With students, use the street map of North Dunedin to locate Baldwin street on the Satellite image and the topographical (contour) map.
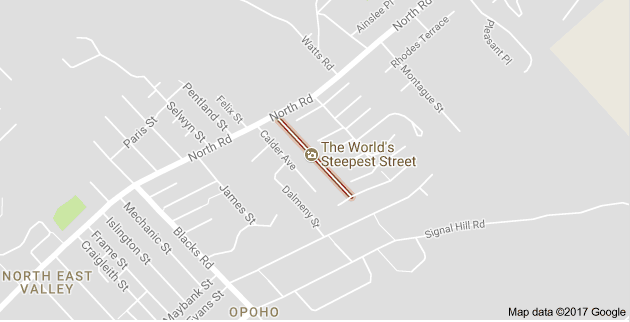
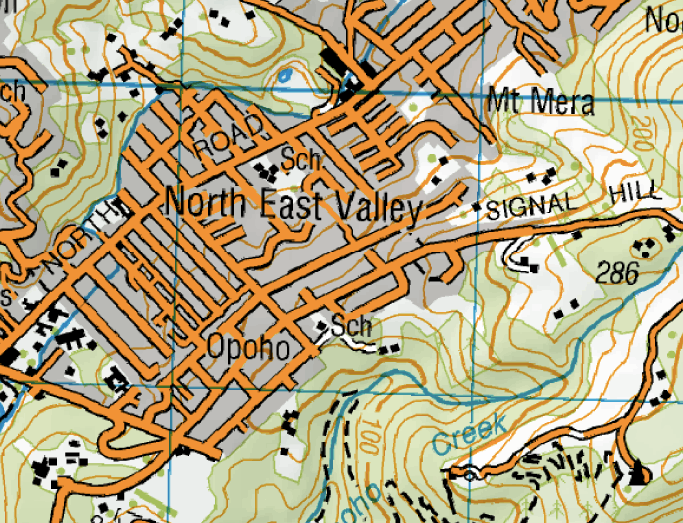
Discuss, drawing attention to the following points:
- Which lines on the topographical map are contour lines?
- What are contour lines used for on a map?
- Can you tell which streets are steep from the street map?
- Can you tell which street are steep from the satellite image?
- The scale of the topographical map is shown in the blue grids where each ‘square’ represents 1 km2. Discuss why it might be useful to have such a scale. What other ways could scale be shown?
- Why aren’t the blue ‘squares’ perfectly square and aligned with the horizontal and vertical edges of the map?
Your students might benefit from, and be engaged in, exploring other topographical maps, street maps, and satellite images relevant to their local area, as an extension to this task.
Building Ideas
Introduce the following context to students: The scale of the topographical map is shown in the blue grids where each square represents 1 km2. Provide students with a digital image of the topographical map, either from a scan or screenshot of this map, or by downloading the map of North Dunedin from www.topomap.co.nz.
Have students zoom the map out (or in) until the side lengths of the blue ‘squares’ are a tidy 10 cm, and then use this visual to measure the length of Baldwin street.
Reinforcing Ideas
- Introduce the following context to students: The scale of the topographical map is shown in the blue grids where each square represents 1 km2. The orange contour lines mark every 20 m change in elevation.
- Find the length of Baldwin St.
- Count the number of contour lines (and parts thereof) Baldwin St passes through and use these to measure the height of Baldwin St (from top to bottom).
- Find the (average) gradient of Baldwin St.
Extending Ideas
- Have students use the 1 km2 per square scale and the contour lines on the topographical map to find the average gradient of Baldwin St.
Session 5
This session focuses on finding and using the angle of elevation of a steep street. Within this session, students are required to draw on their knowledge of metric measurements, percentages, and decimals.
Introducing Ideas
Introduce the following context to students: A Baldwin St home-owner wants to build a carport with the roof parallel to the street. They know that Baldwin St rises from 30 m above sea level at the bottom of the road to 100 m at the top. They have measured the length of the street to be 375 m.
At what angle to the horizontal does the carport roof need to be?
Discuss, drawing attention to the following points:
- Using the measurements for the full length of the street gives the average angle of elevation of the street. How might this be useful for the home-owner’s building project?
- What could the home-owner do to ensure their carport roof is parallel to the part of the road it is situated on?
Building Ideas
- Introduce the following context to students: The steepest street in Wellington is Weld Street. Since some of the street is too steep for traffic, it turns into steps for pedestrians. The total length of Weld St is 1.2 km with a rising from 136 m above sea level at the bottom of the street to 192 m above sea level at the top.
- What is the change in altitude you would experience if you walked up the full length of this street?
- Weld St is a relatively straight street. Find the average gradient of this street?
Reinforcing Ideas
- Introduce the following context to students: Filbert St in San Francisco has a gradient of 0.315.
- What is the change in altitude over a 100 m length of this street?
- If steps are made on the footpath of this street with a depth of 50 cm, what height do they need to be?
- Find the angle of elevation of Filbert St.
- Compare the angle of elevation of Baldwin St (19°) with that of Filbert St.
Extending Ideas
- Introduce the following context to students: A very steep street in Canada, Côte St-Ange has a 33% gradient.
- Express this gradient as a decimal number.
- What is the change in altitude over a 100 m length of this street?
- If steps are made on the footpath of this street with a depth of 50 cm, what height do they need to be?
- Find the angle of elevation of Côte St-Ange.
- Compare the angle of elevation of Baldwin St (19°) with that of Côte St-Ange.
Session 6
This session focuses on comparing and using gradients, and using right angle triangle problem solving techniques to find unknown lengths.
Introducing Ideas
Introduce the following context to students: The Wellington cable car runs in a direct line from the CBD to the suburb of Kelburn where a street would be useful but the land is deemed too steep. The cable car operates on a gradient of 1 in 5.06
- Compare the gradient of the Wellington cable car with that of Baldwin St which is has a 35% gradient.
Discuss, drawing attention to the following points:
- How can these gradients be compared when they are in different formats?
- Which format of presenting a gradient is the more useful to visualise steepness?
- Which format of presenting a gradient is the more useful for calculation?
- Which is steeper, the cable or the street?
Building Ideas
Introduce the following context to students: A cable car operates on a gradient of 1 in 5 and gains 120 m in elevation.
Provide time for students to work through the following tasks:
- Construct a right angle triangle that represents this situation using a suitable scale. How high is your triangle?
- Measure the hypotenuse of the triangle you have constructed.
- Use the scale and length of the hypotenuse of your triangle to find the distance the cable car operates over.
Reinforcing Ideas
Introduce the following problem to students: The Wellington cable car operates on a gradient of 1 in 5.06 and gains 120 m in elevation.
Find the distance travelled in a single cable car journey.
Extending Ideas
- Introduce the following context to students: A pedestrian stairway is to be built beside a cable car which operates on a gradient of 1 in 5 and gains 120 m in elevation. Each of the steps is to be 40 cm deep.
- How high will each step need to be?
- How many steps will be needed in total?
- What is the distance covered by the cable?
Dear parents and whānau,
Recently, we have been exploring how angles of elevation and gradients can be found, and, with the use of problem solving methods, be used to find unknown lengths, angles, and to solve practical situations.
Ask your child to share their learning with you.