Whilst this unit is presented as a sequence of five sessions, more sessions than this may be required. Any session may extend beyond one teaching period. This unit is written to focus on the work of Pablo Picasso, who co-founded the cubist movement. You may prefer to focus the activities on similar works by New Zealand artists.
Session 1
This session is about naming and describing plane (2D) shapes, and using these to create a picture. Note: By drawing around the shape ākonga are creating a two-dimensional shape. Limit the colour selection, as this is relevant to the work in a later lesson.
SLOs:
- Sort geometric blocks and explain their groupings.
- Use geometric language to describe plane shapes.
- Understand the features of a two-dimensional shape.
- Create an artwork using plane shapes.
Activity 1
Make geometric blocks available to pairs of ākonga (tuakana/teina).
Begin by having individual ākonga sort a selection of the geometric blocks into groups, and explain to their partner the groupings they have made. Have them repeat the sorting task, this time categorising them differently.
Encourage and affirm appropriate geometric language, including the correct use of shape names and descriptions of their features.
Activity 2
As a class (mahi tahi), brainstorm and record on the class chart, all shape and attribute language associated with the task in Activity 1.
Activity 3
Make paper, pencils, and pastels or crayons available, but limit the colour selection.
Challenge ākonga to make a picture of a person, object or place that is important to them. Explain that they are to make their picture using the shape blocks to help them.
Demonstrate how to begin the picture by drawing around several shapes and then colouring in the outline. For example:
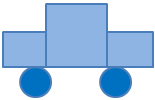
Explain why your picture is important to you. (For example: ‘My Dad used to drive an old blue car a bit like this one.’)
Activity 4
Have ākonga make and complete their own pictures. When pictures are complete, have each ākonga name their picture, write a short story about it, using words from the brainstorm list in Activity 3. Their story should explain why the subject of the picture is important to them and how they made their picture. This activity could be integrated with explicit writing instruction (e.g. explanation writing).
Activity 5
Refer to the example picture made in Activity 3 above and to the artworks they have just completed.
Ask: “Are the shapes two-dimensional shapes or three-dimensional shapes?” Discuss ideas.
Write the word ‘dimension’ and 2D below the picture.
Ask ākonga to discuss in pairs the meaning of what has been written.
Through discussion, develop understanding of the meaning of the word ‘dimension’, of two dimensions and of the abbreviation, 2D.
Highlight the shapes that they have drawn are like (foot) prints only. They are wide and long, but not deep. Explain that two-dimensional shapes have no depth or thickness.
Activity 6
- Have ākonga discuss in pairs and decide whether the geometric blocks themselves are two-dimensional or three-dimensional shapes.
- Have them physically take up positions in the classroom to indicate their thinking (for example: 2D on one side of the mat, 3D on the other).
Discuss, conclude and record that the geometric blocks are 3D shapes because they have width, length, and thickness (depth), and we can feel these. Recognise that the geometric block shapes have different thickness or depth. - Write face, edge and vertex on the class chart. Have ākonga locate and identify each feature on several of the geometric blocks. Write the plurals of each word beside the singular, highlighting the word vertices. Make the connection between the 2D language of sides and corners, and the 3D terms edges and vertices.
Activity 7
Invite ākonga to share their art works and stories. Conclude by writing on the class chart, ‘We used two-dimensional shapes to make our artworks today.’
Session 2
This session is about choosing and responding to a piece of Picasso’s artwork.
SLOs:
- Recognise how shape is an important feature of Picasso’s artworks.
Activity 1
Have several ākonga share with the class their art stories from Session 1, Activity 3.
Acknowledge ākonga as artists.
Activity 2
Explain that you have a true story to tell about another artist. Read Attachment 1: Picasso. (Omit the quote in the box).
Ask ākonga what they found most interesting in the story.
Record their ideas on the class chart, summarising their learning about Picasso.
Activity 3
Write on the class chart: “Art is a lie that makes us realise the truth.” Explain this is something Picasso said. Have ākonga discuss what he might mean by this.
Elicit ideas: for example, art does not always show us how things really are (“they lie”) but we recognise this by comparing art with how things are ("the truth").’
Activity 4
- Locate around the classroom, several individual small copies of each Picasso’s pictures from Attachment 2. There should be enough for each ākonga to have a picture of their own choice.
Explain what you have done. You do not need to elaborate on cubist art at this stage, it will be discussed in Session 3 and 4. - Have ākonga silently complete an ‘art-walk’ once around the ‘gallery of artworks’. Have them make a second rotation, this time choosing and taking an artwork of their choice and returning to their place.
- Make available paper, pencils and glue sticks.
Have ākonga glue their chosen picture onto their paper, leaving sufficient space to write about it.
Remind the ākonga that in Session 1 they wrote about their own artworks.
Explain that each ākonga is to write about the Picasso picture they have chosen.
Their writing should:- explain their feelings about the picture
- explain how they think Picasso made the picture
- include a short story about why the picture might be important to Picasso
- Clarify the task with the ākonga, list on the class chart any special words that they might need and set a time limit.
- Some ākonga may want to explain how their picture fits with Picasso’s statement in Step 3 above.
Activity 5
- When the task is complete, have ākonga who chose the same picture, form a group. Have the ākonga share their responses in their groups, comparing their ideas.
- Ask, “Who wrote something about “shapes” in their writing?”
Ākonga take turns to talk about the way Picasso uses shapes in his pictures, including identifying the features of those shapes. For example: In Picture 1, triangles with lots of corners (angles) have been used.
Activity 6
Conclude the session by encouraging ākonga to share their writing about Picasso’s artwork.
Session 3 and 4
This session is about exploring the features of a three-dimensional shape. Ākonga recognise that a 3D shape is comprised of plane shapes, and represent 3D shapes in an artwork.
SLOs:
- Understand and describe the features of a cube.
- Create an artwork, developing a practical understanding of the relationship between 2D and 3D shapes.
Activity 1
Begin by having more ākonga read their Picasso artwork stories from session 2.
Activity 2
- Make paper and pencils available.
Have ākonga form pairs with their Picasso artworks. Partners should have different pictures.
Write on the class chart the headings: Colour Shape Other
Have ākonga write these headings on one shared piece of paper. Set a time limit.
Have ākonga look at both Picasso pictures and record on the chart under the three headings the things they notice about both art works. - Have partners share their findings with another pair.
Discuss as a class, highlighting (in most instances) the narrow range of colours, light/dark contrasts, different angles of geometric shapes.
Activity 3
- Show the class a wooden cube.
On the class chart, write cube and list its features, including the number of faces, edges and vertices. Highlight that we can view a cube from different angles.
Write cubism on the class chart. Explain that it is a name for an art style that Picasso is famous for. Have ākonga suggest what this might be and record their ideas/definitions on the class chart.
If required, complement ideas with these points:
Cubism:
- uses simple geometric shapes
- shows things from different viewpoints in any one artwork
- sometimes breaks up (or fragments) 3D shapes into parts
- shows the plane (2D) shapes that make up 3D shapes.
Talk about each of these, having ākonga find and discuss examples in their artworks in front of them.
Activity 4
- Explain that ākonga will make their own cubist artwork about one thing that is important to themselves. Refer to Picasso’s use of music/musical instruments or parts of these.
Make available at least one copy of Attachment 3 per ākonga, scissors, glue, A4 paper, pencils, crayons/pastels.
Explain that their completed artwork should:- include parts of something that are important to them personally
- fill the A4 page
- use the shapes or parts of shapes from Attachment 3
- show the shapes connected or touching in some way
- include lines they have drawn
- include their own (limited) choice of colour in empty spaces.
- Model the beginning of this process.
Cut out one cube shape from Attachment 3. Discuss this with reference to the wooden cube, highlighting that this is a way of capturing a 3D shape in art.
Cut the cube (or cuboid) picture into its component parts. It is important for ākonga to understand the differences and similarities between cuboids and cubes - a cube is a cuboid with all edges the same length.
Recognise and discuss the squares (and rectangles) that result. These are the 2D shapes that make up the 3D shape.
Look at the parallelogram shapes. Discuss that this is what happens to the square and rectangular faces when they are shown in 2 dimensions. - Show the developing process.
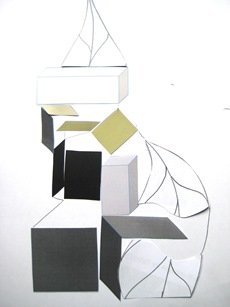
For example: a plant (leaf) may be something important to the artist.
.jpg)
This can be cut and arranged alongside some shapes to produce the artwork.
- Refer to the features noted in the headings: colour, shape and other, in Activity 2, Step 1 above. Are these Picasso style features reflected here?
- Refer to the cubism features list in Activity 3, Step 2 above. Are these features evident here?
- Identify next steps to complete the artwork. (Fill the page, include more cuboid shapes or parts of these, fill in any white paper spaces remaining with appropriate colours.)
Activity 5
Ākonga can now begin their artworks. Ask them to stop and review progress throughout, reflecting on their own work and giving feedback to others.
Activity 6
Finish artworks with a title.
Session 5
This session is about reflecting upon and consolidating the key learning about 2D and 3D shapes and about one artist.
SLOs:
- Identify and articulate key learning about geometric shapes.
Activity 1
Ākonga can display their cubist art (including titles) on their desks. Explain that ākonga will undertake a slow and silent art-walk in which they are to notice works they particularly like. They should look closely at these and decide what it is that makes them appealing to them personally. The two stars and a wish feedback structure could be used here. That is, ākonga should give two positive comments and a suggestion for improvement to another ākonga.
Activity 2
Have several ākonga share their ideas and feedback on the artwork they have noticed, explaining what they like about it and why. Have them refer to the artwork criteria when making their comments.
Activity 3
Make available poster paper large enough to accommodate ākonga artworks from Session 1 and Session 4, Activity 5.
Have each ākonga place (and glue) both artworks onto the poster paper, leaving sufficient space to attach a reflective comment.
Activity 4
On writing paper, have ākonga:
a. Write which of their own artworks they prefer, writing 2-3 reasons for their preference.
b. Explain what they have learned about geometric shapes through their exploration of Picasso’s art and of cubism.
c. Attach their reflections to their poster paper beneath their artworks.
Activity 5
- Ākonga can share and display their reflections. Discuss.
- Reflect on Picasso’s statement: “Art is a lie that makes us realise the truth.”
Recognise that the artworks do not show things as they are, but they helped us to see some things that are true.
On the class chart list the ‘true’ things (truth) that ākonga have learned about art and about mathematics (geometry).
Activity 6
Conclude the session by sharing some of your own favourite Picasso artworks. Discuss the fact that shape is a feature of much of his work.

Mathematical magic
This unit provides you with a range of opportunities to assess the entry level of achievement of your students.
This unit can be differentiated by altering the difficulty of the tasks to make the learning opportunities accessible to a range of learners. For example:
Some of the activities in this unit can be adapted to use contexts and materials that are familiar to students. For example:
Counting and colours in te reo Māori could be introduced in this unit and used throughout other mathematical learning.
Prior Experience
It is expected that students will have a range of prior experiences working with numbers, geometric shapes, measurement, and data. Students are expected to be able to use simple addition and subtraction in situations where sets are joined, separated, and compared.
Session One
Talk to your students about the purpose of the unit, which is to find out some information about them, so you can help them with their mathematics. In the first session students explore a ‘magic trick’ about dice and extend what they find to develop their own magic trick. Look for your students to generalise, that is, explain why the method works every time.
Dice Faces
Card Sums
In this example below only 5 is odd so the total is 20 + 1 = 21.
Note that students may find variations on a general rule:
The highest sum possible is 25, if all the odd numbers show up. Each time an odd card is turned over one is lost from the sum. The even number is always one less than the odd number. If you see how many even numbers there are you take that number from 25. For example, below there are three even cards, 0, 2, and 8, so the sum is 25 – 3 = 22.
Possible extension:
Suppose you wanted to make the trick look even more impressive by making 10 cards; 0-1, 2-3, 4-5, …,16-17, 18-19.
How could you work out the total without adding all the numbers then?
Session Two
In this session, the theme of mathematical magic is continued as students look for patterns in the place value structure of 100. Begin with a Slavonic Abacus and a Hundreds Board.
Slavonic abacus
Does the student use the tens and ones structure of the abacus or attempt to count in ones?
How many beads are on the whole abacus? How do you know?
If 45 beads are on the left side, how many beads are on the right side?
You might revisit the fact that five tens are fifty. Fifty mean five-ty or five tens.
(Student A), please move some of my kiwi to the left side and cover up the rest so I cannot see them (using an A4 sheet of paper).
Crosses Pattern
In this task students apply place value to explain why a pattern on the hundreds board works every time.
2 + 22 = 24 (top and bottom numbers) and 11 + 13 = 24 (left and right numbers).
Possible extension:
Any square on the hundreds board is magic. The numbers along each axis have the same sum. Why?
Below 12 + 23 + 34 = 69, 13 + 23 + 33 = 69, 14 + 23 + 32 = 69, 22 + 23 + 24 = 69.
Hopefully more able students can see that this works for the same reason that the cross pattern works. For each line, the sum is three times the centre number, with one of the end numbers the same amount more than that number as the other is less.
Other units that will support the development of Place Value at level 2 include:
Session Three
In this session students explore simple two-dimensional dissections in which a shape is cut up into smaller pieces and those pieces are put together to form a different shape. They will need square shaped pieces of paper or card.
Copymaster 1 contains the target shapes. Either provide students copies of the Copymaster or display it on screen. Ask the students to work out how to form each shape using all the pieces from the square. Look for your students to:
Copymaster 2 has some target shapes that can be made by connecting all four pieces. Challenge your students to make each target, record the solution, and make up their own target for someone else in the class. Be aware of the need to check for uniqueness. Is the target really the same as another? This brings in ideas about reflection and rotation.
Can you use these four pieces to create a hexagon?
Session Four
In this session students consider the likelihood of magic happening. Students will consider whether the trick is really magic or if something else is involved.
Am I magic or is something else going on?
Their beliefs might be deterministic: "You are a teacher, so you are clever."
Some beliefs might acknowledge chance: "There are only two cups. You have a good chance of being right each time."
A student might spot that the cups are marked. If not, reveal the trick to them.
Magicians like to disguise their tricks so the two cups might be a bit simple. Let’s try the same idea but have three cups and one treat. Can you figure out a way to get a treat each time?
S: I always choose the position where a treat didn’t go at first.
T: Did that always work? Did anyone else try that idea? What happened? Why do you think that happened?
Other students might always choose a position where a treat was first located, or randomly select a position.
Extend the activity:
You might extend the task by varying the number of cups and treats, e.g. four cups and one, two, or three treats.
Session Five
In this session, students look for repeating patterns and connect elements in the pattern with ordinal numbers.
Let students create their own patterns. Look for students to:
Extend the activity:
There are many ways to increase the difficulty of repeating pattern prediction:
Dear parents and whānau,
For the first week of school our mathematics unit is about mathematical magic. We will investigate number tricks, magically change a square into other shapes, predict the future of a pattern, explain and justify why things work.
Ask your child about their magical abilities and have them share some of the magic tricks they have done in class with you.
Pirate plays
In this unit we explore the size of a metre and develop our own ways to estimate a metre length.
When ākonga can measure lengths effectively using non-standard units, they are ready to move to the use of standard units. The motivation for moving to this stage often follows from experiences where ākonga have used different non-standard units for the same length. They can then appreciate that consistency in the units used would allow for the easier and more accurate communication of length measures.
Measurement experiences must enable ākonga to:
The usual sequence used in primary school is to introduce non standard measures followed by standard measures; the centimetre first, then the metre, followed later by the kilometre and then millimetre.
The centimetre is often introduced first because it is small enough to measure common objects. The size of the centimetre unit can be established by constructing it, for example by cutting 1-centimetre pieces of paper or straws. Most primary classrooms also have a supply of 1-cm cubes that can be used to measure objects. An appreciation of the size of the unit can be built up through lots of experience in measuring everyday objects. Ākonga should be encouraged to develop their own reference for a centimetre, for example, a fingertip.
As ākonga become familiar with the size of the centimetre they should be given many opportunities to estimate before measuring. After using centimetre units to measure objects, ākonga can be introduced to the standard ruler (30cm). It is a good idea to let ākonga develop their own ruler to begin with. For example, some classrooms have linked cubes which can be joined to form 10 cm rulers. Alternatively pieces of drinking straw could be threaded together.
The correct use of a ruler to measure objects requires specific instruction. The correct alignment of the zero on the ruler with one end of the object needs to be clarified.
Metres and millimetres are established using a similar sequence of experiences: first construct the unit and then use it to measure appropriate objects.
This unit can be differentiated by varying the scaffolding provided or altering the difficulty of the tasks to make the learning opportunities accessible to a range of learners. For example:
The context for this unit can be adapted to recognise diversity and student interests to encourage engagement. For example, the unit could be focused around the journeys of Pasifika and Māori peoples to Aotearoa, by including activities that make use of non-standard measures to standard measures. For example, how did Māori know how long or wide their wharenui had to be without any standard measures or the length of their new waka or how long their journey to another marae might be. Ask ākonga what they think are the advantages and disadvantages of non standard measures.
Te reo Māori vocabulary terms such as inea (to measure), mitarau (centimetre), and mita (metre) could be introduced in this unit and used throughout other mathematical learning.
Session One
Begin the session by acting out the following scene with your class (mahi tahi model).
Characters:
Captain Kaiwhakaako - teacher
Crew - ākonga
Props:
Treasure - a small box
Crooked palm tree - desk
Captain Kaiwhakaako, the pirate, decided to bury their treasure.
They started from the crooked palm tree and carefully counted 12 steps, (heel, toe) and then stopped and placed the treasure on the ground.
To make sure that they remembered where they left it, they wrote down on their map - 12 steps.
He wanted to make really sure that he had measured correctly before digging the hole so he asked a cabin boy or girl to check.
Captain Kaiwhakaako was puzzled. How could the crew member have a different number of steps?
Had they made a mistake?
Can you think of a measure that Captain Kaiwhakaako could use that is the same for everyone?
If ākonga come up with the suggestion of a metre, ask:
How long is it?
When and where is used as a measurement?
Session two
Tell ākonga that Captain Kaiwhakaako has decided that now they know what a metre is, they want to start drawing up plans for their new pirate ship and that they would like the crew to help.
Discuss with ākonga the type of boats that pirates sailed in. This could include discussion about waka and waka ama (outrigger canoe).
Provide them with chalk and a metre measure and take them outside to draw the boat to Captain Kaiwhakaako requirements.
A metre is as high as …………….(my ribs).
How wide is a metre? A metre is from my fingertips to ……………
Session three
Check how ākonga position the shapes when measuring.
Do they begin from the same baseline?
Do they use the measuring unit consistently without gaps or overlapping?
Ākonga can show their results by pasting their outlines on to paper and recording the number beside it.
Captain Kaiwhakaako has gone to a boat shop to buy some new canvas for sails. They want two metres. Can you show me using a body measurement how long two metres would be?
Session four
If 1cm cubes that connect are available join 100 using two different colours to distinguish the decades. Place the line of cubes on top of the metre ruler and count in tens to 100.
Provide ākonga with string, scissors and glue and let them investigate the different ways of creating patterns with 1 metre of string. Ākonga can first measure a metre, and then make a pattern.
Discuss that different patterns look as though they have different lengths.
Session five
Captain Kaiwhakaako has decided to have a sports day for the pirate crew. The events for the day are:
You could adapt this session to include games you have played as a class that involve throwing, kicking, jumping, and tossing. The key learning is estimating and measuring in metres. At each station, ākonga need to estimate how far they will kick/jump/throw/toss in metres, and then measure the actual distance covered.
Dear family and whānau,
We have been busy this week doing lots of measuring using metres. We have found out how many of our handspans equal a metre so that we can estimate lengths. We have also used our metre measuring strings to measure distances around the classroom.
Measuring Strings
Use your measuring strings to measure these distances in metres:
If you walked 10 metres from your letterbox where could you end up? Draw a map showing this.
Figure It Out Links
Some links from the Figure It Out series which you may find useful are:
Picasso
This unit uses the context of Picasso's art to explore two and three-dimensional shapes, to recognise their features, and to develop appropriate language to discuss Picasso's and their own artworks.
In level one, students have been learning to name some common shapes, becoming familiar with their features. As students are given opportunities, they find their own systems for sorting shapes, justifying their categories and developing the important geometric language of attributes.
Initially, students come to understand two-dimensional shapes as flat or plane shapes that have two dimensions. They have length and width but no depth, and therefore, technically, cannot be ‘held’. As they work with three-dimensional shapes, they come to understand the way in which two-dimensional plane shapes build three-dimensional shapes. Students need to have a clear understanding of the meaning and concept of ‘dimensions’ and should be able to explain in their own words what the abbreviations 2D and 3D mean. The change in language from ‘sides and corners’ for two-dimensional shapes, to ‘faces, edges and vertex/vertices’ is not an insignificant one. The language itself conveys the shape category and should be emphasised and subsequently well understood.
As students work with physical shapes they need to have opportunities to come to understand the defining characteristics of the shapes. Having them talk about and explain these characteristics within a particular learning context, consolidates conceptual understanding. The representation of three-dimensional shapes in the two-dimensional medium that a painted artwork is, creates its own challenge and interest. It should involve deconstructing 3D shapes and recognising that they are comprised of 2D plane shapes. This is a key understanding to be developed at this level.
In levels 3 and 4 students are challenged to explore and represent objects from different viewpoints and perspectives. The work in this unit of work is a useful precursor to developing these concepts.
Picasso's cubist art provides a useful context for the exploration of two and three dimensions as well as developing recognition in the students of the importance of shape as fundamental structure of art itself.
Associated Achievement Objectives
Art
Visual Arts
This unit can be differentiated by varying the scaffolding provided or altering the difficulty of the tasks to make the learning opportunities accessible to a range of learners. For example:
The contexts in this unit can be adapted to recognise cultural diversity and encourage engagement. For example, in addition to the works of Picasso, students could respond to cubist works from New Zealand artists. New Zealand artists that include elements of cubism in some of their work include:
Te reo Māori vocabulary terms such as mata (face), tapa (edge), akitu (vertex) and matahuhua (cubism) could be introduced in this unit and used throughout other mathematical learning.
Whilst this unit is presented as a sequence of five sessions, more sessions than this may be required. Any session may extend beyond one teaching period. This unit is written to focus on the work of Pablo Picasso, who co-founded the cubist movement. You may prefer to focus the activities on similar works by New Zealand artists.
Session 1
This session is about naming and describing plane (2D) shapes, and using these to create a picture. Note: By drawing around the shape ākonga are creating a two-dimensional shape. Limit the colour selection, as this is relevant to the work in a later lesson.
SLOs:
Activity 1
Make geometric blocks available to pairs of ākonga (tuakana/teina).
Begin by having individual ākonga sort a selection of the geometric blocks into groups, and explain to their partner the groupings they have made. Have them repeat the sorting task, this time categorising them differently.
Encourage and affirm appropriate geometric language, including the correct use of shape names and descriptions of their features.
Activity 2
As a class (mahi tahi), brainstorm and record on the class chart, all shape and attribute language associated with the task in Activity 1.
Activity 3
Make paper, pencils, and pastels or crayons available, but limit the colour selection.

Challenge ākonga to make a picture of a person, object or place that is important to them. Explain that they are to make their picture using the shape blocks to help them.
Demonstrate how to begin the picture by drawing around several shapes and then colouring in the outline. For example:
Explain why your picture is important to you. (For example: ‘My Dad used to drive an old blue car a bit like this one.’)
Activity 4
Have ākonga make and complete their own pictures. When pictures are complete, have each ākonga name their picture, write a short story about it, using words from the brainstorm list in Activity 3. Their story should explain why the subject of the picture is important to them and how they made their picture. This activity could be integrated with explicit writing instruction (e.g. explanation writing).
Activity 5
Refer to the example picture made in Activity 3 above and to the artworks they have just completed.
Ask: “Are the shapes two-dimensional shapes or three-dimensional shapes?” Discuss ideas.
Write the word ‘dimension’ and 2D below the picture.
Ask ākonga to discuss in pairs the meaning of what has been written.
Through discussion, develop understanding of the meaning of the word ‘dimension’, of two dimensions and of the abbreviation, 2D.
Highlight the shapes that they have drawn are like (foot) prints only. They are wide and long, but not deep. Explain that two-dimensional shapes have no depth or thickness.
Activity 6
Discuss, conclude and record that the geometric blocks are 3D shapes because they have width, length, and thickness (depth), and we can feel these. Recognise that the geometric block shapes have different thickness or depth.
Activity 7
Invite ākonga to share their art works and stories. Conclude by writing on the class chart, ‘We used two-dimensional shapes to make our artworks today.’
Session 2
This session is about choosing and responding to a piece of Picasso’s artwork.
SLOs:
Activity 1
Have several ākonga share with the class their art stories from Session 1, Activity 3.
Acknowledge ākonga as artists.
Activity 2
Explain that you have a true story to tell about another artist. Read Attachment 1: Picasso. (Omit the quote in the box).
Ask ākonga what they found most interesting in the story.
Record their ideas on the class chart, summarising their learning about Picasso.
Activity 3
Write on the class chart: “Art is a lie that makes us realise the truth.” Explain this is something Picasso said. Have ākonga discuss what he might mean by this.
Elicit ideas: for example, art does not always show us how things really are (“they lie”) but we recognise this by comparing art with how things are ("the truth").’
Activity 4
Explain what you have done. You do not need to elaborate on cubist art at this stage, it will be discussed in Session 3 and 4.
Have ākonga glue their chosen picture onto their paper, leaving sufficient space to write about it.
Remind the ākonga that in Session 1 they wrote about their own artworks.
Explain that each ākonga is to write about the Picasso picture they have chosen.
Their writing should:
Activity 5
Ākonga take turns to talk about the way Picasso uses shapes in his pictures, including identifying the features of those shapes. For example: In Picture 1, triangles with lots of corners (angles) have been used.
Activity 6
Conclude the session by encouraging ākonga to share their writing about Picasso’s artwork.
Session 3 and 4
This session is about exploring the features of a three-dimensional shape. Ākonga recognise that a 3D shape is comprised of plane shapes, and represent 3D shapes in an artwork.
SLOs:
Activity 1
Begin by having more ākonga read their Picasso artwork stories from session 2.
Activity 2
Have ākonga form pairs with their Picasso artworks. Partners should have different pictures.
Write on the class chart the headings: Colour Shape Other
Have ākonga write these headings on one shared piece of paper. Set a time limit.
Have ākonga look at both Picasso pictures and record on the chart under the three headings the things they notice about both art works.
Discuss as a class, highlighting (in most instances) the narrow range of colours, light/dark contrasts, different angles of geometric shapes.
Activity 3
On the class chart, write cube and list its features, including the number of faces, edges and vertices. Highlight that we can view a cube from different angles.
Write cubism on the class chart. Explain that it is a name for an art style that Picasso is famous for. Have ākonga suggest what this might be and record their ideas/definitions on the class chart.
If required, complement ideas with these points:
Cubism:
Talk about each of these, having ākonga find and discuss examples in their artworks in front of them.
Activity 4
Make available at least one copy of Attachment 3 per ākonga, scissors, glue, A4 paper, pencils, crayons/pastels.
Explain that their completed artwork should:
Cut out one cube shape from Attachment 3. Discuss this with reference to the wooden cube, highlighting that this is a way of capturing a 3D shape in art.
Cut the cube (or cuboid) picture into its component parts. It is important for ākonga to understand the differences and similarities between cuboids and cubes - a cube is a cuboid with all edges the same length.
Recognise and discuss the squares (and rectangles) that result. These are the 2D shapes that make up the 3D shape.
Look at the parallelogram shapes. Discuss that this is what happens to the square and rectangular faces when they are shown in 2 dimensions.
For example: a plant (leaf) may be something important to the artist.
This can be cut and arranged alongside some shapes to produce the artwork.
Activity 5
Ākonga can now begin their artworks. Ask them to stop and review progress throughout, reflecting on their own work and giving feedback to others.
Activity 6
Finish artworks with a title.
Session 5
This session is about reflecting upon and consolidating the key learning about 2D and 3D shapes and about one artist.
SLOs:
Activity 1
Ākonga can display their cubist art (including titles) on their desks. Explain that ākonga will undertake a slow and silent art-walk in which they are to notice works they particularly like. They should look closely at these and decide what it is that makes them appealing to them personally. The two stars and a wish feedback structure could be used here. That is, ākonga should give two positive comments and a suggestion for improvement to another ākonga.
Activity 2
Have several ākonga share their ideas and feedback on the artwork they have noticed, explaining what they like about it and why. Have them refer to the artwork criteria when making their comments.
Activity 3
Make available poster paper large enough to accommodate ākonga artworks from Session 1 and Session 4, Activity 5.
Have each ākonga place (and glue) both artworks onto the poster paper, leaving sufficient space to attach a reflective comment.
Activity 4
On writing paper, have ākonga:
a. Write which of their own artworks they prefer, writing 2-3 reasons for their preference.
b. Explain what they have learned about geometric shapes through their exploration of Picasso’s art and of cubism.
c. Attach their reflections to their poster paper beneath their artworks.
Activity 5
Recognise that the artworks do not show things as they are, but they helped us to see some things that are true.
On the class chart list the ‘true’ things (truth) that ākonga have learned about art and about mathematics (geometry).
Activity 6
Conclude the session by sharing some of your own favourite Picasso artworks. Discuss the fact that shape is a feature of much of his work.
Dear family and whānau,
In maths we have been exploring two-dimensional and three-dimensional geometric shapes. We have also been learning about Picasso and cubism, and have made some artworks of our own.
We would really like you to visit our classroom art gallery, either in person or online. You are invited to write your comments and feedback in our art visitors’ book or as a comment on the post.
We look forward to hearing what you think.
Cuisenaire mats
In this unit ākonga use Cuisenaire rods to make 'number mats' that illustrate a variety of numerical patterns and can be visually appealing. Ākonga formally record the number relationships in the mat. This unit is based on the assumption that the small white cube is one. There are many ways Cuisenaire rods can be utilized without naming the white rod as one.
It is important for ākonga to know the meaning of the equality sign. Realising that '=' indicates that the two expressions on either side of it are equal, is a key step on the road to algebra. These two expressions have the same status - one does not have to be the 'answer' to the other.
This idea is fundamental to algebraic understanding at later levels. It is introduced here with a geometric technique that links numbers via Cuisenaire rods.
This unit could be repeated at a higher level by assigning a value other than 1 to the white rod.
Links to Numeracy
This unit provides an opportunity to develop the number knowledge of ākonga in the context of Grouping and Place Value. It also provides a way to develop early part-whole thinking in the addition and subtraction domain, as it allows ākonga to clearly see the different ways a number can be partitioned.
To develop ākonga knowledge of groupings within 5 and 10, focus the attention of ākonga on the 5-mat and the 10-mat. For example,
Can you find 2 numbers that join together to make 10 on the 10-mat?
Can you find two different numbers?
How many different combinations can you find?
List the combinations as they are identified. Encourage ākonga to see the relationships between the two addends: as one increases, the other decreases. This is illustrated using the Cuisenaire mats:
This unit can be differentiated by varying the scaffolding provided or altering the difficulty of the tasks to make the learning opportunities accessible to a range of learners. For example:
Refer to the list of ‘possible extensions for Levels 3 and 4’ at the end of the unit for further suggestions of ways in which this unit can be adapted to Levels 3 and 4.
This unit is focussed on making visual representations of number combinations, and as such is not set in a real world context. You may wish to explore real world applications of number combinations in the teaching sessions following the unit, for example ākonga could discuss waka ama with a defined number of seats, with coloured shirts to represent number patterns. For example in a 5-waka, there can be 3 red and 2 blue shirts (3 + 2), 4 red and 1 blue shirts (4 + 1), or 3 red, 1 blue and 1 green shirts (3 + 1 + 1).
Te reo Māori vocabulary terms such as rākau Ātaarangi (Cuisenaire rods) and tau (number), as well as te reo Māori for the colours of the rods and numbers tahi ki tekau (one to ten), could be introduced in this unit and used throughout other mathematical learning.
If they are available, magnetic cuisenaire rods which stick onto a whiteboard are very useful.
Search for “online fractions modelling with cuisenaire rods” to find websites that can be used to make number mats with Cuisenaire rods.
Getting Started
Here the concept of a 5-mat is introduced. It is constructed from combinations of Cuisenaire rods that all have the same length as the yellow rod (5). The 5-mat is a device to help ākonga explore equality of combinations of numbers. It also helps them to see that '=' means 'is equal to'.
When Cuisenaire rods are exactly made in units of 1 cm, some ākonga may also be able to check the length by measuring.
Draw a clearly labelled diagram on the whiteboard or as a poster, for reference.
Ākonga can then suggest the number combinations demonstrated by the 5-mat on the board. The 5-mat above has:
4 + 1
2 + 3
1 + 1 + 1 + 1 + 1
or 5 x 1
= 5
= 5
= 5
= 5
Exploring
Here the concept of 'equal' is explored further using mats of different sizes.
Note that 4 x 3 is interpreted as 4 groups of 3 here and not 3 groups of 4.
Did anyone else find something like this?
Is 4 + 8 = 8 + 4? Why?
Did anyone else find something like this that did NOT work?
Did anyone else find something like this?
Is 2 x 6 = 6 x 2? Why?
Did anyone else find something like this that did NOT work?
Rows that show a strong visual pattern may also show interesting number patterns.
Make me a mat that shows that 4 + 7 = 2 + 9.
What other equalities can a mat like this show?
Make me a mat that shows that 2 x 5 = 3 + 7.
What other equalities can a mat like this show?
Let ākonga pursue this aspect of the problem in pairs, independently or in small groups. Rove and support ākonga as necessary.
Reflecting
This section brings together what ākonga have discovered so far.
Is it true that 2 x any number = that same number x 2? Why? Why not?
Possible extensions for Levels 3 and 4
This unit can be extended for ākonga working at Level 3 or Level 4.
? + 1 + 5 = 12; and
? + 1 + 5 = 3 x 4.
Answering this could lead to a statement such as 5 x 3 + 1 = 16.
Use a mat to check whether 2 x 5 + 4 = 6 + 1 + 7 or 5 + 3 x 4 = 7 + 9.
Dear parents and whānau,
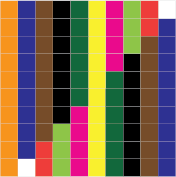
This week in maths we have been using coloured Cuisenaire rods to make 'number mats' which help to show that the equal sign '=' says that the numbers on either side of it are the same. Here is an example of a 12-mat. The white rod = 1, the red = 2, the green = 3, the pink = 4 and so on. Each line of colours = 12.
Looking at the green and pink rows, this shows 3 + 3 + 3 + 3 = 4 + 4 + 4. This can be read as 3 + 3 + 3 + 3 is the same as 4 + 4 + 4. Talk with your child about what other equations can be written using the 12-mat.
Figure it Out Links
A link from the Figure It Out series which you may find useful is: