This unit uses the context of Picasso's art to explore two and three-dimensional shapes, to recognise their features, and to develop appropriate language to discuss Picasso's and their own artworks.
- Sort geometric blocks and explain their groupings.
- Understand and use geometric language to describe the features of two-dimensional (plane) shapes.
- Create an artwork using plane shapes.
- Recognise how shape is an important feature of Picasso’s artworks.
- Understand and describe the features of a cube.
- Create an artwork, developing a practical understanding of the relationship between 2D and 3D shapes.
- Identify and articulate key learning about geometric shapes.
In level one, students have been learning to name some common shapes, becoming familiar with their features. As students are given opportunities, they find their own systems for sorting shapes, justifying their categories and developing the important geometric language of attributes.
Initially, students come to understand two-dimensional shapes as flat or plane shapes that have two dimensions. They have length and width but no depth, and therefore, technically, cannot be ‘held’. As they work with three-dimensional shapes, they come to understand the way in which two-dimensional plane shapes build three-dimensional shapes. Students need to have a clear understanding of the meaning and concept of ‘dimensions’ and should be able to explain in their own words what the abbreviations 2D and 3D mean. The change in language from ‘sides and corners’ for two-dimensional shapes, to ‘faces, edges and vertex/vertices’ is not an insignificant one. The language itself conveys the shape category and should be emphasised and subsequently well understood.
As students work with physical shapes they need to have opportunities to come to understand the defining characteristics of the shapes. Having them talk about and explain these characteristics within a particular learning context, consolidates conceptual understanding. The representation of three-dimensional shapes in the two-dimensional medium that a painted artwork is, creates its own challenge and interest. It should involve deconstructing 3D shapes and recognising that they are comprised of 2D plane shapes. This is a key understanding to be developed at this level.
In levels 3 and 4 students are challenged to explore and represent objects from different viewpoints and perspectives. The work in this unit of work is a useful precursor to developing these concepts.
Picasso's cubist art provides a useful context for the exploration of two and three dimensions as well as developing recognition in the students of the importance of shape as fundamental structure of art itself.
Associated Achievement Objectives
Art
Visual Arts
- Share ideas about how and why their work and others’ works are made, and their purpose, value and context.
- Investigate and develop visual ideas in response to a variety of motivations, observation or imagination.
- Share the ideas, feelings, and stories communicated by their own and others’ objects and images.
This unit can be differentiated by varying the scaffolding provided or altering the difficulty of the tasks to make the learning opportunities accessible to a range of learners. For example:
- encouraging students to use 3D shapes (geometric blocks) to touch, move, look at from different angles so they can understand more about their attributes and how 2D shapes link with 3D shapes
- providing templates for students to use to create their art works from 2D shapes (session 1)
- providing students with a glossary of terms and phrases that they can use to write about Picasso’s art (session 3)
- choosing the number of shapes from Attachment 3 that students work with to create their own cubist art work (session 4)
The contexts in this unit can be adapted to recognise cultural diversity and encourage engagement. For example, in addition to the works of Picasso, students could respond to cubist works from New Zealand artists. New Zealand artists that include elements of cubism in some of their work include:
- Louise Henderson
- Colin McCahon
- Melvin Day
- John Weeks
- Wilfred Stanley Wallis
- Charles Tole
Te reo Māori vocabulary terms such as mata (face), tapa (edge), akitu (vertex) and matahuhua (cubism) could be introduced in this unit and used throughout other mathematical learning.
- Geometric blocks
- Pencils, crayons, pastels etc.
- Glue sticks
- Scissors
- Art paper
Whilst this unit is presented as a sequence of five sessions, more sessions than this may be required. Any session may extend beyond one teaching period. This unit is written to focus on the work of Pablo Picasso, who co-founded the cubist movement. You may prefer to focus the activities on similar works by New Zealand artists.
Session 1
This session is about naming and describing plane (2D) shapes, and using these to create a picture. Note: By drawing around the shape ākonga are creating a two-dimensional shape. Limit the colour selection, as this is relevant to the work in a later lesson.
SLOs:
- Sort geometric blocks and explain their groupings.
- Use geometric language to describe plane shapes.
- Understand the features of a two-dimensional shape.
- Create an artwork using plane shapes.
Activity 1
Make geometric blocks available to pairs of ākonga (tuakana/teina).
Begin by having individual ākonga sort a selection of the geometric blocks into groups, and explain to their partner the groupings they have made. Have them repeat the sorting task, this time categorising them differently.
Encourage and affirm appropriate geometric language, including the correct use of shape names and descriptions of their features.
Activity 2
As a class (mahi tahi), brainstorm and record on the class chart, all shape and attribute language associated with the task in Activity 1.
Activity 3
Make paper, pencils, and pastels or crayons available, but limit the colour selection.
Challenge ākonga to make a picture of a person, object or place that is important to them. Explain that they are to make their picture using the shape blocks to help them.
Demonstrate how to begin the picture by drawing around several shapes and then colouring in the outline. For example: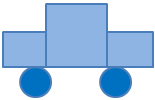
Explain why your picture is important to you. (For example: ‘My Dad used to drive an old blue car a bit like this one.’)
Activity 4
Have ākonga make and complete their own pictures. When pictures are complete, have each ākonga name their picture, write a short story about it, using words from the brainstorm list in Activity 3. Their story should explain why the subject of the picture is important to them and how they made their picture. This activity could be integrated with explicit writing instruction (e.g. explanation writing).
Activity 5
Refer to the example picture made in Activity 3 above and to the artworks they have just completed.
Ask: “Are the shapes two-dimensional shapes or three-dimensional shapes?” Discuss ideas.
Write the word ‘dimension’ and 2D below the picture.
Ask ākonga to discuss in pairs the meaning of what has been written.
Through discussion, develop understanding of the meaning of the word ‘dimension’, of two dimensions and of the abbreviation, 2D.
Highlight the shapes that they have drawn are like (foot) prints only. They are wide and long, but not deep. Explain that two-dimensional shapes have no depth or thickness.
Activity 6
- Have ākonga discuss in pairs and decide whether the geometric blocks themselves are two-dimensional or three-dimensional shapes.
- Have them physically take up positions in the classroom to indicate their thinking (for example: 2D on one side of the mat, 3D on the other).
Discuss, conclude and record that the geometric blocks are 3D shapes because they have width, length, and thickness (depth), and we can feel these. Recognise that the geometric block shapes have different thickness or depth. - Write face, edge and vertex on the class chart. Have ākonga locate and identify each feature on several of the geometric blocks. Write the plurals of each word beside the singular, highlighting the word vertices. Make the connection between the 2D language of sides and corners, and the 3D terms edges and vertices.
Activity 7
Invite ākonga to share their art works and stories. Conclude by writing on the class chart, ‘We used two-dimensional shapes to make our artworks today.’
Session 2
This session is about choosing and responding to a piece of Picasso’s artwork.
SLOs:
- Recognise how shape is an important feature of Picasso’s artworks.
Activity 1
Have several ākonga share with the class their art stories from Session 1, Activity 3.
Acknowledge ākonga as artists.
Activity 2
Explain that you have a true story to tell about another artist. Read Attachment 1: Picasso. (Omit the quote in the box).
Ask ākonga what they found most interesting in the story.
Record their ideas on the class chart, summarising their learning about Picasso.
Activity 3
Write on the class chart: “Art is a lie that makes us realise the truth.” Explain this is something Picasso said. Have ākonga discuss what he might mean by this.
Elicit ideas: for example, art does not always show us how things really are (“they lie”) but we recognise this by comparing art with how things are ("the truth").’
Activity 4
- Locate around the classroom, several individual small copies of each Picasso’s pictures from Attachment 2. There should be enough for each ākonga to have a picture of their own choice.
Explain what you have done. You do not need to elaborate on cubist art at this stage, it will be discussed in Session 3 and 4. - Have ākonga silently complete an ‘art-walk’ once around the ‘gallery of artworks’. Have them make a second rotation, this time choosing and taking an artwork of their choice and returning to their place.
- Make available paper, pencils and glue sticks.
Have ākonga glue their chosen picture onto their paper, leaving sufficient space to write about it.
Remind the ākonga that in Session 1 they wrote about their own artworks.
Explain that each ākonga is to write about the Picasso picture they have chosen.
Their writing should:- explain their feelings about the picture
- explain how they think Picasso made the picture
- include a short story about why the picture might be important to Picasso
- Clarify the task with the ākonga, list on the class chart any special words that they might need and set a time limit.
- Some ākonga may want to explain how their picture fits with Picasso’s statement in Step 3 above.
Activity 5
- When the task is complete, have ākonga who chose the same picture, form a group. Have the ākonga share their responses in their groups, comparing their ideas.
- Ask, “Who wrote something about “shapes” in their writing?”
Ākonga take turns to talk about the way Picasso uses shapes in his pictures, including identifying the features of those shapes. For example: In Picture 1, triangles with lots of corners (angles) have been used.
Activity 6
Conclude the session by encouraging ākonga to share their writing about Picasso’s artwork.
Session 3 and 4
This session is about exploring the features of a three-dimensional shape. Ākonga recognise that a 3D shape is comprised of plane shapes, and represent 3D shapes in an artwork.
SLOs:
- Understand and describe the features of a cube.
- Create an artwork, developing a practical understanding of the relationship between 2D and 3D shapes.
Activity 1
Begin by having more ākonga read their Picasso artwork stories from session 2.
Activity 2
- Make paper and pencils available.
Have ākonga form pairs with their Picasso artworks. Partners should have different pictures.
Write on the class chart the headings: Colour Shape Other
Have ākonga write these headings on one shared piece of paper. Set a time limit.
Have ākonga look at both Picasso pictures and record on the chart under the three headings the things they notice about both art works. - Have partners share their findings with another pair.
Discuss as a class, highlighting (in most instances) the narrow range of colours, light/dark contrasts, different angles of geometric shapes.
Activity 3
- Show the class a wooden cube.
On the class chart, write cube and list its features, including the number of faces, edges and vertices. Highlight that we can view a cube from different angles.
Write cubism on the class chart. Explain that it is a name for an art style that Picasso is famous for. Have ākonga suggest what this might be and record their ideas/definitions on the class chart.
If required, complement ideas with these points:
Cubism:- uses simple geometric shapes
- shows things from different viewpoints in any one artwork
- sometimes breaks up (or fragments) 3D shapes into parts
- shows the plane (2D) shapes that make up 3D shapes.
Talk about each of these, having ākonga find and discuss examples in their artworks in front of them.
Activity 4
- Explain that ākonga will make their own cubist artwork about one thing that is important to themselves. Refer to Picasso’s use of music/musical instruments or parts of these.
Make available at least one copy of Attachment 3 per ākonga, scissors, glue, A4 paper, pencils, crayons/pastels.
Explain that their completed artwork should:- include parts of something that are important to them personally
- fill the A4 page
- use the shapes or parts of shapes from Attachment 3
- show the shapes connected or touching in some way
- include lines they have drawn
- include their own (limited) choice of colour in empty spaces.
- Model the beginning of this process.
Cut out one cube shape from Attachment 3. Discuss this with reference to the wooden cube, highlighting that this is a way of capturing a 3D shape in art.
Cut the cube (or cuboid) picture into its component parts. It is important for ākonga to understand the differences and similarities between cuboids and cubes - a cube is a cuboid with all edges the same length.
Recognise and discuss the squares (and rectangles) that result. These are the 2D shapes that make up the 3D shape.
Look at the parallelogram shapes. Discuss that this is what happens to the square and rectangular faces when they are shown in 2 dimensions. - Show the developing process.
For example: a plant (leaf) may be something important to the artist..jpg)
This can be cut and arranged alongside some shapes to produce the artwork.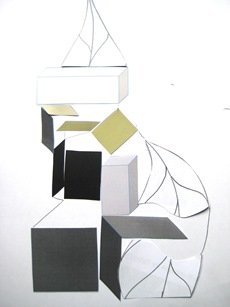
- Refer to the features noted in the headings: colour, shape and other, in Activity 2, Step 1 above. Are these Picasso style features reflected here?
- Refer to the cubism features list in Activity 3, Step 2 above. Are these features evident here?
- Identify next steps to complete the artwork. (Fill the page, include more cuboid shapes or parts of these, fill in any white paper spaces remaining with appropriate colours.)
Activity 5
Ākonga can now begin their artworks. Ask them to stop and review progress throughout, reflecting on their own work and giving feedback to others.
Activity 6
Finish artworks with a title.
Session 5
This session is about reflecting upon and consolidating the key learning about 2D and 3D shapes and about one artist.
SLOs:
- Identify and articulate key learning about geometric shapes.
Activity 1
Ākonga can display their cubist art (including titles) on their desks. Explain that ākonga will undertake a slow and silent art-walk in which they are to notice works they particularly like. They should look closely at these and decide what it is that makes them appealing to them personally. The two stars and a wish feedback structure could be used here. That is, ākonga should give two positive comments and a suggestion for improvement to another ākonga.
Activity 2
Have several ākonga share their ideas and feedback on the artwork they have noticed, explaining what they like about it and why. Have them refer to the artwork criteria when making their comments.
Activity 3
Make available poster paper large enough to accommodate ākonga artworks from Session 1 and Session 4, Activity 5.
Have each ākonga place (and glue) both artworks onto the poster paper, leaving sufficient space to attach a reflective comment.
Activity 4
On writing paper, have ākonga:
a. Write which of their own artworks they prefer, writing 2-3 reasons for their preference.
b. Explain what they have learned about geometric shapes through their exploration of Picasso’s art and of cubism.
c. Attach their reflections to their poster paper beneath their artworks.
Activity 5
- Ākonga can share and display their reflections. Discuss.
- Reflect on Picasso’s statement: “Art is a lie that makes us realise the truth.”
Recognise that the artworks do not show things as they are, but they helped us to see some things that are true.
On the class chart list the ‘true’ things (truth) that ākonga have learned about art and about mathematics (geometry).
Activity 6
Conclude the session by sharing some of your own favourite Picasso artworks. Discuss the fact that shape is a feature of much of his work.
Dear family and whānau,
In maths we have been exploring two-dimensional and three-dimensional geometric shapes. We have also been learning about Picasso and cubism, and have made some artworks of our own.
We would really like you to visit our classroom art gallery, either in person or online. You are invited to write your comments and feedback in our art visitors’ book or as a comment on the post.
We look forward to hearing what you think.