This unit encourages students to discover and apply the rule for area of a triangle (area equals half base times height). Students will practise multiplication and division strategies as they calculate areas.
- Recognise that two identical right angled triangles can be joined to make a rectangle.
- Recognise that a triangle has half the area of a rectangle with the same base and height lengths.
- Apply the rule ‘area of triangle equals half base times height’ to calculate the area of triangles.
Area is a two-dimensional concept related to the geometric concept of an enclosed region. It can be defined as the size of a surface expressed as a number of square units. Investigations into the size of an area should begin with comparisons between different surfaces and progress to the use of non-standard, and then standard, units. The use of formulae to calculate the areas of common polygons is the final stage of the learning sequence.
When the students are able to measure efficiently and effectively using standard units, their learning experiences can be directed to situations that encourage them to "discover" measurement formula. For example, the students may realise as they count squares to find the area of a rectangle, that it would be quicker to find the number of squares in one row and multiply this by the number of rows. In this unit the students find a formula for calculating the area of a triangle by seeing it as half of a rectangle.
This unit is also designed to allow students to practice their multiplicative strategies as they calculate the area of triangles.In particular it reinforces the fact that the order in which they multiply and divide is not important (commutative property of multiplication).
The learning opportunities in this unit can be differentiated by providing or removing support to students and by varying the task requirements. Ways to support students include:
- using grid paper with square centimetre dimensions so students can ‘see’ the units
- cutting up shapes made with paper, moving the parts, and taping them together, to show that the areas stay the same, e.g. transform a rectangle into two right angle triangles
- clarifying the language of measurement units, such as “centimetre square” as an area that is 1cm x 1cm.
- clarifying the meaning of symbols, particularly 45cm2 as 45 square centimetres and 45m2 as 45 square metres
- easing the calculation demands by providing calculators where appropriate.
Tasks can be varied in many ways including:
- adjusting the complexity of the numbers involved, e.g. whole number versus fraction dimensions for side and edge lengths.
- allowing physical solutions with manipulatives before requiring abstract (in the head) anticipation of measures.
- using digital tools to model the shape and area of triangles - a search for “Geogebra area of a triangle” leads to several useful tools that could be used to enrich learning .
allowing students to draw and create triangles on tablets or laptops - reducing the demands for a product, e.g. less calculations and words, and more diagrams and models.
The context for this unit can be adapted to suit the interests and cultural backgrounds of your students. Area is useful to many everyday pursuits, such as painting a bedroom, creating a vegetable patch, tiling a kitchen or bathroom, interpreting house plans, and working out the size of a playground, marae or field. Some of the activities can be adapted to be taken outside the classroom and into an authentic ‘area’ context (for example, the school sports field).
Te reo Māori vocabulary terms such as horahanga (area), paenga (perimeter), tapatoru (triangle), and tapatoru hāngai (right angle triangle) could be introduced in this unit and used throughout other mathematical learning.
- Grid paper
- Copymaster 1: Triangle Area Worksheet
Session 1
In this session students revise how to calculate the area of a rectangle. The knowledge covered in this session is foundational to understanding how to calculate the area of a triangle.
- Begin with a discussion around the question “what is area?”. Encourage students to differentiate between perimeter and area, and to identify contexts in which measuring area is needed (e.g. construction, pattern-making, planning a sports event). Ensure that students understand area as a measure of the size of a two-dimensional surface that is measured in square units - square metres (m²), square millimetre (mm²), square centimetres (cm²).
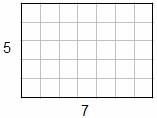
- Draw an unlabelled rectangle on the board and ask students to tell you what its area is.
- If students are unsure of what they need to do to work out the area of the rectangle, ask them to tell you what features of the shape they could measure (i.e. length, height).
- If they say they could measure “two sides” then label two opposite sides and see what they say. It is important that students realise that they need to know the base and the height, or two sides at right angles to each other, to be able to find the area of a rectangle.
- If students can correctly work out the area of the rectangle from its base and height measurements ask them to describe their method and explain why it works. If nobody can give an explanation then a brief discussion is in order. Drawing a grid to link the concept of area with the array model of multiplication may help to clarify students’ understanding.
- Encourage students to use any multiplicative strategies they are confident working with to multiply the base and height measurements. You could also use this as an opportunity to reinforce a target multiplication strategy.
How did we work out the area of the rectangle?
How did we work out 5x7? - Ensure that students have a clear understanding that the area of a rectangle equals its base times its height. Ensure that correct units are used; if the lengths are labelled in centimetres then the area has to be given in square centimetres (cm2), if the lengths are not given units then the area should be given in square units (units2).
Session 2
In this session students divide rectangles diagonally to produce right angled triangles. They recognise that the two triangles formed are equal in area.
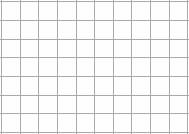
- Ask students to cut a rectangle out of grid paper, ensuring that its base and height are whole square amounts. (You may want to put limits on the size of the rectangle depending on the ability of your students – eg. No more than 10 squares along each side.)
- Ask students to work out the area of their rectangle (remind them to record their answers in units2). Ask students to explain their method to a partner.
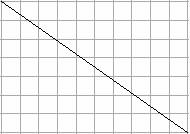
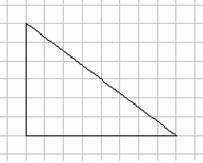
- Ask students to rule a line from one corner of their rectangle to the diagonally opposite corner. Model how to do this, emphasising the accurate use of a ruler. Ensure that they can see the two right angled triangles they have created. If students are unfamiliar with the term ‘right angle triangle’, explain to them that this type of triangle is called a ‘right angle’ triangle because the space between the two arms of the angle (point to the arms) is 90 degrees. We can mark a 90 degree angle with a small square in the corner. This shows us that this angle is exactly 90 degrees.
- Ask them to find the area of each triangle. They may need to count all the squares within the triangles.
What do you notice about the areas of the two triangles?
Students should notice that the two triangles have the same areas and that therefore the area of each is half the area of the rectangle. If they had worked out the areas by counting, ask them to use multiplication to check their counting.
What is the area of each triangle exactly?
How could you work out the areas of the triangles? [Halve the area of the rectangle]
What numbers would you need to multiply or divide? [Either base times height times half or base times height divided by two.]
What would be the easiest strategy for you? [Initially students are likely to mistakenly think that they have to multiply the base and height before dividing - often a better strategy is to halve one of these factors before multiplying.] Have students cut along the diagonal and rotate one triangle to sit on top of the other. Emphasise that the triangles are identical, meaning that they must have the same area.
Ask: Will this work for any rectangle you can make?
- Students should be given the opportunity to experiment with a few different rectangles so that they can see that the rule holds true for any rectangle. They can work with a partner to discuss and justify their findings. If necessary, they can work with a small group to consolidate understanding
Session 3
In this session students draw right angled triangles, complete the rectangle and calculate the area of the original triangle.
- Draw a right angled triangle on the board; label its base 10cm and its height 5cm.
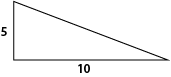
- Ask students whether they can tell you its area (remind them of the correct units – cm2).
- Discuss suggestions for how you could work out its area.
Do we have enough information to work out the area?
Could we work out the area of another shape that would help?
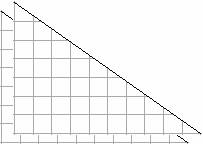
Remember what we discovered about rectangles last maths lesson – two identical right angle triangles can be positioned together to make a rectangle - could that help? - Ask students to draw a triangle on their grid paper so that two of its sides are along lines of the grid paper. (You may want to put limits on the size of the triangle depending on the ability of your students – eg. No more than 10 squares along each side.)
- Now get them to draw the matching triangle that makes a rectangle. Draw the triangle to make a rectangle on your diagram on the board to illustrate.
- Challenge students to work out the area of their completed rectangle and then that of the triangle.
- Get each student to complete several triangles to ensure they are doing it correctly. Ask them to show their triangles to a partner. Their partner should confirm whether or not the student has drawn the triangles correctly, worked out the area of the rectangle, and correctly worked out the area of the triangle.
- Return together as a class to discuss:
Does this work for every right angled triangle?
Can you describe a rule for the area of a right angled triangle?
Are there any clever tricks to make the maths easier? [Divide one of the sides by two before multiplying] - Get students to record a rule for the area of right angled triangles in their own words. Students may see that the area of any right angled triangle is equal to the area of the rectangle with the same base and height divided by two. Get them to record the statement “For right angled triangles, area equals half base times height.”
Session 4
In this session students draw non right angled triangles, and experiment with finding their area.
- Draw an unlabelled non right angled triangle on the board. Draw one of its sides horizontal.

- Ask students what information they will need to be able to work out its area. It is likely that students will try to apply their learning from the previous session and tell you that they need to know the length of two sides.
- Ask students to draw a triangle of their own on grid paper, so that all three corners are on grid intersections, but only one of its sides is along a line of the grid.
- Now challenge them to find its area by measuring two sides.
- If they apply their rule “area equals half base times height”, ask them to draw the rectangle to illustrate. They will be unable to.
- Bring the class back together and discuss why it does not work. Emphasise that in a non-right angled triangle the height is not equal to either of the sides. Discuss this then send students to try to find a rectangle that will work for their triangle.
- When most students have identified that the height of the rectangle needs to be at right angles to the base since rectangles have all right angles bring the class back together.
- Draw the diagram below on the board and ask students whether the rectangle is twice the size of the triangle.
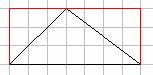
- If students cannot see that the two smaller triangles join to make the larger triangle, add an extra line as illustrated below.
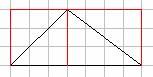
What is the area of the left hand rectangle?
What is the area of the left hand part of the right angled triangle?
What is the area of the right hand rectangle?
What is the area of the right hand part of the right angled triangle? - Give students time to draw some of their own triangles with only one side along a grid line, and work out their area. Ensure that they are including units in their answers.
- Return together as a class to discuss:
Does this work for every triangle?
Can you describe a rule for the area of any triangle? - Get students to record a rule for the area of right angled triangles in their own words. Emphasise that the area of any triangle is equal to the area of the rectangle with the same base and height divided by two. Get them to record the statement “For all triangles, area equals half base times height.” refer back to the diagram to consolidate understanding.
Session 5
In this session students state a rule for the area of a triangle and use it to find the area of some triangles.
- Begin the lesson by asking students to tell you the rule for the area of a triangle. Confirm that it is "area equals half base times height".
- Have students complete the triangle area worksheet (Copymaster 1) individually, in pairs or as a class. This should give you a good idea of any students who need further support to understand the key concepts.
- As an extension. challenge students to find triangles in the classroom or in the wider school environment and make the measurements required to calculate their area. Provide measuring equipment as required. Insist on correct units. During this time, you could work further with students in need of more support. Follow the sequence of the prior sessions, focussing on specific gaps in knowledge.
- Ask students to challenge each other with triangles to calculate the areas of. Compare answers and strategies for measuring and calculating and discuss differences.
Family and whānau,
In maths this week we are learning about the area of triangles. Ask your child to explain to you the rule for working out the area of a triangle. See if they can explain why the rule works using diagrams to show you what they have learned. Your child needs to find the area of 3 different triangles around the house recording the details in their book. Ask them to explain their thinking to you.