The purpose of this activity is to support students using their understanding of properties to establish the differences and similarities between and among shapes. Similarity is the basis of classifying shapes by their defined properties and difference is important for recognising non-examples.
- Copymaster (sets of odd-shape-out cards)
- Protractor
- Mirror
- Ruler
- Show the students the Set A shapes from the Copymaster. This could be displayed on a shared screen.
One of these shapes is the odd one out. It is different from the other two.
Which shape is the odd one out?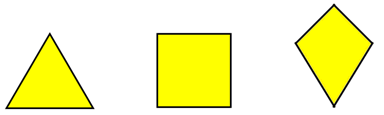
Let students select a shape and tell a peer their reason for selecting it.
Discuss the possible odd shape out. Each shape can be chosen with the correct criterion. For example:- Triangle: 3 sides/angles while the other two shapes have four sides/angles
- Square: Only shape with parallel sides. Only shape with right angles.
- Kite: Only shape with unequal sides. Only shape with unequal angles.
As students explain their choice, ask them to indicate to the shape and make the property (e.g. sides, angles) clear to others. Explanations about angle are an opportunity to measure angles with a protractor to check for equality. Through discussion, encourage the use of relevant mathematical vocabulary and te reo Māori kupu (e.g. tapa - side/edge).
- Pose other suggestions for choosing the odd shape out.
- [Name] says that only the square is symmetric. Is he/she correct?
Note that all three shapes have symmetry, but the square has four lines where a mirror can be located, the equilateral triangle has three lines, and the kite has one line. - [Name] says that only the kite has unequal sides. Is he/she correct?
Measuring the sides will show that the square and equilateral triangle has all sides equal. The kite has two pairs of equal sides.
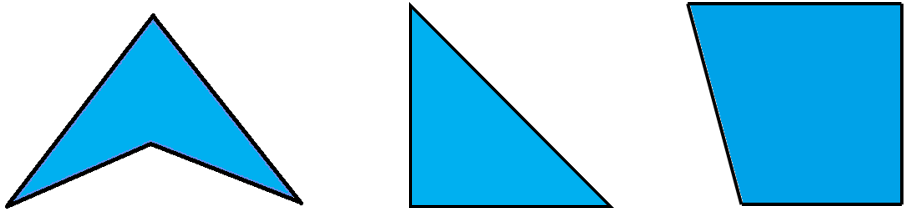
- Show the students the Set B shapes from the Copymaster.
Ask students to work in pairs. Consider pairing students to encourage tuakana-teina and productive learning conversations.
Each of these shapes is different. Can you explain how we know this?
- After a suitable time discuss students’ ideas. There criteria might be:
- Arrowhead (a concave kite):
No right angles, concave (angle more than aright angle), two pairs of equal sides (other two shapes have one pair of equal sides) - Right-angled triangle:
Three sides (the other shapes have four), one right angle. - Trapezium:
Two right angles, one pair of parallel sides, not symmetric (other shapes have one line of symmetry).
- Arrowhead (a concave kite):
- The Copymaster has four other sets of odd-shape-out. You might use the sets as challenges in pairs or as further practice for the whole group in identifying similarities and differences.
Next steps
- Ask students to create their own set of three shapes for an “odd shape out” set. A requirement is for them to provide their answer for how each shape can be the odd one out. They then trial their set to see if the ideas of others are the same as their ideas.
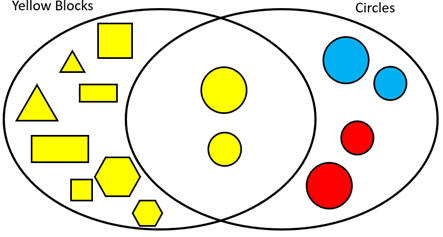
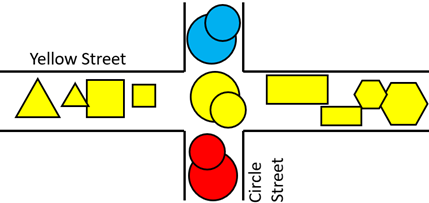
- Explore the concept of intersection further. One way to do so is to work with a set of attribute (logic) blocks. Use the metaphor of an intersection of two streets. The example below shows the intersection of the yellow blocks and circular blocks.
In a Venn diagram, the relationships are represented as below: