This unit seeks to connect learning outcomes, and provide problem solving opportunities across all five content strands, number, geometry, statistics, algebra, and measurement. The context of houses is used to develop concepts such as drawing and modelling 3-dimensional objects, using coordinate systems to locate position, find the possibilities of events, and identify paths through simple networks.
- Draw a diagram showing the top, side, front, and back of a solid figure.
- Make the net for a solid figure.
- Use coordinates on a map to identify the position of houses.
- Construct triangles and quadrilaterals by measuring appropriate lengths
- Identify the properties of triangles and quadrilaterals.
- Find all the possible outcomes for a simple event.
- Find a path through a network.
This multiple-strand unit covers a wide range of mathematics topics including: properties of triangles and quadrilaterals, networks, nets and diagrams of 3-dimensional solids, coordinates on a number plane, and combinations. Students need to have knowledge of 3D shapes (e.g. cuboids), 2D shapes (e.g. triangles) and of how to read coordinate pairings.
It supports students who are working within stage 6 (advanced additive) of the Number Framework. At stage 6 a student can estimate answers and solve addition and subtraction tasks involving whole numbers by choosing appropriately from a broad range of strategies (for example place value partitioning, rounding and compensating or reversibility). The student uses a combination of known facts and a limited range of strategies to derive answers to multiplication and division problems (for example doubling, rounding or reversibility).
This unit can be differentiated by varying the scaffolding provided to make the learning opportunities accessible to a range of learners. For example, drawing views of 3-dimensional structures can be scaffolded using variables like:
- simplifying the complexity of the building
- allowing students to physically move and manipulate the position of a building when drawing it
- removing the requirement of scale
- providing grid paper so drawing to scale is easier.
The practical nature of the tasks in the unit requires access to physical and diagrammatic resources. Providing materials, and putting varied demands on what tasks are carried out mentally, is a powerful tool in catering for diversity.
The contexts in this unit can be adapted to reflect the cultural and geographical diversity of your class and environment. For example, historic home tours might be connected to tours of local important buildings (e.g. the buried village outside Rotorua, or the Waimunga Valley pathways, the Dunedin railway station). Constructing nets for solids might be framed around models of wharenui or wharekai, or of significant buildings in the local area.
Te reo Māori vocabulary terms such as inea (to measure), tapawhā (quadrilateral), tapatoru (triangle), taunga tukutuku (coordinates), and tūponotanga (probability, chance) could be introduced in this unit and used throughout other mathematical learning.
- Coloured felt pens or pencils
- Strips of card and split pin paper fasteners, hole punch
- Cardboard, scissors, glue, rulers, protractors
- Plasticine, clay or other modelling material
- Copymaster 1
- Copymaster 2
- Copymaster 3
- Copymaster 4
Session 1
- Show the students House Plan One (Copymaster 1). Illustrate how the house designer drew the plans by setting up an object on a desktop and drawing the object as seen from the front, side, and top as you move around the object. Provide the students with plasticine or modelling clay and ask them to make a small model of the house that is shown in these plan drawings. To engage students further in this learning, you might ask architects, planners or builders, who are members of your school community, to come in and discuss how they use house plans and nets in their work.
- Next, support students to check their models by sketching it. They should move the model around to be able to see the front, side, and top views. The drawings can be checked against the original plans. Discuss with the students what features they concentrated on in producing the model. This might include thinking of the model in two parts - the basic cuboid (rectangular prism) and the triangular prism that forms the roofline.
- Provide the students with House Plan Two, from Copymaster 1, and challenge them to make a 3D model of that house using the provided clay or other modeling materials.. Help scaffold the task by discussing what features of the house are different to the previous plan. Students may note that the new house has the same roofline but the top view shows that it is L-shaped. As with the first plan the models can be checked by using them to produce plan drawings.
- The activity can be extended in two ways. Firstly tell the students that architects frequently make models of their buildings for presentation purposes. Get them to design the net (flat pattern) that could be folded up to make a model of house one. This could be produced using the plasticine model by rolling it on a sheet of paper and tracing around each face as it lies against the paper until all the faces have been traced. Students should note that use of symmetry can make the process much easier.
- One net of house plan one looks like this:
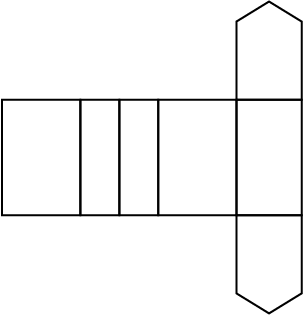
- Discuss with the students how nets usually have tabs to allow them to be glued together. The usual convention is to put a tab on every second edge as you work around the perimeter (outside) of the net but other ways are also workable. Encourage students to experiment with different ways of creating tabs, and discuss the advantages and disadvantages of different methods. Creating the net for House Plan Two is considerably more difficult but can be done in halves and symmetry used to create the full net.
- Another extension of the activity is for students to make their own house model from plasticine and create front, side and top view drawings of it. These drawings are then given to another student who must produce either the model or net for the plan. This could be extended to making building models of important buildings from your local context (e.g. the school buildings, the local marae)
Session 2
The context of this session involves discussion of the distance different students live from school. If you feel this context is not appropriate for your class, you could reframe the learning in the context of planning a school trip. You could choose three different places for the class to “visit” on this hypothetical class trip (e.g. the museum, the swimming pool, the marae). Finding the middle point of these locations could be presented as finding the best location for a lunch stop. In a historical context, the three places could be chosen from places where the Treaty of Waitangi was signed (e.g. Waitangi, Manukau, Opotiki, Akaroa, Ōnuku, Ruapuke Island).
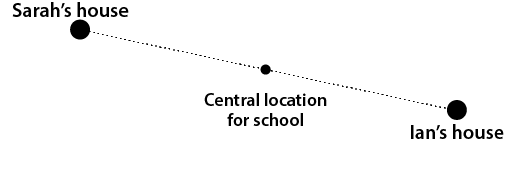
Ask several students in the class how far they live away from the school. They may give their answers in distance or travel time. Comment that they are going to investigate where the school should be to make it as central as possible. Ask two students to mark as accurately as possible where their house is on a street map of the area. Ask the students if the school is central (in the middle) of these two houses. This is easy to visualise by drawing a line between the two locations:
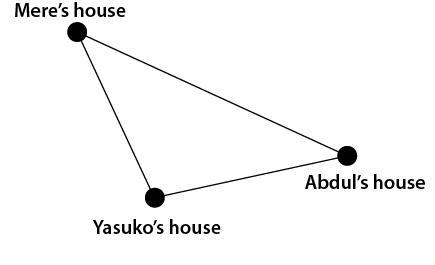
- Finding the central location becomes more difficult when three houses are involved. Tell the students to draw a triangle in their books and assume that each corner is the location of someone’s house. The triangle does not need to be equilaterial. In fact, it is desirable that the students try several different triangles. Challenge the students to find a method of locating the central point for the school, meaning the point that minimises the travel of all three students.
Discuss the methods that students have used. These might be focused on features of the triangle, particularly equally splitting angles and sides. Such methods might produce solutions like:
Split the angles method.
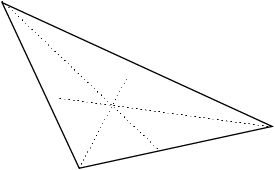
Split the sides method that, in this case, does not appear to give a sensible solution.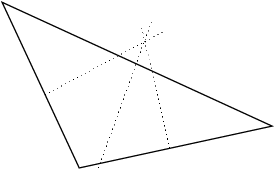
Width by height method. Draw the smallest rectangle that includes all of the corners and cut the sides in half. The intersection of these “bisectors” gives the centre.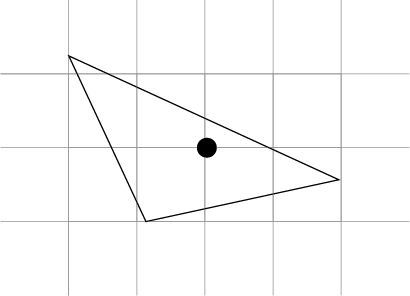
The co-ordinate method. Each house location is given an ordered pair and the average of the x-coordinates and the average of the y-coordinates is found. This gives the centroid or balance point of the triangle.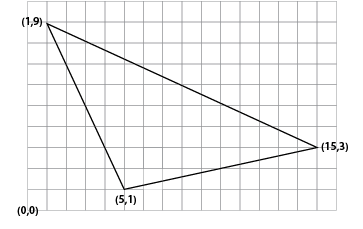
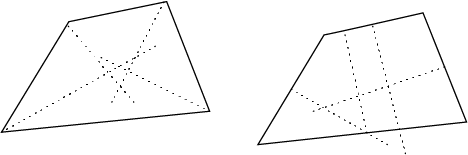
The average of the coordinates gives the point (7, 4.33…). In this case the coordinate averaging method seems to give a good indication of the centre.Discuss with the students which of these methods will also work if we consider finding the centre of four or more houses. They may conclude that the length by width and coordinate methods will always work, no matter the number of houses. The split the angles and sides methods could be tried with some quadrilaterals to determine if they will work.
- Apply both the length by width and coordinate methods to the task of finding the central location for a school that only included students in your class. Use a scale map of the district. Draw a coordinate plane over the map and ask each student to provide the location of their house as an ordered pair. Note that decimal ordered pairs could be used to make the locations more accurate. A spread sheet might be used to find the average of all the coordinates quickly.
Name | X coordinate | Y coordinate |
Joe | 3.5 | 6.4 |
Gill | 0.9 | 8.7 |
Shirley | 6.5 | 1.2 |
| … | … |
| =average(B2:B?) | =average(C2:C?) |
- Compare the centre as determined by both methods. Discuss which method appears to be the most accurate. Students may note that outlier (extreme) coordinates have a pronounced effect on the length by width method but minimal effect on the average coordinate method. This could be modelled by introducing a hypothetical student who lives an extreme distance from the school and noting the effect using the spreadsheet and map.
Session 3
- Tell the students that they are going to investigate the best way to build framing on the wall of a house. This could be related to the context of new school buildings, building a dream classroom, or the building of local community places (e.g. the marae). Using cardboard strips and split pin paper fasteners, get the students to construct the following “walls.”

- Point out the need to accurately measure the strips and location of the holes so that the walls lie flat. Which one is more stable if it is placed standing up on a flat surface? Encourage students to estimate their answers to this, and justify their thinking. The walls of the house need to be reasonably rigid. The students should notice that the vertical and horizontal arrangement tilts while the triangular arrangement stays fixed.
- Ask the students why they think this occurs. They may comment that triangles are strong while the angles of the rectangles are movable (which can be demonstrated by tilting the rectangular model). Discuss why the triangular walls, while very strong, might not be functional in building houses. Building triangular houses constricts the amount of space available inside of the house. This relates to the difficulty of measuring angles, so that the walls will intersect, and the difficulties of living in dwellings with non-perpendicular (right-angled) corners. A-framed houses are a good example of the later problem. Building a tetrahedron (i.e. triangular pyramid) with polygons or toothpicks and blu-tack might be a good way to demonstrate the inefficiency of space usage.
- To develop students’ ideas about the structural strength of triangles and quadrilaterals get them to carry out the following investigation.
- Make the following lengths from cardboard strips. The lengths show the length between the holes:

- Ask the students to make as many different triangles as they can by fastening the cardboard strips with fasteners and moving the sides around. They will realise that only one triangular shape is possible as the side lengths determine the angles at the corners.
- Ask them to use another length of cardboard strip (for example 18cm between holes) and use it with the other lengths to make quadrilaterals of different shapes. The students will see that the angles at the corners can be changed by tilting the quadrilateral. This could be used at another time to investigate the sum of interior angles.
- The students might try making triangles and quadrilaterals with different lengths to further validate their conjectures if need be.
- Extend this idea by telling the students that they are allowed to add only one strip of card and fasten it to the original vertical and horizontal wall arrangement they started with. The challenge is to stabilise the wall so it does not tilt. This can be done by using a brace that effectively turns the quadrilaterals in the wall into triangles with rigid structural strength.
Session 4
- Tell the students that they have been hired by a construction company as a consultant to look at the colour schemes for a new housing estate (Copymaster 2). The houses all have the same design so the company is keen to use the colours to make each house appear different to the others in the estate. This could be related to new buildings that are being constructed in your local area. It could also be related to pre-existing buildings (e.g. the school, the marae), or imaginary buildings (e.g. a dream school). In a historical context, this learning could be related to the types of materials that were used to build early houses in New Zealand (e.g. kauri, rimu, mataī).
- The company has only bought three colours of paint: red, blue and yellow. They have decided that for each house the roof will be painted in one colour, the walls in a different colour, and the window sashes and door in a third colour. They are wondering if three colours are enough. How many houses can be painted with three colours remembering that each scheme must be unique? That is, no two houses can look the same. Encourage the students to be systematic in planning the colour schemes. Provide them with copies of Copymaster 2.
- After an appropriate time of investigation, bring the students together to share their ideas. Focus on strategies they have used to systematically find all the possibilities. Strategies might include:
Using tables
| Roof | Walls | Door/Windows |
| Red | Yellow | Blue |
| Red | Blue | Yellow |
| Yellow | Red | Blue |
| Yellow | Blue | Red |
| Blue | Yellow | Red |
| Blue | Red | Yellow |
Using tree diagrams
Roof Walls Door/Windows
Focusing on the structure of these models reveals that the six combinations are found by finding three possibilities for the roof colour multiplied by two possibilities for the walls (that is 3 x 2 x 1).
- The company has built 120 houses in the estate so obviously three colours are not sufficient to make each colour scheme unique. Ask the students to predict how many colours will be needed to produce 120 unique colour schemes. Intuitively it seems that a large number of colours will be required.
- Suggest to the students that they progress systematically in finding out the number of combinations when each new colour is added. This should involve “adding on” to the tables, diagrams, or other models that they used in the simpler example with three colours.
- The students may notice that the addition of a fourth colour, say green, results in a four fold increase in the number of possibilities. Extending the table illustrates this clearly:
| Roof | Walls | Door/Windows |
| Red | Yellow | Blue |
| Green | ||
| Red | Blue | Yellow |
| Green | ||
| Red | Green | Blue |
| Yellow | ||
| Yellow | Red | Blue |
| Green | ||
| Yellow | Blue | Red |
| Green | ||
| Yellow | Green | Red |
| Blue | ||
| Blue | Yellow | Red |
| Green | ||
| Blue | Red | Yellow |
| Green | ||
| Blue | Green | Red |
| Yellow | ||
| Green | Red | Yellow |
| Blue | ||
| Green | Yellow | Red |
| Blue | ||
| Green | Blue | Red |
| Yellow |
Similarly drawing the tree diagram will reveal four possibilities for the roof colour multiplied by three possibilities for the wall colour multiplied by two possibilities for the door/windows colour (4 x 3 x 2 = 24).
- Students will have to look for some generalisation in determining how many possibilities occur with five colours. Creating all of these possibilities would be a painstaking process. Ask the students to discuss in groups what might happen when the fifth colour is used. Look for reasoning like:
Roof Walls Door/Windows
5 colours x 4 colours left x 3 colours left gives 60 possibilities. - This would mean that a sixth colour would create 6 x 5 x 4 = 120 possible colour schemes which would be enough to make each of the 120 houses unique.
- Students might explore other scenarios that are either simpler or more complex. For example:
What happens to the number of possibilities if it is decided that the roof, windows, and doors are painted the same colour?
What happens to the number of possibilities if the windows and door are painted in different colours? - Students might also be asked to solve problems that are similar in structure. For example:
You have these digit cards in a pack: 0, 1, 2, 4. You deal out three cards. 4 then 2 then 0 come up.
What other card combinations might have come up?
How many different combinations are there?
Session 5
- Discuss with the students why people might be interested in very old houses. Tell them that touring large, old houses is very popular with tourists. As the houses are very precious it is important to design tours that do not involve returning frequently to the same room or doorway. Tourists don’t like repeating themselves either.
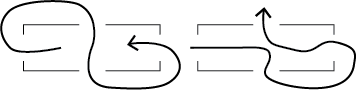
- Use an overhead projector to show the plan of the rooms in "Comfy Cottage" (Copymaster 3). The gaps indicate doorways and the start and finish indicate where the tour is to begin and end. Tell the students to mark a tour through Comfy Cottage. Note that there are several possible tours. One possible tour is given on Copymaster 3. Discuss strengths and limitations of the tours. The example given returns to the lounge.
Is it possible to tour the whole house without returning to the lounge? - Tell the students that they are going to be given several historic homes to design tours for. They will need to decide which rooms to start and end the tour on and check to see whether the tour will go through each doorway only once. Provide the students with copies of Copymaster 4 and encourage them to work in pairs in solving the tour problems. At this stage, you might revisit learning around local buildings of significance, by incorporating floor plans of these buildings. These plans could also be used to extend more knowledgeable students.
- After an appropriate time, bring the class together to share solutions. Concentrate firstly on how the students identified which rooms to begin and end the tour at. Look for common features of these rooms. Students might notice that these rooms always have either one or three doorways. Discuss what they notice about the rooms that are passed through. Focus on the number of doorways in these rooms. Students may notice that they have either two or four doorways.
- Look at both scenarios, an odd or even number of doorways. For a room with an even number of doorways a tourist can either start inside or outside it.
If a tourist starts inside the room they must return to it.
If a tourist starts outside the room they must end up leaving it.
For a room with an odd number of doorways the opposite scenario is true.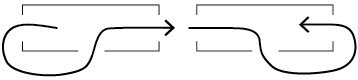
If a tourist starts inside the room they can return to it many times but always end up leaving it.
If a tourist starts outside the room they can pass through it several times but will always end up returning to it. - In this analysis it is easy to see that any house cannot have more than two odd doorway rooms if the tour is to work. This means that the tour must start in one odd room and end in the other. Along the way, any even-doored rooms are entered then left.
- Challenge the students to try this theory out by creating two house plans where a tour is possible and two plans where a tour is not. Students can share these plans to help confirm that a tour is only possible given no more than two odd-doored rooms.
Kia ora parents and whānau,
This week in maths we have been looking at some ideas linked to houses. We've talked about how to draw them, how to find the centre of a group of houses, how to make a strong wall, counting different combinations of colours, and finding paths through room plans.
Ask your child what their favourite activity was and have them explain it to you. You may need a pen and paper!