In this unit we look at various ways of measuring the height of an inaccessible object. The fundamental piece of mathematics used here is the ratio of corresponding sides of similar right angled triangles. The actual measurements needed relate to (i) an intermediately placed stick and (ii) the tangent of an angle.
- Measure lengths and angles accurately.
- Find the height of objects using trigonometry.
In the teaching sequence we ask how you could find the height of the
There are in fact many ways to find the height of a building. One easy way is to drop a weight on a piece of string from the top and measure out the length of the string as it falls.
Knowing how to find heights of objects is clearly important. In some areas there are Council limits on the height of buildings. It is useful to find the height of mountains, first for the knowledge alone and secondly to see if the mountain is growing or not. This latter information enables geologists, for instance, to learn about the movement of the Earth’s tectonic plates. Of course there are all sorts of surveying reasons (building bridge, roads, etc.) for needing to find heights. And you might want to know how big a flag pole is so that you can work out how much rope you might need to haul up the flag or how much scaffolding you might want to use when you are painting it.
(Of course, it might be easier just to lower the flag pole and do the measurement directly on the ground!)
Having decided that it’s important to measure the heights of things, you may want to know how to do it and how to do it accurately. The point of this unit is for students to learn how to measure the height of different objects that are accessible. By this we mean objects like flagpoles where the point on the ground immediately below the highest point of the object is accessible and not obstructed by something. So generally speaking, a building is not accessible as the point at ground level underneath its is usually inside a room and not directly visible from outside.
The basic tool that we will use is similar triangles and trigonometry. In this unit we will develop knowledge of the use of the tangent of an angle in a right angled triangle.
Note that trigonometry isn’t only useful in finding sides of triangles. It’s worth knowing that it’s also extremely useful in senior secondary school and university in integration, part of calculus, where it enables us to find integrals of a range of functions.
- Calculators
- Protractors
- Tape measures
- Connected 3, 2002, How High is that Tree?
- Construction equipment
Session 1
In this first session we just explore the idea of measuring the heights of objects.
Teachers’ Notes
The point of this first session is for the students to get a feel for what they are going to be doing in later sessions. Rather than just going in cold and following the methods that you want them to use, give them a chance to ‘play’ with the idea of measuring inaccessible objects; let them think about how it could be done. This exploring will help them to more easily remember the processes that they use later because it gives them something to ‘hang’ these methods on in their minds.
However, you might want to ‘nudge’ the students in the direction of the various methods that they’ll work on in later sessions.
Notice here that we are also concerned to see them estimate heights. This is an important skill and it is not something that comes easily to them. They need all the practice they can get.
Teaching sequence
-
Lead a discussion about how you could find the height of a range of objects from flag poles to buildings to mountains.
How could you find the height of the school flagpole?
How could you find the height of the
How could you find the height of Mount Cook/Aoraki?
Use objects that are familiar to the students.
Let them think about the answers by questioning them about how practical their method would be. Also ask them what their methods are based on. If there is some mathematics there get them to justify its use. If they want to use some equipment, get them to tell you why it will work. Find out too, what assumptions they are making.
-
Then get on to other practicalities.
Is it easier to measure a flagpole than a tree? Why? Why not?
Is it easier to measure something that’s close than something that’s a long way away? Why?
Does it matter if the ground between you and the object is going uphill or downhill? What is the simplest situation?
How accurate will your method be? Will you be able to measure the flagpole to within a centimetre/metre/kilometre?
Again they will need to justify their claims.
-
Then get them to do some predicting. Send them to work in their groups on the following questions.
How high do you think the flagpole/building/mountain is? (Choose three local objects here that you have a chance of measuring over the course of the unit.)
How accurate do you think your answers will be?
How did you come up with your guess? (The flagpole is 4 basketball players high, say.)
Get them to record (i) their guesses for the three heights; (ii) the three error estimates; and (iii) their method of guessing the various heights. Put the answers into a sealed envelope. These can be opened later when they have done some practical work.
-
In a class discussion, go over what the groups have done and come to a class consensus on the answers if you can. (Don’t force it. If there are several points of view that is not a problem.) Record the class answers and put them away in an envelope for later.
-
Let them then work in their groups to develop two practical ways to measure heights.
-
Give the students time to summarise what has been discussed in this class.
Session 2
In this session the students will measure the height of something where there is a flat piece of ground between them and the object. This will be done by using corresponding sides of similar right angles triangles.
Teachers’ Notes
In this session we want to measure the height of an object that has flat ground on at least one side of it. (This is an accessible object.) If you have a gym, then almost any object there could be measured. If you have a netball court, then you could measure the height of the hoop.
The basic mathematical idea here is shown in the diagram below.
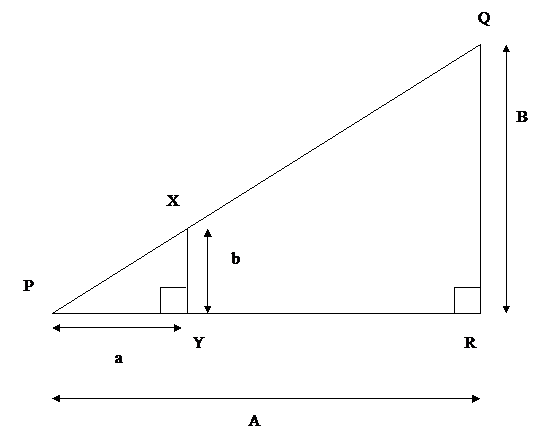
The basic idea is that the two right angles triangles are similar so that ![]() . If we rearrange the equation we’ll get
. If we rearrange the equation we’ll get ![]() . If we can measure A, a, and b, we’ll be able to find B, the height of the object.
. If we can measure A, a, and b, we’ll be able to find B, the height of the object.
Note that we have suggested that the students do some examples in the form of ‘Challenges’. Hopefully this is more interesting than doing lots of examples from worksheets and it gives them a chance to use their creativity.
To measure something in the gym, one student could lie on the ground with their eye at P and another could move a stick (XY) till its top and the net at Q are in line. Then they need to measure a, A and the stick’s length b.
Teaching sequence
-
Quickly recall the discussion from the last session.
-
Remind them of the method of similar triangles. (The diagram is in the Teachers’ Notes.) Get them to go through some particular examples where a, b and A are given and check that they can find B, the height of the object.
-
Now give them four challenges to be worked on in their groups.
Challenge 1: If you know that PY = 4m, XY = 3m, and PR = 12m, what other lengths on the diagram can you find? (Using similar triangles and Pythagoras’ Theorem, you can find QR, PX, PQ as well as RY and QX.)
Challenge 2: If you know that PY = 12m, XY = 5m, and PQ = 12m, what other lengths on the diagram can you find? (Using similar triangles and Pythagoras’ Theorem, you can find QR, PX, PR as well as RY and QX.)
Challenge 3: If you know that PX = 25m, QX = 50m, and RY = 40m, what other lengths on the diagram can you find? (Using similar triangles and Pythagoras’ Theorem, you can find QR,
Challenge 4: What is the fewest number of sides that you need to know in order to find all of the others? Will two do? (No, you have to have three.) If it’s three, then which three sides will do?
-
While they are working on the Challenges, go round the groups and check on progress. Be helpful but don’t give answers away too easily.
-
Get them to report back on what they have found. Check the answers as you go.
-
Now prepare them for a practical task in the gym, say.
Suppose that the netball hoop is at Q. How can we find its height above the ground?
Discuss.
(How could you use the diagram in a practical situation? What would XY be? What would you have to measure? How would you measure it? What problems might you face?)
-
Get the students in groups to decide what equipment they need for the next session when they will actually measure the heights of several objects. Let them record their intended plan of action in their books.
Session 3
This is a practical session where they measure an accessible object or two.
Teachers’ Notes
Plan to use the netball court or the gym to measure some heights.
Teaching sequence
-
After the preparation of the last session the students should be ready to go straight to the netball court or gym to find the heights of several objects. As they are getting the measurements they need, go round and give them whatever practical help they is necessary. It should be clear that it’s a pain having to lie on the floor. How can they take the observations without lying down?
-
Now use the method of similar triangles from the last session to calculate various heights. Measure each object at least twice as there are several places where errors might creep in. The measuring can be done on the netball court or the gym.
-
Get them to think about the accuracy of their measurements.
-
Where might errors have crept in?
-
Using a step ladder, measure the objects directly.
-
Discuss the results that they have found. This might be a good time to open up the sealed envelopes to see how good their earlier guesses where.
-
Write up the results of the lesson and especially comment on anything that went wrong.
Session 4
Here we introduce the idea of tan θ.
Teachers’ Notes
Here we use the fact that ![]() to find the height QR. Since this gives
to find the height QR. Since this gives
QR = PR tan θ, if we can measure PR and θ, we can find QR.
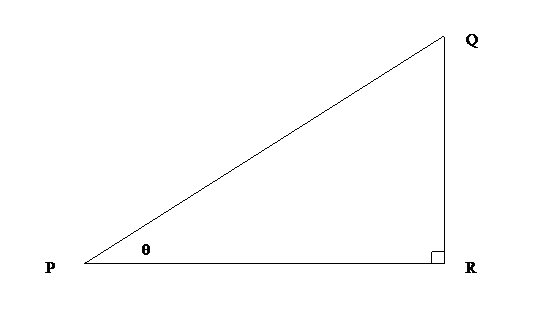
Use the diagram below to pose the various challenges.
Teaching sequence
-
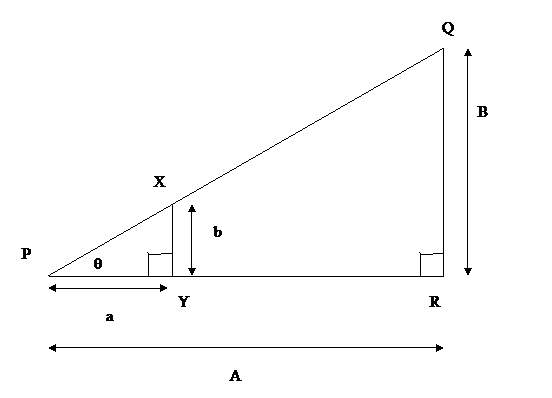
Using the diagram from session 1, show the class that
 . Remind them that this is because the two triangles are similar (the ratio of corresponding sides of similar triangles is the same).
Is this ratio the same no matter where the vertical line XY is in this diagram? -
If the students can easily see that the answer to this question is ‘yes’ and depends on the similar triangle property, then move on to define this ratio for right angled triangles to be tan θ. If they can’t, then give them a few triangles to experiment with. Let them measure the sides and see that, although the ratio changes from triangle to triangle, for each triangle it is independent of where the vertical line XY is.
-
Send them into their groups to calculate tan θ for various values of θ. Do this directly by drawing the triangles and then measuring the sides. They should be able to use protractors to produce right angled triangles where θ = 30º, 45º, and 60º. Have a reporting back session to discuss their results.
-
Discuss tan θ in a whole class setting.
How would you find tan 25º?
Do you have to draw the triangle each time?
Show them how to find the tan of an angle using a calculator.
-
Now set them various challenges relating to the triangle PQR with angle QPR = θ.
Challenge 1: If you know that PR = 4m and θ = 30º, how big is QR? Can you then find PQ?
Challenge 2: If you know that PR = 6m and θ = 45º, how big is QR? Can you then find PQ?
Challenge 3: If you know that PR = 10m and θ = 60º, how big is QR? Can you then find PQ?
Challenge 4: If you know that PR = 4m and θ = 20º, how big is QR? Can you then find PQ?
Challenge 5: If you know that QR = 12m and θ = 30º, how big is PR? Can you then find PQ?
Challenge 6: If you know that QR = 10m and θ = 45º, how big is PR? Can you then find PQ?
Challenge 7: If you know that QR = 2m and θ = 50º, how big is PR? Can you then find PQ?
Challenge 8: If you know that QR = 6m and θ = 65º, how big is PR? Can you then find PQ?
-
Check that the groups are on track. When most people have nearly finished return to the whole class setting and discuss their results.
-
Now try another challenge. You’ll need graph paper for this.
Challenge 9: What does the graph of y = tan θ look like?You will probably need to discuss this with them before you let them start graphing.
What do you need to know?
-
When they have all produced a graph, choose one or two to put on the wall.
-
Then return to the diagram with X and Y and pose the following challenge.
Challenge 9: In this triangle if you are told that θ = 40º, what two sides do you need to be given in order to find all of the lengths? -
Discuss what results they produce. There are several answers to the Challenge. So long as they choose two sides that are not in the same triangle they should be able to find all sides using the tan relation or Pythagoras’ Theorem.
-
Give the students time to write up what they have learnt in this session.
Session 5
In this session we find the height of an object using tan.
Teachers’ Notes
In this session we use the tan function to find heights of accessible objects. This time the measurements that we take are the angle of elevation and the distance from the object.
They might actually produce some equipment to do this measuring. Below we show a device that was used in mediaeval times. It can be easily made with a toy construction kit.
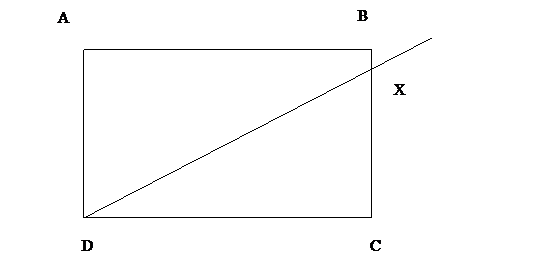
First of all, construct a rectangular frame ABCD with a rod DX. This rod is pivoted at D and the point X is able to move up and down CD as the rod DX moves up and down. If the frame is put on a table, the top of the object can be sighted using DX. (You’ll need to know how high the table is, of course.) The angle θ is then angle CDX and this can be read off of the frame if a protractor is reproduced at the D corner.
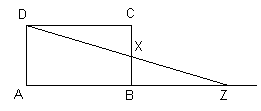
Now turn the frame upside down. This time sight the bottom of the object with DX. Suppose the bottom of the object is at Z. Then triangles DCX and ZBX are similar. So ![]() . Rearranging gives
. Rearranging gives ![]() . Now we can measure all the distances on the RHS of the equation from the frame. So we can calculate BZ. Now BZ + AB is the distance of the object from D. We don’t need to measure the length from D to the object.
. Now we can measure all the distances on the RHS of the equation from the frame. So we can calculate BZ. Now BZ + AB is the distance of the object from D. We don’t need to measure the length from D to the object.
This method is useful when we have an accessible object that isn’t accessible!! For instance, it is useful if we want to measure the height of a tree that is on the other side of a river.
Teaching sequence
-
Discuss how you might use the tan function to measure the height of an object.
-
Remembering the problem that students had lying on the floor to ‘sight’ the flagpole with the stick, get them to think about how they could find the various measurements without lying down. The piece of equipment in the Teachers’ Notes may be useful here.
-
When they are prepared to do the measuring, let them return to measure the same objects that they measured in session 3 (on the netball court or in the gym or wherever they did it before).
-
When they have finished and made all the relevant calculations, let them report back on their findings.
-
Which method do you think is the most accurate? Why?
-
Where does the greatest inaccuracy come in?
-
Let them write up the results of this session.