In this unit students investigate the relationships between the area and perimeters of squares and rectangles.
- Use a formula to calculate the area of rectangles and squares.
- Investigate the relationship between the perimeter and area of rectangles.
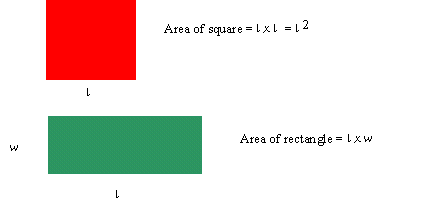
Area is the amount of flat (planar) space enclosed by some boundary. Perimeter is the distance around that boundary. Area is measured in square units (e.g. m^2) because squares tessellate easily and consistently fill a 2-dimensional space in two directions. In the early stages of learning about area students fill a shape with squares leaving no gaps or overlaps. Since the squares are laid out in rows and columns it is more efficient to use multiplication (e.g knowledge of arrays) to find the number of units in a rectangular space. This leads to knowledge of the formula length x width, which is used to find the area of a rectangle. In the same way, the students might find a formula (i.e. (½) x width x height) for calculating the area of a right-angled triangle, by seeing it as half of a rectangle.
Similarly, a formula for the perimeter of a rectangle is perimeter = 2 x length + 2 x width. Since the sides of a rectangle are all equal the formula for perimeter is perimeter = 4 x side length. In both the area and perimeter formula students should recognise squares as a specific type of rectangle. Dissecting and reassembling parallelograms, trapezia, and triangles, allow students to "discover" and understand area formulae to be used with a range of shapes.
Summary of Area Formulas
The unit could be used as a series of sessions with the whole class. If appropriate, after introducing and modelling each activity, your whole class could rotate around these stations over the course of a week. Ensure that your students have had physical experiences with exploring area prior to working on these problems, and that they have developed the knowledge necessary to complete each activity independently or with a partner. During this time, you could also hold small group teaching sessions to address gaps in knowledge and misconceptions that have become apparent during your introduction (or other whole class teaching).
The learning opportunities in this unit can be differentiated by providing or removing support to students and by varying the task requirements. Ways to differentiate include:
- using square grid paper alongside symbols to model how area and perimeter can be found
- using tables to support students in looking for patterns in perimeters and areas
- explicitly teaching students about the meaning of symbols such as cm^2
- using collaborative groups so students can discuss, and explain ideas, and justify claims using mathematical and statistical reasoning. Organise these groups to be composed of students with mixed levels of mathematical confidence and knowledge to encourage these collaborative learning processes
- encouraging students to draw, use diagrams and materials, and use digital tools to explore measurement concepts (e.g. Google drawings, online shape tools - search online for interactive area and perimeter tool)
- for each task, providing direct and explicit teaching, modelling, and opportunities for students to make calculations with a partner and independently, ensuring they feel confident before beginning to work independently on the task
- providing opportunities for students to express their mathematical understanding, and the ideas developed in this unit, in different ways (e.g. as a video, by acting it out, with the use of digital tools, or as a poster, PowerPoint, or movie)
- validating the mental calculation strategies used by students, and encouraging them to work in an increasingly efficient and systematic manner
- constraining the size of the rectangles and squares to make calculation easier
- providing calculators to ease the cognitive load associated with calculation.
This unit mostly uses squares on paper as the context, though Copymaster 2 is based on areas of rooms within in a house. Area and perimeter occur commonly in everyday life in situations like fencing an animal enclosure, measuring the size of a pizza, laying out squares to make tapa cloth or a quilt, working out how many free-range chickens can feed on a block, and spacing out vegetables or trees for planting. Vary contexts to suit the interests and cultural backgrounds of your ākonga, and to make connections to current events and relevant learning from other curriculum areas. You could choose one context to frame all problems in, or vary the contexts presented in each problem. Links could also be made to the traditional methods used by early Māori peoples to measure area and perimeter.
Te reo Māori kupu such as horahanga (area), paenga (perimeter, circumference), and ine (measure, measurement) could be introduced in this unit and used throughout other mathematical learning
- Copymasters for each of the 5 stations (see bottom of unit)
- Scissors
- Squared paper
- Square tiles
- 30 cm rulers
- Calculator
- Tape
- Coloured pens
Station 1
At this station we investigate the relationship between the area and perimeters of rectangles. The investigation is posed as two problems for the students to work on independently or with partners.
Resources:
- Square tiles
- Squared paper
- Copymaster of Station 1
Problem 1:
The landscape gardeners have thirty-six square paving slabs to make a rest area in the middle of a lawn. To make it easy to mow they want the rest area to be rectangular in shape and have the least perimeter (distance around the outside) as possible.
What arrangement of the tiles gives the smallest possible perimeter? (6 x 6)
Can you explain why this happens? (A square is the rectangle with the least perimeter for a given area)
Problem 2:
Use what you have learned from the first problem to work out which rectangular rest area the gardeners would make if they had forty-eight tiles.
(6 x 8 is the closest approximation of a square that can be produced with 48 tiles)
Station 2
At this station students design a house for the Affluent family. There are three problems to be investigated.
Resources:
- Squared paper (1 cm)
- Scissors
- 30 cm rulers
- Copymaster of station 2
- Mr and Mrs Affluent want you to design their new house. They give you the following sizes for the rooms of the house.
Living Room: 48 square metres Bathroom: 8 square metres
Dining Room: 12 square metres Laundry: 6 square metres
Kitchen: 12 square metres Toilet: 2 square metres
Bedroom One: 24 square metres Bedroom Two: 16 square metres
Bedroom Three: 20 square metres Bedroom Four: 12 square metres
Conservatory/Entrance: 12 square metres
- Use squared paper, with a scale of 1 cm = 1 m to design the house. You may find it easier to cut each room out of paper first so it can be moved around. Remember to keep passageways down to a minimum.
- When your house plan is complete, draw it showing the side lengths and areas of each room. Record the wall lengths of the house and its total area. That area is 156 m2 (“156 square metres”)
Station 3
At this station students investigate the link between the side lengths of a square and its area. There are four parts to this problem: making a square with a given area, finding the side length of the square (by finding the square root of the area), drawing squares with given area measurements, and finding the area of square diagrams.
Resources:
- Square tiles
- Squared paper
- Calculator
- Copymaster of station 3
Problem:
- Make a square with 25 square tiles. What is the side length of the square? Key in √25 on the calculator. What do you notice?
√25 gives 5 which is the side length of a square with area of 25 cm2. Use square tiles and your calculator (if you need) to complete the entries in this table:
Number of Tiles Side Length of Square Square Root 9 3 √9 = 36 6 √36 = 81 9 √81 = 49 7 √49 = 100 10 √100 = What does the square root function on a calculator do?
Gives you the square root of that number (the number that multiplies by itself to give that number). In this context, it tells you the side length of the square with that area.- Use what you have found out from part 2 to draw squares with the following areas on squared paper.
121 square units (11 x 11)
6.25 square units (2.5 x 2.5)
12.25 square units (3.5 x 3.5)
18 square units (4.24 x 4.24)
42 square units (6.48 x 6.48)
90 square units (9.49 x 9.49)
- What are the side lengths of these squares?
The left square has an area of 2 cm2 so the side lengths are √2.
The right square has an area of 4.5 cm2 (1/2 x 9) so the side lengths are √4.5.
Station 4
At this station we use several different problems to investigate the area of rectangles.
Resources:
- Squared paper (1 cm)
- Scissors
- Tape
- Copymaster of station 4
Problems:
- Cut out a 4 cm x 4 cm square from squared paper.
What are the area and perimeter of the square in centimetres? (area = 16 cm2 and perimeter = 16 cm.) - By making one straight scissor cut and moving and taping the pieces make a rectangle with a perimeter of 20 centimetres.
What is the area of the rectangle? Explain how you got your answer.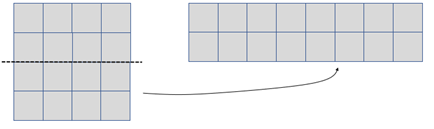
Area remains unchanged (8 x 2 = 16 cm2) - Cut out a 12 cm x 3 cm rectangle from squared paper. By cutting, moving, and taping (as in part 2) change the rectangle into a square.
What changes happen to the area and perimeter from the starting rectangle to the square?
Try to explain why this happens.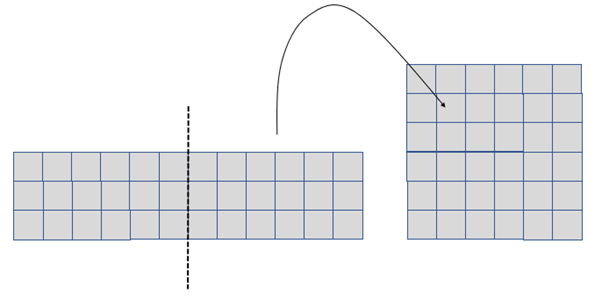
The area remains constant (36 cm2).
The perimeter decreases from 30 cm to 24 cm. - Change a 8 x 3 rectangle into a 6 x 4 rectangle by making two straight scissor cuts, moving the pieces and taping. What changes happen to the area and perimeter in this case?
Here is one solution. There are others.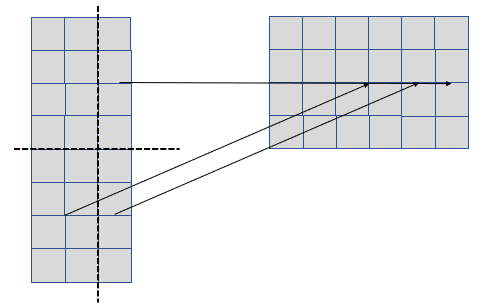
The area remains constant (24 cm2). The perimeter changes from 22 cm to 20 cm. - Make up a cut, move and tape rectangle/square puzzle for someone else to solve.
- As an extension cut out a 6 x 6 square. By cutting the square in half, moving the pieces and taping, change the square into a triangle. Find the height and the longest side length of the triangle. How do these lengths compare to the area of the square?
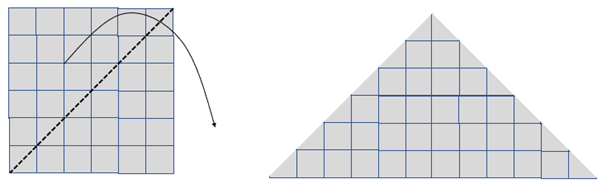
The longest side of the triangle is 12 cm and the height is 6 cm.
The area of both the square and triangle is 36 cm2.
The area of the triangle is ½ x 12 x 6 = 36 cm2. - Investigate changing other rectangles into triangles with one cut. Find the height and longest side length of each triangle and compare it to the area.
What do you notice?
Students should notice that ½ x b x h gives the area of a triangle.
Station 5
At this station we look for patterns in the perimeters and areas of squares.
Resources:
- Square tiles
- Squared paper
- Coloured pens
- Copymaster of station 5
Problem:
- Below are a 2 x 2 square and a 3 x 3 square. You may wish to make them with square tiles.
What is the difference between their perimeters?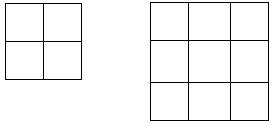
The 2 x 2 square has a perimeter of 4 x 2 = 8 units.
The 3 x 3 square has a perimeter of 4 x 3 = 12 units. - Compare the perimeters of a 3 x 3 square with a 4 x 4 square.
The 3 x 3 square has a perimeter of 4 x 3 = 12 units.
The 4 x 4 square has a perimeter of 4 x 4 = 16 units. - Compare the perimeter of a square with the next biggest square.
What do you notice? Why does this occur?
The difference is always 4 units because 1 unit is added and there are four sides. - Go back to the 2 x 2 and 3 x 3 squares. Compare the areas of these squares.
- Compare the area of different squares with the area of the next biggest square. What pattern do you notice?
Organising your results in a table may help:
| Square | Area | Difference from previous square |
| 1 x 1 | 1 | |
| 2 x 2 | 4 | 3 |
| 3 x 3 | 9 | 5 |
| 4 x 4 | 16 | 7 |
| 5 x 5 | 25 | 9 |
| 6 x 6 | 36 | 11 |
- Investigate the difference in areas and perimeters between rectangles and the next biggest rectangle, like 1 x 2 and 2 x 3, 2 x 3 and 3 x 4, 3 x 4 and 4 x 5…
What patterns do you notice?
Try to explain why each pattern occurs.
Just like the square, 1 unit is added to each side and there are four sides. So the differences in perimeter are four each time.
The difference in area increases by even numbers.
| Rectangle | Perimeter | Difference | Area | Difference |
| 1 x 2 | 6 | 2 | ||
| 2 x 3 | 10 | 4 | 6 | 4 |
| 3 x 4 | 14 | 4 | 12 | 6 |
| 4 x 5 | 18 | 4 | 20 | 8 |
| 5 x 6 | 22 | 4 | 30 | 10 |
Family and whānau,
Did you know that the largest lasagne was made in Wieliczka, Poland? It measured an amazing 25 m x 2.5 m!
This week your child is to work on the following questions. Please encourage them to explain their thinking.
- What shape was the lasagne? Draw a sketch of this with the measurements noted.
- What is its perimeter?
- How would the perimeter change if the length was one metre longer?
- How would the perimeter change if the length was 5 metres longer and the width one metre shorter.
- What is the area of the lasagne?
- How many people do you think you could feed with this lasagne?