Purpose
The purpose of this activity is to support students in sorting a set of 2D shapes by the properties of the shapes.
Achievement Objectives
GM2-3: Sort objects by their spatial features, with justification.
GM2-4: Identify and describe the plane shapes found in objects.
Required Resource Materials
- Cards made from copymaster (all the shape cards and the property cards)
- Small mirror without a frame
- Hoops or short skipping ropes tied in a loop (to house sets of shapes)
Activity
- Spread out all the shapes from the Copymaster on the floor or tabletop.
Can you help me sort these shapes into groups? The shapes in the groups should be the same in some way.
Let students attempt a sort. Ask them to justify the allocation of shapes to groups.
It is likely that students will opt for a binary sort (2 options). Look for explanations like:- “I put the round shapes in this group and the shapes with corners in this group.”
This opens a discussion about a corner being the meeting point of two sides. - “I put the triangles in this group and all the other shapes in this group.”
Consider: have all the triangles been identified?
- “I put the round shapes in this group and the shapes with corners in this group.”
- Introduce the property cards (page 3 of the Copymaster). Note that they are given in sets and are shaded accordingly:
- Right angles / Non-right angles
- Parallel sides / Non-parallel sides
- 3 sides and 3 corners / 4 sides and 4 corners / More than 4 sides and 4 corners
- Symmetrical / Non-symmetrical
- Discuss what each term means, and introduce relevant te reo Māori kupu (e.g. koki hāngai - right angle, hangarite - symmetry/symmetrical, whakarara - parallel, tapa - edge/side).
- Use the mirror to check if shapes are symmetrical. This can be done by placing the mirror in the middle of the shape, and subsequently seeing whether the reflection of the shape, combined with the non-reflected portion of the shape, looks whole.
- Show that an angle that does not look like an L is a non-right angle. This could be done using comparison with other shapes containing right-angles and a protractor, if necessary.
- Draw a large circle (or create one with rope or hula hoops). Label each circle using the cards “right angles” and “non-right angles”.
Invite students to choose a shape and allocate it to one of the circles. You might also ask the students to identify a real-life context in which they have seen each shape (e.g. it is the same shape as the whiteboard).
After a few cards the sorting should end up with something like this: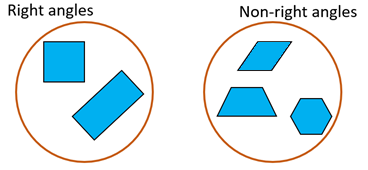
- Ask students to explain their reasoning for the placement of each shape. Encourage the use of relevant mathematical vocabulary, and the use of comparison.
- Choose a shape that has both right-angles and non-right angles. Examples are shown below:
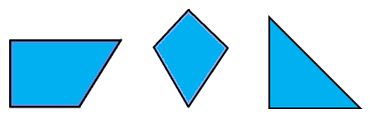
Where will we put these shapes?
Look for students to explain that the shapes have some right angles and some non-right angles.
- Show students that overlapping the circles allows a shape to belong in both groups.
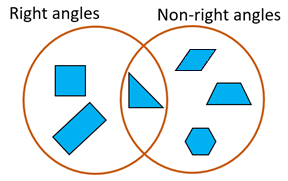
-
Provide each pair of students with their own set of shape cards, two or three hoops, and a set of property cards. Provide mirrors and protractors for students to use, if needed. Ask pairs to work collaboratively to sort the shapes. You might also ask the students to identify a real-life context in which they have seen each shape. Roam as they work, looking for the following:
- Do they understand the property they are using to classifying the shapes?
- Are they consistent in applying the criterion?
- How do they deal with intersection of groups if it applies?
- How do they deal with shapes that the criteria do not apply to?
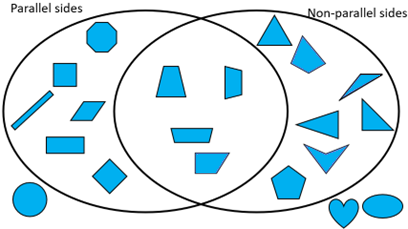
For, example the students with parallel and non-parallel sides should have a display like this:
- Provide time for students to create an explanation of their sorting, using a suitable means of action and expression (e.g. written, verbal, videoed, labelled), and then share their explanation with the class.
Ask questions that are aimed at thinking about properties, such as:
All the triangles have no parallel sides. Why does that happen?
Where do the closed curves, like the circle and ellipse go? Why can’t they be included?
Which quadrilaterals go in the parallel sides hoop? Why? Can you name them?
- You may decide to change the set of property cards you give to each group and see if they can re-classify the shapes by the new criteria. That is a good way to assess students’ understanding of shape properties.
Next steps
- Apply the property cards to different sets of shapes.
- Develop students’ mathematical terminology to include shapes that arise from sorting. For example:
These shapes have the similarities; four sides, one pair of parallel sides, on pair of non-parallel sides. The name given to these shapes is trapezium.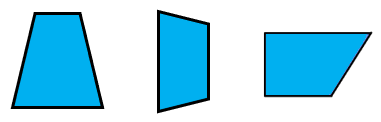
- Ask students to draw shapes that meet properties you provide. Begin with a single property then increase the number of properties that students need to get correct simultaneously.
For example:- Single property:
- Four sides
- Two equal sides
- Five angles
- Two properties:
- Four sides and two equal sides
- Three sides and symmetry
- Two equal angles and two equal sides.
- Single property:
Attachments
2d-shapes_0.pdf107.69 KB
Add to plan
Level Two