Purpose
The purpose of this activity is to support students in naming common two-dimensional shapes using mathematical terms. Students also explore where in real-life they encounter these shapes.
Achievement Objectives
GM2-3: Sort objects by their spatial features, with justification.
GM2-4: Identify and describe the plane shapes found in objects.
Required Resource Materials
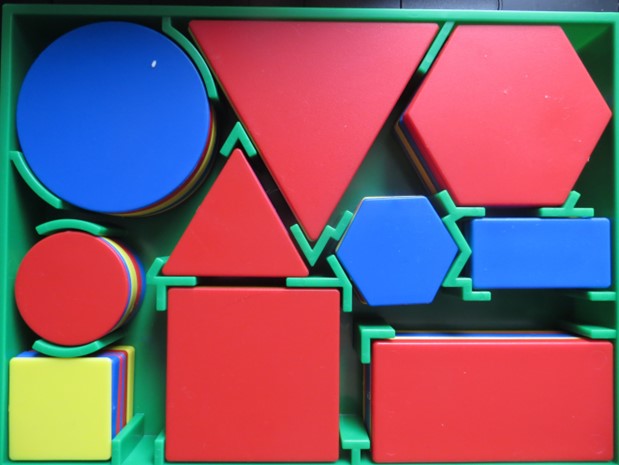
- A set of attribute blocks
- PowerPoint
Activity
- Begin the lesson by allowing students to explore the set of attribute blocks. You could also display a digital representation of these on a shared screen.
What can you tell me about this set of blocks?
- Students might offer the names of shapes, describe their attributes, or make links to real-life contexts in which they have seen these objects. Record students' ideas on a large chart or shared screen.
- What pictures can you make with these shapes?
Provide time for students to create pictures using the shape blocks, and discuss these creations with their peers.
- To assist with the generation of students' ideas, you might provide an example of a tangram picture for students to initially emulate, before asking them to create pictures around a shared theme (e.g. buildings, animals, people).
- When discussing the pictures made, encourage students to name the individual shapes used. Names like oblong (rectangle) and hexagon may need to be introduced to this discussion.
- Draw attention to the real-life places in which students have seen these shapes. For example, the wheels on cars are circles, the windows on houses are rectangles or squares.
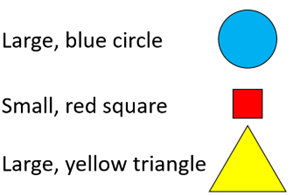
- Play a game of Shape Soup with the students. You might bring a large pot from home to cook the imaginary soup in. The first four slides of the PowerPoint have four recipes.
- Read each recipe and invite the students to add the ingredients as they are read.
- Once the pot is full, do a check to see that nothing has been missed out.
Have we got 1 blue circle? Check!
Have we got 3 triangles? Check! - Together, list the names of each shape. You might also include the colours (red, blue, and yellow) and the sizes (small and large).
- Discuss the features of each shape. Students might describe features in their own words, such as “pointy bits” for corners or “flat lines” for sides. You might count the numbers of corners and sides that the shapes have.
- Ask students to make up and write their own recipe for shape soup.
When the recipes are written students can read the recipes to a partner while that person makes the soup. Consider what extra supports will be needed to for writing, and what means of action and expression students might use (e.g. verbal recordings or explanations, digital presentations).
- Slides 5 and 6 of the PowerPoint provide some pictures made with attribute blocks. There are two ways to use the pictures:
- Students make the picture with attribute blocks. They create their own pictures. This way is good for students to attend to the features of the shapes.
- Students describe to another student how to assemble the picture. This requires the student to use the shape names as well as positional terminology to locate the shapes. The student receiving the instructions must interpret the instructions, further reinforcing their mathematical vocabulary. You might encourage use of relevant te reo Māori kupu in this activity (e.g. tapa - edge/side, akitu - vertex/corner, the names of specific shapes).
Next steps
- Start with a single attribute block. Encourage students to compare this block with others, focusing on the similarities and differences.
- Find a block that is the same as this one in some way.
Note that the similarity might be shape, size, or colour. There may be several similarities. - Find a block that is different to this block in some way.
If a student chooses a different shape, look for them to name the shapes and explain how the shapes are different by attending to features. For example, “a circle has no corners, but a triangle has three corners.”
- Find a block that is the same as this one in some way.
- Look for shapes in the environment. Go on shape hunts around the school, use digital technology to find images that contain shapes, or look in current texts and relevant learning resources (e.g., sports gear, picture books, the school garden, artwork) to find real-life examples of shapes. Make connections between shapes and purpose. For example, “circles make good wheels because they roll,” or “rectangles make good bricks because they stack.”
Provoke attendance to features and purpose with questions like, “why does a circle roll when a rectangle doesn’t?” and “why does a rectangle stack when a circle doesn’t?”
Attachments
naming-flat-shapes.pptx45.48 KB
Add to plan
Level Two