The purpose of this unit is for students to investigate the transformation elements of geometry in spring flowers. They apply these elements to create artworks.
- Develop and use attribute language.
- Sort flowers by their appearance.
- Explain and justifying groupings with reference to attribute language.
- Recognise and describe reflection.
- Recognise and describe symmetry.
- Recognise and describe rotation.
- Recognise and describe translation.
- Apply understandings of reflection, symmetry, and translation to practical tasks.
- Make an artwork in which elements of transformation are evident.
This unit begins with students sorting a selection of spring flowers by their characteristics. As they sort, the students explain and justify their grouping and, in doing so, use and develop important attribute language. This might make reference to the flowers’ colour, size, shape, texture, fragrance, weight, the number of flowers on one stem, and so on. Students might contribute their own unique rationale for their grouping and should be encouraged to develop increasingly sophisticated classifications.
In working closely with a range of flowers the students will notice that they are comprised of interesting shapes that, in many flowers, are arranged in patterns. The transformations demonstrated in these flowers often involve reflections and rotations, in particular, and translations in the arrangement of leaves along a stem. These three transformations are distinct actions and are commonly referred to as ‘flip, turn, slide.’
To understand reflection, students should work with mirrors and reflected images. It is important that students understand that a reflection is not a translated copy, but a ‘flipped reverse’ image. To develop this understanding, it is helpful to talk about the way the image is ‘flipped’, and to describe the image from the line of symmetry outwards.
Students need to understand that a rotation is when an object turns around a point. In the case of some flowers, the turns made by petals are part turns, or half and quarter turns, which, when repeated, complete one full turn or rotation. Students should have many opportunities to model and explore these actions.
As students work with translation, the focus is on the absence of turns and flips. Rather the only movement is a ‘slide’ along a plane.
Crosscurricular links (The Arts)
As students work with the flowers, an appreciation of their aesthetic qualities is developed. Flowers have inspired artworks and have been appreciated for their beauty throughout history. As students view the results of their own and each other’s practical creative tasks, it is important that they are given opportunities to express the feelings and responses.
Associated Achievement Objectives
Visual Arts, level 1
- Explore a variety of materials and tools and discover elements and selected principles.
- Investigate visual ideas in response to a variety of motivations, observation and imagination.
- Share the ideas, feelings and stories communicated by their own and others’ objects and images.
The learning opportunities in this unit can be differentiated by providing or removing support to students, and by varying the task requirements. Ways to differentiate include:
- providing simpler or more complex images
- varying the level of guidance supported to students when they are drawing transformations and using mirrors
- allowing students to work in pairs or small groups on some activities. By grouping students strategically you can encourage greater peer learning, extension, and scaffolding.
The activities in this unit can be adapted to use objects that are part of your students' everyday life. For example, you may prefer to use leaves, shells, or other images with the appropriate symmetry instead of flowers.
Te reo Māori kupu such as whakaata (reflection), hangarite (symmetrical, symmetry), huri (rotate, rotation), and neke (translate) could be introduced in this unit and used throughout other mathematical learning. You could also encourage students, who speak a language other than English at home, to share the words related to transformations that they use at home.
- A selection of spring flowers
- Pictures of spring flowers
- Paper
- Pencils and erasers
- Coloured felts/crayons/pastels
- Saucers/dishes
- Sand
- Cardboard
- Scissors
- A large selection of small flowers and leaves
- A daisy chain (or picture of one)
- A class set of rectangular hand mirrors
- One larger mirror (approx. A4 size)
- Copymaster 1, Copymaster 2, Copymaster 3
Whilst this unit is presented as sequence of five sessions, more sessions than this may be required. It is also expected that any session may extend beyond one teaching period.
Session 1
This session focuses on students becoming aware of the attributes of flowers. This is achieved through students sorting flowers, justifying their groupings of flowers, and using the language of attributes. You might make links in this session to the conservation or growth of native plants in your local environment. A local horticulturalist might be able to come talk to your class about spring flowers.
SLOs:
- Develop and use attribute language.
- Sort flowers by their appearance.
- Explain and justifying groupings with reference to attribute language.
Activity 1
- Make connections to students' prior knowledge. Write Spring on the class chart and have students talk to a buddy to tell them what they know about Spring. Share and record their ideas on the chart, including the fact that many beautiful flowers appear in Spring.
- Explain that the class is going for a spring walk about the school/neighbourhood and that it is the job of everyone in the class to ‘spot spring flowers’ and to return to class with ‘wonderful words’ to describe the spring flowers that they notice. You might make links to vocabulary discovered in a shared book to help students describe the flowers.
- Complete the walk. Brainstorm and record the spring flower words. Read these together.
Activity 2
Make a selection of spring flowers available.
- Have students work in pairs. Explain that together they are to sort their pile of flowers into groups of different kinds, and that they must be ready to tell another group about what they have done.
- Have students complete the sorting and share their thinking with a few other pairs.
- As a class, share some of the grouping results and discuss.
- Photograph and print the groupings.
- Have individual students name their work and write an explanation for their grouping of the flowers. Note that this task could be completed in a writing session. Encourage students to use the words generated in the class brainstorm to help them describe their groupings. You might provide an exemplar or sentence starters to support students in this task.
E.g. I grouped these flowers because...
My flowers are... (encourage the use of adjectives)
The flowers in my grouping are.... (encourage the names of specific flowers).
Activity 3
- Conclude the session by displaying the pictures in Copymaster 1,
Explain that:
Vincent Van Gogh was an artist who usually wrote his name, Vincent, on his artworks. Notice his signature.
He was born in the Netherlands and lived for some of his life in France.
In ten years Van Gogh made about 900 paintings.
He only sold one painting during his lifetime.
He only became famous after he died, which was over 120 years ago.
One thing he loved to paint was sunflowers.
Show Copymaster 1. This is one of many pictures that he painted of sunflowers. The second is a painting that someone has created. They have been inspired Van Gogh’s art and created their own painting of sunflowers.
Note that sunflowers are not spring flowers because they grow from seed through the spring and summer and reach maturity in late summer. You might create a new copymaster using artworks, featuring spring flowers, created by New Zealand artists (or perhaps artists that are currently part of your community). Artists such as Frances Hodgkins, Rita Angus, Dick Frizzell, and Vaine Ngaro have all created works of art featuring flowers. Your students might also be able to take pictures of art work from their homes and local communities featuring flowers. - Ask the students what they notice about the flowers in artwork and add appropriate attribute language to the list already begun on the class chart.
- Explain to the students that in another session, they will be making some flower art works.
Session 2
This session focuses on students understanding the symmetry of reflection, explaining this using their own words, and applying this knowledge.
SLOs:
- Recognise and describe reflection.
- Recognise and describe symmetry.
- Apply understandings of reflection and symmetry to practical tasks.
Activity 2
Make available individual copies of the photographs of the flowers shown on Copymaster 2.
- Have each student select 2 or three photos of their choice and ask them what is the same about the flowers they have selected.
Accept all appropriate answers. Guide the discussion to the shape of the flowers and to the fact that if they look at their flowers from each side of the photo, the flowers look much the same. - Make available a set of small rectangular hand mirrors. Have each student carefully fold one of their photos in half then place the mirror along the fold. Model this process for students.
- Have students describe about what they see to a partner. Encourage them to notice and describe the parts of the flower closest to the fold (line of symmetry), and identify the parts that are farthest away.
- Record their ideas on the class chart. For example: ‘I can see the whole flower again’, ‘It just looks like the flower in the picture’, ‘It’s like the opposite from the middle out-ways.’
- Introduce and write the words ‘reflection’, and ‘symmetrical’. Introduce the word flip and demonstrate folding, then ‘flipping’ open the picture of the flower.
- Have the students apply the mirror to another of their photos and describe to a partner what they see, using the words ‘reflection’, and ‘symmetrical’. Model using these words in a sentence and display a sentence starter on the board for the class to use.
E.g. I can see 3 petals in the reflection.
I know that my flower is symmetrical because I can see three petals in the mirror and on the paper.
I notice... I can see that... - Have students notice and describe the parts of the flower closest to the mirror line of symmetry, and identify the parts that are farthest away. Write line of symmetry, discuss and demonstrate. Have students identify a possible line of symmetry on their flower, by folding and using their mirror. Have them describe what they can see to a partner, and then to the whole class.
Activity 3
Make Copymaster 3 available to each student.
- Demonstrate how to complete one of the flower drawings. Show how to begin at the line of symmetry and to work out, thinking about which parts are close to the ‘centre’ and which are far away.
- Have each student ‘complete’ each flower using the mirror first, then by drawing the ‘reflection’ and colouring it appropriately.
- Have the students check their own drawings by, once again, applying the mirror (to the line of symmetry).
- For students ready for extension, you could ask them to create their own reflected drawing of a flower using a small square of paper and their mirror.
Activity 4
- Display the sunflower picture. Show the bigger (A4 size) mirror.
- Ask individual students to demonstrate how they would check if this picture is symmetrical.
- Have students place the mirror in both vertical and horizontal positions, demonstrating that only the vertical placement produces a complete picture that is like, but not exactly the same as, the whole original picture.
- Draw a pencil line of symmetry vertically down the centre of the picture. Discuss that the sides are not exactly the same and, if something is truly symmetrical, it would be an exact flip. Check to see if just the vase is symmetrical.
Session 3
This session focuses on students applying their understanding of symmetry to create a sand-saucer flower design.
SLO:
- Apply understandings of reflection and symmetry to practical tasks.
Activity 1
- Display the class chart and the words, ‘symmetry’ and ‘line of symmetry’.
Review some examples of student work from Session 2. - Display several of the flower pictures from Copymaster 2 and have individual students show how to draw a line of symmetry down the middle of the picture and describe the reflection. Encourage the use of the language developed in Session 2.
Activity 2
- Make available, saucers, damp sand, a selection of small flowers and leaves, small pieces of card, rectangular hand mirrors.
- Explain that each person in the class is going to make an artwork for display. Decide on a purpose for these artworks (e.g. other classes of students and parents may be invited to the Room x Art Gallery when the artworks are complete).
- Demonstrate how to fill a saucer with damp sand, pat it down firmly, take a piece of card and use it to score a line of symmetry down the centre of the sand, and carefully arrange chosen flowers in an ‘artistic’ way on one side only of the line.
Emphasise the importance of covering all the sand in this half (not having any sand showing). - Give students ample time to complete this process.
- Demonstrate how to complete the sand-saucer making the other half a reflection of the half just completed. Emphasise once again how to begin at the line of symmetry and to work out from this line.
- As each student completes their artwork have them check the symmetry of it with their hand mirror. Have them write their name on the small piece of card and display their named work.
Activity 3
- When all floral artworks are completed and displayed, complete a silent art-walk, asking students to notice the artworks in which there is ‘ a good reflection.’ Discuss.
- Have student talk about the process of creating the sand saucers. Have them evaluate their own work by telling and showing a buddy what in particular they did well/could improve in their artwork. This could be completed as a short presentation or piece of writing, and could be accompanied by a photograph of the students' artwork.
Session 4
This session develops the understanding that rotation is turning around a point.
SLOs:
- Recognise and describe rotation.
- Apply understandings of rotation to practical tasks.
Activity 1
- Review the process for making the symmetrical reflecting artworks.
- Display the class chart and with a felt pen draw a large dot in its centre. Show the picture of the frangipani flower.
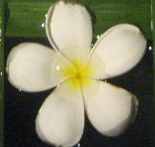
- Make a felt pen and a cardboard template of the shape of one of the petals available to students.
- Ask: ‘Can someone show the class how to use the felt pen and this cardboard cut out petal to make a frangipani flower on the class chart?’
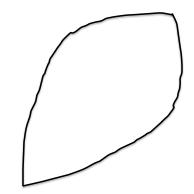
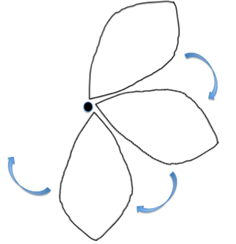
- After demonstrations and discussion, agree that it is possible to place one end of the template at the large dot, draw around the template, then turn the template to another place, keeping the end on the black dot.
- Write ‘turn’ on the class chart and make a list of ‘things that turn' (e.g. wheels, balls, ships, cars, people). Record students' ideas.
- Ask the students if they know another word for turn. Introduce and record the words ‘rotate’ and ‘rotation’ and record these on the class chart.
- Ask how many turns have to be made to make to complete a whole flower. Explain that the turns that are being made are parts of turns.
- Model (or have a student model) one complete turn, a half turn, and a quarter turn. You might also make links to the movement of an analogue clock by moving the arms to show a quarter past, half past, and o’clock. You could also play a game of Simon Says to help students explore these different amounts of rotation.
- Have students take turns with the cardboard petal template, to model a quarter turn and a half turn. Have them draw a flower using 4 quarter turns and count the 4 petals, before drawing a flower with half turns. Draw attention to the fact that this flower has just 2 petals.
Activity 2
- Explain that each student will make a artwork using ‘turning’ to help them.
- Provide pencils, erasers, paper, cardboard templates of petals of different shapes, crayons or pastels, spare pieces of cardboard. Have each student make their own flower, or several flowers, using the process that has been modelled with a petal shape of their choice. Have them colour their completed flower/s.
- Have students draw and cut out a template of their own and repeat the process with their own ‘unique’ petal shape, including making one flower using quarter turns (four petals).
- Conclude the session by having individual student explain how they made their flowers. this could be done as a verbal sharing, or as a written explanation. Encourage students to use key words, including half, quarter, turn, dot/point, middle, petal, flower. Written explanations could be attached to the flower pictures for display.
Session 5
This session develops the understanding that when a shape is translated, it slides, without turning or flipping, in one direction along a plane.
SLOs:
- Recognise and describe translation.
- Apply understandings of translation to practical tasks.
- Make an artwork in which elements of transformation are evident.
Activity 1
- Display Van Gogh’s Sunflowers once again. Have students review and explain reflection and rotation in their own words, with reference to their own work and to the picture. Prompt them to notice that the vase is symmetrical, and that the sunflower petals rotate around a very large point
- Show the students a daisy chain and talk about the fact that the daisies are in a line that is created by the linking of stems.
- Explain to the students that they will make another artwork today, a bit like the daisy chain. They will not be ‘reflecting’ and they will not be ‘turning’ (rotating) the elements of their artwork. Ask for suggestions of other kinds of movements.
Look at the line of daisies.
How have the daisies moved?
With discussion, agree and emphasise that another action or transformation could be to slide along a line (translation).
Activity 2
- Make available sheets of coloured paper, lengths of white paper, pencils, scissors, glue, crayons/pastels.
Demonstrate the following process for students:- Fold the paper into four (in half twice).
- Keep the paper folded and draw a simple flower (daisy) shape on the visible quarter.
- Cut around the flower shape, cutting through 4 layers of paper (ensuring that 4 identical flower shapes are cut out).
- Keep the flowers in the pile.
- Place the pile of 4 at one end of a length of white paper.
- Slide each paper daisy, one at a time, off the pile and along the paper strip till there are four daisies in a row.
- Emphasise that the daisies are not turned at all. The only thing they do is slide.
- Glue each flower carefully into place.
- Connect each flower with a green line (daisy stems)
- Emphasise that there are no flips (reflection), no turns (rotation) only sliding (which is called translation).
- Have students complete the task, with support as appropriate.

- Have students repeat the process to add extra details to their flowers or to extend their daisy chain.


- Display the artworks and together, write a class explanation about the ‘daisy chain process’ using sliding, with no turning or flipping.
- As a class, reflect on the mathematical ‘flip, turn, slide’ actions used to make each of the class artworks.
Take an ‘art-walk’ and have students notice where these actions have been accomplished well. - Highlight the fact that, just as Van Gogh (or another relevant, chosen artist) really liked to make art about flowers, and about sunflowers in particular, the class has enjoyed making art with spring flowers. Consider also, displaying a vase of spring flowers and having students create their own painting/pastel artwork called Spring-flowers.
Dear parents and whānau,
We have been finding out about the famous artist Van Gogh and his picture, Sunflowers. We have been artists too and have used geometry (reflection, rotation and translation) to help us to make our artworks.
Please come and visit our classroom Art Gallery and write your comments about our maths and our art.
Thank you.