This unit involves folding and cutting paper to produce and perceive number patterns and geometric shapes. This unit contains similar content to Fold and Cut. You may want to incorporate parts of both units in your teaching.
- Fold paper systematically.
- Cut shapes from folded paper.
- Find number patterns derived from folding and cutting using a table.
The aim of this unit is to explore shape and number by folding and cutting paper. As students progress through this unit, they reinforce their knowledge of basic shapes and their ability to describe plane shapes.
Within this, a key mathematical ideas explored is the finding of number patterns produced as a result of the relationship between the number of folds and the number of shapes. This involves visualisation, which is important to the development of students' number, geometry and measurement concepts. Frequent opportunities should be provided for students to explore and explain their images.
The learning opportunities in this unit can be differentiated by providing or removing support to students and varying the task requirements. Ways to support students include:
- providing necessary supports with folding and cutting (such as modelling and individualised support). Gradually releasing your level of responsibility allows you to scaffold students towards working independently
- providing opportunities for students to explore diagrammatic, physical, and digital models of shapes and cut-out figures
- supporting students to find the lines of symmetry in their finished product
- modelling an expectation of a table by co-constructing it with the children
- asking predictive questions to encourage students to think beyond what is visible
- providing opportunities for students to work in a range of flexible groupings to encourage peer learning, scaffolding, and extension
- challenging students to look for a relationship between the number of folds and the creases.
The context for this unit can be adapted to suit the interests and experiences of your students. For example:
- Some children may want to explore origami and kirigami. Origami involves folding but no cutting whereas kirigami involves folding and cutting. Simple pop-up cards can be made using kirigami.
- Add words from children’s home language to the table e.g., tapatoru, triangle, one fold, 1 shape or sikuea, square, 3 folds, 3 shapes.
You might also decide on an overarching, real-world context for the learning that occurs in this unit. For example, folding and cutting paper shapes might lend itself to creating design elements for greeting cards, a tapa cloth, stop-motion videos, or collage art.
- Scissors
- Several pages of newspaper per student
- Appropriate graphic organisers and table templates
Session 1
In this session students explore folding and cutting.
- Bring the class together and talk about folding and cutting paper.
Can you think of some ways of folding and cutting paper to make interesting shapes and patterns?
You might provide each student with one piece of paper and a pair of scissors, and give them time to respond to this question through folding and cutting the paper.
- Demonstrate the following method using a rectangular piece of paper. Fold it in half one way, then fold it in half the other way. Now fold the paper along a diagonal through the point of the paper that is as close as possible to the centre of the original paper. Fold the paper in half again through a similar diagonal.
Cut a person shape so that the hands go through the opposite side of the fold to the body. When you open up the folds you should find that you have 8 people in a circle holding hands. This will be much easier with a large piece of paper.
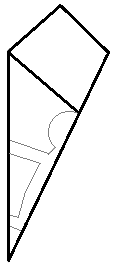
The cutting and folding for the 8 people is shown in the diagram above. However, there are lots of other ways that you can fold paper. We have suggested some in the sessions below. You can take any of these, and then fold the paper in half, perpendicular to any other folds.
- Have the students, in pairs, discuss how the paper might be folded. Talk about the possible cuts that could be made to the paper.
- Provide students with scissors and a suitable amount of paper. Ask them to draw the shape they plan to cut before they do the cutting. Remind them that you will want to get together in a little while to see what they have done. As it is important that they can tell other members of the class how to produce what they have done, they should make some notes. You might provide a graphic organiser, lined paper, or a device with a camera (e.g. iPad) to support students in recording these notes. Model the chosen recording process for students to ensure they know what to do.
- While they are working, it is a good opportunity to notice the different ways students solve the problem. Ask questions that will elicit information about their thoughts. Did that shape you made surprise you? Why?/Why not?
- Bring the class together and let students talk about what they have achieved. Display the work in a suitable location, or store the shapes to be used at a later date (e.g. as part of an art project).
Session 2
In this session we use cutting to find a pattern in the number of shapes produced by ‘concertina’ folding.
- Demonstrate to the class how they can ‘concertina’ a piece of paper. Start by folding a piece of paper in half, then fold the loose ends down to meet the first fold line. Show them how to do more and more folds using this method (this is a bit fiddly).
- Talk about cutting pieces (i) from one side but not totally through; (ii) from the other side but not quite totally through; and (iii) totally through from both sides.
What do you get?
How many shapes do you get?
- Let the students experiment by themselves with different shapes and different numbers of folds and put their results into a table. You might model the creation of one table, and then photocopy it for the class to use. Alternatively, you could ask students to create a table independently, following the model you created, or ask them to finish a partially created table.
- Bring the class back together to discuss what they have so far. Ask them:
How do the number of shapes depend on the number of folds? Talk to them about the value of a table for collecting evidence.
Number of folds Number of shapes - Send them back to get evidence for a number pattern.
- Let them create a poster or other suitable presentation and display these results.
Session 3
In this session we use cutting to find a pattern in the number of shapes produced by repeatedly folding in half along the same axis.
- Demonstrate to the class how they can fold a piece of paper in half several times, while keeping the folds parallel. Discuss how this method of folding is different to the one in the previous session. Talk about cutting pieces (i) from one side but not totally through; (ii) from the other side but not quite totally through; and (iii) totally through from both sides.
What do you get?
How many shapes do you get?
- Let the students experiment by themselves with different shapes and different numbers of folds.
- Bring the class back together to discuss what they have so far. Ask them:
How do the number of shapes depend on the number of folds?
- Send them back to get evidence for a number pattern.
- Let them create a poster or other suitable presentation and display these results.
Session 4
In this session we use cutting to find a pattern in the number of shapes produced by ‘perpendicular’ folding.
- Demonstrate to the class how they can fold paper in half one direction and then fold it in half the other direction (perpendicular to the first fold). Show them how to do more and more folds using this method. Discuss how this method of folding is different to the ones in the previous sessions. Talk about cutting pieces (i) from one side but not totally through; (ii) from the other side but not quite totally through; (iii) totally through from both sides; and (iv) from the corners.
What do you get?
How many shapes do you get?
- Let the students experiment by themselves with different shapes and different numbers of folds and put their results into a table.
- Bring the class back together to discuss what they have so far. Ask them:
How does the number of shapes depend on the number of folds?
- Discuss their results.
Session 5
In this session students use their folding and cutting to make prescribed numbers of specific shapes.
- Recall the activities of the previous sessions. Tell them that this time they are to make various shapes but they have to decide how to fold and cut the paper to produce the shapes below:
- one diamond
- one kite
- two diamonds
- four diamonds on the corners of a square
- a square
- a square using only two cuts
- four circles in a row
- regular hexagon (six sided figure with all sides and angles equal)
- a big disk with a smaller disk removed (an annulus)
If needed, you could explore these shapes with physical shape tiles, diagrams, or a digital representation (search online for interactive shape tool) to ensure students understand the necessary attributes of each shape.
- Provide time for students to complete these tasks in pairs. If some students finish well ahead of the others, check that they can describe how they produced the required figures. Then get them to invent some tasks of their own. You could also challenge students to create a tangram design (you might provide some of these for inspiration) from the shapes they have created.
- Have time for reporting back and sharing.
Dear family and whānau,
This week we have been exploring the world of cutting and folding and creating interesting shapes. This work helps us to undertsand the geometry of transformation. Your child has been asked to show you some of the shapes we have been making with different folds. They will need some old newspapers and scissors to demonstrate this. Send any interesting creations to school to add to our displays.