This is a level 4 geometry strand activity from the Figure It Out series.
A PDF of the student activity is included.
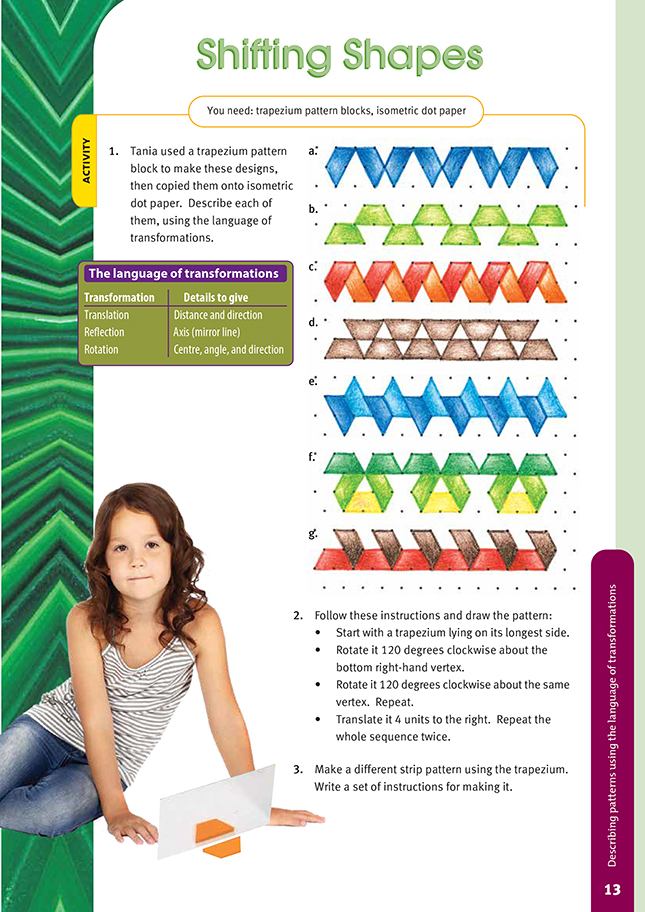
Click on the image to enlarge it. Click again to close. Download PDF (281 KB)
describe patterns using the language of transformation
FIO, Level 4, Geometry, Book One, Shifting Sands, page 13
trapezium pattern blocks
Copymaster of isometric paper
In this activity, students use the language of transformations to describe how a single pattern block can be used to generate frieze-type designs. The students may be surprised at the number of repeating patterns that can be created solely from one simple shape. Patterns generated in similar ways are found in the art, architecture, and artefacts of many cultures.
Transformations are an interesting and useful mathematical tool. Apart from the understandable confusion between the similar-sounding words "translation" and "transformation", students quickly develop meaning for translation and the other three common transformations: reflection, rotation, and enlargement. But they are not likely to understand them fully or be able to describe them precisely until they reach senior high school.
In this activity, the students are asked to:
- name the transformation that shifts the trapezium from one position to the next
- define the transformation more precisely by giving the details listed in the panel.
Each pattern is generated by a single pattern block. The student "traces" the outline of the block, moves it in a defined way to a new position, traces its outline, and then moves it again. The students should use a trapezium block to help them understand the transformations involved.
Question 1a involves repeated reflections in a series of vertical axes (mirror lines). Trapezium 1 is reflected in a vertical axis through its far right point to give the second trapezium. This is then reflected in a vertical axis through its far right point to give the third, and so on.
The pattern in question 1b involves translation. The challenge is to describe it so that someone else could follow the instructions and get the same pattern. The Answers suggest describing the movement in terms of dots along and dots up or down.
Question 1c involves a series of rotations, alternately anticlockwise and clockwise, about a centre that is different each time. The angles between the lines of dots on the isometric dot paper are all 60 degrees, so the angle of rotation can be defined precisely without measurement.
Two transformations are used in question 1d. The trapezium is translated 1 unit to the right and then reflected in the horizontal axis that coincides with the short parallel side of the trapezium.
It will be obvious that both reflection and translation are involved in question 1e, but because the axes are sloping (neither vertical nor horizontal), the students may not know how to define them. The Answers use the word "negative" to clarify which of the possible sloping axes they are referring to. A negative slope is one that goes downhill as your eyes move across the page from left to right.
Although it looks complicated, the pattern in question 1f involves only a series of 60 degree rotations.
The particular design is determined by the continually changing centre and whether the rotation is clockwise or anticlockwise.
It is probably best to visualise the pattern block in question 1g as rotating 60 degrees clockwise and then 60 degrees anticlockwise about its bottom right vertex before being translated 2 units to the right.
The second of these three transformations adds nothing to the pattern but makes it easier to define the following move.
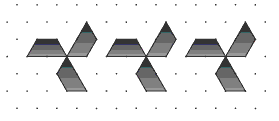
Question 2 makes continued use of the fact that the angles defined by the isometric dot paper are all 60 degrees.
At this stage, the students will be doing well if they can describe what is going on in fairly simple terms and in such a way that someone else has a good chance of following their description. More rigorous definitions can be introduced at later levels.
You or your students may like to collect and display examples of patterns that repeat in a linear fashion.
These could be in the form of pictures, photographs, drawings, or repeating patterns on actual objects.
The students could try and describe how the patterns are repeated, using the language they have learned. In this way, you can help them make links between theory and practice.
Answers to Activity
1. Answers will vary. All of these patterns can be described in a number of different ways. Possible descriptions are:
a. Reflect the trapezium in a vertical axis. Move the axis of reflection 11/2 units to the right and reflect again. Repeat.
b. Translate it along 1 dot, up 1 dot, along 1 dot, and down 1 dot. Repeat.
c. Rotate it 60o ; anticlockwise about the top righthand vertex and 60o clockwise about the bottom right-hand vertex. Repeat.
d. Reflect it in a horizontal axis and translate it 1 unit to the right. Repeat.
e. Reflect it in the axis that has a negative slope and makes an angle of 60owith the horizontal. Translate it 1 unit down that same axis. Repeat.
f. Rotate it 60o anticlockwise about the bottom right-hand vertex, 60o clockwise about the bottom left-hand vertex, 60o anticlockwise about
the bottom right-hand vertex, and 60o anticlockwise about the bottom left-hand vertex. Reflect it in a vertical axis. Repeat.
g. Rotate it 60oclockwise about the bottom righthand vertex and 60o anticlockwise about the same vertex. Translate it 2 units to the right. Repeat.
2. Your pattern should look like this:
3. Patterns and instructions will vary.