This is a level 4 geometry strand activity from the Figure It Out series.
A PDF of the student activity is included.
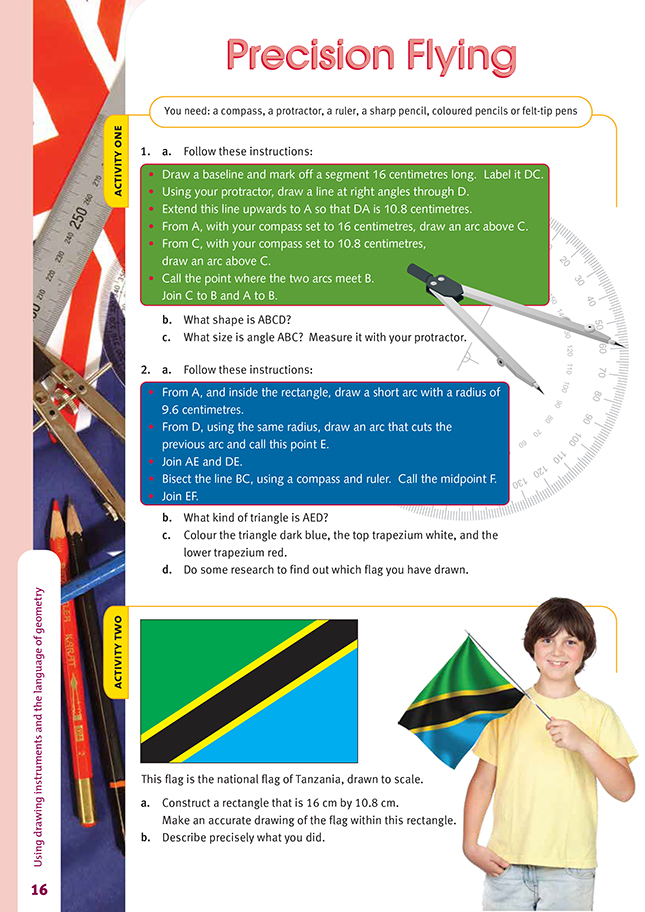
Click on the image to enlarge it. Click again to close. Download PDF (286 KB)
use drawing equipment to construct two dimensional shapes
ruler
protractor
compass
FIO, Level 4, Geometry, Book One, Precision Flying, page 16
pencil
coloured pencils or felt-tip pens
Rough drawing methods were sufficient for Alien Action (page 7 of the students' book), but in these activities, the students follow geometrical instructions and use some formal construction techniques to achieve a high level of accuracy. They should use only a sharp pencil for all parts of the drawing process, though the finished
designs can be coloured. Make sure that the students know that they are expected to leave their construction lines in, so they should keep them tidy.
The geometrical terms used in Activity One include baseline, segment, arc, bisect, and midpoint.
Activity One
Question 1a makes the distinction between a line, which is infinite in length, and a line segment, which is a finite part of a line. It also introduces the idea of using a compass not just to draw circles, but to find the point that is at a fixed distance from 2 other points (in this case, point B, which is 16 centimetres from A and 10.8 centimetres from C).
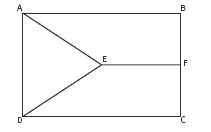
In question 1c, the students use a compass and ruler to bisect the line BC. This method can give a more accurate result than measuring the length and splitting the result in two. It also creates a line through the midpoint at right angles. The method is illustrated in the diagram below, using the line AB.
The process is:
- Set the compass to a radius that is a little over half the length of the line segment to be bisected.
- Swing pairs of arcs above and below from A and B so that they intersect.
- Join the points of intersection to bisect the line segment.
The (dotted) line is known as the perpendicular bisector or mediator of AB.
There are a number of websites devoted to flags of the world (see below). Any of these will give the answer to question 2d.
.gif)
Activity Two
This activity involves working with enlargement. The students need to work out how much larger the 16 centimetre by 10.8 centimetre rectangle is than the given illustration, then multiply the measurements in the illustration by this factor to find the measurements they need for their larger Tanzanian flag.
As an extension, groups of students could investigate the geometry of one or two other flags of the world and share their findings with the class. Where flags have features such as stars or crescents, the students could describe the geometry of the features even though they are unlikely to be able to give a complete set of
instructions for drawing the flag.
Good websites include: www.crwflags.com
www.flags.net/fullindex.htm
Answers to Activities
Activity One
1. a. You should have a rectangle, labelled like this:

b. A rectangle
c. 90o
2. a. The finished design, before colouring, should look like this:
b. An isosceles triangle (not an equilateral triangle)
c. Practical activity
d. It is the flag of the Czech Republic.
Activity Two
a. Practical activity
b. Descriptions will vary. Here is a suitable description:
- I constructed a rectangle, ABCD, that was 16 cm by 10.8 cm.
- I drew the diagonal DB.
- I drew 2 lines that were parallel to, and 1.3 cm from, DB.
- I drew 2 further lines that were parallel to, and 2 cm from, DB.
- I coloured the top triangle dark green, the middle 2 strips black, the other 2 (thin) strips gold, and the bottom triangle blue.