Purpose
The purpose of this activity is to support students ordering a set of up to five shapes by area. Since it is difficult to directly compare more than two shapes at a time, students need to control the order relationships and find ways to record the two-shape comparisons.
Achievement Objectives
GM2-1: Create and use appropriate units and devices to measure length, area, volume and capacity, weight (mass), turn (angle), temperature, and time.
Required Resource Materials
- Copymaster (use page 1 to print, laminate and cut out two sets of leaves (A-E and V-Z))
- Scissors
- Glue sticks
Activity
- Show students the set of five leaves labelled A-E. Ensure the leaves are not shown in order of area.
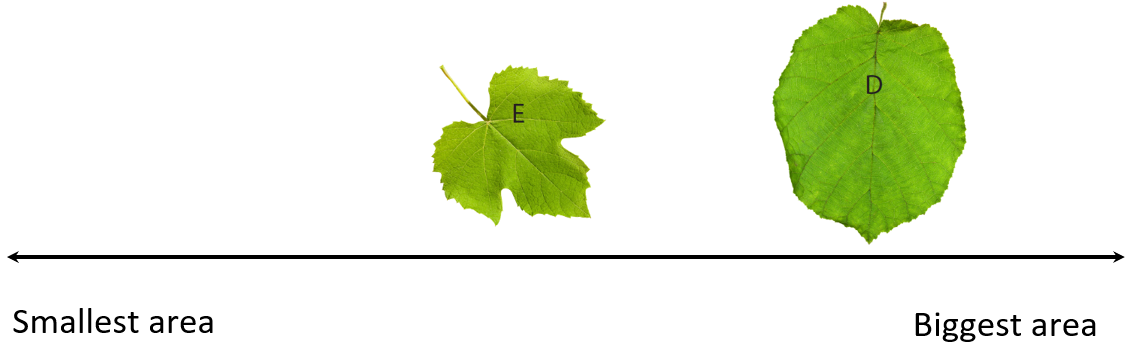
Begin with a pair of leaves D and E.
Which leaf has the biggest area? How do you know?
Students might suggest overlapping the leaves to see which has extra area compared to the other.
Introduce the te reo Māori kupu horahanga, meaning area.
- Draw a continuum with opposite ends labelled "smallest area" and "biggest area".

- Ask your students to tell you where to place leaves D and E on the continuum. Appropriate positions are shown below:
- Introduce leaf C.
Where should this leaf go on the line? Explain how you know?
Students may be willing to accept that C has less area than either D or E. Confirm the relationship by overlapping the leaves in two pairings DC and EC.
If we know that this leaf is smaller than both A and E, where should it go on the line?
Ask a student to place leaf C where they think it should go.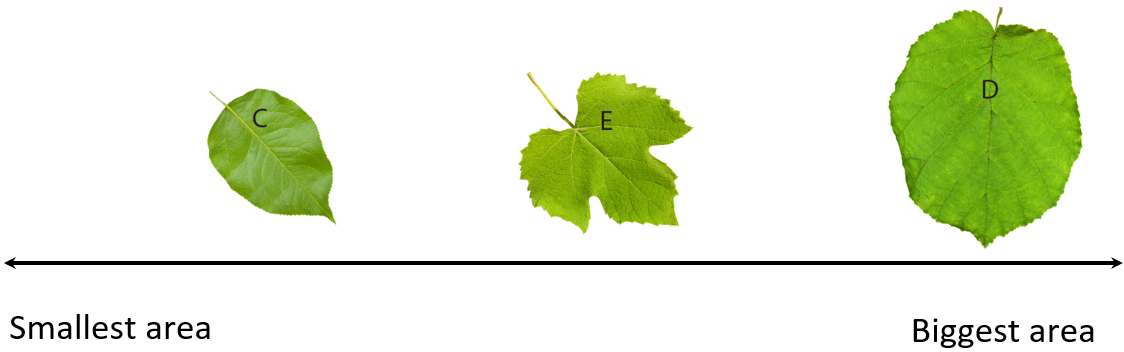
- Ask the students to quickly draw a picture of the line so far. Their drawing should capture the order C-D-E instead of focussing on the detailed appearance of the leaves.
- Choose leaf A and compare it by area with leaf E.
Which leaf has more area leaf A or leaf E?
Students should notice that A has more area than E.
Think about where leaf A should go on the line. (To the right of E)
Should we compare leaf A with leaf C? (No need since it has less area than E so it also has less area than leaf A)
Should we compare leaf A with leaf D? (Yes. Either leaf could have more area)
Once D is compared to A ask students to add to their drawing to show the placement of leaf A.
Finish ordering by considering leaf B that has the least area. The complete line should look like this: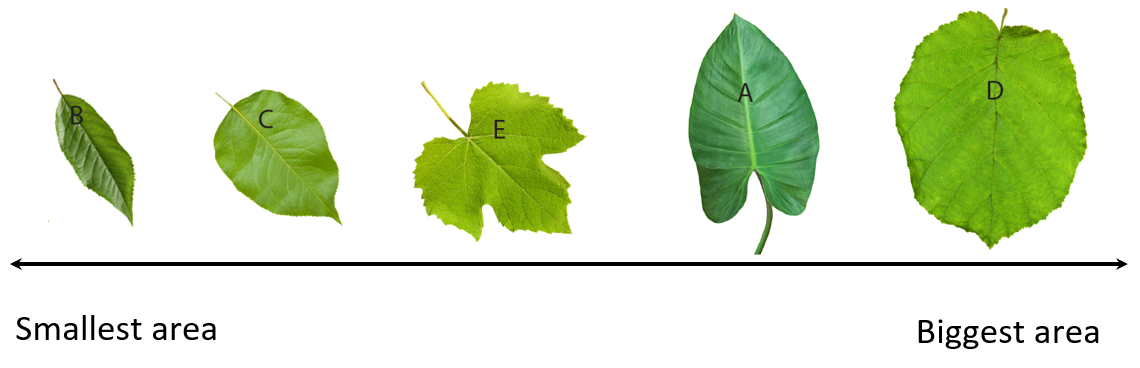
- Carry out a similar investigation with the leaves labelled V-Z (Set B). An issue may occur around equal area. Students might decide the leaves X and Y are the same area.
How do we show that two leaves are the same area on our line?
Equal area is shown by both leaves occupying the same point on the line.
- Photocopy pages 2 and 3 of Copymaster 3 for students to work on, in appropriate groupings. They should cut our the set of handprints in each set and glue them to the continuum to show order by area. As students work, look for:
- Do they attend to area, the amount of flat space, rather than length?
- Are they able to work with differences in orientation of the handprints?
- Do they overlap the handprints where necessary?
- Can they organise the area relationships for pairs of handprints into an ordering of four or five handprints?
- Can they address equality of area by placing the handprints in the same location?
- After a suitable time gather the group to discuss the points above and compare continua that students create. Address situations where there are differences in order.
What handprints do we need to compare?
Next steps
- Pose problems where the shapes are more regular (e.g. rectangles). Use contexts like books, paper surfaces, or items that are of relevance to the learning foci and cultural backgrounds of your students. Support students to use informal units, like tiles, beans, counters, and pieces of pasta, to measure the area.
- Use students themselves as units of area. Make ‘islands’ using skipping rope as the perimeter. Compare islands by area by putting students inside the island to see how many will fit. Discuss the issues with students being different sizes and being spread out rather than close together.
Attachments
ordering-areas.pdf1.57 MB
Add to plan
Level Two