This is a level 3 link geometry activity from the Figure It Out series.

Click on the image to enlarge it. Click again to close. Download PDF (747 KB)
describe two dimensional and three dimensional shapes using geometric language
classmate
FIO, Geometry and Measurement Link, No Looking! page 4
Copymasters of Barrier Games
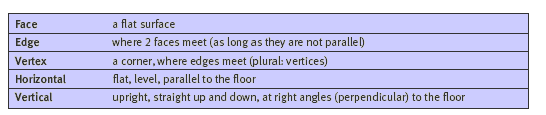
These activities give students opportunities to practise and refine giving precise descriptions of 2- and 3- dimensional objects. As the teacher, you will need to actively promote the use of geometrical language by introducing useful terms, encouraging students to use them, and asking questions that require students to
reflect on how they could make their instructions clearer and more precise.
Activity One
The students are likely to learn most from this activity if you work through question 1 with the whole group.
The following paragraphs describe one way of doing this:
Divide the group in half. One half will be instructors and the other half, model makers. The instructors will refer to the picture in the book but keep it hidden from the model makers. The model makers will share a box of multilink cubes and will keep their models hidden behind individual screens. (Picture books are ideal for this purpose.) Explain to everyone that the giving of instructions will be a co-operative effort but the model makers will work individually.
When you have given an overview of what will happen, ask the students what sort of information the model makers will need to know (for example, the number of cubes to be used, the colours required, the number of layers …). Follow this discussion by introducing the list of mathematical words below, writing them on a chart. Explain that you want the instructors to use the words where appropriate.
When everyone understands and is ready, invite the instructors to suggest suitable instructions. They should do this through you, in a co-ordinated fashion, so that you can write them on the whiteboard for discussion and evaluation when the models have been made. As each instruction is given and written up, the model makers try to follow it and construct their model.
When this phase is completed, ask the model makers to reveal their models and to compare them with the picture in the student book. If a model is not identical, ask the model maker to try to identify why. Then look back at the instructions as you recorded them and ask for suggestions for how they could be improved.
Emphasise the value of geometrical words by underlining or ticking them each time they occur. Are there other words that should be on the list?
For question 2, after the students have had a chance to make their own model and instruct their classmate how to make it, ask:
- What could your partner do to make their instructions clearer?
- Which geometrical words did you and your partner use?
- Did anyone manage to use all the words on our list?
- Did anyone use another geometrical word that we could add to our list?
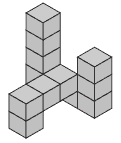
The models in question 2 can be as complex as you or your students
want them to be. The illustration shows one made with 12 multilink cubes.
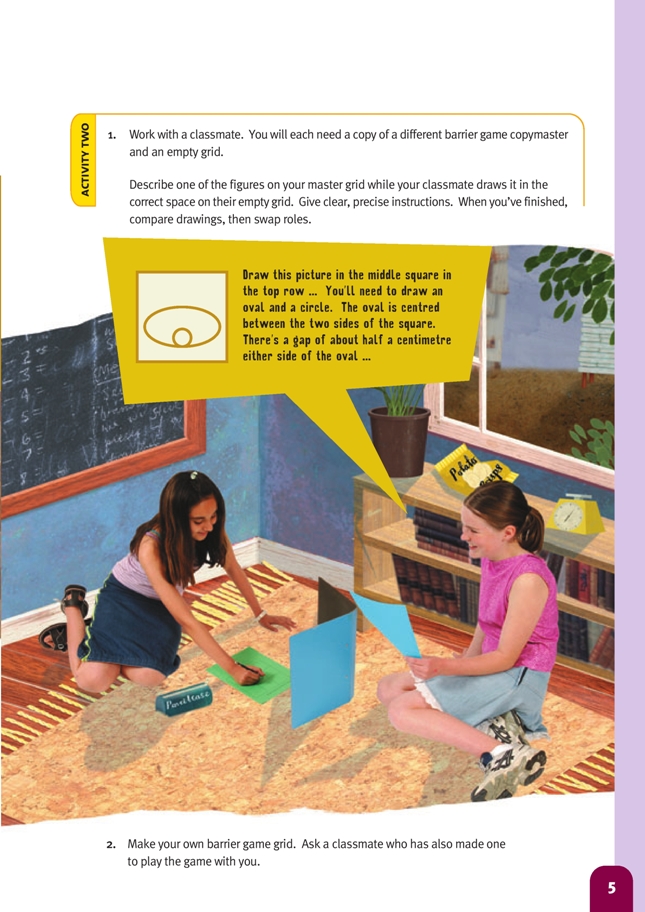
Activity Two
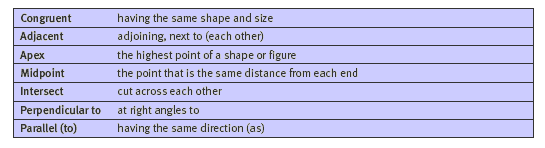
Some of the diagrams on the copymasters will prove quite difficult to describe, and the students will find that the task is much easier if they have the geometrical words they need. Talk about this with your group because they may otherwise feel that mathematical terms are just complicated ways of talking about simple things.
There are numerous geometrical words that could be used in this activity, but it’s best to concentrate on those that are likely to be needed. Each word on the following list will be helpful when describing at least one of the figures on the copymasters. Add the words to your list and display it in a prominent place so that the students can refer to it while they are doing the activity. Alternatively, photocopy a list for each student
and get them to tick each word as they use it.
If you make up a puzzle that involves matching the terms and their definitions, this will give you an opportunity to clear up areas of linguistic confusion.
Again, it is a good idea to involve the whole group in an introductory task before
letting them get on with it. This gives you another opportunity to model and
reinforce what is wanted and is likely to lead to the best learning outcomes.
Those who made the models in the first demonstration should now be the
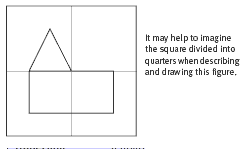
instructors. Draw this figure on a sheet of paper and hold it up so that only the
instructors can see it. The other half of the group will need pencils and paper
and will draw it behind individual screens (books).

Before they start, ask the students what sort of information those doing the
drawing will need to be given. (For example: which cell on the blank grid they
are to draw the figure in, what the finished picture looks like, what the component
shapes are, how big the parts are relative to each other, where each shape is
positioned …) Ask the students to suggest how they could make sure that the
other person draws the parts of the figure the right size and positioned in the
right part of the square. Suggestions might include:
- “You could divide the big square into smaller squares (see the dotted lines).”
- “You could estimate in centimetres or millimetres the size of each component shape and its distance from the edge of the square.”
- “You could describe what lines up with what.”
As instructions are given, record them so that the students can evaluate and improve on them once the figure is revealed for all to see, as with the first activity. The students should now be ready to do question 1 in pairs without further guidance.
Question 1 may take all the time you can allocate for this maths session. If this is the case, you could use question 2 as a follow-up task to be done another day.
After the activities, encourage reflective thinking by asking these questions:
- What made it easier to recreate the other person’s object or drawing? Which words or phrases did you find useful?
- What made it difficult? What could you do to overcome these difficulties?
- which geometrical terms did you use? (You could use your vocabulary chart as a checklist.)
- What tips would you give to someone else about to do this activity?
Answers to Activities
Activity One
1. Descriptions will vary. You could start by saying how many cubes there are in total and what colours. You could then describe the model starting from the bottom layer and working up.
2. Practical activity
Activity Two
1. Practical activity. Start by saying which of the 9 squares your chosen figure goes into. Then say how many shapes (and what kind) go to make up the
figure. You could suggest that the other person imagines the square divided into a 2 x 2 or 3 x 3 grid, depending on the figure. This will help you explain where to place objects and how big they should be. Or you could estimate sizes and
distances in millimetres or centimetres. Describe what lines up with what, where the parts of the figure cut across each other, and so on. With practice, you should find that your descriptions get better and easier to follow.
2. Practical activity