Purpose
The purpose of this activity is to support students measuring the area and perimeter of rectangles when the side lengths are given in decimal measurements. This does not include the conversion of measures, such as m2 to cm2.
Achievement Objectives
GM2-1: Create and use appropriate units and devices to measure length, area, volume and capacity, weight (mass), turn (angle), temperature, and time.
Required Resource Materials
- Rulers
- Rectangles of cardboard cut to these sizes and labelled on the back with the dimensions:
5 cm x 8 cm, 10 cm x 6 cm, 3 cm x 12 cm, 8 cm x 11 cm, 14 cm x 2 cm, 9 cm x 9 cm, 7 cm x 9 cm, 4 cm x 15 cm. - 1 cm place value blocks (unit cubes)
Activity
- Lay out the rectangles out in random order.
Let’s work together to put the rectangles in order of area. The rectangle with the smallest area will go on the far left, and the rectangle with the largest area will go on the far right.
Let the students work collaboratively to put the rectangles in order along the continuum.
- Discuss students' ordering of the rectangles. You might record students' arguments on the board. Refrain from confirm the order of all rectangles at this stage.
- Take a pair of rectangles that students have judged to be adjacent on the continuum.
Show the students with a ruler that the edges of a unit cube measure 1 cm.
This is a cubic centimetre. It measures 1 centimetre in each dimension. We are using the cubes as a unit of area.
Introduce the te reo Māori kupu horahanga, meaning area.
- Take each card and place unit cubes along the top and left edges.
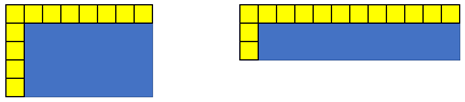
Can you work out the area of each rectangle in square centimetres?
- Allow students to work out the area, using appropriate means of action and expression. This might involve using a calculator. If necessary, fill more of the rectangle to support students to recognise the array structure of rows and columns.
- Discuss the use of multiplication, number of rows x number of columns (or vice versa), to find the number of square centimetres that fit in the rectangle.
- Record the areas as equations on the rectangles:
5 cm x 8 cm = 40 cm2 and 3 cm x 12 cm = 36 cm2. - Highlight the meaning of cm2 as “square centimetres.”
- Confirm order of the rectangles on the continuum.
- Conduct a similar process with two other rectangles. Assign pairs of students to each remaining rectangle. You might arrange these pairs to encourage tuakana-teina and productive learning conversations.
Work out the area of your rectangle in square centimetres. Record your equation on the rectangle when you finish measuring.
- Provide time for students to share their thinking. Look for them to record the area as an equation, using the correct units.
- Check the order of the cards on the continuum.
- Did anyone find an even easier way to find out how many square centimetres were in their rectangle?
Look for students to recognise that the number of centimetres along the top and side can be found using a ruler. Let those students demonstrate to the others how that works.
- Give your students an open challenge like:
Make as many rectangles as you can that have an area of 24 cm2.
You might provide students with 1 cm grid paper to support them. Otherwise expect most students will use ruler measurements to make their rectangles.
- After a suitable time gather the group to share the different rectangles.
Have we found all the possible rectangles? How do you know?
Systematically listing the multiplication of side lengths is one way to check for completeness.
- 1 cm x 24 cm
- 2 cm x 12 cm
- 3 cm x 8 cm
- 4 cm x 6 cm
Next steps
- Explore using square centimetres to find the area of shapes that are not rectangles, such as stains on paper towels, or or images that are relevant to your students' learning in other curriculum areas, interests, and cultural backgrounds. You might photocopy 1 cm grid paper onto OHP film and use the film sheets as overlays on top of the stains.
- Explore using part units of 1 cm2 when shapes do not have whole number sides. For example, can students find the area of a rectangle that is 8½ cm x 5½ cm?
Add to plan
Level Two