This unit is about estimating and measuring angles. Students begin using the ‘circular’ benchmarks of 0,1/4, 1/2, 3/4, and full turn, before coming to understand and use the more formal unit of measurement, the ‘degree’.
- Use the degree unit for angle measures.
- Understand how degree measures relate to turns.
- Estimate the size of angles.
- Use a protractor to measure and draw angles.
- Learn about everyday contexts related to angles.
Angle can be seen as and thought of in at least three ways. These are as:
- an amount of turning
- the spread between two rays
- the corner of a 2-dimensional figure.
Measuring an angle is similar to measuring other attributes such as length or area. Unit angles are used to fill or cover the spread of an angle in the same way that unit lengths fill or cover a length. A unit for measuring an angle must be an angle. Nothing else has the same attribute of spread that we want to measure. While the usual unit for measuring angles is degrees you can also measure angles using other sized “wedges” (for example, a wedge of 90°).
Once this concept is well understood students can begin using protractors to measure angles.. The protractor is a frequently misunderstood measuring instrument. Part of the difficulty is because the units (degrees) are very small and it is physically impossible to cut out a single degree. Another problem is that a protractor may not clearly show the degrees of an angle, only small marks and numbers, with which students must image the rays and vertex of an angle. around the outside edge. Finally, the numbering on a protractor, which often runs clockwise and anticlockwise, can be confusing.
The learning opportunities in this unit can be differentiated by providing additional support to students, or by varying the requirements. Ways to support students include:
- providing additional support as needed. For example, in session 1, ensure that all students are able to demonstrate the common benchmark turns (1/4 turn, half turn, full turn). In session 4, check that students understand the relationship between degrees and turns and understand how to calculate the number of degrees in the benchmark turns
- allowing time for more sharing and discussion of ideas by spreading session 3 and session 4 over two sessions
- providing extra examples and equipment to manipulate.
This unit is focused on the measurement of angles and apart from session 1 does not use real world contexts. Consider framing the learning in sessions 3 and 4 in a context that will appeal to the interests, knowledge and cultures. For example, students could be given the opportunity to use their angle measuring devices to measure the angles of school playground equipment, or encouraged to show their whānau how they work to measure angles in the home. You could also make connections between the learning in this unit, to learning around the navigational methods used by early Māori and Pacific peoples on their journeys to Aotearoa New Zealand.
Te reo Māori vocabulary terms such as mehua (measure), whakatau (estimate), putu (degree), koki (angle), ine-koki (protractor), huri (turn), raki (North), (rāwhiti) East, tonga (South), uru (West), and koki hāngai (right-angle) could be introduced in this unit and used throughout other mathematical learning.
Session 1
Begin the unit by examining rotations in real situations. In all of the examples that are used to promote discussion, focus the students on the various ways of measuring an amount of turn about a particular point, starting at one position and finishing in another.
Focus the students on the various ways of measuring an amount of turn about a particular point, starting at one position and finishing in another. For example, the hinge of the railway crossing control arm or carpark exit arm, the horizontal position and the vertical position; the centre of the clock, when the minute’s hand is pointing at the 12 and a later time.
Select from the following situations:
- A control arm at a railway level crossing.
What does the arm do as a train approaches?
How would you describe its movement?
What would happen if the mechanism controlling the arm broke and it was only able to go half-way back to where it started?
What problems may be faced by traffic having to cross the crossing? - The minute hand on a clock.
How do we describe the minute’s hand when it is positioned in the following pictures (Draw on board)
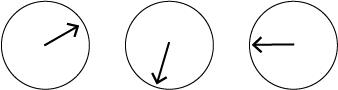
How long has passed when the minute’s hand goes through a quarter turn?
What fraction of a complete turn does the minute’s hand go through in 5, 10, 20, 45 minutes? - Scissors, opening and closing.
How do you interpret the amount of ‘openness’?
Can scissors open up to show a half turn? - Identify at least 4 things that turn in or about the classroom.
- Using a compass identify North, South, East and West and perhaps put signs up to show those directions in the classroom. Have the students stand and face to the North of the classroom. Now ask them to turn (on the spot) and face East. Ask them to draw a sketch or picture of what they have done. Get them to write a description of the amount of turn they needed to make.
Face the students North again. Ask them to make a half-clockwise turn and describe the direction in which they are now facing. How would you draw a picture to show someone else the half turn that you have just completed?
Starting from North each time, you might ask the students to complete a 3/4 turn, a turn somewhere between a 1/4 and a 1/2 turn, nearly a 1/4 turn. These instructions must include the direction of turn, for example, clockwise and anticlockwise. Follow up with appropriate questions as well as activities that allow the students to build an image directly related to ‘amounts of turn’. For example, what would be the result of two anticlockwise quarter turns look like?
Alternatively, have the students face the front of the classroom, and make turns ‘on the spot’ as previously indicated.
Session 2
Show students an angle estimator, and provide materials so they can make one of their own. The design is shown below:
White paper or card
(cut along line)Coloured paper or card
(cut along line)Insert two circles
along cut lines


- Ask students to show various turns using their angle estimator. For example, 1/4 turn, 1/2 turn, a turn a little bigger than 3/4 turn.
- Give students time to compare and discuss their answers with a partner.
- Working in pairs, ask one student to make an angle while the other student says what fraction of a turn, or how many turns the angle is. Together they can draw and label the angles in their books or on a piece of paper.
- Alternatively, the students could sit back to back. One student makes an amount of turn using the angle estimator and tells the amount of turn to their partner. The partner makes the turn and they then check their results.
- The angle estimator shows two amounts of turn. How do you think they are related? (The two together make up a full turn.)
Session 3
In this session the students make protractors with waxed paper. A careful comparison with a standard protractor will enable the students to use a protractor with understanding.
- Give each student a 20 cm diameter circle of waxed paper. Ask them to fold it in half and crease firmly along the fold. Fold in half again so that the folded edges match and once more crease firmly. Repeat two more times. When unfolded there should be 16 equal wedges. Model this process and create your own protractor alongside students.
- Demonstrate how to use these protractors to measure angles. Draw a quadrilateral and show the students how to place the protractor on top of the shape and count the number of “wedges” in each angle (see image below). Help the students to understand that angles (in this case wedges on the circle) are used to measure an angle.
- Working in pairs, ask one student to draw a large four-sided shape (about A4 sized) while the other chooses and measures one of the angles in the shape. The students then take turns measuring and recording the angles in the shape. Repeat with the other student drawing a new four-sided shape for them to measure the angles of. Pair or group students together to support each other as required.
Session 4:
In this session the students are introduced to a standard protractor. A careful comparison with the wax paper protractor created previously will support students to use the standard protractor with understanding.
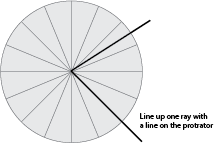
- Show students a large image of a circular protractor (Copymaster One). Explain that a full turn is a turn of 360 units (or small amounts of turn) called degrees and denoted by °.
Compare this with a metre being divided into 1000 smaller lengths each called a millimetre. Just as the abbreviation ‘mm’ is used for millimetre, the symbol ° is used for degree. - Identify the important features of a protractor and explain their significance: scale (and the direction in which it runs), the centre or base line, and the centre point (which will be the vertex of the angles measured on the protractor).
- Ask the students to relate the wedges on their waxed paper protractor to a full turn of 360°. In particular, a 1/2 turn or 8 wedges is the same as 180°, a 1/4 turn or 4 wedges becomes 90°, and a 3/4 turn or 12 wedges becomes 270°.
- Give each student or pair of students a protractor. It is preferable to use circular protractors so that they can directly relate it to the waxed paper version they created. Get them to identify these parts:
- the centre or mid-point of the protractor
- the centre line (or baseline if using a 1/2 circle protractor)
- the inside scale
- the outside scale
- Ask students to draw an estimate of an angle and then measure it with a protractor to see how close their estimate is. Use 90 degrees, 45 degrees, 100 degrees, 200 degrees. You may need to model this process first, and scaffold all (or some) students through estimating and measuring angles.
- Working in pairs, ask the students to estimate and measure a variety of angles (Copymaster Two). During this time, roam and support individuals or small groups of students as needed. Ensure students use the features of the protractor correctly and measure each angle accurately.
Dear family and whānau,
This week we have been working on angles. Ask your child to draw the following angles: 90 degree angle, 45 degree angle, 180 degree angle. Alternatively they could show you the angles using an angle estimator that can be created using two different coloured circles of heavy paper or card.
| White paper or card (cut along line) | Coloured paper or card (cut along line) | Insert two circles along cut lines |
|
|
|