This is a level 3 geometry activity from the Figure It Out theme series.
A PDF of the student activity is included.
Click on the image to enlarge it. Click again to close. Download PDF (317 KB)
design a net
Paints, crayons, or felt-tip pens
Different shaped small boxes
Light cardboard
FIO, Level 2-3, Theme: Gala, Making Boxes, page 6
Square grid paper
Scissors, tape, ruler
This activity allows the students to explore the relationship between 3-D packaging shapes and 2-D flat designs.
Pulling a box apart will enable the students to see how the box is made and to note the relationships between the sides, top, and base. The students will need to take care to only pull apart glued joints and not to tear the cardboard. They should look for the glued tabs that hold the sides together. Ask the class to look carefully at the pulled-apart box and discuss what they notice about how the boxes have been made.
Because the boxes will vary in size, demonstrating how to draw an enlarged and reduced shape will be useful. Begin with a basic shape like a square, taking care that the enlarged and reduced copies have the same proportions as the original.

Draw this onto an overhead transparency marked with a square grid.
Use the squares to show the effect of reducing each side by a half

and enlarging each side by a factor of two.
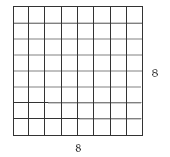
When the students understand enlargement and reduction of a simple shape (such as the square above), show them an enlarged and a reduced shape of a net.
Note that the enlarged and reduced nets still have the same proportions as the original.
When you check the students’ answers, make sure that the enlargements and reductions have the same proportions as their original designs. Listen to the students describing their designs to their classmates to check their understanding of translation, reflection, and rotation.
Growing Changes on page 24 of Geometry, Figure It Out, Level 3, shows how overhead projectors can be moved closer or further away from the screen to demonstrate enlargement and reduction of a shape. The shape will still have the same proportions. Note that in Growing Changes, the students are projecting onto a screen that is marked with a square grid. The overhead transparency does not have a grid on it.
In question 2, the students make a decorated box. They could use a stencil and light pencil to try out various positions and to visualise what the end product may look like once it is folded and taped.
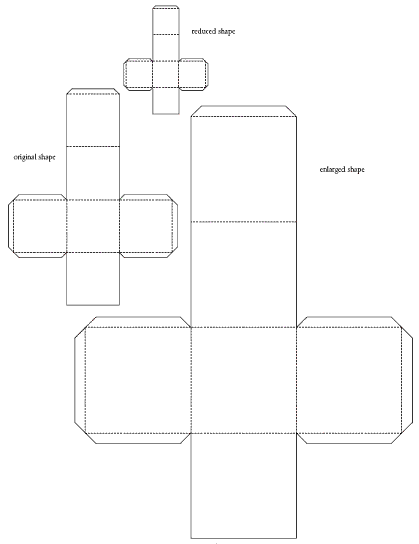
This net pattern shows horizontal reflection between two centre folds and vertical reflection between the centre and ends.
Before showing their boxes to classmates, the students could write a set of instructions for making boxes, using the language of geometry. The classmates could follow the instructions to make the boxes and then compare them with the original boxes. The boxes should be displayed around the classroom. If not used for gala stall sweets, they would make nice gift boxes to use at home for events such as birthdays.
Activity
Practical activity