This is a level 4 geometry activity from the Figure It Out theme series.
A PDF of the student activity is included.
Click on the image to enlarge it. Click again to close. Download PDF (228 KB)
interpret a contour map
draw a three dimensional modle
build a scale model
FIO, Levels 4-4+, Theme: Disasters Strike!, Fire Alarm! page 11
Construction materials such as iceblock sticks and glue (for lookout moel)
1 centimetre grid paper
Other mathematical ideas and processes
Students will also:
• convert units of area from one measure to another
• use isometric drawings to create 3-dimensional models.
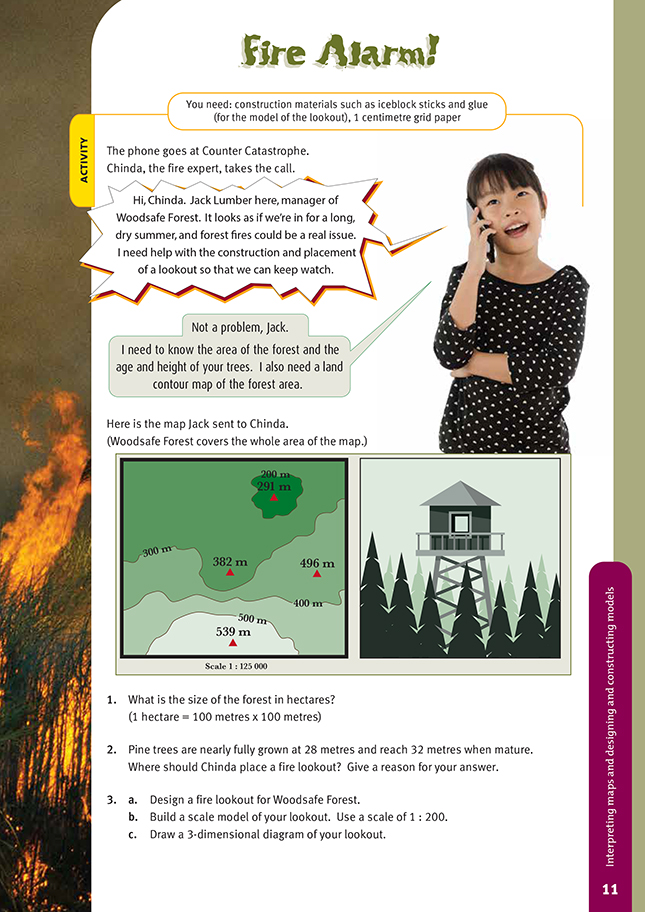
In this activity, students convert scale distance and area into actual distance and area.
Before the students set out to calculate the area of the forest, review the units they will need to use. A hectare is an area equivalent to a square that is 100 metres by 100 metres, which is (10 x 10) x (10 x 10) = 104, or 10 000 square metres. A good learning experience for the students is to mark out a rectangle with an area of a
hectare on the school grounds. As an extension, have them calculate the size of the school grounds in hectares. Then, to develop an appreciation of scale, have them draw their school grounds using a scale such as 1 : 1 000 To prepare the students for the forest problem, discuss how to convert square metres to hectares.
We’ve seen that 1 ha = 10 000 m2. If possible, mark off an area that has both its length and breadth somewhere between 100 and 200 metres. Have the students calculate the area in square metres to begin with. For example, if the section is 140 metres by 120 metres, the area is 16 800 m2. To find this area in square centimetres, there are two options from which to choose:
• convert the length and breadth to centimetres and then calculate the area;
• convert the square metres to square centimetres by dividing the area in square metres by 10 000
(1 square metre = 100 centimetres x 100 centimetres, or 10 000 cm2.).
The students would benefit from doing both calculations in order to appreciate the value of each approach.
The students also need to understand the relationship between hectares and square kilometres. A hectare occupies an area 100 metres by 100 metres, and a square kilometre occupies an area 1 000 metres by 1 000 metres, so there are 100 (10 x 10) hectares in a square kilometre. The students will need to decide what units they are going to use for their calculations. They can either:
• convert the scale lengths to actual lengths and then calculate the area (1 centimetre represents 125 000 centimetres, which is 1.25 kilometres);
• do all the calculations in scale units and convert the result to hectares at the end.
The first alternative is probably better. As a general principle, the students should be encouraged to work in units appropriate to the problem. For an area like this, the kilometre is the best choice because that is the unit we use for large-scale land measurements. If they choose to work in small units such as metres or
centimetres, they will find themselves dealing unnecessarily with very large numbers and will greatly increase the risk of error.
The simplest calculation is probably this:
i. The rectangle is 7.2 by 6.3 centimetres.
ii. As 1 centimetre represents 1.25 kilometres, the actual dimensions are 9 kilometres by 7.875 kilometres, giving an area of 70.88 square kilometres (to 2 d.p.).
iii. As there are 100 hectares in a square kilometre, the area of the forest in hectares is 70.88 x 100 = 7 088 hectares.
The Lookout
The best point on which to build the lookout is obviously the highest point in the forest. The highest point according to the map is 539 metres. However, trees will be growing in this area as well, so the lookout must be higher than mature pine trees, which are approximately 32 metres in height.
Some design issues to take note of will be the size of the base, how the base will be secured to the ground, and the stability of the structure. Many students may be tempted to build the model first and then draw the plans. However, the desired learning outcome is that the students should be able to build according to scale.
To achieve this, it is vital that they create a scale drawing first, using the given scale of 1:200. This means that if the lookout is 35 metres (3 500 centimetres) high, the height of the drawing should be 3 500/200 = 17.5 centimetres high, as should the model.
Some students have a great deal of difficulty with spatial perception and moving from a 2-dimensional drawing to a model. The opposite is also true. For these students, it may be worthwhile to have them plan their model using isometric block diagrams. The model they design will understandably be very “square”. However, the learning goal here is for the students to gain confidence and familiarity with scale models and
3-dimensional drawings. Once this confidence has been gained, a more open approach to the planning and drawing can be adopted.
Cross-curricular links
Social Studies and Health and Education
The students could explore the importance of the forests to Māori in pre-European times. Included in this study could be the beliefs of Māori around conservation. The students could make comparisons, using a Venn diagram, between conservation as it was in the 19th century and conservation as it exists in the 21st century, with an emphasis on the effects that conservation has on the people. The students could draw up a plan outlining ways to ensure that our native trees are preserved. Where appropriate, encourage them to relate this plan to their school or local environment.
Achievement Objectives
Social Studies
Demonstrate knowledge and understandings of:
• why and how individuals and groups pass on and sustain their culture and heritage (Culture and Heritage, level 4)
• how and why people view and use resources differently and the consequences of this (Resources and Economic Activities, level 4)
Health and Physical Education
• specify individual responsibilities and take collective action for the care and safety of other people in their school and in the wider community (Healthy Communities and Environments, level 4)
Science
The students could investigate the impact of forest fires on the environment and how living things adapt.
Achievement Objectives
• investigate and describe special features of animals and plants which help survival into the next generation (Living World, level 4)
• investigate a national environmental issue and explain the need for responsible and co-operative guardianship of New Zealand’s environment (Planet Earth and Beyond, level 5)
Answers to Activity
1. 7 088 ha (70.88 km2, to 2 d.p.)
2. She should place a fire lookout at the highest point, 539 m, so that the fire watcher can see over the whole forest.
3. a. Designs will vary but should be at least 35 m tall so that there are clear sight lines above any mature trees.
b. Scale models will vary.
c. Diagrams will vary.