Purpose
The purpose of this activity is to support students in establishing structure within one shape. That shape then becomes the foundation for creating a growth pattern.
Achievement Objectives
NA3-8: Connect members of sequential patterns with their ordinal position and use tables, graphs, and diagrams to find relationships between successive elements of number and spatial patterns.
Required Resource Materials
- Square tiles or squared paper
- PowerPoint (in paper form or displayed on a shared screen)
Activity
- Show the students slide 1 of the PowerPoint.
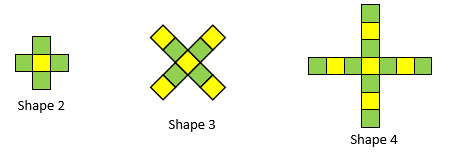
Here is shape three in a growing pattern.
Describe how the shape is made up.
Draw what shape four might look like.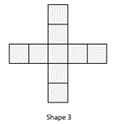
- Let students use squared paper to create shape four.
There are many possible designs including (see slides 2 and 3):- Adding one square to each of the four arms.
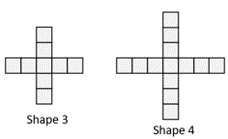
- Adding one square to each of the horizontal arms.
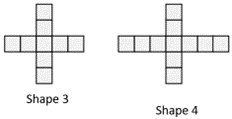
- Adding one square to each of the vertical arms.
- Adding one square to each of the four arms.
Students may come up with other creative variations, such as taking some squares away.
In each case discuss these key questions:
What stays the same as the pattern grows?
What changes as the pattern grows?
- Let students choose a shape and extend the pattern in both directions to show shapes one, two, three, four, five and six. Other students can check the patterns for consistency.
Are the constant (same) features kept?
Are the changes (differences) made in a consistent way?
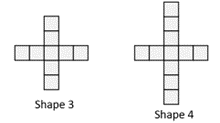
- Use the shape three designs on slides 4 to 6 as the start of a similar process. For each shape discuss the features of the shape.
Ask students to draw shapes two and four then check that the changes are consistent.
Next steps
- Provide students with examples and non-examples of growth patterns. Non-examples are sequences where the changes are not applied consistently, or some constant features are lost as the pattern grows. Here is a non-example of a growth pattern (slide 7).
What is wrong with this pattern? Can you fix it?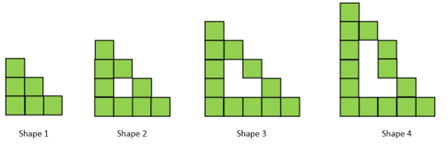
Look for students to recognise that each side of the right-angled triangle increases by one square in each step. That change is not consistently applied in the step from Shape 3 to Shape 4. The pattern should look like this (slide 8):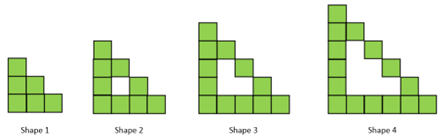
- Explore more complex growth patterns in which changes to colours, or orientations of squares occur. For example, what will shape five look like?
Attachments
Add to plan
Level Three