In this unit students interpret 2-dimensional representations of 3-dimensional objects and learn to create their own representations.
- Construct plan views of solid objects.
- Create nets that fold to form solid objects.
- Classify 3-dimensional shapes by their properties.
- Identify 3-dimensional shapes in the environment.
Plan views are different drawings of the same building. These drawings are commonly seen in house design and usually show the structure from above (top or seagull view), front, and side.
In this unit, students study solid (3-dimensional) shapes. Some solids are polyhedral. A polyhedron (singular) is a three-dimensional solid object that consists of a collection of polygons (flat shapes) that bound (enclose) a space. Students learn about prisms and pyramids which are classes of polyhedra (plural). In the figure below, the cube, cuboid, hexagonal prism, and triangular prism all have a constant cross-section if cut parallel to the end faces. Having a constant cross-section is the defining property of a prism. A cylinder is similar to a prism, however, because it has a curved surface, it is not technically a polyhedron.
Pyramids have a base that names the pyramid (e.g. square), and triangular faces that converge at a point, the apex. The figure below shows square-based and triangular based (tetrahedron) pyramids. A cone is similar to a pyramid in the same way that a cylinder is similar to a prism, as it has a curved surface, which means it is technically not a polyhedron.
In this unit students explore creating nets which are flat patterns that fold to form a solid. Nets are important in the packaging and construction industries.
The learning opportunities in this unit can be differentiated by providing or removing support to students, by varying the task requirements. Ways to support students include:
- providing materials, such as physical or digital models of 3-dimensional solids, so students can move and manipulate these, and themselves, in relation to the objects
- explicitly modelling the building and drawing of shapes from various viewpoints, so students appreciate the minimal requirements of plan views. This could include the use of digital cameras
- altering the complexity of the shapes students are asked to construct
- providing access to sculpting materials, such as plasticine, so students can create their own 3-dimensional models
- orientating cube models so the viewpoint matches the orientation of isometric paper
- providing opportunities for students to work in groups and pairs to encourage collaboration, peer-sharing of ideas, questioning, and reciprocal learning
Tasks can be varied in many ways including:
- manipulating the complexity of the 3-dimensional objects the students represent
- scaffolding the process of representational drawing into a sequence of steps.
The contexts for this unit can be adapted to suit the interests and cultural backgrounds of your students, and to make connections with current events and relevant learning from other curriculum areas. Build on the interests of your students. Many buildings throughout the pacific are examples of prisms so are ideal for this unit. For example, traditional whare and fale were usually the shape of pentagonal prisms. Students might also be motivated by interesting local buildings or iconic structures from around the world (perhaps from cultures that are relevant to their heritage). You could choose one context to frame all problems in, or vary the contexts presented in each problem.
Te reo Māori kupu such as raumata (net of a solid figure) and the names for different shapes could be introduced in this unit and used throughout other mathematical learning
- Interlocking cubes
- Cuisenaire Rods (optional - a digital representation could also be used. Search online for interactive Cuisenaire Rods)
- Geometric solids (Prisms, pyramids, spheres, etc.) (Useful)
- Polydrons, Geoshapes, or other interlocking plastic polygons (a digital representation could also be used. Search online for interactive Shape Tool)
- Scissors, rulers, protractors, sticky tape
- PowerPoints One, Two, Three, Four and Five
- Copymasters One, Two, Three, Four, Five, and Six
Session One
In this session students create plan views (top, front, side) of models made with connecting cubes.
- Use PowerPoint One to introduce cityscapes. Slides 1-3 show some iconic skylines from around the world. Ask students if they know the cities shown (New York, Melbourne, Shanghai). You could adapt the PowerPoint to include skylines from locations that are more relevant to your students (e.g. that reflect their heritage)
Do you know where this is? How?
Students might spot iconic buildings or landmarks such as rivers or harbours. - Introduce the connecting cubes. Slides 4 – 6 show how plan views of a building can be created by lying it on a surface and viewing it from different positions. Note that the drawings are what the camera sees and do not include cubes hidden behind others. Slide 7 shows all three views simultaneously.
- Give all students some cubes and invite them to construct the building. They will need a maximum of 10 cubes each. This could be done in pairs if necessary.
After a suitable time, ask students to compare their buildings and check that what they have built is correct. Model constructing the building and viewing it from different perspectives. Use the language that is used on the slide - e.g “this is the top view”. Encourage students to share any other terms they use when talking about perspective (e.g. bird’s eye view). - Give students the puzzle on Slide 8. Ask them to work independently to create a building that matches the three views. Watch as students work. Look for the following:
Do they approach the task systematically or resort to trial and error?
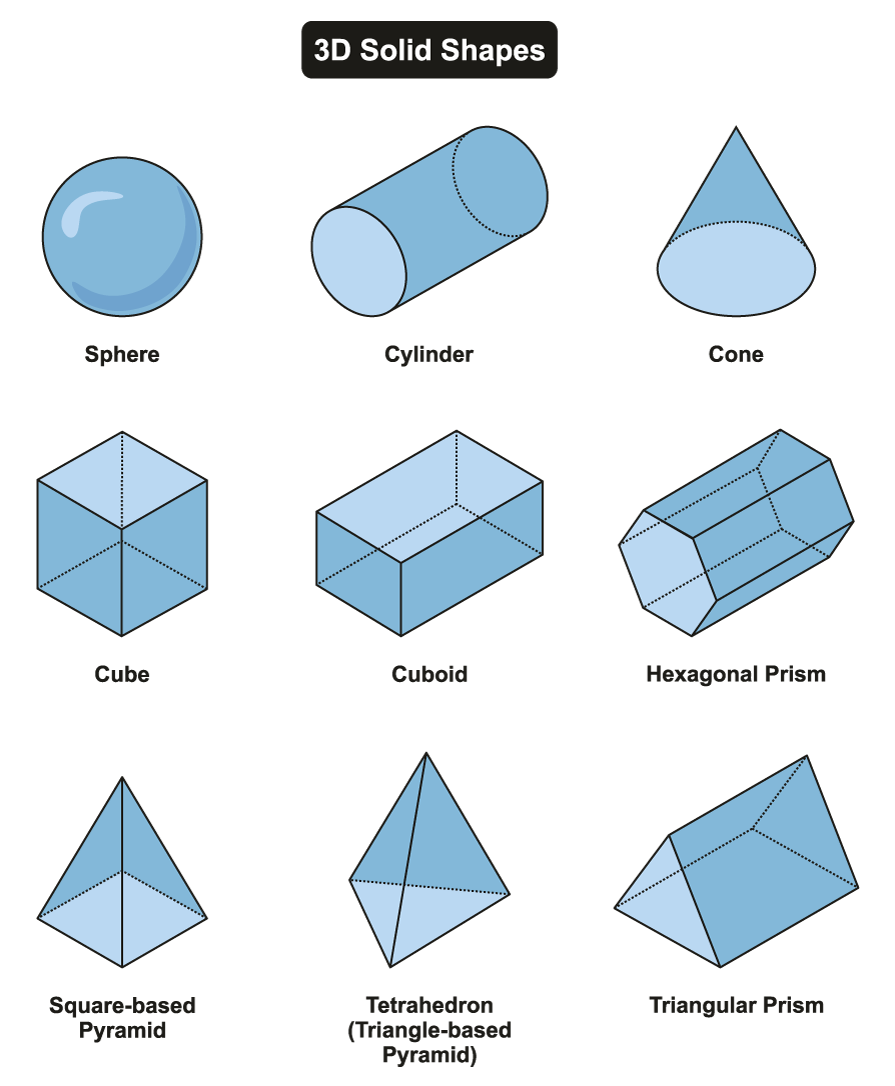
Do they get one view correct first, the top for example, before trying to get the other views correct? - Discuss strategies that might be used to coordinate the information from the three views. One way is to organise the data using the top view.
The numbers are the heights of the towers of cubes. Looking at each tower individually, and using the data from both directions, gives the permissible height/s. Given that 12 cubes are used, all three “1 or 2” towers must have two cubes.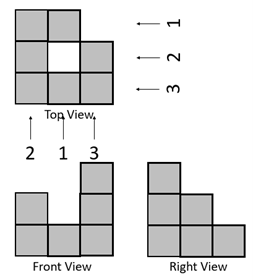
- Ask students to create their own puzzles. Provide Copymaster One to support their recording. When they are done, students can exchange their puzzle drawings with a partner to see if that student can create a matching building.
Session Two
In this session students practise making cube buildings from plan views. The session progresses to creating plan views of other objects, including common geometric solids.
- Provide students with about 15 cubes each. Show the class Slides 1-5 of PowerPoint Two, one at a time. Give students plenty of time to create their buildings and share the results with each other. The buildings get more complex as the slides progress. Look for students to apply systematic strategies, as discussed above. You might decide to create a puzzle wall with plan drawings made by students in Session One.
- Slide 6 shows plan views of a coffee cup.
What do you think this object is?
Do you have enough information?
Draw what the object might look like from the right side.
Draw what the object might look like from the left side. - After the students have attempted the left and right-side views animate the slide to show how lines might be used for more accuracy. An interesting point is that the width of the right and left views is the same width as the front.
Why? - Slide 7 shows the top and left views of a cone.
What might this solid be? How do you know?
Students should recognise that the front and right views are also triangles. You might take digital photographs of a cone to show the views. Many students want to show the curvature of surfaces in their plan views and require support not to do so. - Slide 8 shows two views (top and right) of a simple house structure.
What shape might this be?
Sketch what you think the front view looks like. - Animate the slide to show how construction lines support drawing the front view.
Now draw the left view. - Slide 9 shows a wharenui at Whakarewarewa village (Rotorua). This is an example of a house with a gable roof. You could edit this slide to include other wharenui, perhaps from your local area, that include gable roof.
Session Three
In this session students explore nets (flat patterns) for simple solids with the aim of connecting these to plan views. A complete unit on 3 dimensional solids is available at Level 3 at this link: Polyhedra: 3D Shapes. You may like to work through the Polyhedra Unit so students are comfortable with designing simple nets. This session builds on that work.
- Show Slide One of PowerPoint Three.
Imagine I wanted to make an architect model of this building. I would need a net or flat pattern to fold up.
What shapes would be in the net?
Students should recognise that the end faces of the building are pentagons (five sides).
What is a solid like this called in mathematics? (pentagonal prism)
How many rectangles are needed to wrap around the pentagonal faces? (five) - Slides 2-5 can be used to remind students how to form the net for other prisms. Slides 3-5 are animated so only the picture of the solid is visible at first.
What is the mathematical name for this solid?
Sketch what you think the net will look like.
Note that one layout for each net is given but there are many different configurations of the set of shapes that will also work. - Return to Slide 1 and pose the challenge.
Create a net to build an architect model of this building. Take care to measure correctly so the edges match exactly. You will need to think about which edges are the same length.
You might define the length of one edge to keep the models of manageable size. Eight centimetres is a good size for the width of the building. - Provide students with 1cm grid paper (Copymaster Two) to make construction and measurement easier, and scissors and tape. Allow your students plenty of time to construct their nets, fold, and glue/tape them. Roam and support students with the construction, and encourage them to support each other.
An alternative is to use digital technology. Tools like PowerPoint or Google Drawings could be used. There are also a variety of freely-available tools online that allow students to manipulate shapes - search online for interactive shape tool. Using computer generated shapes, rotating, and translating them, saves time and allows for experimentation with less consequence than physical construction.
- Slide 6 shows one possible net. Animate the slide progressively using mouse clips.
What other edges of the net will be the same length as this edge?
What other points will join this point when the net is folded? - Show Slide 7 but do not animate it.
Here are two views of a Manor house. Complete the drawings of the front and right views.
What do you need to be careful about? - Provide the students with Copymaster Three to draw on.
Animate the slide to support students if needed.
Now create a net for the architect model of this house. - Give your students Copymaster Two to ease the measurement load and to keep lines parallel or perpendicular. Parallels and perpendiculars are an interesting point of discussion. Students may decide to build the house and annex separately.
Roam while students work, looking for the following:
Do they recognise that both the body of the Manor House and the annex are rectangular prisms?
Do they recognise that the top of the Manor House is a square based pyramid minus the base?
Do they attend to side lengths that must be equal? - Slide 8 provides two possible nets for the Manor House and Annex though many variations also work.
- If your students require more challenge use Slides 9-11 which represent a house with a hip roof. The net is difficult to create. Copymaster Four can be used for students to draw plan views.
- After students have attempted their nets, discuss the challenges of creating the nets.
What strategies were helpful? (Seeing the whole building as made of units such as a rectangular prism or a pyramid)
What did you find most challenging?
Which of the possible nets are best for creating architect models? (Minimising the joins creates a more robust model)
Session Four
In this session students are asked to create their own architect buildings. The intention is to create a village that can be used in Session Five.
- Look through PowerPoint Four with your students. You might choose houses that are most culturally relevant to your students.
What shapes are houses and other buildings most likely to be?
Why do you think those shapes are used?
Why are shapes like cones and cylinders not used very much? - We are going to create architect models for the next session. You must be able to make the building using a single sheet of grid paper (Copymaster Two). You can combine two shapes to make your building. I want you to be adventurous. Let’s get lots of interesting buildings.
- Provide the students with scissors, grid paper, rulers, protractors, tape, and bottles of PVA (some students might want to create tabs). Encourage students to use digital technology if it is available. Roam the room as students work. Refer them to nets of common solids if they need support. Highlight situations where edge lengths need to be equal.
- After students have sufficient time to make a model gather the class. Ensure students write their name on the base of the model.
Is there a way we could group our buildings into different shapes? - Look at how the buildings might be classified, such as, single-level and high rise, basic shape (prism, pyramid, etc.), face and curved surfaces, house and apartments, etc.
- Collect the models and locate them in a safe place.
Session Five
There are two options for this session:
- Create villages in a grid layout and challenge students to draw plan views of each village using compass directions.
- Drawing the buildings.
You might choose to do both of these activities.
Creating villages
- Use Copymaster Five to create a grid reference system. You might enlarge it to A3 to get more space.
- Place five different building models on each grid. Fix them in place with Blu-Tack or a loop of cellotape.
- Use the compass application on a mobile phone to orientate the grid, North facing North, and South facing South.
- Ask students to create place drawings of the village. You might allow them to position themselves at eye level to draw views from the West, East, and North.
- Can they draw the plan view by imaging, without needing to view the village from above?
Drawings of the buildings
- Give each student an architect model that is not their own. Ask them to draw pictures of the building that will allow another person to identify it.
- Students might use plan views, nets, perspective drawing, or their own style of representation (Cubist paintings by Picasso might inspire students).
- PowerPoint Five can be used to develop isometric drawing. The slides are animated so you can pause the slides and let students imitate the drawing to that point. Copymaster Six has isometric grid paper for students to use.
- Once drawings have been made, allocate students a drawing that is not their own. Challenge them to locate the building the drawing represents. There may be multiple candidates.
Dear family and whānau,
This week we have been exploring 3 dimensional shapes. Ask your child to explain how these solid shapes have faces, edges and vertices. We have been learning to represent solid objects with drawings on paper and make patterns that fold up to make models of the object.
You might like to look at some cardboard packets from home, open them up, and see what the net (flat pattern) looks like.