This unit brings together a number of valuable mathematical ideas using the practical context of international paper sizes. Students practice some basic algebra by finding the general terms of patterns and then using these general expressions to find other specific terms. Measurement skills are applied here too.
- find patterns in the lengths of the sides of standard paper formats
- use patterns relating to the lengths of the sides of standard paper formats
- see that fractions can be ‘continued’ in order to calculate basic surds
This unit is essentially an exploration of the international standard A, B and C paper formats. These sizes were invented because when photocopying and in the printing industry, it is useful to have standard sheet sizes that can be obtained from larger ones by folding in half. The web site referenced below in Teachers’ Notes (i) gives a very good introduction to this topic.
The main point of this unit is learning that these standards exist, finding the importance of √2 in this context, and finding the pattern that governs the sheet side lengths. As a result it could be used to revise ideas concerning patterns that they will have met so far, or it could be used to introduce them. The unit should emphasise to the students the value of pattern in practical objects.
Left open at the end of the unit is the topic of continued fractions. This session could be taken considerably further (see the web site in Teachers’ Notes (ii)).
Teachers’ Notes:
(i) A-series paper. Here we show why the ratio of the side lengths of A series paper is 1 to √2. Below we show two consecutive sheets of A series paper.
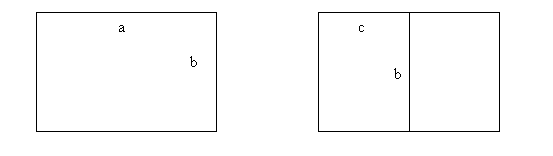
Now the ratio a to b is the same as the ratio b to c. So a/b = b/c or ac = b2. But in addition, a = 2c. So 2c2 = b2. As a result b2/ c2 = 2 so the ratio b/c = √2. (Similarly a/b = 2c/b = 2/√2 = √2.)
Background. For more information on this topic see the web site
http://www.cl.cam.ac.uk/~mgk25/iso-paper.html
This site will tell you who the first person was to think of the ‘doubling’ idea for paper. It also considers why the USA and Canada are two of the small number of countries to not so far opt for this international series of papers and what the author thinks are the consequences of this.
(ii) Continued fractions: To get the continued fraction for √2 use the following approach.
Let x2 = 2. Then x2 + x = 2 + x, so x(x + 1) = 1 + (1 + x).
Divide both sides by x + 1 to give x = 1 + 1/(1 + x).
Now apply this equation to the x of the RHS of this equation to give
x = 1 + 1/[1 + (1 + 1/(1 + x)] = 1 + 1/[2 + 1/(1 + x)].
Repeat until satisfied to give the continued fraction

To calculate this recursively press the following sequence of keys on your calculator:
- 2
- reciprocal button
- ‘+ 2’
- go to b and repeat b and c as often as you wish
- finally ‘+ 1’
The result will be a better and better approximation to √2 depending on how long you repeat the b and c above.
If you start again with the equation x2 = 3 and do a similar piece of algebra, you’ll get:

This will mean that you can use a similar algorithm to the one you used for √2 but you will need to alternate between 1 and 2 in step c.
Where to next? There is a lot more information on paper sizes on the internet. A simple search will get you more information than you will need but the sites you find may provide a good basis for student projects.
One area into which you might like to extend this work is the Golden Mean (Golden Ratio). This parallels the work we do here in that by folding rectangles whose sides are in this ratio we can obtain other rectangles with the same property.
- Enough copies of B0, B1, B2, B3, B4 and B5 paper that students in pairs can have access to them
- Enough copies of C0, C1, C2, C3, C4 and C5 paper that students in pairs can have access to them
- Enough copies of A0, A1, A2, A3, A4, A5 and A6 paper that students in pairs can have access to them
- Rulers or other measuring devices that will measure objects that vary in size from 14 cm up to 120 cm
- Calculators
- Scissors
Golden Ratio, recursive, international standard paper size, square root, ratios, surd
The sessions below look quite long but the first three are essentially the same but they involve different sized paper. Sessions 2 and 3 also show the link between three international formats.
Session 1 International paper: A
This session is an exploration of the A series size of paper. The students will get the chance to use measuring to discover how one size of paper is related to the next and what the dimensions of each size is.
The A series is one of an international series of paper sheet sizes. ISO 216 defines the A series as follows:
- The height divided by the width of all the formats is the square root of 2;
- Format A0 has an area of one square metre;
- Format A1 is A0 cut into two equal pieces;
- All smaller A series formats are defined in the same way by cutting the next larger format in the series parallel to its shorter side into two equal pieces;
- The standardised height and width of the paper formats is a rounded number of millimetres.
Resources: Provide the class with enough copies of sheets of A0, A1, A2, A3, A4 and A5 paper that pairs of students can have access to one of each at some point in the early stages of the lesson.
Before this unit you might try to find a way of introducing the class to the paper sizes by calling the sheets by name whenever you have a chance to use them. We list some examples below:
|
Paper size |
Uses of that size |
|
A0 |
Technical drawings;posters |
|
A1 |
Technical drawings; posters |
|
A2 |
Drawings; diagrams; large tables |
|
A3 |
Drawings; diagrams; large tables; large photocopying; newspapers |
|
A4 |
Letters; magazines; forms; laser printing and photocopying |
|
A5 |
Note pads; books |
|
A6 |
Post cards; books |
- Introduce the paper sheets that you are going to use during this lesson. Ask the students
Do you recognise any of these sheets?
Where have you seen them?
What are they used for?
They will probably know the A4 size if not its name. They will have seen that size used for photocopying and printing. They may have heard of A3 and/or A5 but the rest of the sizes may well be new to them. - What we are trying to do today is to see what relation there is between the different sizes and why they are that way. So I want you to measure them and try to see what patterns you can find.
Work in pairs, taking turns to measure and record the measurements. When you have measured what you think is necessary, check your measurements with another pair.
Then try to see if there are any patterns in your measurements. - While they are working move round the class and check that they are on the right track. As you go round you might ask them how they are going to compare the measurements of the different sizes. You may have to hint to certain pairs that producing a table is a good way to look for patterns.
Below we show the official dimensions. The length measurements are in millimetres and the area measurements are in square millimetres. The lengths are rounded to the nearest millimetre. The areas are not exactly the product of the lengths of the two sides because of the errors introduced when the lengths are rounded.
|
Paper sizes |
Shortest side length |
Longest side length |
area |
|
A0 |
841 |
1189 |
1000000 |
|
A1 |
594 |
841 |
500000 |
|
A2 |
420 |
594 |
250000 |
|
A3 |
297 |
420 |
125000 |
|
A4 |
210 |
297 |
62500 |
|
A5 |
148 |
210 |
31250 |
|
A6 |
105 |
148 |
15625 |
Naturally the students’ measurements will not be as accurate as these but they should be sufficiently accurate for them to see the patterns that are present.
Students who finish their measuring more quickly than the others should be encouraged to write down the patterns that they see.
- When most of the class have completed their measurements call the class together and put representative measurements on a large table of values that can be seen by all of the class.
Discuss these results and the possible patterns. They should be able to see that (i) the shortest length of An-1 is the longest length of An; (ii) the area of A0 is 1 m2; and (iv) that the longest length of An-1 is twice the shortest length of An. They might be able to discover for themselves that (v) the ratio of any two sides of these pieces of paper is the same; and (vi) that ratio is √2. If they can’t see this immediately then leave it for a later discussion. - Now send them back into their pairs or other groups to determine the dimensions of A7 and A8 paper. They might also be challenged to suggest uses for A7 and A8 paper. (A7 could be used for notes and A8 for playing cards.)
The faster students should be challenged to find a formula for the dimensions of An paper in terms of n. (These are 1000 x 2-1/4-n/2 mm by 1000 x 21/4-n/2 mm millimetres. The area is 2-n m2.) - Bring the class together to discuss the results so far. They will most likely have found the dimensions of the sheets by looking at the table and extending it. Some students may have realised how to get an A7 sheet from an A6 sheet by folding the latter in half.
What answers did you get for the dimensions of the A7 and A8 paper?
What do you think the area of these paper sheets is?
How did you work these out?
How could you check your answer by measurement? (Fold A6 sheet in half.)
How can you get an A4 sheet from an A3 sheet? (Fold in half.)
How could you get an An-1 sheet from an An sheet?
What advantage is there in having a standard set of paper sizes? (Storage is simpler; production is less costly; storage is more efficient.)
But why would you develop a pattern of paper sizes based on halving? (Easy to cut small sheets from one big sheet; photocopying two pages onto one is quick and efficient; calculating weight is easy too.)
If you avoided it earlier now is the time to produce the relation between the two sides of any An sheet. You will need to judge the strength of your class to decide whether they can do this for themselves or whether you work through it as a class. We have provided the argument above in ‘A description of the mathematics explored in this unit’. - Discuss the main points of today’s lesson and provide the class with headings so that they can write up what has been done in their note books. It will be valuable for work in later sessions to put the table of measurements above, as well as the deduced values for A7 and A8, in their books.
- For homework you might ask them to find two different sized paper objects at home, measure them and see if they are A sized sheets. If they aren’t A sized, how do they relate to the A sizes?
Session 2 International paper: B
This session is an exploration of the B series size of paper. The students will get the chance to use measuring to discover how one size of paper is related to the next and what the dimensions of each size is.
The format of this session is almost exactly the same as Session 1. The only real difference is the linking of the B series of paper sizes to the A series.
Resources: Provide the class with enough copies of sheets of B0, B1, B2, B3, B4 and B5 paper that pairs of students can have access to one of each at some point in the early stages of the lesson. It may be that it is difficult to get many different sizes of the B format paper. If the B size of paper is not readily available in your area, then you may need to cut the sizes out for yourself. A quicker (sneakier) way might be to introduce the paper sizes to a Level 5 class but have them actually cut out the B size sheets.
The purpose of the B sheets is to provide an international standard size paper that fits into gaps of the A series. We list some of the applications of the B sized sheets. You may like to complete this table as an activity of the class. It could be something that is done over a week or two by leaving it in a place where the students can easily see it and inviting them to add to the gaps. They may find using the internet is a good way to find this information.
|
Paper size |
Uses of that size |
|
B0 |
|
|
B1 |
|
|
B2 |
|
|
B3 |
|
|
B4 |
newspapers |
|
B5 |
books |
|
B6 |
books |
-
Introduce the paper sheets that you are going to use during this lesson. Ask the students
Do you recognise any of these sheets?
Where have you seen them?
What are they used for?
They will probably know the B4 size if not its name. They will have seen that size used for photocopying and printing. They may have heard of B3 and/or B5 but the rest of the sizes may well be new to them. -
What we are trying to do today is to see what relation there is between the different sizes and why they are that way. So I want you to measure them and try to see what patterns you can find.
Work in pairs, taking turns to measure and record the measurements. When you have measured what you think is necessary, check your measurements with another pair.
Then try to see if there are any patterns in your measurements. -
While they are working, move round the class and check that they are on the right track. As you go round you might ask them how they are going to compare the measurements of the different sizes. They should realise from session 1 that a table is a good way of representing their data.
Below we show the official dimensions. The length measurements are in millimetres and the area measurements are in square millimetres. The lengths are rounded to the nearest millimetre. The areas are rounded to the nearest 100 mm2.
|
Paper sizes |
Shortest side length |
Longest side length |
area |
|
B0 |
1000 |
1414 |
1414200 |
|
B1 |
707 |
1000 |
707100 |
|
B2 |
500 |
707 |
353600 |
|
B3 |
353 |
500 |
176800 |
|
B4 |
250 |
353 |
88400 |
|
B5 |
176 |
250 |
44200 |
|
B6 |
125 |
176 |
22100 |
The students’ measurements may not be as accurate as these but they should be sufficiently accurate for them to see the patterns that are present.
Students who finish their measuring more quickly than the others should be encouraged to write down the patterns that they see.
-
When most of the class have completed their measurements call the class together and put representative measurements on a large table of values that can be seen by all of the class.
Discuss these results and the possible patterns. They should be able to see that (i) the shortest length of Bn-1 is the longest length of Bn; (ii) the area of B0 is about √2 m2; (iii) that the area reduces from Bn to Bn-1 by a factor of 2 (or nearly so depending on their measurements) and (iv) that the longest length of Bn-1 is twice the shortest length of Bn. After the last session they might be able to discover for themselves that (v) that the ratio of any two sides of these pieces of paper is the same; and (vi) that that ratio is √2. If they can’t see this immediately then leave it for a later discussion. -
Now get the pairs to compare the table of B size paper to that of the A size paper from the last session. Give them time to consider how the two sizes might be linked.
-
Discuss the relations between the A and B sizes. This is not easy. It turns out that the shortest (longest) side of Bn is the geometric mean of the shortest (longest) lengths of An and An-1. So the shortest (longest) length of Bn = the square root of the product of the shortest (longest) length of An and the shortest (longest) length of An-1. Get them to experiment with various ideas. You may need to tell them that they will have to use two sizes of A paper to get one size of B paper. (In general, the geometric mean of a and b is √(ab).)
-
Now send them back into their pairs or other groups to determine the dimensions of B7 and B8 paper. They might also be challenged to suggest uses for B7 and B8 paper. (B7 is the size of passports in the EU and the USA; B8 is used for playing cards.)
The faster students should be challenged to find a formula for the dimensions of Bn paper in terms of n. (These are 1000 x 2-n/2 mm by 1000 x 21/2-n/2 mm millimetres. The area is 21/2-n m2.) -
Bring the class together to discuss the results so far. They will most likely have found the dimensions of the sheets by looking at the table and extending it. Some students may have realised how to get a B7 sheet from a B6 sheet by folding the latter in half.
What answers did you get for the dimensions of the B7 and B8 paper?
What do you think the area of these paper sheets is?
How did you work these out?
How could you check your answer by measurement? (Fold B6 sheet in half.)
How can you get a B4 sheet from a B3 sheet?(Fold in half.)
How could you get a Bn-1 sheet from a Bn sheet?
What advantage is there in having a standard set of paper sizes? (Storage is simpler; production is less costly; storage is more efficient.)
But why would you develop a pattern of paper sizes based on halving? (Easy to cut small sheets from one big sheet; photocopying two pages onto one is quick and efficient; calculating weight is easy too.)
If you avoided it earlier now is the time to produce the relation between the two sides of any Bn sheet. It is exactly the same as the argument for the A series sheets
So you might expect more students to be able to do it in this session. -
Discuss the main points of today’s lesson and provide the class with headings so that they can write up what has been done in their note books. It will be valuable for work in later sessions to put the table of measurements above, as well as the deduced values for B7 and B8, in their books.
-
For homework you might ask them to find two different paper objects at home, that differ from the objects they measured last time. Ask them to measure them to see if they are B sized sheets. If they aren’t B sized, how do they relate to the B sizes?
Session 3 International paper: C
This session is an exploration of the C series envelope sizes. The students will get the chance to use measuring to discover how one size of envelope is related to the next and what the dimensions of each size is.
The purpose of the C series is to provide envelopes that will take A and B formats easily.
You should find a great deal of similarity here between this session and the previous two. In fact you may be able to let the students try this session as an investigation. Give them the C series envelopes and ask them to explore them as they did the A and B series. To help you may list the key things that they have to work on. These include
- What are the dimensions of the C formats?
- How are the side lengths of consecutive formats of the C series related?
- How are the side lengths of a single format related?
- How are the areas of the different formats related?
- Can you find a formula for the lengths of the sides and for the area of Cn?
- What are the dimensions of C7 and C8?
- How is Cn related to An, Bn or both?
- How do the A and B sheet sizes fit into the C format envelopes?
On the other hand we have given the full details of the session in the same way that we have done for sessions 1 and 2 just in case you prefer to do it that way.
Resources: Provide the class with enough copies of C0, C1, C2, C3, C4 and C5 envelopes that pairs of students can have access to one of each at some point in the early stages of the lesson.
Before this unit you might try to find a way of introducing the class to the envelope sizes by calling them by name whenever you have a chance to use them. We list some examples below:
|
Paper size |
Uses of that size |
|
C0 |
Envelopes for A0 letters - unfolded |
|
C1 |
Envelopes for A1 letters – unfolded or A0 folded once |
|
C2 |
Envelopes for A2 letters; A0 folded twice; A1 folded once |
|
C3 |
Envelopes for A3 letters - unfolded |
|
C4 |
Envelopes for A4 letters - unfolded |
|
C5 |
Envelopes for A4 letters – folded once |
|
C6 |
Envelopes for A4 letters – folded twice |
- Introduce the envelopes that you are going to use during this lesson. Ask the students
Do you recognise any of these envelopes?
Where have you seen them?
What are they used for?
What does your family use most often? -
What we are trying to do today is to see what relation there is between the different sizes and why they are that way. So I want you to measure them and try to see what patterns you can find.
Work in pairs, taking turns to measure and record the measurements. When you have measured what you think is necessary, check your measurements with another pair.
Then try to see if there are any patterns in your measurements. -
While they are working, move round the class and check that they are on the right track. As you go round you might ask them how they are going to compare the measurements of the different sizes. They know by now that a table is a good way of representing their data.
Below we show the official dimensions. The length measurements are in millimetres and the area measurements are in square millimetres. The lengths are rounded to the nearest millimetre. The areas are rounded to the nearest 100 mm2.
|
Paper sizes |
Shortest side length |
Longest side length |
area |
|
C0 |
917 |
1297 |
1189300 |
|
C1 |
648 |
917 |
594700 |
|
C2 |
458 |
648 |
297300 |
|
C3 |
324 |
458 |
148700 |
|
C4 |
229 |
324 |
74300 |
|
C5 |
162 |
229 |
37200 |
|
C6 |
114 |
162 |
18600 |
The students’ measurements should be sufficiently accurate for them to see the patterns that are present.
Students who finish their measuring more quickly than the others should be encouraged to write down the patterns that they see.
-
When most of the class have completed their measurements call the class together and put representative measurements on a large table of values that can be seen by all of the class.
Discuss these results and the possible patterns. They should be able to see that (i) the shortest length of Cn-1 is the longest length of Cn; (ii) the area of C0 is about √(√2) m2 or 2¼ m2; (iii) that the area reduces from Cn to Cn-1 by a factor of 2 (or nearly so depending on their measurements) and (iv) that the longest length of Cn-1 is twice the shortest length of Cn. After the last session they should be able to discover for themselves that (v) that the ratio of any two sides of these pieces of paper is the same; and (vi) that that ratio is √2. -
Now get the pairs to compare the table of C size envelopes to that of the A size and B size paper from the last two sessions. Give them time to consider how the two sizes might be linked.
-
Discuss the relations between the A, B and C sizes. This is not easy. It turns out that the shortest (longest) side of Cn is the geometric mean of the shortest (longest) lengths of An and Bn. So the shortest (longest) length of Cn = the square root of the product of the shortest (longest) length of An and the shortest (longest) length of Bn. Get them to experiment with various ideas. You may need to tell them that they will have to use the sizes of A and B paper to get one size of C paper. (In general, the geometric mean of a and b is √(ab).)
-
Now send them back into their pairs or other groups to determine the dimensions of C7 and C8 envelope. They might also be challenged to suggest uses for C7 and C8 paper.
The faster students should be challenged to find a formula for the dimensions of Cn paper in terms of n. (These are 1000 x 2-1/8-n/2 mm by 1000 x 23/8-n/2 mm millimetres. The area is 21/4-n m2.) -
Bring the class together to discuss the results so far. They will most likely have found the dimensions of the C7 and C8 envelopes by looking at the table and extending it. They should know by now that they can check this by folding certain other envelopes.
What answers did you get for the dimensions of the C7 and C8 envelopes?
What do you think the area of these envelopes is?
How did you work these out?
How could you check your answer by measurement? (Fold C6 envelope in half.)
How can you get a C4 envelope from a C3 envelope?(Fold in half.)
How could you get a Cn-1 envelope from a Cn envelope?
What advantage is there in having a standard set of envelope sizes? (Storage is simpler; production is less costly; storage is more efficient.)
But why would you develop a pattern of envelope sizes based on halving? (Because the sheet sizes use this property.)
If you avoided it earlier now is the time to produce the relation between the two sides of any Cn envelope. It is exactly the same as the argument for the A and B series sheets
So you might expect more students to be able to do it in this session. -
Discuss the main points of today’s lesson and provide the class with headings so that they can write up what has been done in their note books.
-
For homework you might ask them to find two different sized envelopes at home. Ask them to measure them to see if they are C sized envelopes. If they aren’t C sized, how do they relate to the C sizes?
Session 4: Inventing Paper Sizes
In Sessions 2 and 3 we used the geometric mean. Here we use the arithmetic mean to determine a new ‘International’ paper format.
Resources: This session will require calculators, paper and scissors.
- In a previous lesson we used the geometric mean to produce new types of paper sizes.
What is the geometric mean?
Why is it called that?
Given an a x b rectangle, what is the geometric mean? √(ab) - Discuss using a diagram, the fact that the geometric mean gives the side of a square which has the same area as the a x b rectangle. Give them examples to work out.
- Along with the geometric there usually goes the arithmetic
What do you think the arithmetic mean might be?
Calculate several examples. - Divide the class up into three groups. One will determine the sheet size obtained from the arithmetic means of the sides of An-1 and An; another will determine the sheet size obtained from the arithmetic means of the sides of Bn-1 and Bn; and the third will determine the sheet size obtained from the arithmetic means of the sides of Cn-1 and Cn. Each group will cut paper to the appropriate size for their group’s calculations.
- Then ask them:
Are the sides of your sheets in the ratio of √2 to 1?
Why?
Will any calculation you do with sides that are in the ratio √2 to 1 stay in that ratio?
Will the sheets that two groups have made fit into the envelopes that the third group made?
Can you find a formula for the sides and areas of your sheets?
Groups that work more quickly could be asked:
Which is bigger, the arithmetic mean of two numbers or their geometric mean?
Are they ever the same? When? - Give them headings to make notes in their books.
Session 5:The Square Root of 2
The unusual number √2 is obviously of interest if only because of its application to paper and envelope sizes. In this session we look at √2 and see how to calculate it to any degree of accuracy by using continued fractions.
Resources: Students will need a calculator in this session.
- The value √2 is clearly important as far as these international paper formats are concerned. Ask:
What is the exact value of √2?
How would you calculate it?
What value do you get?
Let them have time to think about these questions. They will probably think of using a calculator but how does the calculator work it out? One way that it could do it is through continued fractions. Using the algebra in ‘A description of the mathematics explored in this unit; Teachers’ Notes’ show them the continued fraction equation for √2 and how to use it to find approximations to √2. - Let them work in pairs to find √2 by the straight application of the calculator and by continued fractions. How many times do they have to repeat the continued fraction operation until they reach the original accuracy of the calculator?
- But we can use continued fractions to find other surd values too. Let’s try √2. What would the continued fraction for √3 be?
How would you find it? - Let them find √3, √5 and √6 by first finding the appropriate continued fraction and then doing the iteration using a calculator.
- While they are working on these problems move round the class and give help where it is needed.
Get them to report back when they have spent sufficient time on the problems. - Give them headings to make notes in their books.
Extension work
There is a great deal more interesting work on continued fractions that could lead on from here. Students might be asked to investigate the properties of continued fractions. (See the site referenced in Teachers’ Notes.)