Purpose
The purpose of this activity is to support students in finding the volumes of cuboids, that have dimensions given in whole number, using multiplication.
Achievement Objectives
GM3-2: Find areas of rectangles and volumes of cuboids by applying multiplication.
Required Resource Materials
- Two cuboid shaped boxes of similar volume, preferably with dimensions that fit 2cm x 2cm x 2cm cubes.
- Connecting cubes
- Calculators (if needed)
- PowerPoint
Activity
- Show students the two cuboid shaped boxes.
Let's imagine I found these two boxes at the supermarket. They hold the same stuff and their prices are the same. Which box should I buy?
Students might discuss how full each box is, and make a link to the amount of stuff that each box could hold.
Let’s assume that each box is filled to the brim with say, rice bubbles. Which box should I buy?
Look for students to consider how much space is available in each box.
The space inside the box is called its volume.
Do you think the volume of these boxes will be the same or different? Why?
How could we measure the volume of these boxes?
Students might suggest filling one box with rice bubbles, then tipping the contents into the other box.
That would waste the rice bubbles. Perhaps I could use these cubes to measure the volume - how do you think I would use these cubes to find out which box holds most?
Provide time for students to discuss this idea. You might record students' suggestions on a shared display or document.
You might also introduce relevant te reo Māori kupu, such as the rōrahi (volume), and poro-tapawhā hāngai (cuboid).
- Arrange the cubes in the boxes as a measure of volume. At first the cubes might be put in loosely which raises the issue of air space. Packing the cubes tightly is more reliable.
Is there an easy way to count the cubes, rather than one at a time?
I would still have to pour the rice bubbles out to fit the cubes inside the box. Is there a way to measure the volume, using these cubes, without wasting the rice bubbles?
Look for students to suggest creating a tower or layer that is the size of the base of each box, then iterating this layer (or imagining its iteration) to form a shape is the same width and height as the box. Use whatever strategy students suggest, to find the volume of the boxes. Highlight that you are looking for a more efficient way to do so.
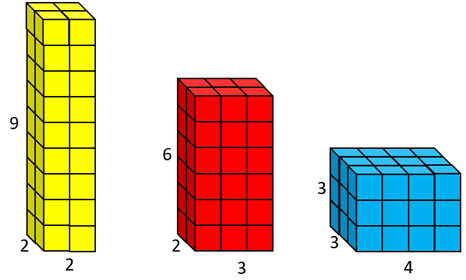
- Use the first slide of the PowerPoint (on screen or printed) to prompt the students to make three different cuboids with connecting cubes. The models have the same volume.
- Provide time for students to make and share their cuboids.
- Pose a new challenge to students:
Can you think of an efficient way to find the volume of each cuboid? What about a way that doesn't involve counting all of the cubes?
Make calculators, pencils, and paper available for students as they work on this problem. You might allow students to work in strategically organised groups to encourage peer scaffolding and extension, as well as productive learning conversations. Some students might also benefit from working independently, whilst others may need additional support from the teacher.
Look for students to:- Apply multiplication. For example, by using 2 x 2 = 4 to find the number of cubes in a layer, then multiply 9 x 4 = 36 to find the total number of small cubes in the yellow cuboid.
- See relationships among the cuboids. For example, if the bottom layer has twice as many cubes as that of another cuboid, the height is half of that cuboid (blue and red cuboids).
- Record their thinking in an organised way that allows them to look back and explain their working out.
- Discuss the strategies students used. Ask them to justify the calculations they use. For example if the work out 2 x 3 x 6 = 36 cubes, ask them what features of the cuboid each factor represents.
You calculated 3 x 6 = 18. What does that tell you about the cuboid? (a vertical layer)
Then you went 2 x 18. Why did you double 18?
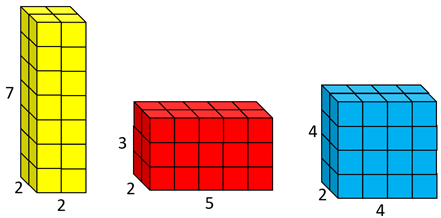
- Pose other problems using cuboid models. For example, put these cuboids in order of volume (PowerPoint slide 2). Continue to progress students from relying on materials, to imaging, and then using mental calculations and reasoning.
Next steps
- Present students with diagrams of cuboids without visible cube divisions. To find the volume of these diagrams, students must image the placement of single cubes within the cuboid. A unit cube needs to be iterated (repeated) across the length and depth of the bottom layer. That layer then needs to be iterated four times.
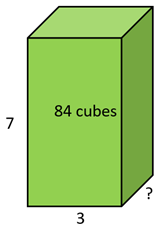
- Provide examples where students are given the volume and two edge lengths of a cuboid, and are asked to find the missing edge length. For example, the volume of the cuboid is 84 cubes and two edge lengths 7 and 3 are given. The problem can be represented as 7 x 3 x ? = 84 cubes.
Extend the problem by only providing the volume and asking students to find cuboids that match. For example, find as many cuboids as you can that have a volume of 72 cubes.
Attachments
volume-of-cuboids.pptx55.94 KB
Add to plan
Level Three