This is an investigation, leading to the derivation and use of Pythagoras' Theorem in two and three dimensions. The initial focus of this unit involves students in aspects of geometry from levels 4 and 5 of the curriculum, to establish the groundwork necessary for the final stages of the unit.
- Devise an algebraic rule to identify tilted squares that can fit on geoboards of different sizes.
- Devise an algebraic rule to identify the size of the smallest square geoboard on which tilted squares can fit.
- Devise and use an algebraic rule for Pythagoras’ theorem.
- Devise algebraic rules to find Pythagorean triples.
When students engage in activities that provide opportunities to generalise, they think algebraically whether they use the symbols of algebra or numbers from arithmetic. Using algebraic symbols however provides opportunities to use a language that is powerful, concise and clear.
Many students will have seen Pythagoras’ Theorem as a tool for calculating the length of a side of right-angled triangles given the length of the other two sides. The focus of this unit is not just using the theorem in this way. Rather, students use the tools of problem-solving, making calculations for a range of data relating to tilted and non-tilted squares, tabulating results in systematic ways to help pattern seeking, and explaining the generality of connected ideas.
There are altogether fourteen tasks in the unit. The latter tasks provide opportunities for students to spot patterns that can generate sets of three natural numbers that satisfy the theorem of Pythagoras. It is suggested that students also make spreadsheets based on their formulas they find for these triples.
- Copymaster 3: 5-by-5 geoboards on dot grids.
- Copymaster 2: 4-by-4 geoboards on dot grids.
- Copymaster 4: square dot grid.
- Copymaster 1: 3-by-3 geoboards on dot grids.
Each session in this unit comprises a sequence of tasks or challenges. It is suggested that students have an opportunity to engage in each task by themselves before they begin sharing their ideas with other students or with their teacher. The role of the teacher is to first listen carefully to students as they try to explain their thinking to others and then interact with the students only when they or their peers appear to have reached an impasse. Such interactions might then be to help clarify students’ thinking or even redirect thinking where necessary.
Notes have been included at the beginning of each session to provide mathematical background including solutions, as well as on aspects that are likely to pose some difficulty for students. The exact nature of any interactions will depend on the situation and on the thinking progress that has been made.
Session 1
Teachers’ Notes
Most students limit their squares to the four non-tilted squares with sides 1, 2, 3, and 4 units. Challenge students to find more than four squares. Look for students who have five, six, seven or eight squares – if they have eight, four will be tilted squares.
As soon as one student has one of these tilted squares, it doesn’t take long before a growing number of students have several tilted squares. Then challenge the students to find a way to tell that they have all the possible squares. Listen to students talking with each other about their squares. It is likely that some will use language such as, ‘one space across and two spaces up’, or ‘one space across and two spaces down’, or ‘two spaces across and 1 space up’, or ‘two spaces across and 1 space down’ etc to describe a [1, 2] or [2, 1] tilted square. A [1, 2] square is made by choosing a corner of the square as a starting position and shifting 1 space across followed by 2 spaces up to locate an adjacent corner. This process is repeated to locate the third and then the fourth corners. At the appropriate moment, have the students share this description with other students.
In order that they can be sure there are only eight different squares possible, students will need to devise a systematic strategy, either directly on their 4-by-4 geoboard diagrams or by listing in a table such as that below.
|
Description of square |
Square |
|
one along zero up |
[1, 0] or [0, 1] |
|
one along, one up |
[1, 1] |
|
two along, zero up |
[2, 0] or [0, 2] |
|
two along, 1 up |
[2, 1] or [1, 2] |
|
two along, 2 up |
[2, 2] |
|
three along, zero up |
[3, 0] or [0, 3] |
|
three along, one up |
[3, 1] or [1, 3] |
|
four along zero up |
[4, 0] or [0, 4] |
Students will find that a [2, 3] square will not fit on their 4-by-4 geoboards. Only those squares for which the sum of the two numbers used to describe the squares is less than or equal to 4 will fit on a 4-by-4 geoboard. When a 5-by-5 geoboard is used, the sum of the two numbers used to describe the squares must be less than or equal to 5. In fact, only squares [a, b] where a and b are whole numbers, and a + b ≤ n, will fit on an n-by n geoboard.
In the final task in this session, suggest that students enter their results in a table to help them see any patterns.
|
Square |
Smallest square geoboard |
|
[3, 5] |
8-by-8 |
|
[1, 2] |
3-by-3 |
|
[2, 4] |
6-by-6 |
|
[1, 6] |
7-by-7 |
|
[4, 7] |
11-by-11 |
So an (x + y)-by-(x + y) geoboard is the smallest square geoboard on which an [x, y] square, where x and y are whole numbers, will fit.
Teaching Sequence
Task 1
-
How many different sized squares can be made on a 4-by-4 geoboard (Copymaster 2). (Each square must have each corner on a dot on the geoboard.)
.gif)
-
Find a way to show how you can be sure that you have found all the different squares possible?
Task 2
-
The tilted squares below are sometimes called [2, 1] squares.
.gif)
.gif)
-
Show a [2, 2] and a [1, 3] square on your diagrams for question 1. Explain how this labelling works.
-
Decide if a [1, 2] square is the same as a [2, 1] square. Explain your reasoning.
-
Label a [1, 0] square and explain what this labelling means.
-
-
Use the labelling method, [2, 1] and so on, to list all the squares you have found for question 1. Arrange the squares in order of size.
-
Decide if a [2, 3] square should be in your list. Make a drawing to check.
Task 3
-
Devise a rule that can be used to tell which squares can fit on a 4-by-4 geoboard.
-
Make a rule that indicates which squares that can fit on a 5-by-5 geoboard (Copymaster 3). Draw the squares to check your rule.
-
Now devise a rule that indicates which squares can fit on an n-by-n geoboard.
Task 4
-
Predict the size of the smallest geoboard on which a [3, 5] square will fit. Draw a diagram on dot paper (Copymaster 4) to check your prediction.
-
Predict the size of the smallest geoboards on which the following squares will fit. Draw diagrams on dot paper to check your predictions.
a. [1, 2] b. [2, 4] c. [1, 6] d. [4, 7] -
Devise a rule to predict the size of the smallest square geoboard on which an [x, y] square will fit. Explain how the rule works.
Session 2
Teachers’ Notes
In this session, students explore the area of the squares found in the previous session, and use these area calculations to help explore relationships for what we have called [2, 1], [2, 3], … [a, b] triangles.
For students who cannot see how the surrounding square can help calculate the area of the tilted square, suggest that they might imagine that the surrounding square creates four identical ‘tear-off’ triangles. Ask the students to see if they can find a way to calculate the area of first two triangles, which together form a 1-by-2 rectangle, and then four triangles. Encourage students to present their results in a table like the one below to help them see patterns.
|
Square |
Area (unit2) |
|
[1, 0] |
1= 12 |
|
[2, 0] |
4 = 22 |
|
[1, 1] |
2 = 12 + 12 |
|
[1, 3] |
10 = 12 + 32 |
|
[2, 3] |
13 = 22 + 32 |
|
[2, 4] |
20 = 22 + 42 |
The area of a [3, 4] square is 32 + 42 = 25 unit2 and the area of a [5, 12] square is 52 + 122 = 169 unit2. So the area of an [a, b] square is a2 + b2 where a and b are whole numbers. While this generalisation arises from patterns involving whole numbers only, it is also true for squares such as [2.3, 1.6], that is, where a and b are real numbers. The area of a [2.3, 1.6] square is then 2.32 + 1.62 = 7.85 unit2.
In Task 6, the first right-angled triangle is a [1, 2] triangle. It is formed by shifting one space across from a starting point (lower left corner) to locate the second corner (the right angle). The third corner is located by shifting two spaces up from the second corner. Focus first on the second triangle, the [3, 1] triangle, and have students explain the meaning of their labelling before labelling the other triangles: [2, 3], [2, 2], and [4, 3]. Tell students the longest side of a right-angled triangle has a special name; the hypotenuse.
As students draw and then calculate the areas of the squares on each side of the different triangles, suggest that they should enter their results in a table like the one below.
|
Right-angled Triangle |
Area of square on horizontal side |
Area of square on vertical side |
Area of square on hypotenuse |
|
[1, 2] |
1 = 12) |
4 = 22 |
5 = 12 + 22 |
|
[3, 1] |
9 = 32 |
1 = 12 |
10 = 32 + 12 |
|
[2, 3] |
4 = 22 |
9 = 32 |
13 = 22 + 32 |
|
[2, 2] |
4 = 22 |
4 = 22 |
8 = 22 + 22 |
|
[4, 3] |
16 = 42 |
9 = 32 |
25 = 42 + 32 |
Ask students to look carefully for any patterns and then write a rule in their own words for the relationship linking the three areas. Students might share and explain their rules before it is formalised as Pythagoras’ Theorem:
.gif)
Teaching Sequence
Task 5
-
Find the area of the following [2, 1] square. The surrounding square shown in the second diagram will help.
.gif)
-
Draw each square in the table below on dot paper (Copymaster 4). Work out the area of each square. (It may be helpful to draw surrounding squares as shown in Question 1 above.)
Square
Area (unit2)
[1, 0]
1
[2, 0]
4
[1, 1]
[1, 3]
[2, 3]
[2, 4]
-
- Look for any patterns in your answers for Question 2 and then see if you can predict the area of a [3, 4] square and a [5, 12] square.
- Check that the rule works by drawing the square on dot paper.
- Explain how the rule works for an [a, b] square.
Task 6
-
The shaded right-angled triangle below is a [1, 2] triangle. Label the other triangles.
.gif)
-
On dot paper (Copymaster 4), draw squares on the sides of a [1, 2] right-angled triangle like this. Find the area of each square and mark the areas on the squares.
.gif)
-
Draw the three squares on the sides of the other triangles given for question 1. Find the area of each square and mark the area on the square.
-
Write a rule linking the areas of the three squares on the sides of any right-angled triangle. Explain how the rule works.
Session 3
Teachers’ Notes
In this session, students use Pythagoras’ Theorem to help solve problems that are geometrical in nature. These tasks are essentially to help consolidate understanding of Pythagoras’ Theorem.
They firstly find the area of each square for which the area is not indicated. Then they use their results to calculate the lengths of the sides of each square. The areas and lengths are shown in the table below. The values in bold type are the values that must be calculated.
|
Task 7 |
Areas of squares |
Length of sides of squares |
|
Q1a. |
AB2 = 7 |
AB = 2.65 |
|
AC2 = 7 |
AC = 2.65 |
|
|
BC2 = 14 |
BC = 3.74 |
|
|
Q1b. |
BC2 = 450 |
BC = 21.21 |
|
AB2 = 225 |
AB = 15 |
|
|
AC2 = 225 |
AC = 15 |
|
|
Q2a. |
AC2 = 36 |
AC = 6 |
|
AB2 = 100 |
AB = 10 |
|
|
BC2 = 136 |
BC = 11.66 |
|
|
Q2b. |
BC2 = 120 |
BC = 10.95 |
|
AC2 = 12 |
AC = 3.46 |
|
|
AB2 = 108 |
AB = 10.39 |
In Task 8 Q1, ask the students to draw a circle using compasses and then see how many right-angled triangles they could draw with diameter as hypotenuse – they should measure with a protractor to check the right angle. In fact there is an infinite number of right-angled triangles that can be drawn with three corners on the circle and with hypotenuse as the diameter. So any response where the sum of the areas of the two smaller squares that can be drawn on the two shorter sides is 102 = 100 unit2 is likely to lead to correct side lengths.
In Task 8, Q2a, ask students to first calculate the areas of the squares that can be drawn on each side of the triangle. These areas are, 12 + 12 = 2 unit2, 32 + 32 = 18 unit2, and
22 + 42 = 20 unit2. The lengths of the sides of the squares are therefore, 1.41 units, 4.24 units, and 4.47 units (rounded to 2 decimal places) respectively. In Q2b, the lengths of the sides are, 2.24 units, 4.47 units, and 5 units, and in Q2c, the lengths of the sides are, 3.16 units, 3.16 units, and 4.47 units (all rounded to 2 decimal places).
In Task 8Q3, the shaded triangles are inside 3-dimensional solids. In Q3a for example, ABC is a right-angled triangle. Students must imagine a square formed on each side of the square. The lengths in the table below have been calculated to 2 decimal places.
|
Question |
AB2 |
AB |
AC2 |
AC |
BC2 |
BC |
|
3a. |
22 = 4 |
2 |
12 + 22 = 5 |
2.23 |
9 |
3 |
|
3b. |
12 + 22 = 5 |
2.23 |
42 = 16 |
4 |
21 |
4.58 |
|
3c. |
32 = 9 |
3 |
30 |
5.48 |
22 + 42 = 21 |
4.58 |
Teaching Sequence
Task 7
-
In each right-angled triangle below, the areas in square units of the squares that are drawn on two sides of the triangle are shown. Work out the area of the third square.
.gif)
-
Find the area of each third square in the following diagrams. In each case, ABC is a right-angled triangle.
.gif)
-
Calculate the lengths of the sides of the triangles in Questions 1 and 2 above.
Task 8
-
In each circle below, O is the centre of the circle. AC = 10 cm is a diameter and ABC is a right-angled triangle.
.gif)
Calculate possible lengths of the two shorter sides of the triangles.
-
Calculate the lengths of the sides in the following right-angled triangles labelled ABC.
.gif)
-
The shaded triangles ABC below are right-angled. Calculate the lengths of the sides of the triangles.
.gif)
Session 4
Teachers’ Notes
In order to work out the diameter, AB, of the circle, in Task 9, students must apply Pythagoras’ theorem to the right-angled triangle CED. But first they must see that
CP = CA and DP = DB. For those students who have difficulty working out the length of CD, ask them to look at triangles OAC and OPC and see if they can work out CP given that AC = 16 metres. In triangle, CED, CD = 41 metres and ED = 25 – 16 = 9 metres. Since by Pythagoras, CD2 – DE2 = CE2, then CE2 = 412 – 92 = 402 and CE = 40 metres. So AB = 40 metres. The shaded section in Figure 1 is a trapezium with area
0.5 x (16 + 25) x 40 = 820 m2.
The shaded section shown in Figure 3 in Task 10 is larger than the section in Figure 1. Here CD = 50 metres and CE = 40 metres = AB. The area of the trapezium is now
0.5 x (10 + 40) x 40 = 1000 m2. So this section has more land than the previous section but costs the same. Other factors such as position may need to be considered before Amber can be certain it is a better buy.
The completed tables for Task 11 are as follows.
Table 1
|
AC |
BD |
Calculation to find CE2 |
AB2 |
|
1 |
1 |
22 – 02 |
4 |
|
1 |
2 |
32 – 12 |
8 |
|
1 |
3 |
42 – 22 |
12 |
|
1 |
4 |
52 – 32 |
16 |
|
1 |
5 |
62 – 42 |
20 |
Table 2
|
AC |
BD |
Calculation to find CE2 |
AB2 |
|
2 |
1 |
32 – 12 |
8 |
|
2 |
2 |
42 – 02 |
16 |
|
2 |
3 |
52 – 12 |
24 |
|
2 |
4 |
62 – 22 |
32 |
|
2 |
5 |
72 – 32 |
40 |
Table 3
|
AC |
BD |
Calculation to find CE2 |
AB2 |
|
3 |
1 |
42 – 22 |
12 |
|
3 |
2 |
52 – 12 |
24 |
|
3 |
3 |
62 – 02 |
36 |
|
3 |
4 |
72 – 12 |
48 |
|
3 |
5 |
82 – 22 |
60 |
For those students who have difficulty seeing the pattern linking the values for AB2 with the values for AC and BD, suggest that they try multiplying the values for AC and BD. It is likely that they will then see that AB2 = 4 x AC x BD which is usually written as
AB2 = 4AC.BD.
If AC = a, and BD = b, then CD = a + b and ED = b – a. Since CD2 – DE2 = CE2, then CE2 = (a + b)2 – (a – b)2.
But (a + b)2 – (a – b)2 = ((a + b) + (a – b))((a + b) – (a – b))
= (2a)(2b)
= 4ab
So AB2 = 4AC.BD is true for any values of AC and BD.
The area of the trapezium with AC = a, BD = b and AB = √(4ab) is (a + b)√(ab).
Teaching Sequence
Task 9
Amber wants to purchase a section on which to build a house. She likes the shape of the shaded section (Figure 1), but wants to know the size (area) of the section before she makes the purchase.
One side of the section is a diameter of a circle, and the other sides are tangents to the circle. Amber draws the diagram, (Figure 2), to help her work out the area.
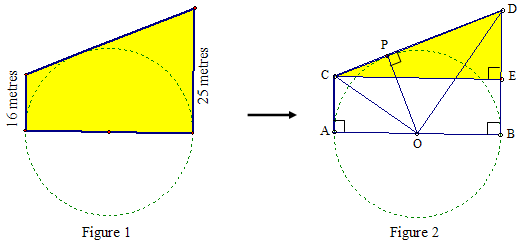
- Work out the length of side CD. Explain your reasoning
- Calculate the length of CE and then work out the length of the diameter, AB, of the circle. Show your working.
- Calculate the area of the shaded section shown in Figure 1.
Task 10
-
Amber also looks at another section (Figure 3), that is the same price as the section in Figure 1. She thinks it may be a better buy. Calculate the area to see if she is correct.

Task 11
-
Amber’s friend, Mark, suggests there may be a formula that Amber could use to help make her calculations. So Amber systematically lists the results of several calculations in tables to help her see any patterns.
Table 1
AC
BD
Calculation to find CE2
AB2
1
1
22 – 02
4
1
2
1
3
1
4
1
5
Table 2
AC
BD
Calculation to find CE2
AB2
2
1
32 – 12
8
2
2
2
3
2
4
2
5
Table 3
AC
BD
Calculation to find CE2
AB2
3
1
42 – 22
12
3
2
3
3
3
4
3
5
- Copy and complete the tables.
- Look for patterns and then write a formula or rule for AB2 in terms of AC and BD.
- Put AC = a and BD = b. Then use algebra to prove that your formula for AB2 always works.
- Find a formula for the area of any section that has three sides that are tangent to a circle as in the examples above.
Session 5
Teachers’ Notes
In this session, students devise formulas that can be used to calculate Pythagorean triples. The numbers, (3, 4, 5) form a Pythagorean triple since 32 + 42 = 52 which indicates that a triangle with sides 3 units, 4 units and 5 units is a right-angled triangle. Pythagorean triples comprise only natural numbers, 2, 2, 3, … . Any set of three natural numbers, (a, b, c) is a Pythagorean triple if a2 + b2 = c2, where c > a and c > b. The Pythagorean triple (3, 4, 5) is known as a primitive since the highest common factor of 3, 4, and 5 is 1. However, although (6, 8, 10) is a Pythagorean triple it is not primitive since the highest common factor of 6, 8, and 10 is 2, not 1. The developing numerical patterns shown in the tables for Tasks 12, 13, and 14 are likely to be clear for most students.
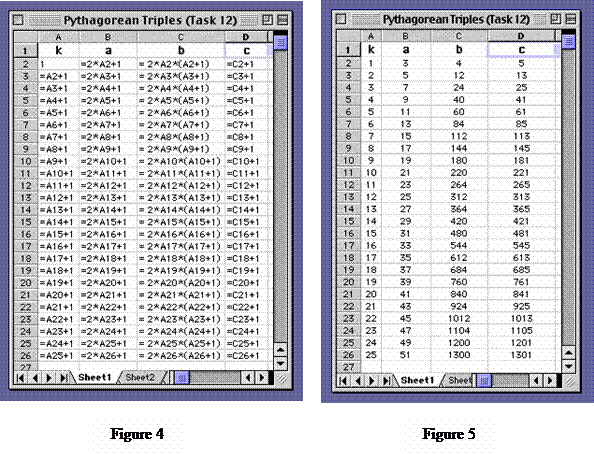
In task 12, a = 2k + 1, b = 2k(k + 1) and c = 2k(k + 1) + 1.
So a2 + b2 = (2k + 1)2 + (2k(k + 1))2
= (4k2 + 4k + 1) + 4k2(k2 + 2k + 1)
= 4k2 + 4k + 1 + 4k4 + 8k3 + 4k2
= 4k4 + 8k3 + 8k2 + 4k + 1.
Also c2 = (2k(k + 1) + 1)2
= (2k2 + 2k + 1)2
= (4k4 + 4k3 + 2k2) + (4k3 + 4k2 + 2k) + (2k2 + 2k + 1)
= 4k4 + 8k3 + 8k2 + 4k + 1
= a2 + b2.
Since a2 + b2 = c2 then a, b, and c form a Pythagorean triple.
The spreadsheet in Figure 4 shows the formulas used to calculate the first 25 Pythagorean triples (Figure 5) where the value for c is always one more than the value for b, that is where c = b + 1.
In Task 13, a = 4(m + 1), b = 4(m + 1)2 – 1, and c = 4(m + 1)2 + 1. Note that c = b + 2.
So a2 + b2 = (4(m + 1))2 + (4(m + 1)2 – 1)2
= (16m2 + 32m + 16) + (4m2 + 8m + 3)2
= (16m2 + 32m + 16) + (16m4 + 64m3 + 88m2 + 48m + 9)
= 16m4 + 64m3 + 104m2 + 80m + 25.
Also c2 = (4(m + 1)2 + 1)2
= 16m4 + 64m3 + 104m2 + 80m + 25
= a2 + b2.
Since a2 + b2 = c2 then a, b, and c form a Pythagorean triple.
The spreadsheet in Figure 6 shows the formulas used to calculate the first 25 Pythagorean triples (Figure 7) where the value for c is always two more than the value for b, that is where c = b + 2.
In Task 14, a = 2xy, b = x2 – y2, and c = x2 + y2 where x and y are natural numbers and
x > y.
So a2 + b2 = (2xy)2 + (x2 – y2)2
= 4x2y2 + x4 – 2x2y2 + y4
= x4 + 2x2y2 + y4
= (x2 + y2)2
But c2 = (x2 + y2)2
So a2 + b2 = c2.
Since a2 + b2 = c2 then a, b, and c form a Pythagorean triple.
Teaching Sequence
Task 12
Five Pythagorean triples (a, b, c) are shown in the table below. Notice that in each set of numbers, the values for c are always one more than the value for b.
|
n |
a |
b |
c |
|
1 |
3 |
4 = 2 x 1 x 2 |
5 |
|
2 |
5 |
12 = 2 x 2 x 3 |
13 |
|
3 |
7 |
24 = 2 x q x q |
25 |
|
4 |
9 |
40 = 2 x q x q |
41 |
|
5 |
11 |
60 = 2 x q x q |
61 |
|
k |
2k + 1 |
|
|
- Write the numbers that go in the empty boxes in the table.
- Write the algebraic formulas for b and c when n = k.
- Generate at least ten more Pythagorean triples that follow the pattern in the table. (You might use a spreadsheet.)
- Prove that the algebraic formulas for a, b and c for the pattern in the table are Pythagorean triples.
Task 13
Five different Pythagorean triples (a, b, c) are shown in the next table. Notice that in each set of numbers, the value for c is always two more than the value for b.
|
n |
a |
b |
c |
|
1 |
8 |
15 = 4 x 22 – 1 |
17 |
|
2 |
12 |
35 = 4 x q – 1 |
36 |
|
3 |
16 |
63 = 4 x q – 1 |
65 |
|
4 |
20 |
99 = 4 x q – 1 |
101 |
|
5 |
24 |
143 = 4 x q – 1 |
145 |
|
m |
4(m + 1) |
|
|
- Write the numbers that go in the empty boxes in the table.
- Write the algebraic formulas for b and c when n = m.
- Generate at least ten more Pythagorean triples that follow the pattern in the table. (You might use a spreadsheet.)
- Prove that the algebraic formulas for a, b and c for the pattern in the table are Pythagorean triples.
Task 14
- Look carefully for patterns in the following table. Then complete the table.
|
a |
b |
c |
|
4 = 2 x 2 x 1 |
3 = 22 – 1 |
5 = 22 + 1 |
|
8 = 2 x 4 x 1 |
15 = 42 – 1 |
17 = 42 + 1 |
|
12 = 2 x 3 x 2 |
5 = 32 – q |
13 = 32 + q |
|
16 = 2 x 8 x 1 |
63 = 82 – q |
65 = 82 + q |
|
20 = 2 x 5 x 2 |
21 =q2 – q |
|
|
24 = 2 x 4 x 3 |
|
|
|
28 = 2 x 7 x 2 |
|
|
- The numbers of a in the table can be represented by the algebraic rule 2xy, where x and y are natural numbers and x > y. Write algebraic rules for b and c using x and y.
- Prove that the algebraic expressions for a, b, and c, form primitive Pythagorean triples.
- Generate at least five more primitive Pythagorean triples using the rules for a, b, and c from the table. (Check that each set of numbers is a triple by confirming the relationship,
a2 + b2 = c2.)