In this unit we apply our understanding of why tessellations work to form our own unique tessellating shapes. We use these shapes to create interesting pieces of art in the style of M.C. Escher, a famous Dutch artist.
- Alter polygons to create unique shapes that tessellate.
- Describe the reflection or rotational symmetry of a shape or tessellation.
This unit is built around the famous artist Maurits Cornelius Escher. Escher was born in Leeuwarden, Netherlands on June 17th, 1898. He studied at the School of Architecture and Decorative Arts in Haarlem but soon gave up architecture in favour of graphic arts at the age of 21.
All M. C. Escher works (C) Cordon Art, Baarn, the Netherlands. All rights reserved. Used by permission.
Escher is famous for two types of engravings. One of these involves impossible situations and the other is his variation on the theme of tessellations. A typical impossible situation shows four men climbing stairs. As you follow the men around and up their particular flights, you realise that they are going round and round. With regard to tessellations, Escher took a tessellation and, by adding and subtracting from the basic unit of the tessellation, turned it into a repeated picture.
There are many web-sites that explore the life and work of M.C. Escher. You can easily find one by entering his name in your search engine.
By emulating Escher and exploring tessellations in this unit, the students will gain a greater appreciation of the way that tessellations work. Hence they will see how mathematics, art and even nature interact.
Other units that refer to tessellating are Keeping in Shape, Level 3 and Fitness, Level 4. It might be useful to have done Measuring Angles, Level 3 before attempting this unit.
Students can be supported through the learning opportunities in this unit by differentiating the nature and complexity of the tasks, and by adapting the context to suit the interests, experiences, and cultural backgrounds of your students. Ways to support students include:
- providing physical and digital manipulatives so students can experiment with the transformations
- modelling examples of altering ‘parent polygons’ and the way in which the new shape is moved to form a tessellation
- discussing the properties of a shape that stay unchanged as it is translated, reflected and rotated
- encouraging students to work collaboratively (mahi tahi) in partnerships, and to share and justify their ideas. Share ideas with the whole class regularly.
The difficulty of tasks can be varied in many ways including:
- restricting the set of shapes and the complexity of the transformations at first. Rectangles altered by translation are much easier than alteration by rotation with triangles and hexagons
- displaying the work of students as models for others, especially students who provide explanations about why particular tessellations work. Motivate students to add new, undiscovered tessellations to the class display.
The contexts for this unit can be adapted to suit the interests, experiences, and cultural backgrounds of your students. For example, tessellations are prominent in Islamic art traditions, in tapa cloth designs from Pacific nations, and in Māori tukutuku panel designs.
Tessellation might fit well with efforts to beautify the school environment. Mosaic tiles can be created from fired clay, or cobblestones created from concrete or mud bricks. Once they are fired or dried they can be painted in traditional Maori patterns that reflect transformation.
Te reo Māori vocabulary terms such as rōpinepine (tessellate, tessellation), neke (translate, translation), huri (rotate, rotation), whakaata (reflect, reflection), and hangarite (symmetry, symmetrical) could be introduced in this unit and used throughout other mathematical learning.
- Copymaster 1: Altered square tessellation
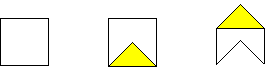
- Copymaster 2: Bumpy square tessellation
- Cardboard squares, parallelograms, "wonky" quadrilaterals, triangles, hexagons.
Getting Started
We begin our exploration of tessellating art by altering squares and parallelograms.
- Show the students the altered square tessellation (Copymaster 1).
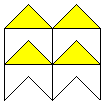
What can you tell me about this tessellation?
Why is it a tessellation?
Which of the regular tessellations does it look like it has been made from?
Can you see how this tessellation has been made? Show us. Look at the tessellating shape and predict how it was altered.
- Give each student a square cardboard tile. Ask them to cut a piece out of one side of the square. Attach the cut out piece to the opposite side of the square with cellotape.
Will your new shape tessellate? Try it and see. - Have the students trace their new shapes several times onto blank sheets of paper to see if the altered shape tessellates.
- Discuss.
Is your altered shape symmetric? What type of symmetry does it have?
Does the new shape have to be symmetric to tessellate?
(Note: When altering a square by translating opposite sides to form a new tessellating figure, the alteration does not have to be symmetrical.)
Describe the movement of the shape as you tessellate with it? (translation or shifting) - Ask students to repeat the altering process with other quadrilaterals that tessellate, for example, parallelograms and rectangles. Also include "wonky" (scalene) quadrilaterals. Not all alterations will create tessellating shapes and this is a useful discovery. The key to creating tessellating shapes is altering opposite sides in exactly the same way.
- Allow time to share and discuss at the end of the session.
What did you discover about altering shapes to create new shapes that also tessellate?
Why do you think it is possible to alter shapes in this way and still end up with a shape that tessellates?
Did you create any shapes that do not tessellate? Why do you think that they won’t tessellate?
Exploring
Over the next 2-3 sessions we use our imaginations to create interesting art pieces using altered tessellating shapes.
- Begin by looking at one of the shapes created yesterday.
Brainstorm for ideas about what the shape could be. In the following shape the addition of an "eye" creates a fish-like shape.

- Have the students select a shape to use for the basis of a piece of tessellating art.
- After they have decided on a shape, have them trace it across a piece of paper to create a tessellation. To transform it into an Escher style piece let them put details on each of the shapes.
- Search online for “Creating Escher Tessellations”. Many useful videos exist to show your students how other transformations can be used to alter a ‘parent polygon.’ Useful transformations include rotation of half a side about the midpoint, and rotation of a whole side onto another. You may decide to introduce these more complex transformations gradually so students master one process before beginning another. There are also free online tools available for creating Escher tessellations.
- Ask questions as the students work that focus on the symmetries of the shape and the tessellation.
Tell me about the symmetries of your shape? (reflection symmetry, rotational symmetry)
How are you generating the tessellation? (translating? rotating? reflecting?)
Why does your shape tessellate? (Encourage the students to focus on the fact that the sum of the angles at any point must equal 360 degrees) - Ask the students to make a written record about the process that they used to make the tessellating shape and the tessellation.
- At the end of each session share the tessellating art.
Reflecting
In this final session we analyse tessellations and attempt to predict the processes that were used to create them.
- Begin by looking at the bumpy squares tessellation (Copymaster 2).
What shape do you think has been altered?
How do you think it was altered? - Next we distribute our tessellating art, created in the previous days, to see if others can determine the tessellating shape and the process by which the tessellation was formed.
- We check with the artists to see if we predicted correctly.
Dear family and whānau,
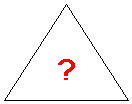
This week we have been working on a unit that changes a square tessellation into a piece of art similar to that produced by a famous Dutch artist called Escher. At home this week we would like you to help your child transform an equilateral triangle into an interesting piece of tessellating art.
All M. C. Escher works (C) Cordon Art, Baarn, the Netherlands.
All rights reserved. Used by permission