In this unit students learn to estimate and measure the area of rectangles, recognise and describe transformations in geometric designs, and apply precise measurement skills and enlargement techniques to create a functional geometric design for a quilt.
- Identify, describe, and demonstrate rotation, translation and reflection within simple designs.
- Estimate and measure the areas of rectangles.
- Accurately measure in centimetres.
- Apply addition and multiplication strategies to problems involving centimetres and a measurement context.
- Create an accurate and tidy tessellation.
- Critique and evaluate measurement and transformation elements in a product.
- Describe a design process, including giving the measurements and calculations.
At Level 3, students refine their ability to accurately use linear scales. As they measure length dimensions in a practical context that demands precision, they refine their understanding of the accuracy that is made possible when using a combination of centimetres and millimetres. Within this, they explore the relationships between different length units of measure. Through practical measurement experiences, students also consolidate their knowledge, and understanding of, area and develop their use their multiplicative strategies with whole numbers.
Patchwork quilting provides a rich context for developing these key measurement and number understandings, and provides an opportunity for the development of key geometric concepts. This involves working with tessellating shapes and developing an understanding of angles, although understanding of four 90° angles tessellating around point is not explicitly developed within this unit. However, there is opportunity to explore this, particularly as student reflect upon the mathematics in the quilt making process and critique the success of their handiwork.
In designing their patchwork squares, students' must recognise that the transformation of component shapes within a patchwork square is fundamental to their design success. This includes identifying that a rotation is a shape turned about a point, that a reflection is achieved when the shape is flipped over creating a ‘mirror image’ of the shape, and that a translation is a shape slid along a line. Whilst this unit requires students to enlarge a design, the geometric nature of that design means that the application of a scale factor is not essential to achieving success.
Associated Achievement Objectives
Technology
Technological practice
- Undertake planning to identify the key stages and resources required to develop an outcome. Revisit planning and include reviews of progress and identify implications for subsequent decision-making.
Technological knowledge
- Understand the relationship between the materials used and their performance properties in technological properties.
Nature of Technology
- Understand how society and environments impact on and are influenced by technology in historical and contemporary contexts and that technological knowledge is validated by successful function.
The learning opportunities in this unit can be differentiated by providing or removing support to students and by varying the task requirements. Ways to differentiate include:
- limiting the complexity of the pattern element used (initial square)
- using digital technology or shape blocks and templates to create patterns
- providing opportunities for whole class, paired, and independent work. Organise groups of students strategically to contain a mix of students with different levels of mathematical confidence and knowledge to encourage tuakana-teina (peer learning), extension, and scaffolding
- physically manipulating the pattern elements to act out transformations.
The contexts for activities can be adapted to suit the interests and experiences of your students. Frieze patterns are common across cultures. Adaptations include:
- using kōwhaiwhai patterns
- using tapa cloth patterns to create friezes.
Consider also how this unit might enable community links. Is there a specific purpose which could enhance the purpose for constructing a quilt? Could the quilt be used to express your school's identity or values, could it be donated to a local community group, could it be created as a shared blanket for the classroom?
Te reo Māori kupu such as ine (measure), mitarau (centimetre), huri (rotate), neke (translate), whakaata (reflect), and rōpinepine (tessellate, tessellation) could be introduced in this unit and used throughout other mathematical learning
- PowerPoint 1, PowerPoint 2
- Copymaster 1
- A Cloak for the Dreamer, by Aileen Friedman (available online)
- A patchwork quilt (or photographs of patchwork quilts)
- Coloured paper (scrap pieces will do)
- Sheets of cartridge or butcher’s paper
- A board (e.g. cork, whiteboard) and Blu-Tack
- Rulers, pencils, felt pens, protractors, erasers, scissors
- Optional if you are making fabric quilts:
- A selection of small pieces of left-over fabric
- Quilting batting
- Fabric to back each quilt (for example, an old bed sheet)
- Needles, sewing pins, cotton thread
- A sewing machine - and possibly community expertise
Whilst this unit is presented as a sequence of five sessions, more sessions than this may be required. It is also expected that any session may extend beyond one teaching period.
Session 1
This session is about recognising the rotational design elements in conventional patchwork patterns.
- Show PowerPoint One (or an actual quilt if possible) and make links with students' prior knowledge. Consider any possible community links here - a member of your local community might be able to bring in quilts or a tapa cloth to share with your class.
What do people use quilts for?
Who makes quilts? Why do you think they make them?
How do you think a quilt is made?
What are the different components that you can see? - Discuss and record the students’ ideas on the class chart.
Acknowledge all ideas and explain that the class will be making their own patchwork quilt(s). - Read: A Cloak for the Dreamer by Aileen Friedman.
- Write tessellation on the class chart. Search the term online to find a definition and some examples. See the Level 4 Unit, Tessellation, Transformation and Art and the Level 3 Unit, Keeping in Shape for further information around tessellations.
E.g. A tessellation is a pattern or arrangement of shapes that fit together without any gaps or overlaps. - Discuss the definition of tessellation that you have provided, and encourage students to reflect on the examples of tessellations they have seen in PowerPoint One and A Cloak for the Dreamer. Highlight that tessellations are flat arrangements of shapes with no gaps or overlaps. If possible, show some further example of tessellations that are relevant to your students (e.g. from local buildings, art, in nature).
- Have students look up the history of patchwork quilts. Originally patchwork quilts were an economical and practical way to use left-over fabric pieces. However, some designs were associated with important eras in history, such as settlement and slavery in USA. Patchwork quilts are both cultural art forms and functional items. This combination of utility and beauty is the reason that they continue to be popular. You might ask a local community member to come and talk to your class about their quilting knowledge and experiences.
- Display an actual quilt if possible, or one of the slides in PowerPoint One.
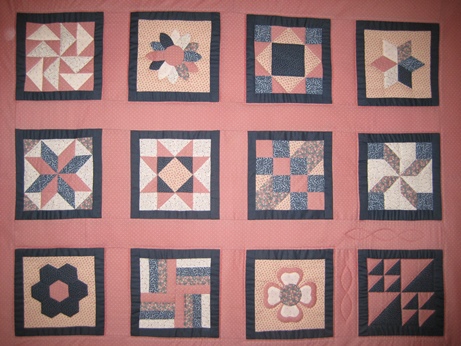
What do you notice about the shapes in this quilt?
Look for students to name the shapes, such as right angles triangles in Slide One or trapezia in Slide Two. - Discuss the properties of the shape, such as parallel sides, angles, and symmetry. Focus on how the shapes fit together using the language of geometry. For example, squares fit together by shifting, known mathematically as translation. Some designs involve a reflection or “flip” of the parent shape to produce the neighbouring shape. Rotation about the mid-point of a side is far less common in quilts patterns.
- Write the words translation, reflection and rotation on the class chart and display an example of each transformation. You could use shape tiles (or a digital model - search online for interactive tessellation tool) to demonstrate this. As a class, identify the translation, reflection and rotation evident in the patchwork panels (PowerPoint One) and describe how the transformations are identified. Identify any examples of glide reflection (a combination of vertical reflection and translation), and glide rotation (a combination of rotation and translation). You might then ask students to create or research examples of these tessellations, and collate these in a class display (e.g. on a slide deck).
- Distribute a copy of Copymaster 1 to each student and make available coloured pencils or felt pens.
Have students write a description of the transformation (using a diagram and words) beside each of the designs, explaining the transformation process used to create the design. If necessary, complete the first example as a class, and then have students work independently or in pairs to describe the remaining transformations. To further support students, have them use shape tiles to model each translation. This could be done in a small group whilst the rest of the class works in pairs/independently. In the 6th empty panel have students create their own design and describe the transformation. - Gather the class together and have students share and discuss their descriptions with a partner and the class, identifying their favourite design. Collect students' copies of Copymaster 1 for use in Session Two.
Session 2
This session is about selecting a design, and applying the practical skills and process required to create a patchwork square.
- Discuss a suitable size for a patchwork square. Have some paper squares available, such as 5cm x 5cm, 10cm x 10cm, 15cm x 15cm, 20cm x 20cm, 25cm x 25cm and 30cm x 30cm.
- Lead a discussion around the size of each square, using the following prompts:
Estimate the side length of this square. How did you estimate accurately? Draw on students' use of personal benchmarks (e.g. it looks about the size of my ruler, and my ruler is 30cm long).
Can you think of something else that might be the same size as this square?
Check the side lengths by measuring with a rule. Check your students' use of measuring tools and model accurate measurement, if necessary.
Was your estimate accurate or close?
What is a good size for a patchwork square? - The size of a suitable square depends on the size of the target area. You should decide how large each completed quilt (or quilt design) will be, and therefore how many quilting blocks need to be created. This could be decided upon as a class, and could provide a valuable context for applying multiplication strategies to whole numbers
Let’s decide on how big our patchwork square should be. Imagine that the quilt will be the size of this sheet of paper (Cartridge or brown butchers’ paper).
What sized square should we use? Why?
Each row of your quilt will have 3 squares, and each column will have 3 squares. How many squares do you need altogether? If each square is 10cm x 10cm, what will the area/length be of each row/column/the whole quilt?) - Explore the layouts of squares of different sizes. A square of about 20cm x 20cm is commonly used in quilt design and is a useful size for photocopying. Using smaller squares will also work.
- Organise students into pairs and ask them to identify their favourite design from Copymaster 1. Give each pair an A4 sheet of photocopying paper, a pencil, ruler, and scissors. Have each pair of students enlarge their preferred design to make a practical template pattern that they will use to complete their full quilt. You may need to model this process first, drawing attention to the proportions and elements of the design. Emphasise and model precision in construction and measuring.
Which lines are important in this design?
Give me specific instructions about where to draw the lines. Words like centre, midpoint, vertical, horizontal, and diagonal might be used.
How can I be sure that my construction is accurate? Look for students to use words like corner, vertical, straight etc. to justify their work. - Ensure that a teacher example template is created for use in the next activity.

- Let pairs of students draw the square template and the construction lines. Calculators will be useful for the next phase if the calculation of area is required.
What shapes make up your square?
What colour is each shape?
How will you create the shapes without wasting paper?
As an extension, ask students to calculate the area of each shape in square centimetres (cm²). This will involve a discussion about finding the areas of rectangles, triangles, and possibly other polygons.
Discuss and model these calculations as required. - Ask students to cut out shapes of coloured paper to complete a single square. Colouring could also be used but cutting out requires students to measure lengths and angles correctly. Students should glue the pieces in place.
- Finish the session by looking at the structure of the squares. Use geometric terms to names and describe the shapes, such as symmetrical, right-angle, parallel, perpendicular (at right angles to), and the language of transformation, such as reflected, rotated, and translated. Draw on your students' knowledge and guide discussion to utilise these terms. You could also use this as an opportunity for whole-class teaching around a specific concept (e.g. right and acute angles).
- Collect all the named squares for photocopying or printing before the next lesson.
Sessions 3 and 4
- In these session students use photocopies of the square to complete their quilting pattern in pairs. They explore how squares are added to the pattern using the transformations of translation, reflection, and rotation. Ensure that at least 9 copies of the square produced by each pair are made in colour. Similarly, ensure that you have copied and cut out plenty of squares of your design from Session Two.
- Ask students to remind you what tessellation means, and how shapes can be tessellated (i.e. a pattern of shapes on a plane - a flat surface - with no gaps or overlaps. The shapes can be slid, rotated, or reflected).
- Using a flat surface (e.g. a whiteboard), take the original square you used to model the design process in Session Two and attach it to the board. Draw on the ideas generated in discussion and model the ways in which a square might be moved to create a tessellation. Alternatively use PowerPoint Two as base to copy, translate, rotate, and reflect the square.
I have many squares just like this one. Now I want to complete my quilt.
How should I arrange the squares?
Look for students to suggest ways that have been discussed earlier (i.e. translation, reflection, rotation, glide reflection, glide rotation). - Model each technique as it is suggested by physically moving a new square, starting with it on top of the first square.

Translation Vertical reflection and translation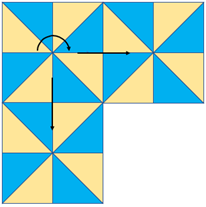
Half turn rotation and translation.
- Discuss: Are these patterns the same or different? How do you know? What do you notice?
Look for students to recognise that the patterns are different, and for them to demonstrate how they are different. - Let students work in pairs to complete their paper quilts. Provide students with cut-to-size pieces of cartridge or butcher's paper (you could have students apply their measurement skills by cutting these to size). This will act as the 'backing' to their quilt. First they need to attach the original square, made with coloured paper, in the top left. Emphasise the need for no gaps or overlaps. Second, they need to decide on the transformation they will use to locate and position squares. It is important that students apply that transformation consistently and do not mix transformations.
- As students work roam the room and provide support. Look for students to:
- Apply a consistent transformation.
- Create accurate and tidy tessellations.
- Describe the transformation using mathematical language (e.g. we have rotated our squares).
- After a suitable time gather the class to share quilt designs. Challenge students to work out what transformation has been used by each pair as they share their quilt pattern. Take digital photographs of the designs and turn them into a PowerPoint slide show for tomorrow’s lesson.
Session 5
- This session is about describing the design of a quilt that includes identifying the element (initial square) and the transformation that was used.
- Show three different designs created by pairs of students. Challenge the rest of the class to describe the geometric element (e.g. right-angle triangle) used to create the pattern and the transformation used. Discuss appropriate mathematical language.
- Use Slides Two and Three of PowerPoint Two to provide a design challenge for students. They may prefer to use letters to assign colours rather than colour in the patterns. For each element the challenge is to apply the stated transformation. Animating the slide can be used to check the designs.
- If students are interested, you might investigate the 7 possible frieze patterns. The work on quilts involved three of the types. Students might create another element and apply a different transformation to create a different quilt pattern.
- If time permits, have students create a presentation that describes the mathematical understandings they have developed throughout the unit (e.g. what transformations and geometric elements they used, challenges, new learning, links to context). Utilise a range of tools and representations that will enable students to express their learning in an engaging and appropriate manner (e.g. on paper, as a slideshow, speech, or video). Display the quilt(s) alongside these presentations.
Dear families and whānau,
As part of our mathematics learning in geometry and measurement, we have been designing and making patchwork quilts in class. These are on display.
We would like to talk about the mathematics that we have been learning and tell you about how we went about designing and making our quilts. You might also have knowledge of quilting to share with us!
You are invited to our class at (time) on (date) for our presentation.
We look forward to seeing you.
Thank you.
Instructions for creating a real quilt
- Explain that about double the amount they have calculated for each fabric will actually be required.
Demonstrate the reason for this by doing the following:- Using the (teacher) template created in Lesson Two above, carefully cut out each component paper shape.
- Pin one shape onto the wrong side of a piece of selected fabric, ensuring that there is an additional 1 cm of extra fabric around all sides.

- Cut out the fabric shape 1 cm larger than the paper template shape, on all sides.
- Leave the pin in the paper shape template. Fold the spare fabric over onto the paper template and pin down each folded-over piece on all three sides (a smaller part of the paper template will be visible, and this will be edged with 1 cm right side folded over fabric).
- Use a needle and thread. Secure the folded-over edges in place by sewing them down using a rough running stitch. This should pass through three layers: the folded edge of the fabric, the paper template beneath it, and the right side of the fabric beneath that.
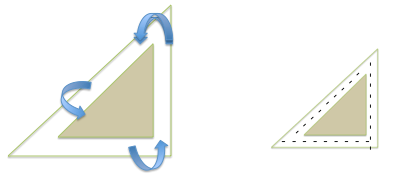
It can be helpful to cut off part of the corner fabric to make neater corners.
(When the triangle is turned to the right side, the fabric triangle will be the same size as the paper template with the spare edge pieces tucked underneath, out of sight and stitched in place.)
- Explain that we do this for each piece of the patchwork square design template.
- Explain that when all pieces are prepared in this way, the students will use small, neat stitches along the edges to hand sew the pieces together to complete their patchwork square.
Activity
- Have student pairs discuss the fabrics that are available. Have the students identify the fabrics that would not be suited for the purpose (for example, thick woollen fabrics, netting, fabric with very open weave), and have the students explain their reasons.
- Give each student the opportunity to select their fabric, ensuring that they have approximately double the amount double calculated in Activity 4 above, because they are cutting each piece of fabric bigger than the paper template to allow for folded piece and the seams.
- Have students cut their paper templates into pieces.
Have them place their paper template pieces onto the wrong side of the appropriate fabric, pinning them on one at a time.
Emphasise the need for economy and very careful placement of each template piece on the fabric, allowing for the 1cm extra on all sides and making best use of the available fabric. - Have students cut out each of the individual (oversize) fabric pieces, leaving the pinned paper template attached to each as they do so.
Sew down the edges of each fabric piece using a running thread, stitch together all of the fabric pieces to complete the patchwork square, remove the running stitch from each piece, remove each paper template piece from the completed patchwork square. When squares are complete, measure and cut border strips.
Use a sewing machine to stitch together the pieces of the quilt (the squares and border strips), add (a) backing layer(s), edge the quilt neatly, carry out the quilting process itself which stitches together the three layers of the quilt.
Explain that an adult will complete the steps that require the use of a sewing machine. - Make needles, cotton thread and scissors available. Have students pin down, onto the paper, the edges around each separate piece and secure these with a hand stitched running thread. When students have sewn the edges of all template pieces with running thread, have students lay out all of their prepared pieces to form the patch design.
- Demonstrate how to sew together one edge of two adjacent pieces.
Put right sides together.
Identify which edge is to be joined.
Using small over-stitching, sew along the wrong-side edges joining two pieces.
Emphasise the importance of using small stitches that will barely show on the right side, and of precision in matching the pieces together, giving particular attention to places where corners meet.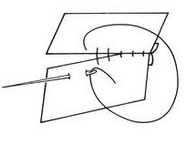
- Have students complete this step, check, and then repeat, systematically joining adjacent pieces to complete their patched piece. Have them take particular care on the corners.
Provide ample time for patching to be completed successfully and with care. When a student has sewn together all of their pieces to complete their square, have them turn their square over and remove the running thread around each piece, and the paper template pieces, as these are no longer needed. - As some students complete their patches, if appropriate, have them work in pairs to measure and cut strips of border fabric, making an allowance of 1cm all round for piecing together.
- When all student patches are completed, have students lay these out in the quilt design, deciding on the best location of their own square. They should consider the overall aesthetics of the quilt design.
It is recommended that an adult complete the piecing together of the patched squares and border fabric to complete quilt.