In this unit students develop a further understanding of two-dimensional representations of three-dimensional shapes through creating drawings and artworks that explore shapes from different viewpoints.
- List the features of common three-dimensional shapes.
- Recognise that the faces of 3D shapes are 2D plane shapes.
- Explore and understand the defining features of a prism.
- Draw (freehand) common 3D shapes from different viewpoints.
- Represent different viewpoints of the constructions with drawings on isometric paper.
- Create cube constructions from viewpoint drawings made by another student.
- Become familiar with and describe the features of a Picasso portrait and of cubism.
- Create a portrait in the Picasso style.
- Appreciate and write about their own artwork and that of one other student, recognising the influence of shape and viewpoint (or perspective).
In level two, students have been learning what is meant by ‘dimension', and coming to understand that three-dimensional shapes, called polyhedra, are bounded by flat (planar) shapes that have two dimensions. At this level, the language associated with the features of 2D and 3D shapes, such as side, vertex (corner), edge, and face, becomes increasingly familiar.
At level three, students are developing greater depth in their understanding of the properties of 2D and 3D shapes, including prisms. Prisms are three dimensional solids with a constant cross-section, and are named after that cross-section. For example, a triangular prism can be cut into parallel cross-sections that are triangles. Other classes of solids, such as pyramids or curved surfaces, have variable cross sections.
As they consolidate their understanding of polyhedra, students recognise that the faces are polygons (bounded planar shapes), and that the properties of those faces contribute to the properties of the polyhedron. Although dynamic computer software enables more helpful representations of three dimensional shapes, the images are still flat, that is in two dimensions. Such flat representations depict limited information about the three dimensional shape they represent. Through representing three dimensional shapes from different perspectives, students learn to focus on different attributes of the shapes, and recognise that representations of the same shape can look very different.
In this unit of work, these understandings combine to inform the student’s appreciation of, at a simple level, some of the features of Picasso’s portraits and his defining art style (cubism). The development of cubism marked a pronounced shift in artists' interpretation of real-world objects. Picasso and Braque attempted to capture the characteristics of three dimensional shapes in a single two-dimensional image.
Associated Achievement Objectives
Art
Visual Arts
- Explore some art-making conventions, applying knowledge of elements and selected principles through the use of materials and processes.
- Develop and revisit visual ideas, in response to a variety of motivations, observation, and imagination, supported by the study of artists’ works.
- Describe the ideas their own and other’s objects and images communicate.
The learning opportunities in this unit can be differentiated by providing or removing support to students, and by varying the task requirements. Ways to support students include:
- providing physical materials, such as models of three dimensional solids, so students can move themselves in relation to those objects
- providing access to sculpting materials, such as plasticine, so students can create their own three dimensional models, and cut cross sections
- orientating cube models so the viewpoint matches the orientation of isometric paper
- explicitly modelling the drawing of three-dimensional shapes from various viewpoints, including the use of digital cameras, so students appreciate the minimal requirements of plan views
- encouraging sharing and discussion of students' thinking
- using collaborative grouping so students can support each other and experience both tuakana and teina roles
- encouraging mahi tahi (collaboration) among students.
Tasks can be varied in many ways including:
- manipulating the complexity of the three dimensional objects the students represent
- scaffolding the process of representational drawing into a sequence of steps.
The contexts for this unit can be adapted to suit the interests and cultural backgrounds of your students. Capitalise on the interests of your students. Cubism is one form of artistic representation. Notable Cubist painters from New Zealand include Louise Henderson, Colin McCahon, John Weeks, Wilfred Stanley Wallis, and Melvin Day. However, other forms of art might be more appropriate to the cultural background and interests of your students. Modern art marries traditional aspects of Māori and Polynesian art with modern techniques and media. Look for art that combines the use of two-dimensional and three-dimensional shapes with culturally-relevant imagery (such as those create by Kura Te Waru Rewiri, Paratene Matchitt, Cliff Whiting, Ralph Hotere, and John Bevan Ford). Students may want to study how modern New Zealand artists represent their subjects to convey meaning and feelings. Consider opportunities to engage with local artists in this unit.
Te reo Māori vocabulary terms that could be used in this unit are: tirohanga (perspective, point of view), mata (face of a solid figure), tapa (edge), akitu (vertex), āhua ahu-toru (three-dimensional shape), poro (prism), inerite (isometric). These kupu could be introduced in this unit and used throughout other mathematical learning.
- Three-dimensional solid shapes: sphere, cylinder, cone, cube, cuboid, hexagonal prism, triangular prism, square based pyramid
- Small plain cubes
- Play dough
- Plastic knives
- Paper
- Pencils
- Copymaster 1
- Copymaster 2
- Copymaster 3
- Interlinking cubes
- Chart paper
- Art paper
- Pastels
Whilst this unit is presented as a sequence of five sessions, more sessions may be required. Any session may extend beyond one teaching period.
Session 1
This session is about students becoming familiar with the defining features of common three-dimensional shapes and representing these shapes with freehand drawings from different viewpoints.
SLOs:
- List the features of common three-dimensional shapes.
- Recognise that the faces of 3D shapes are 2D plane shapes.
- Explore and understand the defining features of a prism.
- Draw (freehand) common 3D shapes from different viewpoints.
Activity 1
- Make available pencils and paper.
Draw a diagram of a circle.
Give student pairs 1 minute to write some of the objects that this circle could represent.
Have student pairs share their ideas with the class.
- Display solid sphere, cylinder and cone shapes.
.png)
Ask, “Could this (circle) be a drawing of a sphere or a cone or a cylinder?” Have students discuss this and reach agreement that this could be a bird’s eye view of a sphere or a cylinder or a view of a cone looking at it from underneath, (or perhaps from the top if the point were very fine).
Write ‘viewpoint’ on the class chart, agree on a definition that a viewpoint is a perspective of an object from a specific location. Discuss and identify other possible drawings of the three objects. Ask students to be specific about the viewpoint each picture is taken from. For example, a cone appears as a triangle from side on, and a cylinder looks like a rectangle from side on. - Does a sphere always look like a circle, no matter the viewpoint?
- Note that many students want to behave like cubist artists, and convey the curvature of surfaces in their drawings. For example, they might draw a side view of a cone with a curved base. Videos of how to draw a cone or sphere could be used to support this.
- Taking and displaying digital photographs of the solids can support students to accept the loss of information in a two dimensional drawing.
Activity 2
- Add to the solid shape display, a cube, a cuboid, a hexagonal prism, a triangular prism, and a square based pyramid.
Create a chart, writing on it the names of each of the shapes and the headings, faces, edges and vertices. This chart could be created digitally or on paper. It should be created in such a manner that will encourage students to refer back to it throughout the sessions. Define the meaning of each feature of the shapes. For example, a face is a polygon that is part of the boundary of a solid. Model and record the features of at least 2 of the shapes. Note that a sphere is a curved surface and has no faces. A cone also has a curved surface.
Shape Faces Edges Vertices Sphere 0 0 0 Cube 6 12 8 Cylinder Cone Cuboid Triangular prism - If you do not have enough models of the shapes available, provide play dough and plastic knives so students can sculpt the shapes.
- Provide students with a template of the chart. Ask students to complete their own chart (individually or in pairs). They should make models of each shape with the play dough, and use these models to explore and confirm the features of each shape.
- Discuss the strategies the students used to count the number of faces, edges and vertices for each solid. Their strategies typically include counting top and bottom of a solid then counting the remaining faces, edges, or vertices.
- Students could be extended by looking for patterns in the numbers of faces, edges, and vertices each shape has. Can they use the pattern to find a shape’s number of edges if the number of faces and vertices are known, etc? Euler’s formula (F + V = E + 2) could be discussed and proven with a cube (6 + 8 = 12 + 2). Note: students may discover this formula in a different format (for example, F + V - E = 2). Use whichever format they discover. Does this formula work with cylinders, cones, and spheres? Students could explore other exceptions to the formula.
- Students could investigate composite 3D shapes (3D shapes made from basic 3D shapes such as cuboids, prisms, pyramids, etc) to see if Euler’s formula still applies. This could be made more meaningful by using composite 3D shapes that are familiar to the students, such as a wharenui which can be seen as a poro-tapatoru (triangular prism) on top of a poro-tapawhā hāngai (cuboid). Does Euler’s formula still apply to a wharenui shape? (it has 7 faces, 10 vertices, and 15 edges)
Draw on the shape of local buildings in your area in this discussion. For example, the main building of the South Canterbury Museum in Timaru has an interesting shape (an octagonal pyramid on top of another octagonal pyramid on top of an octagonal prism). Does Euler’s formula still apply to this shape? (it has 25 faces, 25 vertices, and 48 edges)
What other composite 3D shapes can you think of?
The Let’s Face It activity could be used to further support students to investigate Euler’s formula. - Discuss that a cylinder, cone and sphere have no edges or vertices. That is because edges and vertices are formed where faces, polygons, meet.
How many faces meet at an edge? (Two – this is an important generalisation)
How many corners meet at a vertex? (That number depends on the number of faces surrounding each vertex. For a cuboid the number is three) - What do students notice about the number of faces, edges and vertices of a cube and of a cuboid? (the same)
Why does that happen? (A cube is a type of cuboid)
Activity 3
Have each student choose at least two of the shapes that they have made, and make freehand drawings of each, from at least two different viewpoints. Have students share their drawings with a partner, and have a korero about what they have done, using the language of faces, edges and vertices.
In the follow up discussion ask one student at a time to show just two viewpoints of the same solid.
Can you identify which solid these viewpoints represent?
Do you need more viewpoints or less to make a specific identification? Why?
Activity 4
- Invite students to visualise straight (planar) cuts of a square based pyramid and a cuboid (rectangular prism), parallel to the base. You might use the analogy of slicing loaves of bread.
What shape will the cross sections be? (squares for the pyramid, rectangles for the prism)
Will the cross sections be exactly the same? Students should notice that cross sections of the pyramid vary in size, while the prism has constant cross section.
Alternatively students can make a pyramid and rectangular prism from play dough, plasticine, or cheap vegetables such as potatoes, pumpkin, or carrot (Make a vegetable soup for lunch afterwards). They can make cuts through each shape. Take pictures of their creations to display alongside their explanations of the activity. - Discuss the results, eliciting the explanation that the faces of the cuts of the pyramid change, whilst the prism faces remain unchanged.
Does the property of constant cross section also apply to other types of prism? (Yes) - You might explore the idea by slicing other prisms. Agree on a definition of a prisms?.
Activity 5
Conclude the session by having students draw any prism from at least two viewpoints. Ask them to record their work, using the language of faces, edges and vertices, and to write their own definition of a prism.
Is a prism easy to identify by its viewpoints? Why?
Session 2
This session is about exploring cube constructions, representing those constructions from different viewpoints on isometric paper, and interpreting the drawings of others.
SLOs:
- Make simple constructions using interlocking cubes.
- Represent different viewpoints of the constructions with drawings on isometric paper.
- Create cube constructions from viewpoint drawings made by another student.
Activity 1
- Begin by having students share their work from Session 1, Activity 5.
- Explain that they will use isometric paper to reduce the need to measure, and to make their drawings more precise.
- Introduce the task by showing a cube, selecting a viewpoint, and modelling how to represent a single cube on isometric paper. Videos could be used to share these instructions digitally. The online tool ‘Isometric Drawing Tool’ could be used to model this, and to explore the position and viewpoints of cubes and different shapes represented on isometric paper, throughout this session.
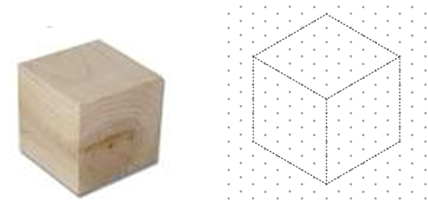
Notice that the cube has a leading edge, marked by the central vertical line. The faces that meet at the edges are drawn as rhombi rather than as squares. The top face is also drawn as a rhombus. - Make cubes and isometric paper (Copymaster 1) available to each student.
- Walk students through the steps of drawing a single cube then try joining additional cubes behind it, and below it.
The drawing above shows a large cube. Discuss any challenges that arise.
What is the smallest cube you could draw? - Students who are ready for extension could try to draw letters, towers, or different shapes. There are lots of videos and prompts online that they could use to challenge themselves.
Activity 2
- Provide isometric paper and nine interlocking cubes to each student. Have students join the cubes to make a shape of interest, then draw this shape from at least two viewpoints. It is important that the faces of the cubes meet exactly.
- If students have difficulty drawing the shapes, model viewing the shape from different viewpoints, and model the drawing of the shape.
- First, get students to tilt their model so there is a leading edge, and the top faces are visible from their viewpoint as rhombi.
- Second, draw the leading edge vertically on the isometric paper. That edge might be several little cube edges joined.
- Third, draw the lateral faces coming back from that edge.
- Finally, complete the whole shape, including the top.
- The Little Boxes activity could be used to further support students having difficulty drawing the shapes if needed.
- Students who are ready to be extended could try drawing isometric cubes with cutouts or “impossible” isometric shapes (tutorials for these are available online).
Activity 3
Ask students to display their models on a table top, and pass in their isometric drawings. Mix-up the drawings and redistribute them randomly amongst the students. Each student must then locate the model that matches the drawing that they have been given. Confirm their matches.
How do you know that this is the correct model? (Viewpoint matches)
What strategies did you use to locate the model?
Is it possible to have different isometric drawings of the same model? Why?
Is it possible to have several models that match a single drawing? Why?
This discussion helps students appreciate the loss of information about a three dimensional object when it is represented in a two dimensional drawing.
Activity 4
Have students dismantle their shapes into single cubes. Collect in the drawings once more, shuffle these and redistribute them. Have students construct the model shape from another student’s isometric drawing. Rove and support students with the building of their shapes.
Activity 5
Conclude the session by discussing the process, having students talk about the representation of shapes from different viewpoints and highlighting the geometric language, e.g. faces, edges, vertices.
Session 3
This session is about exploring a selection of Picasso portraits, identifying some distinguishing stylistic characteristics. Consider whether a community member or art gallery employee might be able to come to your class to talk about Cubist art, Picasso, and relevant art created by New Zealand, Māori, and Pasifika artists.
SLOs:
- Become familiar with and describe the characterising features of a Picasso portrait.
- Understand some of the defining features of cubism.
- Write a description of the influence of geometry in a Picasso portrait.
Activity 1
- Write Pablo Picasso on the class chart. Brainstorm and record student knowledge of the artist. Show his picture, and share the information in Copymaster 2, or set a short time limit and have the students research pertinent information about the artist online.
I wonder why his style is known as cubism? Note that there is nudity depicted in Picasso’s works. You may wish to gather a selection of age-appropriate art works to show your students, as opposed to letting them freely explore his work online. - Discuss how Picasso tried to depict three dimensional features of his subject on a two dimensional surface. Isometric drawing belongs in the perspective methods of realist artists before Picasso.
- Explore the work of New Zealand Cubist artists, including Louise Henderson, Colin McCahon, John Weeks, Wilfred Stanley Wallis, and Melvin Day. Discuss the similarities to Picasso’s work. This could be done as a whole class, or in pairs. If working in pairs, students could compare a work of one the New Zealand artists, with a work by Picasso, with the use of a venn diagram or T chart.
- Compare the Cubist work to traditional Maori and Pasifika art forms (e.g. tapa, siapo, whakairo), and art done by artists such as Kura Te Waru Rewiri, Paratene Matchitt, Cliff Whiting, Ralph Hotere, and John Bevan Ford. In the art created by these artists, two-dimensional shapes are often used.
Activity 2
- Have students work collaboratively (mahi tahi) with a partner and give them one of the pictures in Copymaster 3, paper and pencils. Students should have a korero about their Picasso portrait, and record all the things that they feel and notice about it.
What was Picasso trying to represent about his subject?
How did he alter what can really be seen from one viewpoint? - Have students pair-share their feelings and observations, and agree on common features.
- As a class, discuss their feelings about the artworks. Record these responses, (like because….., dislike because….., puzzled because…., etc.)
- Discuss and record on the class chart the features that they notice about the artworks.
These are likely to include:- You can see the person from a front viewpoint and a side viewpoint (profile) in the same picture
- There are geometric shapes in the pictures
- There are many light and dark contrasts (chiaroscuro is the arrangement of light and dark elements in a pictorial work of art, also known as positive and negative space)
- Black is used to outline shapes and to draw features
- The pictures are not realistic – they are not how people really look
- The pictures appear to be fragmented, or broken up into parts
- They are a combination of two-dimensional flat plane shapes and some realistic rounded and shaded three-dimensional images.
Activity 3
- Write ‘cubism’ on the class chart and have students share their knowledge of this art form. Agree that many of the features they have identified in 2 (above) are defining features of cubism. Explain that Pablo Picasso and Georges Braque began their innovative, new art movement, cubism, in the early 20th century (the 1900s).
What did art look like before that time?
(Some students may know about impressionists such as Van Gogh and Monet who were instrumental in the movement towards conveying feelings about a subject, rather than just capturing a realistic image). - Make a copy of one of the pictures from Copymaster 3 available to each student. Have them write a description of the picture and the artist, synthesising the information that has been presented so far about both and including references to geometry and viewpoints.
Activity 4
- Display both photographs of Picasso (Copymaster 2).
- Explain that in the next session, each student will be choosing one of the photographs and creating their own portrait of Picasso based upon the photograph. The portrait will be in the cubist style.
- Have students begin a draft design of their Picasso portrait.
Activity 5
Conclude the session by having students share their work.
Ask each student to bring to the next session a photograph of a whānau member, friend, or pet that they would like to use as the subject of an artwork.
Session 4
This session is about using the style of cubism to create a portrait of Picasso, and begin an artwork of a person or pet significant to the student.
SLOs:
- Create at least one portrait in the Picasso style.
- Give feedback to other students on the cubist influence evident in their artworks.
Activity 1
- Begin the session by reviewing the features of cubism listed in Session 3, Activity 2, Step 4.
- Display both pictures of Picasso (Copymaster 2).
- Students select one of the pictures of Pablo Picasso, and create a draft cubist portrait.
- Have students share the progress on their draft portraits of Picasso.
What viewpoints did you imagine?
How did you represent how Picasso would look from each viewpoint?
What geometric shapes did you use? Why?
Activity 2
- Make available art paper and pastels. Students choose their own subject. Picasso tended to paint people (women mainly), though animals were another common subject.
- Let students begin their Picasso works in a pastel medium. Insist they sketch the work first in pencil. Art takes careful planning, like other forms of design. Stop at significant points to review progress, checking against the listed cubist criteria.
Activity 3
As students complete their works, have them self-check and peer evaluate the works, referring to the cubist features. This could be completed verbally or with the use of a paper template. Be aware that students are more likely to forget verbal feedback. However, for some students written feedback is often accompanied by feelings of anxiety and nervousness. Scaffold your students into writing constructive feedback (e.g. one positive, one thing that could be improved, another positive). The feedback should always be focussed on the cubist features of the work (i.e. those identified by yourself and the students in activity 2 of this session).
Activity 4
Conclude the session with a gallery walk for the students to appreciate and give feedback on each other’s Picasso portrait artworks.
As a class, recognise those artworks that successfully and strongly show the influence of cubism. Look, in particular for representations from different viewpoints and the use of shapes in the fragmented (or disjointed) forms. Have each student identify improvements they might make to their own artwork.
Session 5
This session is about using self-evaluation and peer feedback to inform a second artwork in the cubist style.
SLO:
- Appreciate and write about their own artwork and that of one other student, recognising the influence of shape and viewpoint (or perspective).
Activity 1
- Begin this session by having students review feedback and self-evaluation, using this to inform their design of their second artwork of the person or pet that is significant to them personally.
- Stop at significant points to review progress, checking against the listed criteria and against their identified intended improvements. As students complete their works, have them self-check and peer evaluate the works.
Activity 2
Upon completion of the second artwork, have each student write a statement about the way in which the work has been created with reference to the cubist features, and whether the final work has captured the character of the special subject (the person or the pet), and if so, how.
Activity 3
- Conclude the session by discussing the ‘geometry’ in their art and in the art of Picasso, referring to the learning in Sessions 1 to 3.
- Discuss how artists like Picasso might represent a triangular prism or square based pyramid as a single two dimensional drawing. Let students choose a solid model and ‘Picasso’ it.
Can you capture the ‘feel’ of the solid as well as it’s appearance?
From this cubist drawing can you tell what solid has been used?
Would you ever see a picture like this in real life?
Dear parents and whānau,
In maths we have been exploring three-dimensional geometric shapes and have been learning to draw these objects from different viewpoints. We have also been learning about Picasso and his style of art, called cubism, and have made some artworks of our own. If you possess extra knowledge of these concepts, then we would love to have you share your expertise with us.