In this unit students make and investigate a variety of polyhedra (3D objects) with a focus on making nets.
- Construct models of polyhedra using structured or everyday materials.
- Use the terms faces, edges and vertices to describe models of polyhedra.
A polygon is a two-dimensional shape with straight sides. A polyhedron is a fully enclosed three-dimensional object with faces that are polygons. There are many different families of polyhedra, including prisms, pyramids, and Platonic solids.
Terms commonly used to describe the attributes of polyhedra include:
- Face: A single polygon in a solid figure
- Edge: A line where two faces connect
- Vertex: A point of intersection of edges – a corner
In the 1750’s Leonhard Euler discovered a famous relationship between these three properties. The number of vertices, plus the number of faces, take away two, equals the number of edges.
E = V + F - 2 (or V + F - 2 = E)
The learning activities in this unit can be differentiated by varying the scaffolding provided or altering the difficulty of the tasks to make the learning opportunities accessible to all students. Ways to support students include:
- providing connecting shapes, such as geoshapes or polydrons, so students can experiment with folding different configurations of shapes
- providing pre-made versions of solid models that students can refer to when making their own
- providing standard nets students can use to make models and asking them to experiment with variations to those nets
- restricting the number of models that students are asked to make, beginning with simpler solids such as cuboids and square based pyramids.
This unit is focussed on the construction of specific geometric shapes and as such is not set in a real world context. There are ways that it could be adapted to appeal to the interests and experiences of your students. For example, students could be given the opportunity to decorate a model of their favourite polyhedra solid in a style of their choosing for a class display. This could range from cultural motifs to favourite colours, patterns or images.
Your students might investigate the use of polyhedra in the real world through contexts such as playground equipment such as domes, shapes of crystals, construction of buildings such as wharenui, sculptures, and terrariums.
Te reo Māori vocabulary terms such as āhua ahu-toru (three-dimensional shape), āhua ahu-rua (two-dimensional shape), mata (face of a solid figure), akitu (vertex), tapa (edge, side), and the names of different shapes could be introduced in this unit and used throughout other mathematical learning.
- Cardboard, tape etc. for making models of geometric solids.
- Geometric connecting shapes (if available).
- Premade models of Platonic solids.
- PowerPoint 1
- PowerPoint 2
- PowerPoint 3
Getting started
- Show the students PowerPoint 1. The first slide shows a football made of pentagons and hexagons. You could add pictures of buildings from your local community that show polyhedra in real-world contexts to this PowerPoint.
What do you know about this solid shape? - Ask students to attend to the shapes that make the solid.
What shapes can you see? (Pentagons and hexagons)
Look at the vertices (corners). How many of each shape meet at one vertex? Is that combination the same for each vertex? (Two hexagons and one pentagon meet at each vertex.) Slide two shows a cube. Show students a cube you have constructed from plastic polygons (polydrons, geoshapes, etc.) or card (see below).
What is this solid shape called? (a cube)
What shapes is it made from? (squares)
How many of those shapes are needed? (six)
How can you count the faces to check you count them all? (e.g. top and bottom, four faces around the middle.)- Explain that the corners can be called vertices.
How many vertices does a cube have? (eight)
How did you count them?
How many edges does a cube have? (12) Pose this challenge:
How many different solids can you make only using equilateral triangles or squares? Let's try to build solids that look balanced.
If needed, go back to the example of the soccer ball to provide an example of symmetric balanced solid.Allow the students time to build the solids. After a suitable collection has developed, bring the class together. Look for the tetrahedron and octahedron.
What is the same about these two solids? (made only of triangles)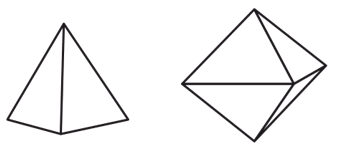
The solid on the left is called a tetrahedron. What does tetra- means? (four)
The solid on the right is called an octahedron. What does octa- mean? (eight)Point out that regular polyhedra are named by the number of faces.
Does anyone have a different polyhedron made only from triangles?
If a student has created an icosahedron (icosa- means twenty), draw the student's attention to it. If not, show slide four of PowerPoint 1.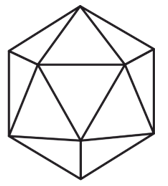
Look carefully at each vertex of the three polyhedra we have made from triangles.
What do you notice?
- Focus the discussion on the consistent pattern around each vertex. Three triangles surround each vertex of the tetrahedron, four triangles for the octahedron and five for the icosahedron.
Is it possible to put six triangles around each vertex and make a solid?
Have students try to see if it works.Surrounding a vertex with six triangles creates a tessellation which covers a plane, or flat surface. The internal angles of an equilateral triangle all measure 60°. Six angles of 60° add to 360° which is a full turn and is "flat" when joined. Therefore it isn't possible to make a solid with six equilateral triangles at each vertex.
One of the students is likely to have made this polyhedra called a triangular dipyramid (made of two triangular based pyramids).
This solid does not belong with these (tetra-, octa- and icosa-). Why not?
If you count the number of triangles surrounding each vertex, what do you get?Some vertices have four triangles meeting (around the ‘equator’) and some have three triangles meeting (top and bottom). There is not the same number meeting at every vertex which is a requirement for Platonic solids.
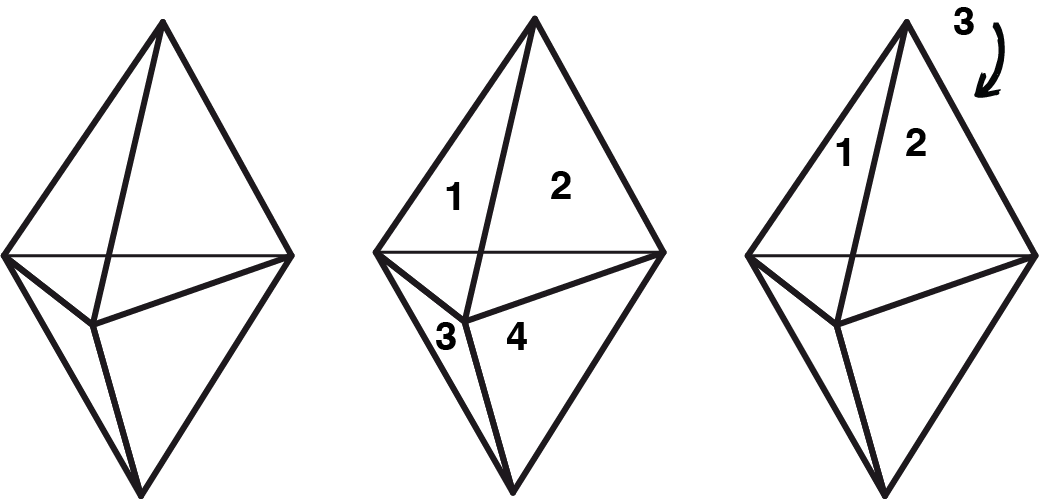
Other students are likely to have made these solids.
Square based pyramid Cuboctahedron Rhombicuboctahedron Draw your students’ attention to the configuration of polygons around each vertex. For the square based pyramid the apex has four triangles around it and each base vertex has a square and two triangles. A square based pyramid might be excluded from the set of balanced symmetrical solids because it is not balanced if it is sitting on one of its triangular sides. For the cuboctahedron there are two squares and two triangles around each vertex. For the rhombicuboctahedron there is one square and three triangles around each vertex.
For all of the balanced symmetric solids made from triangles and squares, ask your students to work out how many faces each solid has. For the tetra-, octa- and icosahedron the prefix names the polyhedron. However, counting the faces on the cuboctahedron and rhombicuboctahedron is a bit more challenging. Encourage your students to record their data systematically:
Solid Number and shape of faces Numbers of vertices Number of edges Tetrahedron 4 triangles Octahedron 8 triangles Icosahedron 20 triangles Triangular dipyramid 6 triangles Cuboctahedron 8 triangles
6 squares
Rhombicuboctahedron 8 triangles
18 squares
- Look for systematic ways to count the number of faces. That might include sectioning off the solid into parts or methodically accounting for each vertex.
Session Two
- Remind the students that in the previous session they were only allowed to use triangles and squares.
What solids did we make?
As the students remember it, bring out a model of the solid and name it. Explain that there is a special group of polyhedra called Platonic solids, that were found by the ancient Greeks. Explain that there are two criteria for a Platonic solid:
- The faces of the solid are all identical, regular polygons.
- The same number of faces meet at each vertex.
Note that regular means that the sides, therefore the angles, of the polygon are the same. Use chalk on the floor to draw this Carroll diagram and place the models within it. This is a complex classification, so you may need to support students to do it.Each vertex is
the sameThe vertices vary One regular shape More than one shape The solids in the top left quadrant are perfect, the others are not.
What other shapes have you got in your set?
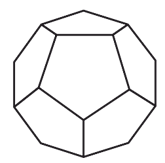
Can any other perfect solids be made with the other shapes?- Let the students explore the possibility of other perfect solids. Only one more exists, the dodecahedron (dodeca- is the prefix for twelve).
Students might have found that hexagons do not work.
Why can you not make a perfect solid with hexagons?
At least three polygons are needed around a vertex. The internal angles of a hexagon measure 120°. Three lots of 120° totals 360° which is a full turn. Therefore, no angle is unfilled for the polygons to come off the flat as the sides are joined.
- Add the dodecahedron to the set of perfect solids. Include it in the table along with the other data.
- Start with the tetrahedron which is the simplest Platonic solid. Hold up the model of this solid.
Imagine if I unpeel the tetrahedron and lay it flat. That pattern is called a net.
What do you think it will look like?
Ask your students to sketch their predictions for the net. They can check their predictions by making each net and folding it up to check.
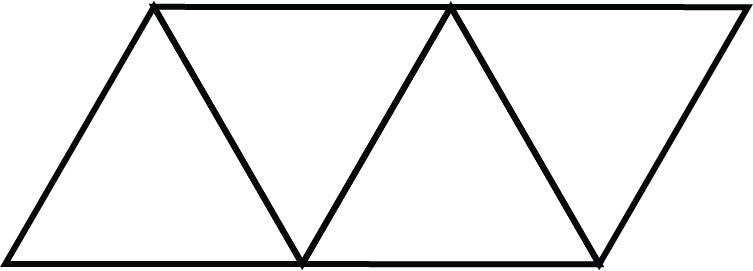
There are two possible nets: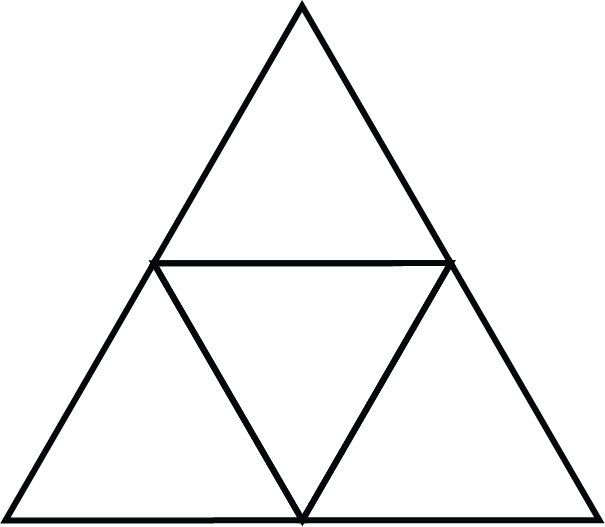
There is also an arrangement of triangles that does not work.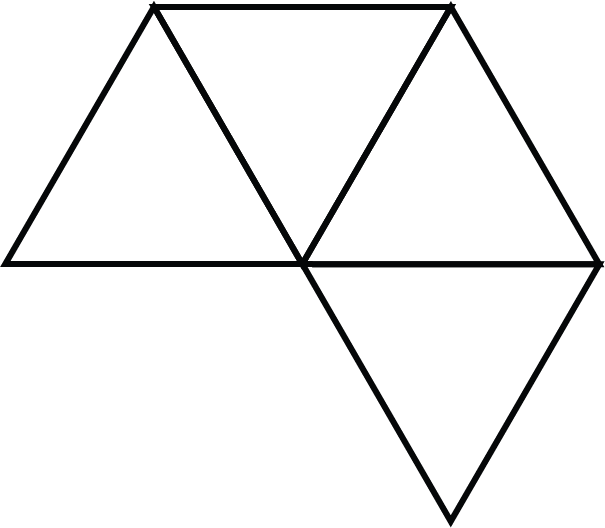
Why do the two top nets work but the bottom one does not?
The reasons why a net will not work are sometimes as important as the reasons why a net will work. All of the nets have four equilateral triangles. This is an essential condition. Nets that fold to make a tetrahedron allow only three corners of a triangle around each vertex when they fold. The bottom allows for four corners around the central vertex, so will not fold to make a tetrahedron. - Ask the students to investigate:
How many different nets will there be for a cube?
Provide each pair of students with square grid paper and six square polydrons. Allow lots of time for the students to find and record possible nets.
Session Three
In this session students try to find a solution set for all the nets of a cube.
- Challenge students to work in pairs to find all the possible nets for a cube.
How many different nets can you make that will fold to make a cube? - Once students have drawn several nets, invite a few students to share their favourite net. Begin a gallery of possible nets. An important issue is how to establish that two nets are different. You might use an example like this:
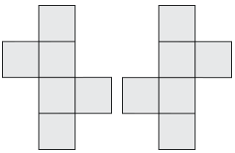
Are these nets the same or different?
Students might notice that one net can be mapped onto the other by reflection or rotation, or both in this case. That means that the nets are not unique (different in a mathematical sense). - Remind the students that you are seeking a full set of nets.
Has anyone got a system for finding all of the nets? - Some students may have noted a family of nets that have four squares in a row. The central line of four can be kept constant and the other two faces moved around to form unique nets. Here are three ‘four in a row’ nets. There are six such nets.
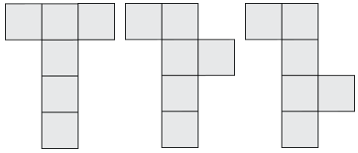
A provoking question might be:
Is it possible to make a net that has no more than three squares in a row?
What about only two squares in a row? - Let the students continue to explore possible nets until they think they have found them all. Can they justify that those nets are the full set?
Gather the class and add to the gallery by asking students to come up with a ‘new’ net. Check each offering is not a reflected or rotated copy of another net. Polydron models are helpful for this as they can be turned and flipped to map onto each other.
- In total there are 11 nets. Carefully organising the nets can help students see a common structure in families of nets. For example, here are the four squares in a row family.
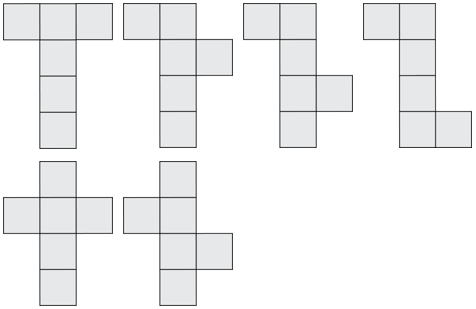
Note that the top four nets fix the top-left square and move the right-hand square to different positions. The next two nets fix the left square to the second central square and find two new positions for the right square. The top-right and bottom-right positions have already been covered in the first four nets.
Another four nets can be found by organising three squares in a row and manipulating the other three.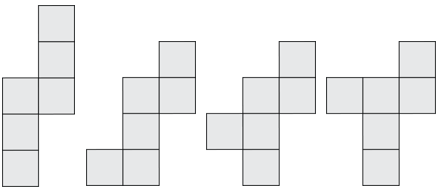
The final net has no more than two squares in a row.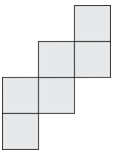
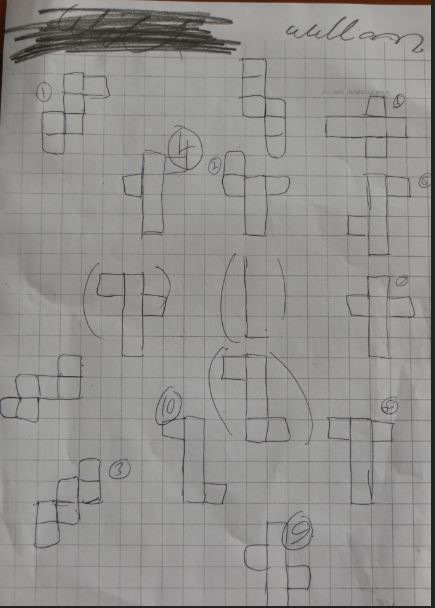
- Look for your students to check any new nets for uniqueness, which means the new net does not map onto an existing net by reflection and/or rotation. For example, in this work sample William signals that a new net is the same as a previous net by bracketing the net.
- Your students might like to attempt finding nets for the other three Platonic solids. Encourage them to sketch the net for the solid they choose on grid paper. They can check the accuracy of their net by making it with polydrons and folding.
- Do your students:
Use symmetry to form the net?
Divide the solid into two halves to simplify the task?
Fix one face as the base or top and imagine the other faces connected to it?
Image the folding of faces to locate them correctly?
Session Four
- Show your students PowerPoint 2. Slide One shows three different views of an octahedron. Ask them to sketch the different views by drawing only the edges and vertices they can see, and not drawing those that are hidden. Slide Two has simple drawings of the same views. Not drawing what they cannot see is a challenge for some students. Asking them to imagine what a digital camera will ‘see’ then create the drawing is a good strategy. Comparing the drawing with the digital camera image helps your students attend to the features that are actually captured.
- Ask your students to take one of the solids they have made and draw three different views of it. The more complex solids like the icosahedron and rhombicuboctahedron can be quite challenging to draw but the simpler solids are very accessible.
For example, the cube (hexahedron) has many possible views.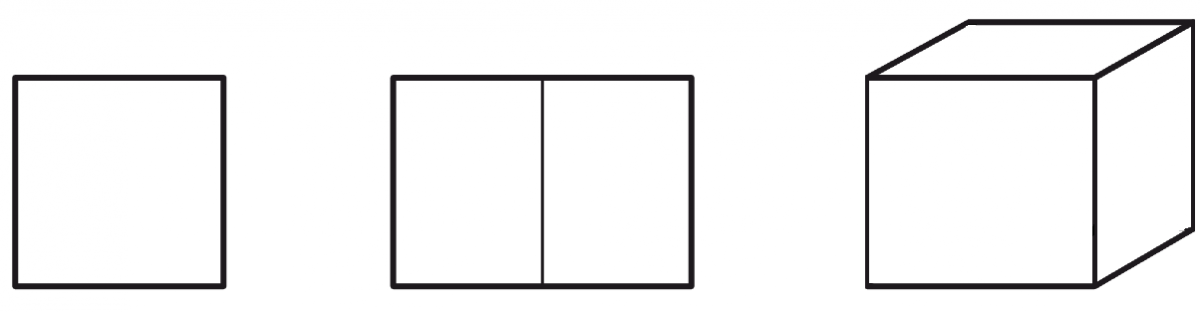
- Once students have created views of their chosen solid they can give the views to a partner who tries to image what perspective the solid was drawn from.
- It is interesting to discuss how perspective changes the way shapes appear. In the views of a cube above a square appears as a non-square rectangle and a rhombus. A square can also appear as a trapezium from certain angles. Learning about perspective drawing in visual art could complement the learning in this session.
Session Five
In this session students create accurate nets for two families of polyhedral, called prisms and pyramids. They look for properties in the nets and consider the relative lengths of edges/sides.
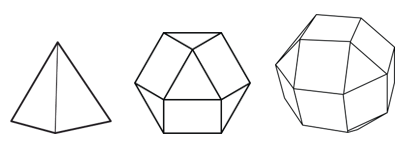
- Show the students PowerPoint 3. Slide One has three examples of prisms.
How are these solids the same and how are they different?
Students should notice how all three solids have rectangular faces though the end faces are different (triangle, square and hexagon). Tell the students that the solids are examples of prisms, polyhedra with consistent cross section. Imagine that each solid was a loaf of bread. It is possible to slice the solid into pieces of the same shape.
Each prism is known by its cross section. For example, a triangular prism has triangular cross sections.
- Ask your students to imagine the net for a rectangular prism. Ask them to sketch the shape of it in the air. Focus on the shapes that must be in the net and relate those shapes to the picture on Slide One. Four rectangles must wrap the end faces which are squares. Give the students 1cm square grid paper. The squares are useful for maintaining right angles and measuring lengths.
- Ask students to use a ruler and pencil to create an accurate net for a cuboid. An accurate net must fold so the sides meet exactly to become edges. Students can check their nets by cutting them out and folding. A common issue for students is that sides in the net that meet to form edges must be congruent (same length).

- Once the net for a rectangular prism is established, focus on the triangular and hexagonal prisms.
What will need to change in the net to form a triangular or hexagonal prism?
Do students recognise that the end faces will need to be triangles or hexagons and that the number of rectangles must match the number of sides? For example, a triangular prism will have only three rectangles. Invite your students to create nets for other kinds of prisms. The grid paper will still be useful though the challenge of getting the matching sides is more difficult.
- Watch to see how your students create triangles and hexagons that have the same side length as the short side of the rectangle.
- Bring the students together to share their nets.
What is the same with all of the nets?
What are the differences?
Imagine the net for an octagonal prism. What would it look like?
You could create a table of data about the prisms and look for patterns, or you may choose to keep the lesson focused on nets.
Prism Number of faces Number of edges Number of vertices triangular 5 9 6 rectangular 6 12 8 hexagonal 8 18 12 Octagonal 10 24 16 - Alternatively, move to Slide Two of PowerPoint Three to discuss the common features of the solids. All of the pictures show pyramids. The base of the pyramid names it. For example, a square based pyramid has a square base. Begin with the square based pyramid.
What shapes are in the net of this solid?
How do you know there will be four triangles?
- Ask students to sketch their prediction for the net.
Which sides will need to be the same length?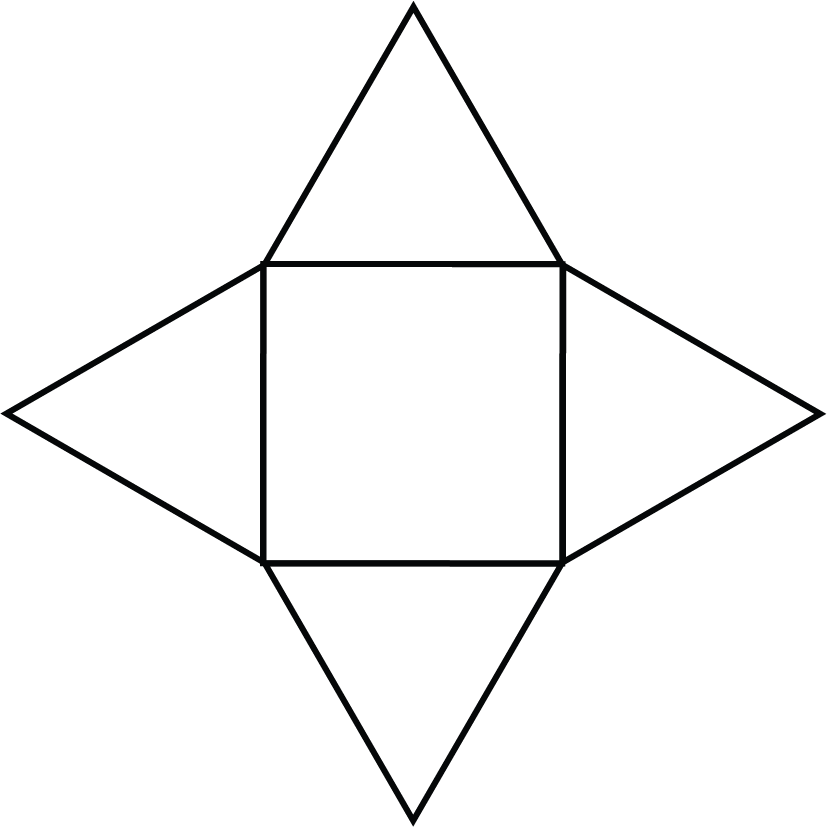
Students can make an accurate net for the square based pyramid or try the challenge of the more difficult pyramidal nets. The net for an octagonal pyramid is an excellent mid-level challenge. As with the prisms you might create a table of data and look for patterns.
Pyramid Number of faces Number of edges Number of vertices Triangular based 4 6 4 Square based 5 8 5 Hexagonal based 7 14 7 Octagonal based 9 18 9
Dear family and whānau,
This week we have been exploring polyhedra. Ask your student to explain how these solid shapes have faces, edges and vertices. For homework your student has been asked to either:
- find photographs of different polyhedrons from magazines and create a poster page for their maths book; or
- use materials found at home to construct an icosahedron.