Whilst this unit is presented as a sequence of five sessions, more sessions than this will be required between sessions 3 and 4. It is also expected that any session may extend beyond one teaching period.
Session 1
This session is about playing a familiar game and evaluating its health benefits and safety considerations.
Students of this age may be challenged to accurately measure their pulse rate. Therefore these lessons use an alternative ‘indicator’ of the effects of exercise: that is that the intensity of worthwhile exercise should prevent you from singing, but should not prevent you from talking.
SLOs:
- Understand how running a distance contributes to fitness and wellbeing.
- Create a personal benchmark for 1 metre.
- Accurately use three measuring devices to measure a distance of more than 3 metres.
- Correctly record length measurements using abbreviations.
- Understand how many metres are in one kilometre.
- Establish a person benchmark for 1 kilometre.
Activity 1
Begin the lesson by singing a favourite waiata. The aim of the lesson is not to learn a new waiata, so consider using one your ākonga are already familiar with.
Activity 2
- Explain to the students that they will be undertaking their regular fitness run (a distance of up to half a kilometre). Discuss the possible effects/benefits of this, and elicit specific statements. Possible responses could include “we get puffed”, “our heart beat/pulse speeds up”, and “it’s good for us”. In response, explain that the increase of beats per minute (bpm) is because their body physically needs to circulate oxygen more quickly as they exercise. Science has shown this is good for us.
Explain that today, when they each return from their run they should (individually) immediately sing the waiata from activity 1 (above), and then talk to a classmate about their run. - Have students complete their run and this task.
- Ask: ‘Who was able to sing the waiata immediately?’
‘Who was able to talk to their classmate?’
Count the responses for each and record these on the class chart. Discuss the results, explaining that being unable to sing immediately shows that they exercised well and their bodies will benefit.
Activity 3
Ask, “How far did you run today?” and “How can we find out?”
Make available 1 centimetre cubes, meter rulers, a 10 metre + tape measure and a measuring wheel.
Have the students share what they know about the metre ruler. Establish that it is called a metre ruler. It is 1 metre long. If centimetres have already been introduced and used, have students line up 1 cm cubes along the ruler to confirm that 1 metre = 100 centimetres.
Activity 4
Develop a personal benchmark by asking: “Who can jump 1 metre?”
Have student pairs measure a 1 metre length on the carpet/floor, marking this with chalk.
Highlight that the measure begins at 0 and ends at 100. Discuss the ‘extra’ space at each end of the ruler.
In their pairs, have students check if each person can jump 1 metre. A tuakana/teina model could work well here.
Agree that when we think about how big 1 metre is, we can think of it as one big personal jump.
Activity 5
- Introduce the tape measure and measuring wheel, explaining and showing how each measures 1 metre and multiples of 1 metre.
Highlight the 1 metre personal benchmark by asking:
If the tape measure is 10 metres, about how many of your jumps is that?
If we measured 100 metres with the wheel, about how many of your jumps is that? - Write ‘standard measure’ on the class chart and ask what it means. Elicit responses and point out that standard units have been created to allow consistency and communication of measures. We understand each other’s measurements if we use the same measures.
Explain that the standard units used in New Zealand, and in most countries in the world, are metric units. Some students may be familiar with the use of feet and inches, and could share their knowledge at this point. Discuss possible situations in which a standard measure might be useful (e.g. travel, building). You might be able to make links to community members (e.g. builders) or favourite hobbies (e.g. sprinting). Consider also how links might be made to your cultural context. - Write centimetre, metre and kilometre on the class chart. Explain that when we write them often, we want a quick way to record them. Model cm, m and km abbreviations. Students may mention that people often refer to "ks" when talking about kilometres.
Activity 6
Have a student model both the correct and an incorrect way to measure using a metre ruler. This could be completed in pairs. Highlight how to mark the beginning and end of the measure and how to correctly replace the metre ruler, when measuring a distance greater than 1 metre.
Have several students measure a length that is more than a metre, read the measure aloud, and record this on the class chart.
Model examples of parts of a metre as well, for example 2 ½ m.
Activity 7
Explain that students will pair up (tuakana/teina) and participate in two measuring tasks to become familiar with the measuring tools. Emphasise that their recording should use the correct abbreviations.
Show and have students make a recording sheet, as demonstrated below. Alternatively, you may feel it would be more effective to provide some, or all, of your students with a graphic organiser to be used in this activity.
Measurement
from ... to | Metre ruler | Measuring tape |
| | |
Have students measure at least three different lengths around the classroom, hall, or other designated area, using a metre ruler and a measuring tape. They should that they get the same measure using each tool.
- Clarify the exact fitness course route, the start and end points, and set relevant boundaries. Have student pairs take turns using the measuring wheel to measure the distance around the course and to then record the result.
Activity 8
Conclude the session by sharing measurement results and reviewing the fitness course distance. Discuss how many metres in 1 kilometre. Estimate and calculate together the number of times they would need to run around the fitness course to cover a 1 kilometre distance. Establish a rough benchmark for 1 kilometre. (For example, 1 kilometre is 5 times around the fitness course.)
Session 2
This session is about recognising that rules that address fairness and safety, help to ensure that a PE/fitness activity is enjoyable. As students design a PE/fitness activity, they learn more about accurately measuring outdoor spaces.
SLOs:
- Understand that rules are designed to ensure fairness and safety.
- Pose an investigative question.
- Create and write instructions for a PE/fitness game, giving consideration to fitness, safety and enjoyment.
- Accurately measure and record the length of a given outdoor space.
Activity 1
Begin with a fitness run.
Activity 2
Explain that the class is going to play a favourite PE game (for example: Ki-o-Rahi, Tunnel ball, Scatter Ball). Together, list the rules on the class chart.
Ask: Which of the rules are about making the game fair? Write F beside these. Discuss that fairness makes the game more enjoyable for everyone.
Ask: Which of the rules are about making the game safe? Write S beside these. Discuss any anomalies. If there are no specific safety rules, list some generic ones.
Activity 3
Return to the class, review the enjoyment of the game and ask if playing the game will make them fit. Discuss why/why not. Refer to the “talk/sing measure” from session 1.
(The response may be, “No, because it didn’t make me puff and I could sing.”)
Review the list of rules and confirm the fairness (F) and safety (S) decisions made earlier.
Highlight the importance of games and activities being safe and enjoyable. Ask if any other safety rules should be added and why.
Activity 4
- List on the class chart, the words ‘enjoyment, fitness and safety’.
- Suggest that students will work in pairs or small groups to create their own PE/fitness games. Through discussion, lead students to pose an investigative question. For example:
‘Can we design a game or activity that keeps us fit, is enjoyable and is safe?’
Record this on the class chart/modeling book. - Explain that students will be using an outdoor space with suitable boundaries, for example, the school tennis courts. Large balls and small balls will be made available. (Make other equipment available, as appropriate.)
- Clarify the task. Students will work in pairs or small groups to:
- Measure and record the size of the designated outdoor space (using skills learned in Session 1.)
- Invent a simple game that the class can play.
- Write down clear instructions and rules, checking for safety and fairness.
- Set time limits and clarify expectations. Have students complete the task.
Activity 5
Have groups swap game instructions with another group. Have them read, critique, seek clarification and suggest refinements or improvements to the other’s game design. You may wish to come up with guidelines and/or a rubric for students to use during this. The groups may wish to play each other’s games as well.
Give time for these adjustments to be made.
Activity 6
Review pair measurements for the outdoor space. Tennis courts are about 23.8m x 8.2m. Remind students that 1000m = 1 km. Estimate together the number of times the length of the court would need to be run to achieve the length of 1 kilometre. (eg. Round up to 25m. 25m x 40 = 1000m) Together calculate the number of lengths of the tennis court needed to run 1km.
Students may use this as a 1 kilometre benchmark. You could also consider other known lengths such as from the school gate to the walking pou, or other local community locations.
Session 3
This session is about creating a simple questionnaire to evaluate each group's activity, and learning about dot plots.
SLOs:
- Plan data collection.
- Collect data by trialing and evaluating an activity on its fitness, safety and enjoyment values.
Activity 1
Begin with a fitness run.
Activity 2
- Review the investigation question recorded on the chart in Session 2.
Ask the students how they should gather the data to answer the question. Guide discussion and agree on a simple evaluation form to be completed by the class after playing each game. For example:
The name of the game: ________________________________
Circle for each: 1 (not so good) 2, 3, 4 or 5 (excellent),
Enjoyment: 1 2 3 4 5
Fitness: 1 2 3 4 5
Safety: 1 2 3 4 5 - Print off the evaluation or have students copy this and practice using it by completing an evaluation for the game played at the start of Session 2.
Activity 3
Working together (mahi tahi model), collate and present the data using three dot plots. For example:
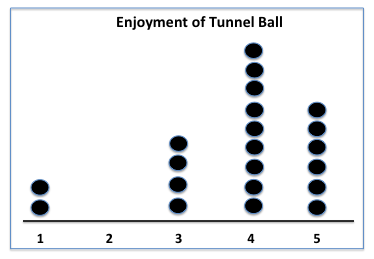

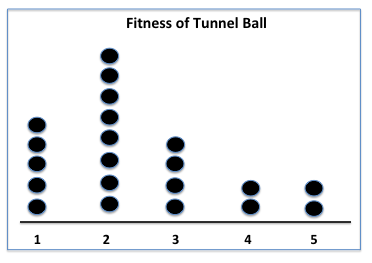
Discuss the dot plot features, the results, and draw conclusions.
Activity 4
For the remainder of the session, and for sessions to follow, have students participate in and evaluate each other’s games. Each group of students will collect the data for their game to analyse and present in Session 4.
Session 4
This session is about student groups sorting the data from their classmate’s evaluations of their activity and presenting the findings.
SLOs:
- Sort and display category data.
- Answer an investigative question.
Activity 1
Begin with a fitness run.
Activity 2
Make available pencils, paper, and sets of data for each pair activity.
Have students work in their groups to sort their data and to discuss their findings. Each student should create three dot plots to present their data, record their own findings and should answer the investigative question in their own way.
As students work, have them record on a small poster, their knowledge of centimetres, metres and kilometres, the relationship between them, and explain why we have standard measures.
Session 5
This session is about communicating investigation findings to others and sharing their understanding of standard measures of length.
SLOs:
- Present findings.
- Review and reflect on the investigative process.
- Review and reflect upon measurement learning.
- Discuss the need for small units of length measure and introduce millimetres.
Activity 1
Begin with a fitness run.
Activity 2
- Have each group present their findings about their game to the class. Allow time for other students to provide feedback.
- Together, as a class:
- Summarise on the class chart conclusions about safety, enjoyment, and fitness.
- Reflect on the investigation process and suggest ways it could have been improved.
Activity 4
Arrange the length measurement tools in front of the students.
Have individual students share their learning about each of the tools.
Ask which tool would be used to measure small lengths.
Introduce the millimetre measure for tiny lengths.
Conclude by reviewing personal benchmarks for (1cm), 1m and 1km.

Fun and fitness
The purpose of this unit is for students to design a PE/fitness game, use standard measures of length, and conduct a statistical investigation into the safety factors and the health benefits of their game.
This unit of work assumes prerequisite knowledge gained at level one: the students can recognise the attribute of length, knows that measurement units are countable and that they can be partitioned and combined. When measuring length they realise that there should be no gaps or overlaps.
In these lessons the students are developing an understanding of a linear scale. They recognise that such a scale is made up of units of equal size that are known as ‘standard units’, because they are able to be easily understood by everyone.
The students learn to accurately reposition a metre ruler when required to measure a length longer than the ruler. In becoming familiar with metre and centimetre units of measure, the students learn to express parts of metres as centimetres and to use the abbreviations m and cm when recording length measures. They come to understand that 1000 metres are equal to 1 kilometre, and develop a personal benchmark for one metre and one kilometre.
Further to the development of measurement skills and knowledge, the students participate in planning and collecting appropriate data to answer a question that has been composed with the support of the teacher (as required). The students sort the data and presents these using a dot plot, whilst refining their understanding of the investigative process. They can answer the investigative question and can suggest consequences of their findings.
Associated Achievement Objectives
Health and Physical Education
Positive attitudes
Safety management
This unit can be differentiated by varying the scaffolding or altering the difficulty of the tasks to make the learning opportunities accessible to a range of learners. For example:
The focus of this unit is designing a PE/fitness game. Encourage students to consider their friends and classmates when planning, and to create a game that will appeal to them and be fun to play. This could be achieved by incorporating favourite elements from other games, or items of current interest. Elements of traditional Māori games such as Kī-o-Rahi, Tapuae and Mā Whero could be used as well.
Te reo Māori vocabulary terms such as inea (to measure), rūri (ruler), and tākaro (game) could be introduced in this unit and used throughout other mathematical learning.
Whilst this unit is presented as a sequence of five sessions, more sessions than this will be required between sessions 3 and 4. It is also expected that any session may extend beyond one teaching period.
Session 1
This session is about playing a familiar game and evaluating its health benefits and safety considerations.
Students of this age may be challenged to accurately measure their pulse rate. Therefore these lessons use an alternative ‘indicator’ of the effects of exercise: that is that the intensity of worthwhile exercise should prevent you from singing, but should not prevent you from talking.
SLOs:
Activity 1
Begin the lesson by singing a favourite waiata. The aim of the lesson is not to learn a new waiata, so consider using one your ākonga are already familiar with.
Activity 2
Explain that today, when they each return from their run they should (individually) immediately sing the waiata from activity 1 (above), and then talk to a classmate about their run.
‘Who was able to talk to their classmate?’
Count the responses for each and record these on the class chart. Discuss the results, explaining that being unable to sing immediately shows that they exercised well and their bodies will benefit.
Activity 3
Ask, “How far did you run today?” and “How can we find out?”
Make available 1 centimetre cubes, meter rulers, a 10 metre + tape measure and a measuring wheel.
Have the students share what they know about the metre ruler. Establish that it is called a metre ruler. It is 1 metre long. If centimetres have already been introduced and used, have students line up 1 cm cubes along the ruler to confirm that 1 metre = 100 centimetres.
Activity 4
Develop a personal benchmark by asking: “Who can jump 1 metre?”
Have student pairs measure a 1 metre length on the carpet/floor, marking this with chalk.
Highlight that the measure begins at 0 and ends at 100. Discuss the ‘extra’ space at each end of the ruler.
In their pairs, have students check if each person can jump 1 metre. A tuakana/teina model could work well here.
Agree that when we think about how big 1 metre is, we can think of it as one big personal jump.
Activity 5
Highlight the 1 metre personal benchmark by asking:
If the tape measure is 10 metres, about how many of your jumps is that?
If we measured 100 metres with the wheel, about how many of your jumps is that?
Explain that the standard units used in New Zealand, and in most countries in the world, are metric units. Some students may be familiar with the use of feet and inches, and could share their knowledge at this point. Discuss possible situations in which a standard measure might be useful (e.g. travel, building). You might be able to make links to community members (e.g. builders) or favourite hobbies (e.g. sprinting). Consider also how links might be made to your cultural context.
Activity 6
Have a student model both the correct and an incorrect way to measure using a metre ruler. This could be completed in pairs. Highlight how to mark the beginning and end of the measure and how to correctly replace the metre ruler, when measuring a distance greater than 1 metre.
Have several students measure a length that is more than a metre, read the measure aloud, and record this on the class chart.
Model examples of parts of a metre as well, for example 2 ½ m.
Activity 7
Explain that students will pair up (tuakana/teina) and participate in two measuring tasks to become familiar with the measuring tools. Emphasise that their recording should use the correct abbreviations.
Show and have students make a recording sheet, as demonstrated below. Alternatively, you may feel it would be more effective to provide some, or all, of your students with a graphic organiser to be used in this activity.
from ... to
Have students measure at least three different lengths around the classroom, hall, or other designated area, using a metre ruler and a measuring tape. They should that they get the same measure using each tool.
Activity 8
Conclude the session by sharing measurement results and reviewing the fitness course distance. Discuss how many metres in 1 kilometre. Estimate and calculate together the number of times they would need to run around the fitness course to cover a 1 kilometre distance. Establish a rough benchmark for 1 kilometre. (For example, 1 kilometre is 5 times around the fitness course.)
Session 2
This session is about recognising that rules that address fairness and safety, help to ensure that a PE/fitness activity is enjoyable. As students design a PE/fitness activity, they learn more about accurately measuring outdoor spaces.
SLOs:
Activity 1
Begin with a fitness run.
Activity 2
Explain that the class is going to play a favourite PE game (for example: Ki-o-Rahi, Tunnel ball, Scatter Ball). Together, list the rules on the class chart.
Ask: Which of the rules are about making the game fair? Write F beside these. Discuss that fairness makes the game more enjoyable for everyone.
Ask: Which of the rules are about making the game safe? Write S beside these. Discuss any anomalies. If there are no specific safety rules, list some generic ones.
Activity 3
Return to the class, review the enjoyment of the game and ask if playing the game will make them fit. Discuss why/why not. Refer to the “talk/sing measure” from session 1.
(The response may be, “No, because it didn’t make me puff and I could sing.”)
Review the list of rules and confirm the fairness (F) and safety (S) decisions made earlier.
Highlight the importance of games and activities being safe and enjoyable. Ask if any other safety rules should be added and why.
Activity 4
‘Can we design a game or activity that keeps us fit, is enjoyable and is safe?’
Record this on the class chart/modeling book.
Activity 5
Have groups swap game instructions with another group. Have them read, critique, seek clarification and suggest refinements or improvements to the other’s game design. You may wish to come up with guidelines and/or a rubric for students to use during this. The groups may wish to play each other’s games as well.
Give time for these adjustments to be made.
Activity 6
Review pair measurements for the outdoor space. Tennis courts are about 23.8m x 8.2m. Remind students that 1000m = 1 km. Estimate together the number of times the length of the court would need to be run to achieve the length of 1 kilometre. (eg. Round up to 25m. 25m x 40 = 1000m) Together calculate the number of lengths of the tennis court needed to run 1km.
Students may use this as a 1 kilometre benchmark. You could also consider other known lengths such as from the school gate to the walking pou, or other local community locations.
Session 3
This session is about creating a simple questionnaire to evaluate each group's activity, and learning about dot plots.
SLOs:
Activity 1
Begin with a fitness run.
Activity 2
Ask the students how they should gather the data to answer the question. Guide discussion and agree on a simple evaluation form to be completed by the class after playing each game. For example:
The name of the game: ________________________________
Circle for each: 1 (not so good) 2, 3, 4 or 5 (excellent),
Enjoyment: 1 2 3 4 5
Fitness: 1 2 3 4 5
Safety: 1 2 3 4 5
Activity 3
Working together (mahi tahi model), collate and present the data using three dot plots. For example:
Discuss the dot plot features, the results, and draw conclusions.
Activity 4
For the remainder of the session, and for sessions to follow, have students participate in and evaluate each other’s games. Each group of students will collect the data for their game to analyse and present in Session 4.
Session 4
This session is about student groups sorting the data from their classmate’s evaluations of their activity and presenting the findings.
SLOs:
Activity 1
Begin with a fitness run.
Activity 2
Make available pencils, paper, and sets of data for each pair activity.
Have students work in their groups to sort their data and to discuss their findings. Each student should create three dot plots to present their data, record their own findings and should answer the investigative question in their own way.
As students work, have them record on a small poster, their knowledge of centimetres, metres and kilometres, the relationship between them, and explain why we have standard measures.
Session 5
This session is about communicating investigation findings to others and sharing their understanding of standard measures of length.
SLOs:
Activity 1
Begin with a fitness run.
Activity 2
Activity 4
Arrange the length measurement tools in front of the students.
Have individual students share their learning about each of the tools.
Ask which tool would be used to measure small lengths.
Introduce the millimetre measure for tiny lengths.
Conclude by reviewing personal benchmarks for (1cm), 1m and 1km.
Dear parents and whānau,
In mathematics we have been measuring distances and learning about metres and kilometres in particular. Ask your child to show how big a centimetre and a metre is, and to tell you about how big a kilometre is.
Please take opportunities to talk about and use these measurements: for example, measure and mark in pencil on a door frame, the height in metres and centimetres of each family member, or, when you are next travelling in the car, point out the speedometer and explain to your child how you know when the car has travelled 1 kilometre.
Letter patterns
In this unit we look at number patterns from letters and numbers. We use a table of values to help record our thinking. It’s important here to look for the pattern and see how the number of tiles changes from letter to letter.
Patterns are an important part of mathematics. It is valuable to be able to tell the relation between two things in order to predict what will happen and understand how they interrelate.
Patterns also provide an introduction to algebra. The rules for simple patterns can be first discovered in words and then be written using algebraic notation.
Links to Numeracy
This unit provides an opportunity to develop number knowledge in the area of Number Sequence and Order, in particular development of knowledge of skip counting patterns.
Help ākonga focus on the number patterns by discussing the tables showing the numbers of tiles used in each successive letter pattern. Look at those patterns that are made by adding a constant number of tiles onto each successive letter. Highlighting numbers on a hundreds board or using a number line may also be helpful.
Questions to develop strategic thinking could include:
Which number comes next in this pattern? How do you know?
Which number will be before 36 in this pattern? (or another number, as appropriate). How do you know?
What is the largest number you can think of in this pattern? please can you explain your thinking?
Could you make a letter T with 34 tiles? How do you know?
This unit can be differentiated by altering the difficulty of the tasks to make the learning opportunities accessible to a range of learners. Specifically, some ākonga may explore the patterns and describe how the shape and number patterns are growing, but may not be ready to predict the next number in the pattern, or how many tiles would be needed to make the nth shape in the pattern. Ākonga could be challenged with number patterns that involve larger numbers. This will encourage them to use a table to explain the number pattern, as drawing or constructing the pattern becomes impractical.
The context of letter patterns can be adapted to recognise diversity and ākonga interests to encourage engagement. Support ākonga to identify and explore other growing patterns in their environment. For example, tukutuku patterns on the walls of the wharenui, or the number of seats on the bus that are occupied as ākonga get onto the bus in pairs.
Te reo Māori vocabulary terms such as letter (reta), tau (number) and tauira (pattern) could be introduced in this unit and used throughout other mathematical learning.
Getting started
Starting with a simple pattern, we build up the level of difficulty and see that it’s necessary to use a table to record what is happening.
Build up the letter ‘I’ using coloured tiles or paper (see the diagram below).
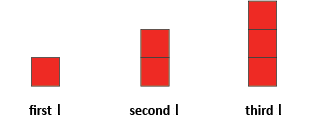
How many tiles do we need for the first ‘I’? The second? The third?
Who can tell me how many tiles we’ll need for the fourth ‘I’?
Can someone come and show us how to make the fifth ‘I’?
How many tiles will we need for the tenth ‘I’? Make it.
What is the number pattern that we are getting?
If we had 11 tiles, which numbered ‘I’ could we make?
Now let’s make it a bit harder. Let’s make an ‘I’ by adding a tile to the top and the bottom each time (see diagram).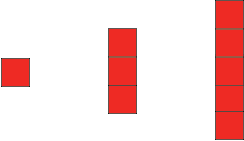
Repeat the questions from the last ‘I’ problem.
How many tiles do we need for the first ‘I’? The second? The third?
Who can tell me how many tiles we’ll need for the fourth ‘I’?
Can someone come and show us how to make the fifth ‘I’?
How many tiles will we need for the tenth ‘I’? Make it.
What is the number pattern that we are getting?
How many tiles do we add on at each step?
If we had 11 tiles, which numbered ‘I’ could we make?
After korero, suggest the idea of a table.
The original ‘I’ problem would give us an easy table. It would look like this:
‘I’ number
1
2
3
4
5
Number of tiles
1
2
3
4
5
What would the table look like where we added two tiles at a time?
Draw up the table with help from the ākonga
How did you know how many tiles to use on the fourth ‘L’?
What is the pattern (tauira) here?
Which ‘L’ in the sequence will use 27 tiles?
Tell me what numbers you used to fill the table. (Check that they are correct by counting the tiles.)
What patterns can you see here?
How did you get the number of tiles for one ‘L’ from the one before?
How many tiles would you need for the 10th ‘L’?
If you had 23 tiles, what numbered ‘L’ could you make?
Exploring
For the next three days the ākonga work at three stations continuing different number patterns and building up the corresponding tables. In the first station, the ākonga complete a similar problem to the one in ‘Getting Started’. In the second station the ākonga find a missing shape in the pattern sequence. Finally in the third station ākonga make their own pattern that fits the given table of values. Ākonga could work in three groups that provide tuakana/teina support. At the end of each day, bring them back together to discuss their thinking. Ask them the kind of questions that were used in ‘Getting Started’. Use the tables to discuss the patterns involved and the relation between successive numbers in the sequence.
Day 1
The material for these stations is on Copymasters 1.1, 1.2, 1.3, 1.4. The ākonga continue the pattern and complete the table. Ākonga could continue to use tiles to support their learning.
Day 2
The material for these stations is on Copymasters 2.1, 2.2, 2.3, 2.4. The ākonga find the missing element of the pattern and complete the table. Tiles could be provided for some ākonga who may need to construct the missing element before drawing it.
Day 3
The material for these stations is on Copymasters 3.1, 3.2, 3.3, 3.4. The ākonga make up their own pattern to fit the values in the table. Ākonga could use the tiles to create patterns and count to check that they match the numbers in the table before drawing them on the sheet.
Reflecting
On the final day let the ākonga make up their own patterns using numbers or shapes, instead of letters. They could construct these with tiles first, or by drawing. Encourage ākonga to think of patterns in their environment, for example, tukutuku patterns in the local wharenui or museum. Ākonga should also provide a table to show the number pattern of their number or shape. Some ākonga might want to leave gaps in the patterns of their numbers or shapes. Other ākonga could fill this in when they share their pattern with the class.
When ākonga are sharing their patterns with the class, point out the importance of the table in seeing what the number pattern is.
Dear parents and whānau,
This week in maths we have been exploring number patterns that come from letters, numbers and shapes. Work with your child to fill in the table below for the plus sign shape in the diagram.
How many tiles would there be in the 4th ‘plus’ shape?
How about the 10th ‘plus’ shape?
Which ‘plus’ in the sequence would you be able to make with 25 tiles?
Exploring and understanding patterns is an important and interesting part of maths. Perhaps you and your child could create another letter, number or shape and explore what number patterns could occur when it is added to. We hope you enjoy doing this. Thank you for your help.
Figure it Out Links
Some links from the Figure It Out series which you may find useful are:
Voting vitality
In this unit, which explores the context of voting, students will become familiar with and apply the five key steps of carrying out a statistical investigation.
In this unit which explores the context of voting, students will become familiar with and apply the five keys steps of carrying out a statistical investigation:
These five are closely linked, as what data is collected can dictate the way that it is displayed and the conclusions that can be reached from the investigation. On the other hand, if some restrictions have been placed on the means of display, only certain types of data collection may be relevant.
At Level 2, you can expect students to be posing (with teacher support) a greater range of questions, including investigative questions and survey questions. They will also be helped to understand some of the issues involved in conducting surveys and learn new methods for collecting data. While at Level 1 students collected data and chose their own ways to display their findings, at Level 2 they will be introduced to pictographs, tally charts and bar charts. More emphasis here will also be placed on describing the data and the making of sensible statements from both the student’s own displays and the displays of others.
Investigative questions
At Level 2 students should be generating broad ideas to investigate and the teacher works with the students to refine their ideas into an investigative question that can be answered with data. Investigative summary questions are about the class or other whole group. The variables are categorical or whole numbers. Investigative questions are the questions we ask of the data.
The investigative question development is led by the teacher, and through questioning of the students identifies the variable of interest and the group the investigative question is about. The teacher still forms the investigative question but with student input.
Associated Achievement Objective
Social sciences AO2: understand that people make choices to meet their needs and wants.
The learning opportunities in this unit can be differentiated by providing or removing support to students and by varying the task requirements. Ways to support students include:
The context for this unit can be adapted to suit the interests and experiences of your students. For example:
Te reo Māori vocabulary terms such as, raraunga (data), kauwhata tāhei (strip graph) and kauwhata pou (bar graph) could be introduced in this unit and used throughout other mathematical learning.
The teaching sequence is designed for teachers to guide students through the five key stages of a statistical investigation. The context used is voting for a native tree which is to be planted in the school. You may choose to conclude the unit by buying and planting the chosen tree, or you may prefer to simply vote on students’ favourite tree. At the end of this unit other possible statistical investigations are provided as examples of what students might further investigate in pairs or small groups. This would allow for the unit to be extended beyond a week.
Session 1
This session is about framing the context for an investigation, and deciding on an investigative question, a sample, and a method of investigation.
Session 2
This session is about going through the voting process and collecting the data in a systematic way.
Session 3
In this session students will see how a strip graph (kauwhata tāhei) can be transformed into a bar graph (e.g. How are we going to display our results? In tables? What is the best graph to use?).
What would be an appropriate title for our graph?
What labels could you use for this graph and where would you write them?
Is this a helpful way of presenting this information?
It is easier to make statements from a bar graph or from a strip graph?
Which completed graph shows our results most clearly?
The questions could be asked in a whole class situation or students could complete a bus stop activity with the questions being posed on the top of a large piece of paper and students visiting each station to record their ideas. Small groups would also be a valuable way for ideas and responses to the questions to be discussed and explored.
Ask the students what they notice about the information shown on the bar graph. Use the prompt “I notice…” to start the discussion. These “noticings” could be recorded as speech bubbles around the bar graph.
Session 4
In this session students discuss the types of things that are worth investigating and carry out their own investigation.
What game should we play at the end of the week?
What should we spend the fundraising money on?
What should we plant in the school/community garden?
Dear parents and whānau,
In mathematics, we have been voting for a tree to plant. We have been using this information to make strip graphs and bar graphs. We have also developed our own statistical investigations.
Please talk with your child about what they have been doing in maths and take any opportunities that arise to discuss with them any simple statistical information that may be presented in the newspaper or on television.
Thank you.
Fraction bits and parts
This unit explores the beginnings of proportional thinking by introducing fractions and associated language. The purpose for this unit is to make, name, and recognise wholes, halves, third parts, fourth parts and fifth parts of a variety of objects.
This unit is based on the work of Richard Skemp. His ideas for teaching fractions can be used successfully with year 2 students, and also with students up to year 8 who are having difficulty understanding fractions. Skemp’s use of the word ‘parts’ is deliberate in that he uses it to refer to ‘equal parts’ whereas 'bits' refers to non-equal parts.
The use of two different physical representations, the whole and parts of a whole, are used to develop the concept of a fraction. Language also plays an important role. Being able to count in fractions helps students understand that you can have 5 thirds or 6 halves.
Using denominators that are the same, students need to know:
This unit can be differentiated by varying the scaffolding provided and altering the difficulty of the tasks to make the learning opportunities accessible to a range of learners. For example:
The context of equal shares can be adapted to recognise diversity and student interests to encourage engagement. Support students to identify and explore other situations in their lives where equal sharing occurs. For example, sharing kai at home or sharing cards to play a game (the pack of cards represents one whole). Rēwena bread modelled out of playdough could be used as another context for eels.
Prior Experiences
Although the unit is planned around 5 sessions it can be extended over a longer period of time.
Session 1
The purpose of this session is to develop students' understanding of equal parts (the denominator).
Resources:
Hoepo and his brothers and sisters are at their Poua’s tangi and although they are sad they are looking forward to the hakari because shortfin eel is always on the menu.
Hoepo is planning to go early to the marquee because he wants one eel all to himself. He is given one whole eel. Hoepo doesn’t know it but he is going to be one sick boy!
The twins appear and they are told they have to share one eel evenly between the two of them. There are now two half parts.
The triplets come next and Aunty Wai says we will have to cut another eel into three equal parts. There are now three third parts.
Hoepo’s sister has come with her three friends. Aunty Wai says that they will have to cut the eel into four equal parts. There are now four fourth parts. Aunty Wai says they are also known as quarters.
Hoepo’s five baby cousins are only allowed to eat small portions so Aunty Wai cuts the last eel into five equal parts. There are now five fifth parts.
I want you to look at one of the third parts and one of the fifth parts. Which is bigger?
Have the students take one of each of the equal parts and put them on another blank board.
Order the equal parts from smallest to biggest.
Let’s say the names.
Students should order from 1/5 – 1
Put them back on the original board.
How many halves are equal to the whole?
How many fourths are equal to the whole?
How many thirds are equal to a whole?
How many wholes are equal to a whole?
Depending on the age of the students symbolic notation can be introduced, using the terms like 1/2 and one half part interchangeably.
Session 2
The purpose of this session is to develop the idea that parts of the same kind may not look alike. In Activity 1 this arose from the use of different objects. Here we see that this can be so, even with the same object.
Resources:
Revise knowledge about equal parts.
What can we remember from yesterday? Write students’ comments in your modeling book.
The three straightforward ways are:
Session 3
The purpose of this session is to consolidate the concepts formed in Sessions 1 and 2, moving onto a pictorial representation.
Resources:
Mix and Match: Rules of the Game
This game is best played by groups of 2-4 people (a tuakana/teina model could be used here).
Session 4
The purpose of this session is to develop students' understanding of a number of like parts (the numerator).
This is the next step towards the concept of a fraction. It is much more straightforward than that of session 1 -3 which involved (i) separating a single object into part objects (ii) of a given number (iii) all of the same amount. Here we only have to put together a given number of these parts and to recognise and name the combination.
Resources:
Warm up
1/2, 2/2, 3/2, 4/2, 5/2, 6/2 (be prepared for students to carry on counting and not realise that 6/2 is equal to 3).
How many halves did we count (six halves = three wholes, write on the board)
How many halves do you think would equal 6? Write on the board
How many halves do you think would equal 9? Write on the board
A Number of Like Parts
This is an activity for up to six students working in two teams (mahi tahi). Its purpose is to introduce the concept described above.
Set the scene for your students:
Yesterday we went to the zoo and saw the zoo keepers feeding some of the animals. We are going to pretend that some of us are the animal keepers feeding the animals and some of us are the zoo kitchen staff, preparing and cutting up all the food.
The animal keepers, one at a time, come to the kitchen and ask for food for each kind of animal in turn. The kitchen staff cut the hay as required (using the shaped playdough, plastic knives and cutting boards), e.g.
Note that the eels, slabs, and hay should be of a standard size.
Note also that the eels, after their head and tails are removed, resemble the eels in a cylinder shape and the slabs of meat and hay are oblongs.
Session 5
So far we have covered denominator and numerator without mentioning their names. Students need to understand that the denominator names the equal parts and numerator names the number of like parts.
Resources:
Revise some of the ideas from sessions 1-4, selecting from these activities:
I want you to give me one fourth + one fourth (write on the board). Can anyone give me cards that mean the same but are written in a different way? (1/4 + 1/4)
I want you to find one fifth and one fifth and one fifth. How many fifths are there? Can anyone give me cards that mean the same but are written in a different way? (1/5 + 1/5 + 1/5)
What happens if we had to feed 5 giraffes and they were allowed 1/3 of a bale of hay each?
What happens if we had to feed 5 rhinos and they are allowed 1/2 a bale of hay each?
What happens if we had to feed 6 zebras and they are allowed 1/4 of a bale of hay each?
To conclude the session, ask the students to work in pairs and complete a think board (Copymaster 7 provides a blank think board and Copymaster 8 shows a completed example.) Suitable fractions for think boards include 2 halves, 3 fourth parts, 2 fifth parts, 4 third parts, 2 quarters. Show and discuss the example of a completed think board for 3/5.
Dear family and whānau,
This week we have been learning about dividing things into equal parts so people get fair shares. Please draw your child's attention to any fractions you use over the week in cooking or when sharing kai or meals. For example if you are having pizza, show them how it is sliced into 4 or 6 or 8 equal sliced parts. Ask them to help share out food when dishing up dinner or making lunches. They can draw pictures or take photos of the things you talk about and bring these to class to share.
In the garden
This unit uses the context of a garden to explore the line and rotational symmetry of shapes.
This unit addresses two areas of geometry: transformation (rotation, reflection, and translation) and the reflective and rotational symmetry of shapes. The key ideas introduced are:
When possible, use mathematical vocabulary to explain the type of symmetry that is being shown or created.
This unit can be differentiated by varying the scaffolding provided or altering the difficulty of the tasks to make the learning opportunities accessible to a range of learners. For example:
The activities in this unit can be adapted to make them more engaging by adding contexts that are familiar or unique to Aotearoa, for example:
Ignite children’s prior knowledge by discussing home or local community gardens that they are familiar with. It may also be helpful to introduce this unit by reading a book about garden settings or viewing images of garden settings online. The overall aim of the unit is to create a classroom display of a garden using the activities as starting points. Be as creative as you can!
Session 1: Up the garden path
In this session students will explore shapes that tessellate or repeat to cover the plane without gaps or overlaps. Although the students will only be covering a strip (path) any covering of a path can be used to tessellate the plane simply by putting paths together.
Session 2: Bugs, Beetles and Butterflies
In this session students will be investigating line symmetry by making butterflies out of coloured paper.
Session 3: Butterfly Painting
In this session students will make symmetrical butterflies with paint. Refer to the pictures of native butterflies from the previous session as inspiration.
Session 4: The Flower Garden
In this session students will be introduced to making symmetrical patterns with shape blocks. The theme for this lesson is flowers for the garden, so showing the students images of flowers and reading or viewing a story about flowers would be beneficial. Sunflowers would be a great example of a flower to use in this session.
Session 5: The Garden Wall
In this session introduce students to the idea of translation. Students will be making tiles for the garden wall. Introduce the activity by showing them examples of some wall tiles from the local area.
Session 6: Wind Catcher in the Garden
In this session students will make a wind catcher, which illustrates rotation, as an ornament for the garden .
Cut along lines in first image
Note: The wind catcher has rotational symmetry but not reflective symmetry. This is because it can be rotated around onto itself but it doesn't have a line of symmetry in the plane.
Other Ideas
This week in maths we have been doing a unit on symmetry using things that we might find in a garden. We identified objects that had reflective symmetry by finding the line or lines of symmetry in the object.
At home this week I would like your child to find three things outside that have a line or lines of symmetry and to draw a picture, take a photo or bring them along to school to share.
Figure it Out Links
Some links from the Figure It Out series which you may find useful are: