Session 1
SLO: Explore the numerals to ten.
Activity 1
- Make paper, crayons/felts, pencils, counters (or similar mathematics equipment) available to the students. Set a time limit as appropriate. Have the students write, draw and show you everything they know about ten.
- Have the students pair share their work.
- Write the word ‘ten’ and the numeral 10 on chart paper or in a modeling book. Collect and record the important ideas that the students have generated. Be sure to use words, symbols and drawings of equations, stories or materials.
- Highlight the fact that in our systems we have ten digits which we ‘reuse’ (for example, the number 10 is made up of the numbers one and zero). On the board show the students 1, 10 and 100 as an example.
- Ask if the students know why ten is an important number. Accept the student ideas and say they will be learning more about why ten is so important.
Activity 2
- Explain that the class will look briefly at other number systems. Locate Italy on a map, show where Rome is and explain that many hundreds of years ago these people, the Romans, wrote numerals to ten this way.
- Have the students talk in pairs about what they see. Record all their ideas.
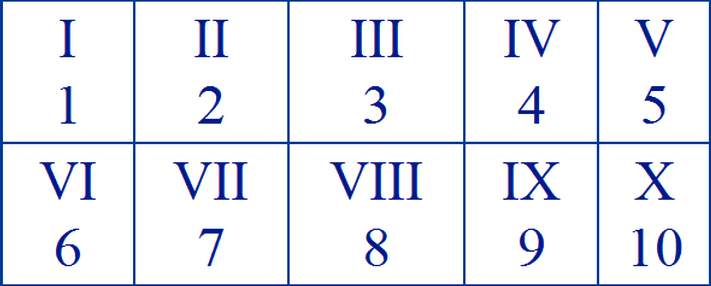
- Talk about the similarities and differences in the way we record ten now, 10 compared with X (ten has its own unique symbol).
- Locate Mexico and Central America on a map. Explain that the Mayan people who lived there hundreds of years ago used these symbols. Have the students talk in pairs about what they see. Record all their ideas.

- Talk about the similarities and differences in the way we record ten now, compared with the Mayan symbol. Discuss why ten is recorded in this way.
- Have students in pairs invent and record their own numerals to ten. Have them write some simple equations using their symbols, then share their numeral system with another group.
- Conclude by reviewing different ways of writing ten. Highlight the fact that in our system we have just ten numerals which we ‘reuse’.
Sessions 2-3
SLOs:
- Instantly recognise and describe patterns within and for ten.
- Make and record groupings within and for ten.
- Review families of facts within ten (introduced in the Using five unit).
Introduce the following activities over the next two sessions.
Activity 1
- Show a frame with ten dots.

Have the students show ten on their fingers, then have them describe to a partner how many dots they see and how many fingers they see, using ‘ten and no more.’ Record 10 + 0 = 10
- Show other tens frames out of order. Direct students to take turns with a partner. Each turn, they should say how many dots they see and describe what they see on the tens frame. For example, “Eight. That’s five dots, and three dots and two empty spaces. That's eight dots and two spaces.” Model this for the class before allowing them to work in pairs. Consider organising the pairs to group together students with mixed mathematical abilities. There may be some students who would prefer to work with the teacher in a small group whilst the rest of the class works in pairs.

- Record several examples as a class using words and symbols. Seven dots and three spaces, four dots and six spaces, one dot and nine spaces.
Record equations with unknowns representing some of the tens frames; For example, for dots: 7 + ☐ = 10, 10 = 4 + ☐, 10 = 1 + ☐
Make it clear that the spaces ask us ‘how many more to make ten?’
- Model using two different coloured counters to fill the spaces, showing and saying ‘seven dots plus three dots is the same as ten dots’.

Record equations, 7 + 3 = 10 and 3 + 7 = 10.
Ask what subtraction equations can be recorded using these numbers. Accept student responses, write and model by removing counters, 10 – 3 = 7 and 10 – 7 = 3
Highlight that the four equations are related because they use the same 3 numbers. They are known as a family of facts.
Model with other tens frames: for example 10 = 4 + 6, 6 + 4 = 10, 10 – 4 = 6 and 10 – 6 = 4.
- Hold up the tens frames in random order. Direct students to call out how many dots they see then record with a “magic finger” on the mat or with writing materials how many more to make ten. For example, show:
Students say, “Eight,” and write 2. Students with emergent writing skills could be paired with a student with more developed writing skills, or could use counters to demonstrate their understanding of how many more are needed to make ten.
Activity 2
Students play Clever Fingers in pairs. (Purpose: to practice seeing, saying and writing combinations to ten)
They need ten counters, pencil and paper to record winning equations. For each “hand” played they move a counter into a ‘used’ pile.
Students, with their hands behind their backs, make a number on their fingers.


They take turns to call ‘Go.’ On ‘Go’ they show their fingers. If the combination of raised fingers makes ten, they say, “Clever fingers” and one student records the equation. 3 + 7 = 10 When all the counters are used (they have had ten turns). They count their equations. Student pairs compare results.
Activity 3
Students play Snap for Ten in pairs.
(Purpose: to practice seeing, saying combinations to ten)
They need playing cards with Kings and Jacks removed, and use the Queen as a zero.
Turn over a card to begin the game.
Students take turns to turn over a card from the pack, placing the turned card on top of the card before. If the turned card can combine in some way with the previous card to make ten the student says, ‘Snap’, states the equation and collects the pile of cards.
For example: if 9 is turned, followed by a 1, 9 + 1 = 10 is stated and the pile of cards is collected.
Activity 4
Students play Memory Tens in pairs..
(Purpose: to practice seeing and saying combinations to ten)
They need playing cards with Kings and Jacks removed, and use the Queen as a zero.
Cards are turned down and spread out in front of the students.
Students take turns to draw pairs. If the numbers on the two cards combined make ten, the pair is kept by the player.
For example: A player draws 6 and 4 and states 6 + 4 = 10 and keeps the pair.
The game continues till all cards are used up.
The winner is the person with the most pairs.
Activity 5
Students play Fast Families
(Purpose: to practice writing and demonstrating family of fact combinations to ten)
They need pencil and paper.
Students place ten counters of one colour on a blank tens frame.
They take turns to roll a ten-sided dice. The dice roller removes the number of counters indicated by the dice roll and says, “Go.”
The players quickly write the four family of fact members associated with 10, 6 and 4: beginning with the equation just modeled.
10 – 6 = 4, 6 + 4 = 10, 10 – 4 = 6, 4 + 6 = 10.
The first to write these calls stop.
That player chooses another player to demonstrate and say the other three family members in logical order by adding 6 onto the 4, saying 4 + 6 = 10, then removing 4 counters saying 10 – 4 = 6 and finally adding 4 back onto the 6 and saying 6 + 4 = 10.
If this player is correct, he rolls the dice and the game begins again.
The winner is the student who accurately records the most families of facts.
Session 4
SLO: Recall and apply groupings to ten using te reo Māori.
- Students count in te reo Māori up to and back from ten: “Tahi, rua, toru, whā, rima, ono, whitu, waru, iwa, tekau. Tekau, iwa, waru, whitu, ono, rima, whā, toru, rua, tahi.”
If students are unfamiliar with nga tau, have a number chart displayed.
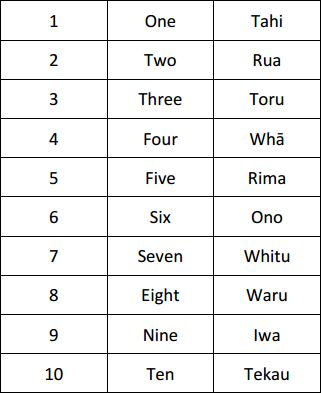
Each student has a set of number words to ten in te reo Māori (Copymaster 1).
A ten-sided dice is passed around the class circle. Each student takes a turn to roll the dice and call the number in English and in Māori and classmates must hold up the Māori word.
- Students play in pairs Nga Tau Pairs
(Purpose: to recognise and come to know number words in te reo Māori)
A mixed piles of tens frames are provided with a mixed pile of Māori number word cards to ten.
Both are turned down. The students take turns turning over a tens frame and a word card. If they match they keep the pair.
The winner is the player who has the most pairs when all the cards are used.
- Students play in pairs Total Tekau (like Snap for Ten)
(Purpose: to recognise and come to know number combinations to ten using Māori number words)
Each student shuffles a double set of Māori number word cards to ten and places the pile face down in front of them.
They take turns to turn over one word card at a time and place these in one pile, one on top of another. If two consecutive numbers together make ten, the player who played the second card calls, ‘Tekau’ and collects the whole pile and begins the game again.
The winner is the player with all the cards or with the biggest pile when the game is stopped.
Session 5
SLO: Recognise the usefulness of knowing combinations to ten.
- Review and practice known facts.
Have a set of tens frames displayed to support some students.
Provide each student with a number fan.
As the teacher shows a digit, each student finds and shows the complementary digit to ten.
For example: the teacher shows 3 and each student shows 7.
- The teacher records subtraction problems and has the students find and show the result.
For example, the teacher writes 10 – 2 = ☐ and the students show 8, the teacher writes ☐ - 5 = 5 and the students show 10.
- Register students on e-ako Maths. Support them to become familiar with the addition and subtraction facts learning tool. This tool supports the student to learn unknown facts to ten by building on already known facts. Tens frames images are used. Students will need to be confident using a Chromebook/iPad/laptop to participate in this task.
- Introduce the term “basic facts”.
Ask the students, “What is a fact?” and record their responses. (A fact is something that has really occurred or is actually the case. It is something that can be tested and can be found to be true).
Ask the students, “What does ‘basic’ mean?” and record their responses. (Something that is basic is essential, fundamental. A ‘base’ is the bottom support of anything or the thing upon which other things rest. It is a foundation.)
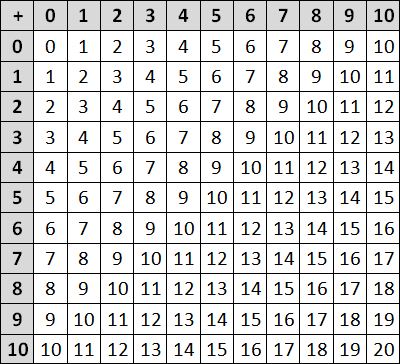
- Identify which are our basic addition and subtraction facts by showing this grid to the students and by exploring how it works. Draw focus to the basic facts that your students are familiar with. Students with more advanced knowledge may be able to share some of the basic facts they know, that make use of higher numbers, with the rest of the class.
- Highlight the importance of knowing combinations to ten and conclude with a game of Memory Tens, as played in session 2.
Session 6
SLOs:
- Recognise the usefulness of knowing combinations to ten.
- Use an ‘if I know, so I know’ approach to solving simple number problems.
- Review content of sessions 1 – 4. Focus on inverse operations of addition and subtraction as shown in the family of facts.
Demonstrate this by developing with the students and “If I know this, then I know that ” flow diagram. For example:
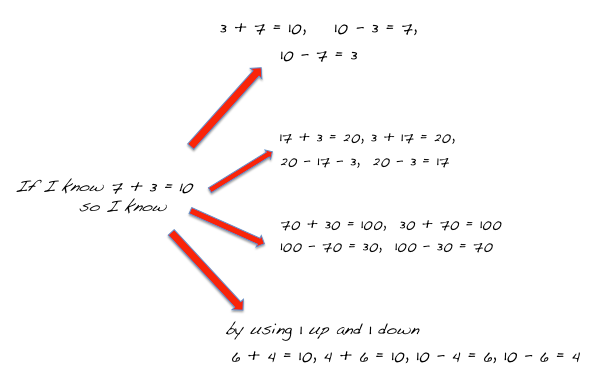
The students are being introduced to this idea. They are not expected to immediately apply the principle to the bigger numbers.
Highlight the important idea that maths is about relationships between numbers, like fact families, and if we look for these and for number patterns, they help us.
- Begin to complete the addition grid together. Write a sentence together describing something the students notice.
Have students complete their own copies of the grid (Copymaster 2) and write (up to) five things they notice.
Have them share with a partner what they have discovered.
- As a class, discuss and record the students’ ‘discoveries’. Make a list together of how knowing about these patterns helps us.
- On their own paper, have the students each write their own favourite equation within or to ten. Have them create their own “if I know this, then I know that" brainstorm chart as modelled in 5a.

All about us
This unit provides you with a range of opportunities to assess the entry level of achievement of your students.
The learning opportunities in this unit can be differentiated by providing or removing support to students and by varying the task requirements. Ways to support students include:
The context for this unit can be adapted to suit the interests and experiences of your students. For example:
Prior Experience
It is expected that students will present a range of prior experience of working with numbers, geometric shapes, measurement, and data. Students are expected to be able to count a small set of objects by ones, at least.
Session One
In this first session students explore an activity called ‘Handfuls' which was first developed by Ann Gervasoni from Monash University, Melbourne. Handfuls could become a regular part of lessons during the year.
How can we check how many things there are?
Session Two
In this session, called “Our Favourites” students explore category data and how it might be displayed. The data comes from their responses, so the displays provide useful information about the class. You may wish to replace the images provided in Copymaster 1 with images of sports that you know are popular with your students.
If we want to find out the favourite sport, what could we do?
Could we arrange the squares, so it is easier to see which sport has the most and the least squares?
The students will now choose other ‘favourites’ to use as data. Copymaster 2 provides some strips of favourites including favourite fruit, fast food, pet, vegetable, way to travel to school, and after school pastime. You may wish to create your own strips using ‘favourites’ that are relevant to your group of students.
Session Three
In this session your students use the language of two-dimensional shapes to provide instructions to other students. The use of te reo Māori vocabulary for shapes could also be introduced and used within this session.
You need multiple sets of shapes. Ideally there is a set of shapes for each pair or trio of students. Attribute blocks are used below to illustrate the activity but other shape-based materials such as those below are equally effective.
“Make Me” is an activity that can be used throughout the year with different materials to develop your students’ fluency in using geometric language for shape and movement.
Where could I put the mirror, but it still looks like the whole shape?
Use two shapes positioned together to draw out the language of position. For example:
right side of the square.
Look to see whether your students:
Session Four
In this session students compare items by mass (weight).
How could we find out which thing is heavier?
Students usually suggest that the objects can be compared by hefting, that is holding one object in each hand.
What can we say about the weight of these two objects?
Look for statements like, “The book is heavier than the stapler,” or “The stapler is lighter than the book.”
Let’s put these objects in order of weight. Who thinks they could do that?
I want you to find five things from around the classroom and put them in order of weight. You can use hefting if you want but we have other balances you can use. You will need to record for us, so we know the order of the objects.
Look to see if your students can:
Session Five
In this session students look for repeating patterns and connect elements in the pattern with ordinal numbers.
Dear parents and caregivers,
For the first week of school our mathematics unit is about us. We will investigate efficient ways to count a set of objects, create graphs of data about ourselves, order objects by mass (weight), build models of shapes from instructions, and create our own sequential patterns.
Making ten
The purpose of this unit of sequenced lessons is to develop knowledge and understanding of combinations to ten.
These lessons build upon the student’s recognition and knowledge of groupings within ten, to scaffold ready combinations and separations in numbers that make ten.
A goal within primary mathematics is for students to use partitioning strategies when operating on numbers. By building images and knowledge of these combinations at an early age, the ability to naturally partition larger numbers will be strengthened. Students should have many opportunities to combine and separate numbers to ten and come to clearly see and understand how these ‘basic facts’ are fundamental building blocks of our number system.
As they work with numbers greater than ten, students will develop knowledge of ‘tidy numbers’ and about ‘rounding to ten’. Students should be encouraged to know and have an intuitive feeling for "ten". Ultimately, they should be able to readily apply this knowledge in solving problems that involve partitioning and combining larger numbers and sets.
Our place value system has ten digits only. It is the place of a digit in a number that determines its value. Ten is the basis of this system. By having the opportunity to briefly explore other number systems (Roman and Mayan), and by considering notation to create their own system, students will better understand the numerals and number representations that we may take for granted within the base ten system we use.
The activities suggested in this series of lessons can form the basis of independent practice tasks.
The learning opportunities in this unit can be differentiated by providing or removing support to students and by varying the task requirements. Ways to support students include:
The contexts for this unit can be adapted to suit the experiences of your students. For example, numbers to ten in other languages can be used in this unit in response to the languages and cultures of your students. For example: numbers from Pasifika cultures could be included in a similar way to how te reo Māori is used in session 4.
Te reo Māori vocabulary terms such as mati (digit) and meka matua (basic facts) could be introduced in this unit and used throughout other mathematical learning.
Session 1
SLO: Explore the numerals to ten.
Activity 1
Activity 2
Sessions 2-3
SLOs:
Introduce the following activities over the next two sessions.
Activity 1
Have the students show ten on their fingers, then have them describe to a partner how many dots they see and how many fingers they see, using ‘ten and no more.’ Record 10 + 0 = 10
Record equations with unknowns representing some of the tens frames; For example, for dots: 7 + ☐ = 10, 10 = 4 + ☐, 10 = 1 + ☐
Make it clear that the spaces ask us ‘how many more to make ten?’
Record equations, 7 + 3 = 10 and 3 + 7 = 10.
Ask what subtraction equations can be recorded using these numbers. Accept student responses, write and model by removing counters, 10 – 3 = 7 and 10 – 7 = 3
Highlight that the four equations are related because they use the same 3 numbers. They are known as a family of facts.
Model with other tens frames: for example 10 = 4 + 6, 6 + 4 = 10, 10 – 4 = 6 and 10 – 6 = 4.
Students say, “Eight,” and write 2. Students with emergent writing skills could be paired with a student with more developed writing skills, or could use counters to demonstrate their understanding of how many more are needed to make ten.
Activity 2
Students play Clever Fingers in pairs. (Purpose: to practice seeing, saying and writing combinations to ten)
They need ten counters, pencil and paper to record winning equations. For each “hand” played they move a counter into a ‘used’ pile.
Students, with their hands behind their backs, make a number on their fingers.
They take turns to call ‘Go.’ On ‘Go’ they show their fingers. If the combination of raised fingers makes ten, they say, “Clever fingers” and one student records the equation. 3 + 7 = 10 When all the counters are used (they have had ten turns). They count their equations. Student pairs compare results.
Activity 3
Students play Snap for Ten in pairs.
(Purpose: to practice seeing, saying combinations to ten)
They need playing cards with Kings and Jacks removed, and use the Queen as a zero.
Turn over a card to begin the game.
Students take turns to turn over a card from the pack, placing the turned card on top of the card before. If the turned card can combine in some way with the previous card to make ten the student says, ‘Snap’, states the equation and collects the pile of cards.
For example: if 9 is turned, followed by a 1, 9 + 1 = 10 is stated and the pile of cards is collected.
Activity 4
Students play Memory Tens in pairs..
(Purpose: to practice seeing and saying combinations to ten)
They need playing cards with Kings and Jacks removed, and use the Queen as a zero.
Cards are turned down and spread out in front of the students.
Students take turns to draw pairs. If the numbers on the two cards combined make ten, the pair is kept by the player.
For example: A player draws 6 and 4 and states 6 + 4 = 10 and keeps the pair.
The game continues till all cards are used up.
The winner is the person with the most pairs.
Activity 5
Students play Fast Families
(Purpose: to practice writing and demonstrating family of fact combinations to ten)
They need pencil and paper.
Students place ten counters of one colour on a blank tens frame.
They take turns to roll a ten-sided dice. The dice roller removes the number of counters indicated by the dice roll and says, “Go.”
The players quickly write the four family of fact members associated with 10, 6 and 4: beginning with the equation just modeled.
10 – 6 = 4, 6 + 4 = 10, 10 – 4 = 6, 4 + 6 = 10.
The first to write these calls stop.
That player chooses another player to demonstrate and say the other three family members in logical order by adding 6 onto the 4, saying 4 + 6 = 10, then removing 4 counters saying 10 – 4 = 6 and finally adding 4 back onto the 6 and saying 6 + 4 = 10.
If this player is correct, he rolls the dice and the game begins again.
The winner is the student who accurately records the most families of facts.
Session 4
SLO: Recall and apply groupings to ten using te reo Māori.
If students are unfamiliar with nga tau, have a number chart displayed.
Each student has a set of number words to ten in te reo Māori (Copymaster 1).
A ten-sided dice is passed around the class circle. Each student takes a turn to roll the dice and call the number in English and in Māori and classmates must hold up the Māori word.
(Purpose: to recognise and come to know number words in te reo Māori)
A mixed piles of tens frames are provided with a mixed pile of Māori number word cards to ten.
Both are turned down. The students take turns turning over a tens frame and a word card. If they match they keep the pair.
The winner is the player who has the most pairs when all the cards are used.
(Purpose: to recognise and come to know number combinations to ten using Māori number words)
Each student shuffles a double set of Māori number word cards to ten and places the pile face down in front of them.
They take turns to turn over one word card at a time and place these in one pile, one on top of another. If two consecutive numbers together make ten, the player who played the second card calls, ‘Tekau’ and collects the whole pile and begins the game again.
The winner is the player with all the cards or with the biggest pile when the game is stopped.
Session 5
SLO: Recognise the usefulness of knowing combinations to ten.
Have a set of tens frames displayed to support some students.
Provide each student with a number fan.
As the teacher shows a digit, each student finds and shows the complementary digit to ten.
For example: the teacher shows 3 and each student shows 7.
For example, the teacher writes 10 – 2 = ☐ and the students show 8, the teacher writes ☐ - 5 = 5 and the students show 10.
Ask the students, “What is a fact?” and record their responses. (A fact is something that has really occurred or is actually the case. It is something that can be tested and can be found to be true).
Ask the students, “What does ‘basic’ mean?” and record their responses. (Something that is basic is essential, fundamental. A ‘base’ is the bottom support of anything or the thing upon which other things rest. It is a foundation.)
Session 6
SLOs:
Demonstrate this by developing with the students and “If I know this, then I know that ” flow diagram. For example:
The students are being introduced to this idea. They are not expected to immediately apply the principle to the bigger numbers.
Highlight the important idea that maths is about relationships between numbers, like fact families, and if we look for these and for number patterns, they help us.
Have students complete their own copies of the grid (Copymaster 2) and write (up to) five things they notice.
Have them share with a partner what they have discovered.
Dear parents and whānau,
In class we have been making, saying and practising addition and subtraction facts with numbers up to ten.
Your child can access practice tasks on the e-ako maths website: https://e-ako.nzmaths.co.nz/ if this suits your family arrangements.
Your child would also enjoy sharing with you activities they have learned in class and would appreciate your making time to play a maths games with them. Here are two we have played in class. You might like to make up one of your own too.
Memory Tens.
In pairs, using playing cards with Kings and Jacks removed, and using the Queen as a zero:
Cards are turned down and spread out in front of the players.
Players take turns to draw pairs. If the numbers on the two cards combined make ten, the pair is kept by the player.
For example: A player draws 6 and 4 and states 6 + 4 = 10 and keeps the pair.
The game continues till all cards are used up.
The winner is the person with the most pairs.
Snap for Ten.
In pairs, using playing cards with Kings and Jacks removed, and using the Queen as a zero:
Turn over a card to begin the game.
Players take turns to turn over a card from the pack, placing the turned card on top of the card before. If the turned card can combine in some way with the previous card to make ten the student says, ‘Snap’, states the equation and collects the pile of cards.
For example: if 9 is turned, followed by a 1, 9 + 1 = 10 is stated and the pile of cards is collected.
The winner is the person with the most cards.
Teddy Bears and Friends
In this unit we compare the lengths of ākonga soft toys directly, and then indirectly using non-standard measurement units.
In this unit ākonga begin by making direct comparisons between objects and putting a number of objects into order according to length. They are also introduced to measuring with multi-link cubes which allows them to compare objects which cannot be placed together.
Multi-link cubes are an example of a non-standard measuring unit. They reinforce most of the principles that underpin measurement and allow ākonga to find out that:
Ākonga will also be encouraged to estimate. Initially these estimations may be little more than guesses, but estimating involves ākonga in developing a sense of the size of the unit. The skill of estimating is just as important as finding exact measurements, as both skills are used frequently in everyday life, for example, estimating shoe size before trying on a shoe, knowing exact height to go on a waterslide.
The learning opportunities in this unit can be differentiated by providing or removing support to ākonga and by varying the task requirements. Ways to support ākonga include:
As the focus of this unit is making measurements of themselves it is already in a context that is meaningful. In some situations, it may be more appropriate to use a collection of classroom objects rather than ask students to bring toys to school.
The context for this unit can be adapted to suit the interests and experiences of your ākonga. For example:
Te reo Māori vocabulary terms such as ine (measure), roa (long), poto (short), nui (big) and iti (small) could be introduced in this unit and used throughout other mathematical learning.
In preparation for this unit, ask ākonga to bring a soft toy to kura. Have a supply of soft toys available to use in the classroom (e.g. for ākonga that forget).
Getting Started
Who has a toy that is taller than this?
Who has a toy that is shorter than this?
Who has a toy that is the same height as this?
Exploring
For the next 3 days we make comparisons using ākonga. In pairs, ākonga take turns drawing outlines of their bodies. A tuakana/teina model could work well here. They use these outlines to make measurements using multi-link cubes or cuisenaire rods (the 10 ones work best). Kaiako or ākonga can record their estimates and actual measurements as appropriate.
At the end of each day, share mahi and make comparisons. Remember to make comparisons amongst the same type (toys or ākonga, in this case).
Whose arm measured more than 25 cubes?
How many more?
Which parts of your body were measured shorter than your arm?
Which is your smallest measurement?
Which is your largest measurement?
What have you measured with rods? Why did you choose rods?
Have you ever been to a place where you were measured? Tell us about it.
Reflecting
Today we line up the outlines of our soft toys ready to go to kura assembly with (the shortest in the front.)
Dear family and whānau,
This week at kura we have compared the lengths of different objects including the toys you brought to kura. We would like your child to have a go at ordering their other toys at home, in order of shortest to tallest. Cutlery, food items or clothing could be used instead of toys. Take a photo or draw a picture of your line up and send it to kura for your tamariki to share.
How long now?
In this unit students compare the duration of events and learn to read time to the hour and half-hour.
Duration
Comparing the duration of two events is an important part of developing an understanding of time passing. This can be done by directly comparing two activities that have common starting points, for example, singing a waiata or running around the building.
After ākonga have directly compared the duration of two events we use sand-timers, counting, and other non-standard measures to compare two or more events.
Telling time
In this unit we learn the skills to tell time to the hour and and half-hour. Telling time must enable them to:
The learning opportunities in this unit can be differentiated by providing or removing support to ākonga and by varying the task requirements. Ways to differentiate include:
The contexts for the duration activities are based on activities that are undertaken by ākonga in your classroom so should be engaging to them. Asking ākonga to choose which activities they would like to compare provides further opportunities for their engagement. For example, they could sing a waiata, complete a hand game or do a short obstacle course.
Te reo Māori vocabulary terms such as karaka (clock), karaka mati (digital clock), karaka ringa (analogue clock), haora (hour), and meneti (minute) could be introduced in this unit and used throughout other mathematical learning.
Session 1: Who finishes first?
In this activity we directly compare two activities to see which takes the longest.
Session 2: Clapping time
In this activity we indirectly compare "quick" events by clapping, stamping and linking cubes.
Writing my name 9 claps
Walking to the board 11 claps
Session 3 : A big clock
In this activity ākonga form a large clock which is then used to show hour times. As you need a large space for the "people clock" this may be best done outside.
Session 4: Making Clocks
In this activity ākonga create their own clocks using paper plates and then use the clock to show times during the school day.
Session 5: The best times of the day.
In this activity we look at different kinds of clocks and talk about telling the time. We draw a picture of our favourite time of the day.
Dear parents and whānau,
This week we have been exploring time and learning to tell time to the hour and half-hour. We have also been looking at different sorts of clocks.
Please support your child to draw pictures or take photos of clocks in your home and community (for example, watches, appliance clocks, novelty clocks, clock radios). We will be using these pictures in an activity later in the week so please email them or send them to school.
Another way you can support your child's learning is by talking about the time when certain things happen, especially if it is on the hour or half hour. For example: "Look! It's 8 o'clock, time for bed" or "It's 5:30, time for tea".
Amazing Mazes
This unit introduces some of the key concepts of position and direction in the context of a series of activities around mazes.
At Level 1 the Position element of Geometry consists of gaining experience in using everyday language to describe position and direction of movement, and interpreting others’ descriptions of position and movement. In this unit students will gain experience using the language of direction, including up, down, left, right, forwards, backwards in the context of mazes. For more activities that involve students giving and following instructions using the language of position and direction you might like to try Directing Me.
Spatial understandings are developed around four types of mathematical questions: direction (which way?), distance (how far?), location (where?), and representation (what objects?). In answering these questions, students need to develop a variety of skills that relate to direction, distance, and position in space.
Teachers should extend young students' knowledge of relative position in space through conversations, demonstrations, and stories. For example, when students act out the story of the three billy goats and illustrate over and under, near and far, and between, they are learning about location, space, and shape. Gradually students should distinguish navigation ideas such as left and right along with the concepts of distance and measurement.
The learning opportunities in this unit can be differentiated by providing or removing support to students and by varying the task requirements. Ways to differentiate include:
The context for this unit can be adapted to suit the interests and experiences of your students by engaging them in identifying the character and destination for each maze. Simple Māori designs can be used for mazes. Images of Native Garden Mazes can be shared with the children to engage them in the unit.
There are many books of mazes and online interactive mazes available. Try to have different resources available in the classroom while you are working on this unit. Early finishers or students who need more challenge could be given the opportunity to work with the other mazes or draw their own.
Session 1
Many students may have some experience of using mazes, whether it is walking through mazes, or solving pen and paper mazes in puzzle books.
Sessions 2-3
Maze Pairs
In this activity one student has a picture of a maze and the other has a blank grid. There are 4 mazes (two basic and two harder), and two blank grids (one for the basic mazes and one for the harder ones) available as copymasters. You can also easily make more mazes by using a vivid to draw walls on the blank grids.
Put Yourself in the Maze
For this extension to Maze Pairs tell students that they have to imagine that they are actually in the maze themselves, and that the only things they can do are to move forward or to turn left or right. This makes the activity much more challenging, as they now need to keep track of the direction they are facing as well as where in the maze they are. Counters with an arrow drawn on to indicate direction faced would be a useful aid.
The activity proceeds as in Maze Pairs above but both partners should use a counter with an arrow as they plot their route through the maze.
Outdoor maze
In this activity students take the direction giving skills they have used in the classroom outside and onto a larger scale.
Session 4
Let students draw their own mazes on grid paper, and challenge a friend to first solve it, and then give instructions for how to get through it. Display some examples of a variety of simple mazes as inspiration.
You may need to give some guidance in drawing mazes – ensure that they are solvable, but try to have plenty of false paths and dead ends.
Possibly students could take their mazes to another class and show them how they have learned to give accurate directions through the maze, or take them home to share with whānau.
Dear family and whānau,
This week we are looking at solving mazes and giving directions in maths. Encourage your child to use language such as left, right, over, under, near, far, to describe where objects are in relation to each other. Ask your child to describe the path they would follow to get out of their room if there was a fire. Ask them to describe the route they take to get to school. Using this kind of language helps to develop the maths ideas. Discuss the terms for left, right, over, under, near, far in your own language.