Problem One
Encourage the students to predict the number of fold lines as they follow the fold instructions. They may be able to draw where they think the fold lines will be after each step, and this can be confirmed by unfolding the square:
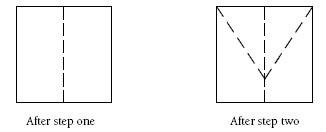
Visualisation is very difficult, so the students need experience with simpler examples, such as:

How many fold lines?
Students may also like to make up simple fold problems for someone else.
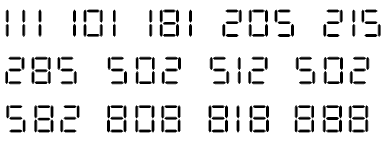
Problem Two
Students will need to identify mirror relationships between the digits.
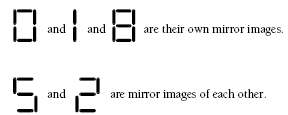
No other mirror relationships exist. This limits the number of two-digit mirror numbers to:

This knowledge can be applied to finding the different three-digit mirror numbers.
Problem Three
A systematic approach will be needed to find all the possibilities. This might begin with all the possibilities involving any green rods:
Six green rods (6 x 3 = 18)
Three green rods, one yellow rod, one pink rod (3 x 3) + 5 + 4 = 18
Two green rods, three pink rods (2 x 3) + (3 x 4) = 18
One green rod, three yellow rods 3 + (3 x 5) = 18
Students can then find all the possibilities that can be made without using green rods:
Two yellow rods, two pink rods (2 x 5) + (2 x 4) = 18
Students might go on to investigate how many ways a length of 24 centimetres could be made with the three different-coloured rods.
Problem Four
If Henry’s pocket money is removed from the $12 total, that leaves $8 to be shared among the remaining younger children. There are several possible combinations, which can be found in an organised way (see the Answers section).
Note: If Henry is the elder by birth of twins, that opens up other possibilities, such as ages 4, 4, 3, 1 or 4, 4, 2, 2.
Students may enjoy making up their own problems about children’s ages.
Answers to Problems
1. 3
2. a.

b. 25, 11
3. 1 green and 3 yellow
2 green and 3 pink
3 green, 1 yellow, 1 pink
6 green
2 yellow and 2 pink
4. Some possibilities:
$4, $3.50, $3.50, $1
$4, $3.50, $3, $1.50
$4, $3.50, $2.50, $2
$4, $3, $3, $2
$4, $3, $2.50, $2.50

In the garden
This unit uses the context of a garden to explore the line and rotational symmetry of shapes.
This unit addresses two areas of geometry: transformation (rotation, reflection, and translation) and the reflective and rotational symmetry of shapes. The key ideas introduced are:
When possible, use mathematical vocabulary to explain the type of symmetry that is being shown or created.
This unit can be differentiated by varying the scaffolding provided or altering the difficulty of the tasks to make the learning opportunities accessible to a range of learners. For example:
The activities in this unit can be adapted to make them more engaging by adding contexts that are familiar or unique to Aotearoa, for example:
Ignite children’s prior knowledge by discussing home or local community gardens that they are familiar with. It may also be helpful to introduce this unit by reading a book about garden settings or viewing images of garden settings online. The overall aim of the unit is to create a classroom display of a garden using the activities as starting points. Be as creative as you can!
Session 1: Up the garden path
In this session students will explore shapes that tessellate or repeat to cover the plane without gaps or overlaps. Although the students will only be covering a strip (path) any covering of a path can be used to tessellate the plane simply by putting paths together.
Session 2: Bugs, Beetles and Butterflies
In this session students will be investigating line symmetry by making butterflies out of coloured paper.
Session 3: Butterfly Painting
In this session students will make symmetrical butterflies with paint. Refer to the pictures of native butterflies from the previous session as inspiration.
Session 4: The Flower Garden
In this session students will be introduced to making symmetrical patterns with shape blocks. The theme for this lesson is flowers for the garden, so showing the students images of flowers and reading or viewing a story about flowers would be beneficial. Sunflowers would be a great example of a flower to use in this session.
Session 5: The Garden Wall
In this session introduce students to the idea of translation. Students will be making tiles for the garden wall. Introduce the activity by showing them examples of some wall tiles from the local area.
Session 6: Wind Catcher in the Garden
In this session students will make a wind catcher, which illustrates rotation, as an ornament for the garden .
Cut along lines in first image
Note: The wind catcher has rotational symmetry but not reflective symmetry. This is because it can be rotated around onto itself but it doesn't have a line of symmetry in the plane.
Other Ideas
This week in maths we have been doing a unit on symmetry using things that we might find in a garden. We identified objects that had reflective symmetry by finding the line or lines of symmetry in the object.
At home this week I would like your child to find three things outside that have a line or lines of symmetry and to draw a picture, take a photo or bring them along to school to share.
Figure it Out Links
Some links from the Figure It Out series which you may find useful are:
Changing Shapes
This is a level 3 geometry strand activity from the Figure it Out series.
A PDF of the student activity is included.
Click on the image to enlarge it. Click again to close. Download PDF (330 KB)
explore symmetry and tessellations
scissors
tape
cardboard or paper
FIO, Level 3-4, Geometry, Changing Shapes, page 7
ruler
This activity gives students a simple method for creating an original tessellating shape. This method is sometimes called the “bite” or “nibble” method. The main rule to follow when changing shapes to create a tessellating tile is that the shape must retain the same area as the original, so each piece that is cut off must be rejoined. Students need to be careful to just translate pieces and not to inadvertently flip them
over.
When they have completed the tile, they translate the tile by sliding it along the plane – up, down, left or right – to create a tessellating pattern. The shape that the students start with must be a polygon in which opposite sides are parallel and congruent because an operation on one side will always affect the opposite side. The square is the easiest shape to start with, but encourage the students to experiment with other
shapes using this bite method. The more sides the polygon has, the more sides that can be altered.
Therefore, starting with a shape such as the regular hexagon can lead to an interesting design.
This activity gives students an opportunity to explore their own artistic creativity. They can add detail to the shapes to give the tessellation added appeal. However, it is important to use this activity not simply as an artistic activity, but as one that gives the students an opportunity to develop an understanding of translation and tessellation and to talk about their creations using the language of geometry.
Under the Sea, Figure It Out, Levels 2–3, page 11 and its accompanying teachers’ notes discuss adapting a triangle to make a whole shape that tessellates.
Answers to Activity
1. Practical activity
2. The shape you start with must be a polygon that has opposite sides parallel and congruent (for example, a rectangle or a regular hexagon).
Your new shape must have the same area as the original shape.
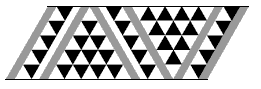
Tricky Triangles
This is a Level 2 Geometry activity from the Figure It Out Series.
A PDF of the student activity is included.
Click on the image to enlarge it. Click again to close. Download PDF (258 KB)
recognise triangles in patterns
make a tessellating pattern using two dimensional shapes
Activity One
This pattern is taken from a section of tapa cloth. The design is based on tessellations of triangles.
Students will need to count the triangles systematically for questions 1–4 and record their counting carefully. A knowledge of symmetry is very useful in solving these problems. For example, students can use the following method to count the number of small brown triangles:
Students can use the total number of small brown triangles to help find the number of small white
triangles. In the central section of the tapa cloth design, there is one more row of small white triangles
than there is of brown triangles, so the total number is: (1 + 2 + 3 + 4 + 5) + (5 + 5) = 25.
In question 3, students may realise that each row contains two more triangles than the previous row: 1 + 3 + 5 + 7 + 9 = 25.
In question 4, students will need to think how many triangles of different sizes there are in the pattern.
Question 5 asks students to generate the next section of the pattern. Students may extend the pattern
down or sideways. Two possible answers are given in the Answers section.
Students can find the next pattern using translation (shifting) and half-turn rotation.
Answers to Activities
Activity One
1. 20
2. 25
3. 25
4. 65
5. a. Answers will vary. They include:
the next section sideways:
i.
or the next section downwards:
ii.
b. Answers will vary, but the two examples
above will give i. 35 or ii. 15 new triangles.
Activity Two
Answers will vary.
Wrap it Up
This is a Level 2 Geometry activity from the Figure It Out Series.
A PDF of the student activity is included.
Click on the image to enlarge it. Click again to close. Download PDF (180 KB)
make a pattern by translating or rotating a shape
Scissors
Cardboard
Strong glue
FIO, Level 2-3, Geometry, Wrap it Up, page 16
Ink and rollers or acrylic paint and brushes
This activity gets students to apply translational and rotational symmetry to create freeze-type patterns. The method suggested uses a printing block.
The patterns created by translation need to preserve the orientation of the figure. For example:
By contrast, the patterns created by rotation involve a change in orientation. For example:
Students may find that they can apply translation and rotation in combination. For example:
Another way of making patterns by reflection is to cut a tracing block from a square of card. Note that it is wise to mark the original corners of the square before cutting to help keep track of the original shape. For example:
The pattern can be duplicated across the whole page by repeated reflection.
Answers to Activity
Teacher to check
Reflect on This
These are level 2 number and geometry problems from the Figure It Out series.
A PDF of the student activity is included.
Click on the image to enlarge it. Click again to close. Download PDF (331 KB)
explore reflection patterns (Problems 1 and 2)
use additive strategies to solve problems (Problems 3 and 4)
Problem One
Encourage the students to predict the number of fold lines as they follow the fold instructions. They may be able to draw where they think the fold lines will be after each step, and this can be confirmed by unfolding the square:
Visualisation is very difficult, so the students need experience with simpler examples, such as:
How many fold lines?
Students may also like to make up simple fold problems for someone else.
Problem Two
Students will need to identify mirror relationships between the digits.
No other mirror relationships exist. This limits the number of two-digit mirror numbers to:
This knowledge can be applied to finding the different three-digit mirror numbers.
Problem Three
A systematic approach will be needed to find all the possibilities. This might begin with all the possibilities involving any green rods:
Six green rods (6 x 3 = 18)
Three green rods, one yellow rod, one pink rod (3 x 3) + 5 + 4 = 18
Two green rods, three pink rods (2 x 3) + (3 x 4) = 18
One green rod, three yellow rods 3 + (3 x 5) = 18
Students can then find all the possibilities that can be made without using green rods:
Two yellow rods, two pink rods (2 x 5) + (2 x 4) = 18
Students might go on to investigate how many ways a length of 24 centimetres could be made with the three different-coloured rods.
Problem Four
If Henry’s pocket money is removed from the $12 total, that leaves $8 to be shared among the remaining younger children. There are several possible combinations, which can be found in an organised way (see the Answers section).
Note: If Henry is the elder by birth of twins, that opens up other possibilities, such as ages 4, 4, 3, 1 or 4, 4, 2, 2.
Students may enjoy making up their own problems about children’s ages.
Answers to Problems
1. 3
2. a.
b. 25, 11
3. 1 green and 3 yellow
2 green and 3 pink
3 green, 1 yellow, 1 pink
6 green
2 yellow and 2 pink
4. Some possibilities:
$4, $3.50, $3.50, $1
$4, $3.50, $3, $1.50
$4, $3.50, $2.50, $2
$4, $3, $3, $2
$4, $3, $2.50, $2.50
Logo Licenses
This unit examines the use of reflective, rotational, and translational symmetry in the design of logos. Logos are designs associated with a particular trade name or company and usually involve symmetry to make them aesthetically pleasing as well as functional.
This unit centres on symmetry, particularly reflective and rotational symmetry, although there is some reference to translation symmetry. A shape has symmetry if it has spatial pattern, meaning it maps onto itself either by reflection about a line, or rotation about a point.
Consider the Mitsubishi logo. There are three lines where a mirror could be placed and the whole figure could be seen, with the image in the mirror forming the hidden half.
This logo also has rotational symmetry about a point. Each turn of 120⁰ (one third of one full rotation) maps the logo onto itself. Since the logo maps onto itself three times in a full turn of 360⁰, the figure has rotational symmetry of order three.
The mathematics of symmetry is found in decorative design, like kowhaiwhai in wharenui, and wallpaper patterns, and motifs such as logos. Human beings are naturally appreciative of symmetry, possibly because it is prevalent in the natural world. Creatures are approximately symmetrical and reflections in water are a common example of mirror symmetry.
The learning opportunities in this unit can be differentiated by providing or removing support to students, and by varying the task requirements. Ways to support students include:
Tasks can be varied in many ways including:
The contexts for this unit can be adapted to suit the interests, experiences, and cultural backgrounds of your students. Capitalise on the interests of your students. Symmetry is common across all cultures of the world. Kowhaiwhai patterns on the rafters of wharenui (meeting houses), designs on Rarotongan tivaevae, Fijian tapa or Samoan siapo cloth usually involve symmetries. Look for examples of symmetrical design in the local community. Encourage students to capture symmetric patterns they see and use the internet as a tool for finding images in Aotearoa. Search for symmetry to show how common geometric patterns are throughout the world.
Te reo Māori vocabulary terms such as hangarite (symmetry, symmetrical), hangarite hurihanga (rotational symmetry), whakaata (reflect, reflection), huri (rotate, rotation), and neke (translate, translation) could be introduced in this unit and used throughout other mathematical learning.
Getting Started
What pattern can you see in the shape?
How did the way we made the shape affect the symmetry it has?
You may want to show how the whole shape is visible if the mirror is located along the fold line.
Mirror symmetry and fold symmetry have the same meaning with 2-dimensional shapes.
It is important for students to see that one half of the shape maps onto the other half by folding and flipping actions. Each alternative term can be demonstrated. Holding a mirror along the fold line enables students to see an image of the whole shape even when one half is masked. Similarly, the amended (cut) circle can be refolded in half and traced around. Then flip the paper over the fold line and trace around it again. The traced figure will be that of the whole amended circle.
Before opening up the circle ask:
What pattern do you expect the shape to have?
Is there another type of pattern in this shape?
Students may not recognise that the cutout shape has rotational symmetry as well. Trace around the shape on a whiteboard. Turn the shape one half turn (180⁰) to show that the shape maps onto itself.
The shape has half turn symmetry. How many times will it map onto itself in a full turn?
Students should predict order 2 rotational symmetry. That means the shape maps onto itself twice, in a full turn.
How are the shapes the same? How are they different?
Do both shapes have the same symmetry?
Most students will realise that there are two lines of reflective symmetry (the fold lines) but the half turn rotational symmetry is harder to spot.
Session Two: Car logos
What make of car was that?
How do you know?
Session Three: Logos in the media
The Starbucks logo belongs in the bottom left cell as it has reflective symmetry but no rotational symmetry.
You work for an advertising company as a logo designer. There are five new companies that need new logos. They have stipulated that the logo must have some symmetry but must also suggest what goods and services they provide. (If you wish, they may also be required to come up with a slogan that captures the message, e.g. "Just do it".)
Here are the companies:
Session Four
Dear family and whānau,
This week we are looking at symmetry and at company logos. We appreciate your help by working with your child to find examples of logos in magazines, television commercials or on websites. For homework your child is asked to sketch two logos in their book and describe their symmetries. Ask your student to explain what reflective and rotational symmetries are, using the logos as examples.

Figure it Out Links
Some links from the Figure It Out series which you may find useful are:
Kōwhaiwhai
This is a level 4 geometry strand activity from the Figure It Out series.
A PDF of the student activity is included.
Click on the image to enlarge it. Click again to close. Download PDF (342 KB)
describe patterns using the language of transformation
square grid paper
FIO, Level 4, Geometry, Book One, Kōwhaiwhai, page 14
coloured pencils or felt-tip pens
This activity builds on the ideas of Shifting Shapes (page 13 in the students' book). The students create patterns using single transformations and combinations of transformations.
Kōwhaiwhai are often used as ornamentation on the uncarved heke (rafters) of a wharenui. Unlike carvings, kōwhaiwhai are not normally made by a master artist. However, their intricate, elegant curves require a designer's eye. Today, a cut-out stencil is sometimes used for the repeated design, and the painting is done
as a team project involving young as well as old. All kōwhaiwhai have meanings and are not just ornamental.
You could have your students study the geometry of kōwhaiwhai as a purely mathematical topic but, if possible, you should take them to a building or museum where they can see actual examples. You could ask someone knowledgeable to explain how they were made and what their significance is.
Both questions in this activity involve practical work, and the students may create very different patterns. Some may choose to modify the given designs, while others may try to create something quite different.
Question 2 says that the three basic transformations can be combined to produce more complex patterns. The complete list of transformations used for kōwhaiwhai is as follows:
Auckland Museum produced an excellent educational kit, kōwhaiwhai Tuturu Māori (PDF, 420KB), which gives a background to the history and significance of kōwhaiwhai, examples of kōwhaiwhai, and an illustrated list of the mathematical transformations used.
Answers to Activity
1.- 2. Practical activities. Results will vary.
Grace's kitchen floor
This problem solving activity has a geometry focus.
Grace’s kitchen floor is square and is fitted by 64 square tiles in a 8 x 8 array.
Grace choses black and white tiles.
She can have the tiles laid so that they look like a chessboard but she is hoping for something a bit unusual.
The tile man sketches something that has reflective and rotational symmetry.
What does he suggest?
The Problem
Grace’s kitchen floor is square and is fitted by 64 square tiles in a 8 x 8 array. Grace choses black and white tiles. She can have the tiles laid so that they look like a chessboard but she is hoping for something a bit unusual. The tile man sketches something that has reflective and rotational symmetry. What does he suggest?
Teaching Sequence
How have you used reflection?
How have you used rotation?
Extension
Grace decides to have the floor tiles laid like a chessboard after all. While redecorating her kitchen, Grace has some cupboards built. Two of these are placed in the opposite corners of the room and take up a whole tile each. (She needs to use 62 square tiles now.)
The tile man says there's a special on. He has a combined tile that consists of a black tile stuck to a white tile. Can Grace tile her floor with these combination tiles and save herself some money?
Solution
There are a large number of possible answers here. Each one can easily be checked to see that it has the right symmetries.
Solution to the Extension
For the extension, colour the squares like a chessboard. When you remove two opposite squares you remove two squares of the same colour. Thus, you have 30 squares left of one colour and 32 of the other. You can’t cover these with the combination tiles as each combination covers one square of each colour.