Purpose
The purpose of this unit of five sessions is to develop the algebraic understanding that the equals symbol, = , indicates a relationship of equivalence between two amounts.
Specific Learning Outcomes
- Review number expressions involving the operations of addition and subtraction.
- Make and recognise combined amounts that have the same value.
- Write statements of equivalence in words.
- Read and write addition and subtraction equations.
- Solve addition and subtraction balance problems and explain the solutions, using the language of equivalence.
- Recognise expressions that are equal in value.
Description of Mathematics
This sequence of lessons provides a fundamental and important foundation for students to be able to read, write, and understand an equation.
The essence of an equation is that it is a statement of a relationship between two amounts. This relationship is a significant one of equivalence. The understanding that the amounts on either side of the equals sign are equal in value, is essential if students are to experience success in algebra, and mathematics.
The most common misunderstanding is when students develop a process view of an equation as a procedure to follow to get an answer, rather than a structural or relational view of equivalence.
Students should be immersed in a range of experiences that support them to explore the concept of equivalence and balance. During these experiences, the teacher must carefully choose the language they use and model. As equations are introduced, recorded, read and interpreted, words and phrases such as ‘has the same value as’, ‘is the same as’, ‘is equal to’ and ‘ is equivalent to’, rather than ‘makes’, or ‘gives an answer of ’ become very important. It is interesting to note that the word ‘equals’, on its own, has subtly become more synonymous with ‘makes’ or ‘gives an answer’, rather than giving the message of equivalence that it should.
When posing problems that position the unknown amount at the beginning or in the middle of an equation, we challenge the students to explore the relationship statement and the operations from a different perspective. This also occurs when students are asked to find ‘different names’ for the same amount.
Students should have opportunities to read and respond to equations, and record them after having interpreted a number problem expressed in words. In developing the ‘balance’ view of an equation, students will understand the equality relationship expressed in an equation such as 6 = 6, rather than being perplexed by the fact that there is no number problem to ‘answer’. Students will also readily understand relationships expressed in equations such as 4 + 2 = 1 + 5, rather than developing an expectation that a single ‘answer’ will follow the = symbol. Instead of expressing solutions in the arithmetic ‘voice’ of ‘problem, calculation and answer’, it is important in early algebra work, for students to explain their solutions in words that make the equivalence relationship explicit.
Opportunities for Adaptation and Differentiation
The learning opportunities in this unit can be differentiated by providing or removing support to students and by varying the task requirements. Ways to differentiate the tasks include:
- varying the complexity of the numbers used in the problem to match the number understanding of students in your class. For example, increase the complexity by using larger numbers for students who are able to count-on to solve problems.
The contexts used in the word problems in this unit can be adapted to suit the interests and experiences of your students. For example:
- changing Jack and the beanstalk to a story that is popular with, or relevant to, your students (e.g. another fairy tale or Māori legend).
- in Session 3, activity 2, replacing the beans with objects that match the story or legend using in Session 1. Remember that the use of the balance scale means that the objects need to be the same weight.
- te reo Māori that could be introduced within these sessions include orite (equal/same), tōkeke (fair), and whārite (equation) as well as the numbers tahi (1) to rua tekau (20).
Required Resource Materials
Activity
These learning experiences use numbers in the range from 1 to 20, however the numbers in the problems and the learning experiences should be adapted, as appropriate, for the students.
Session 1
SLOs:
- Review number expressions involving the operations of addition and subtraction.
- Make and recognise combined amounts that have the same value.
- Write statements of equivalence in words.
- Write and read equations, using the language of equivalence.
- Understand the word ‘equation’.
Activity 1
- Introduce the story of Jack and the Beanstalk (or another story or Māori legend relevant to your students and context). Ask who has planted or picked beans. Read the story. Explain that when the beanstalk is chopped to the ground, Jack picks handfuls of beans from it, some of which are bright green and others dark green. Unfortunately, they are no longer ‘magic’.
- Draw on the class chart, the combinations of beans in Jack’s handfuls. Have students record beside them, in words and number expressions, what they see. For example:
 three and four beans (3 + 4)
 two plus five beans (2 + 5)
Pose subtraction scenarios and have students record their number expressions.
For example:
Jack has eight beans and drops four. (8 - 4)
Jack has 6 beans and drops 1. (6 - 1)
Activity 2
- Make available to the students pencils, envelopes, and sets of two different coloured beans. Have students work in pairs.
Pose the problem:
“Jack wants to give away some packets of beans. He decides he’ll put six in each packet. He puts some beans of each colour into each packet and writes on the outside of the packet how many there are of each colour."
Write 6 on the class chart.
Demonstrate. For example:
Put 2 bright green and four dark green beans into one envelope and write 2 + 4 in pencil on the outside.
Tell the students that they should take turns to put the beans into the packets and to write on the outside. - Have student pairs share their packets and discuss if they have the same combinations recorded. Have them investigate any anomalies (They may have put more or fewer than six in a packet).
- Have student pairs return to the mat with their bean packets, which they place in front of them. On the class chart record:
6 is the same amount as:
Have students take turns to record their number expressions beside this.
6 is the same as: 5 + 1, 4 + 2, 3 + 3, 2 + 4, 1 + 5
Read these together using the language of, “is the same as.”
Ask whether it would be fair for Jack to give these to his friends. (Yes, because they would be getting the same amount. They would be getting an equal amount.)
Activity 3
- Write the word ‘equal’ on the chart.
Have students tell you what ‘equal’ means. Brainstorm ideas and record these. - Add to the recording in Activity 2, Step 3.
6 is the same (amount) as: 5 + 1, 4 + 2, 3 + 3, 2 + 4, 1 + 5
6 is equal to: 5 + 1, 4 + 2, 3 + 3, 2 + 4, 1 + 5
Ask if students know how to write “is equal to” using a symbol. Introduce =.
Model writing 6 = 5 + 1. - Have student pairs share the task of writing the complete equation on each of their packets.
- Have students place their “6” packets into a class container labelled with a 6 to be used in a later session.
Activity 4
- Place containers labelled 3, 4, 5, and 7 in front of the students.
Explain that Jack needs packets with these different amounts. Demonstrate, using a ‘six packet’, that each envelope must have the “number equals story” on it. - Ask what is the correct word for a “number equals story”. Elicit and record the word equation, highlighting that 6 = 5 + 1 (for example) is called an equation because it uses the = sign to show that both amounts are the same. Ask if they can see part of the word ‘equals’ in the word equation.
- Have students make up packets, as before, this time choosing 3, 4, 5, or 7 as their total, and recording a full equation on each packet. For example, 3 = 2 + 1, or 4 = 2 + 2.
- Students should pair share and check their packets and equations before they are placed in the appropriate containers.
Activity 5
Conclude the session by reviewing =, equals and its meaning and the meaning of the word equation. Have students explain these, and record what they say.
Session 2
SLO:
- Write and read addition equations, using the language of equivalence.
Activity 1
- Review the words, equal, equation and the symbol =, recorded on the class chart in Session 1.
Record a ‘six’ equation and read it in different ways together. For example:
6 = 5 + 1, “six is equal to five plus one”, “six is the same as five plus one”.
Highlight the fact that each of the packets in the 6 container have an equal or same amount. - Make available to the students, pencil and paper.
Have students in pairs choose one of the containers (you may need to make multiples of each container depending on class size).
Students begin by taking turns to read aloud to their partner, in the two ways modeled in Step 1 (above), an equation on an envelope selected from the container. They should return these once read. - Explain that in shops, staff do ‘stocktaking’ to check the amount of items they have. Students are to “stock take’ the beans by checking each packet to see that the equation on the outside matches the beans inside.
They should take two packets at a time, check that they have exactly the same amount and record what they find on their “stocktaking sheet” like this:

Students with containers 3 and 4 in particular, will accomplish this quickly.
Activity 2
- Have each student pair join one other pair in this way: two pairs of seven and three, two pairs of six and four and one pair of five and five.
- Refer to Jack and the Beanstalk.
Place in front of the students the cardboard ‘tickets’ and the plastic pegs.
Pose the task:
“Jack is going to have a bean stall. He needs ‘pegged pairs’ with ten beans altogether in each. We are going to help him. We need to make labels to show the contents, or what's inside."
Elicit from the students that by using one packet from each of their containers, they will have ten beans. If necessary, students can explore this idea and check, using their fingers, showing, for example: 10 = 7 fingers (up) and 3 fingers (down). - Demonstrate that the two packets can be pegged together to make one “pegged pair of ten.” Model on the class chart, how labels should show the content in 3 ways. For example:
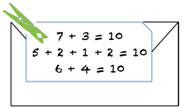
- Write an equation using the number on each of the containers.
We say "7 beans plus 3 beans equals 10 beans" and we write 7 + 3 = 10 - Write each of the expressions on each envelope. (The number of each colour in each envelope)
We say: "This envelope has 5 dark and 2 light (5 + 2) and this envelope has 1 dark and 2 light (1+2). Altogether that equals 10 so " We write: 5 + 2 + 1 + 2 = 10
Tip out the beans and write the number of each of the colours.
We say" There are 6 dark beans and 4 light beans and that is 10 beans altogether."
We write: 6 + 4 = 10
- Conclude the session by having the students read aloud some of the tickets they have made for their pegged pairs.
Review the words, equal, equation and the symbol =, recorded on the class chart in Step 1, highlighting the language of ‘is equal to’ and ‘is the same as’ and that all the equations written are different names for ten.
Session 3
SLOs:
- Solve addition and subtraction balance problems and explain the solutions using the language of equivalence.
- Read and write addition and subtraction equations.
Activity 1
- Introduce balance scales. Brainstorm and record on the class chart, students’ ideas about ‘how balance scales work’, eliciting language of ‘same, level, equal, balance.’
- Place one envelope pair (10) in one pan and ask what could be placed in the other to achieve balance. (Another pegged envelope pair.)
Again, record and ‘test’ student ideas, trying different combinations of pegged pairs. For example:
5 + 5 = 6 + 4
6 + 4 = 7 + 3
Ask why the results are recorded using =.
Elicit reasons such as ,”equals shows that they are the same”, “equals shows that they balance”, “equals shows that both amounts have the same value (10)” , “equals means is the same as”. - Record, 10 = 10 and discuss why this has been written and why it makes sense.
Activity 2
- Model 5 + 5 = 6 + 4 using the scales.
Remove the packet of 4 beans, leaving 6 only on one side. Discuss the tipped scales and how to record the removal of the 4 beans.
Record suggestions. For example:
5 + 5 is not the same as 10 – 4
5 + 5 is not equal to 10 – 4
10 is not equal to 6 - Ask what can be done to restore the balance.
Accept, ‘put 4 back in again’, but work to elicit, ‘take 4 away from the other side.’
Have a student remove 4 beans from one of the 5 bean envelopes (example above), saying how many are remaining in the envelope (1). Return it to the scales.
Record suggestions that describe what has happened now the balance is restored. For example:
5 + 5 - 4 is equal to 10 – 4
10 - 4 is the same as 10 – 4
10 – 4 = 10 – 4
6 = 6
As equations are recorded, have students explain or demonstrate, using the materials, exactly what is happening. Together reach the conclusion: if you take away the same amount from each ‘side’ or pan, the scales will still balance. - Make available to the students, fresh envelopes (or erasers to clear used envelopes), and pegged bundles of ten from Session 2.
Have student pairs combine the beans from the pegged pairs into single envelopes of ten beans, writing 10 on each.
Have students work in pairs with envelopes of ten beans, some spare beans, paper to record equations and a set of balance scales.
Have students undertake the following tasks- Student One removes a number of beans from one envelope, unseen by the other student, and returns the envelope to the scales. This student ‘secretly’ records the equation. For example: 10 – 3 = 7.
Student Two guesses how many were removed, removes this number from the other envelope, ‘secretly’ records the equation, for example 10 – 5 = 5, and returns it to the scales. They look carefully to check to see if the scales balance. If the scales do not balance, Student Two repeats their turn with another amount. When the scales do balance, both students share their final equations and check the amount in each envelope. Both students finally record the balance, for example, 7 = 7.
The students reverse rolls. - Students make teen numbers and record equations.
Student One places one ten envelope and a mixture of both colours of beans into one pan to make a number between ten and twenty. The student records the equation: for example, 10 + 2 + 3 = 15.
Student Two places one ten envelope and a mixture of both colours of beans into the other pan. The two-bean mix must be a different combination, but the total must balance the scales (in this case must equal 15). This student records their equation: for example, 10 + 1 + 4 = 15.
Both students then record what they can see in both pans.
10 + 2 + 3 = 10 + 1 + 4
15 = 15
- Conclude this session with some students sharing their equations from tasks A and B. Record a selection on the class chart and discuss these.
It is important to highlight the balanced nature of the equations. Elicit from the students what their understanding is about equations.
Session 4
SLOs:
- Interpret addition and subtraction word problems that involve start unknown, change unknown and result unknown amounts.
- Write addition and subtraction equations from word problems.
Activity 1
- Review conclusions from Session 3, Activity 2, Step 3, referring to the balance scales.
- Make available to the students: balance scales, packets of beans, spare beans, and a pencil.
Explain that Jack, of Jack and the Beanstalk fame, has some problems for the students to solve and that they may want to use the equipment to help them.
Distribute a copy of Copymaster 1 to each student. Read through the problems together.
Highlight that each student will be writing equations for each problem.
Students should choose whether to work on the problems alone or with a partner; however, each student should complete their own recording sheet. - As students complete the recording task, have them compare and discuss their equations and solutions. They can then write some problems for their partner to solve.
Session 5
SLOs:
- Identify true (correct) from false (incorrect) equations and justify the choice.
- Recognise expressions that are equal in value.
Activity 1
- Students will play two games in the session. Make available beans and balance scales.
Introduce the True/False game. (Copymaster 2)
(Purpose: To recognise when amounts are equal or not equal.)
Model a ‘true’ equation such as 1 + 3 = 2 + 2, highlighting the fact that the amounts on both sides are the same or equal to each other. Each expression is equal to 4. Model a ‘false’ equation such as 1 + 3 = 3 + 2, highlighting the fact that both sides are not the same and not equal to each other. 4 is not equal to 5. This is false (not true). - How to play:
Students play in pairs. They shuffle the playing cards and deal 10 to each player. The remainder of cards is placed in a pile, face down, handy to both players.
The aim of the game is to be the first person to have an equal number of true and false equations (five of each).
As each player turns over their cards, they sort them into true and false groups, face up in front of themselves. If they have more of one group than the other, they continue to take cards from the top of the pile, till the number of their true and false cards is equal.
The first player to have equal numbers of true and false cards calls, “Stop!”
This caller must explain to their partner, for each of their decisions, how they know they are correct in their true/false decisions. They can use beans to support their explanation.
The game begins again. The winner is the person who wins the most of three games.
Activity 2
Students play Same Name snap, using cards from Copymaster 3.
Purpose: To recognise when amounts are equivalent (or not equivalent) and to give the ‘number name’ for the ‘same name’ expressions.
How to play:
Student pairs shuffle the cards and deal all cards so each student has an equal number of cards. These are placed in a pile, face down in front of each student. Student One turns over the top card and places it, face up, between both students. Student Two does the same, placing their card on top of their partner’s card. If the two expressions have equal value, either student calls Same Name, states the number that the expression represents, and the correct equation using either ‘is equal to’ or ‘is the same as’. For example:
2 + 3 is placed on top of 4 + 1.
“Same name! Five! Two plus three is equal to four plus one.” or
“Two plus three is the same as four plus one.”
The caller collects the card pile, records the equation, 5 = 2 + 3 = 4 + 1 on their scoring paper, and the game begins again, with the winner of this round placing the first card.
The student who does not call, can challenge the caller if they believe the “name” is not true for either or both expressions. If they are correct, they collect the pile and record the correct equation. The original caller must erase the incorrect equation.
The game finishes when one student has all the cards, or when one student has recorded ten ‘same name’ equations.
Activity 3
Conclude this session by discussing learning from the games, and reviewing ideas recorded on the class chart over five sessions.
Home Link
Dear parents and whānau,
In maths this week the students have been learning how to read and write addition and subtraction equations. The algebra focus has been on helping the students to understand that equals (=) means “is equal to” or “has the same value as”, rather than being a sign that indicates “the answer”.
They have been playing the Same Name Game in class, so your child will be able to show you how to play. It would be helpful if you can use the phrases “is equal to” or “is the same as”, as you play the game together.
Thank you.

I Like Toys
In this unit we explore ways to pose and answer investigative questions about our favourites by gathering and analysing data and discussing the results.
In this unit the students begin by brainstorming areas for investigation. Young students' areas of interest are likely to focus on themselves and the activities that they are engaged in. Using the students and their interests is a recurring technique used in junior classes. It provides students with contexts that are meaningful and motivating. With the teacher investigative questions are posed about categorical data.
In this unit we use favourites as the theme for the investigations. Much of the data collected at level one will be real objects. In this unit we begin by posing an investigative question about our favourite toys. Once the data (toys) are collected together they can be sorted into categories ready for display. It is important that the students are involved in deciding how to sort the objects. We then draw pictures of other favourites and use them to make displays.
Once more we stress the importance of letting the students decide how to sort and display the data. In this unit we photocopy the drawings so that each pair of students gets the opportunity to make decisions about how the data should be sorted and displayed. The follow-up discussion of the displays will involve the students making statements about the number of objects in each of the categories. In this unit we do not attempt to get the students to formalise their displays into pictographs. However the thinking carried out in this unit means that the students would be ready to use pictographs in future statistics units.
The learning opportunities in this unit can be differentiated by providing or removing support to students and by varying the task requirements. Ways to support students include:
The context, about favourites, for this unit can be adapted to suit the interests and experiences of your students by selecting favourites of interest to your students.
A te reo Māori term that can be introduced in this unit is rōpū (group). Counting in te reo Māori could be used throughout the sessions.
Session 1
Let’s try to find out about our favourite toys. The investigative question we are exploring is "What are the favourite toys of the children in our class?"
Do any of you have toys that could belong with this one? Is there some way that your toy is like this one? How does your toy belong? Who has one that doesn’t belong? Why not?
Four of us brought dolls or action men. Three of us brought balls to kick. Six of us brought toys with wheels. Two of us brought soft animals etc
Session 2
In this session we collect sets of data to use in investigations in the following sessions. If you have time available at the end of the session you may wish to start analysing one of the sets.
Possible favourites include: food, colour, drink, number, animal.
Sessions 3 and 4
In preparation for the next two days, make a set of picture sheets for each pair by photocopying the answers from session 2 (8 per sheet of A4). It is worth taking the time to make copies as it gives everyone the opportunity to sort and display the data.
Can you see your drawing?
Do you see any that are like yours?
Which ones are different to yours?
How are you sorting the pictures?
How many categories or groups have you got?
Is it easy to decide where to put the pictures? Why/Why not?
Session 5
We begin today’s session by getting the students to select their favourite investigation to display on the classroom walls.
How many chose that favourite (e.g. fruit)?
Which things are favourites? How do you know? How does your display show that?
Dear parents and whānau,
This week in mathematics and statistics we are exploring ways to pose and answer investigative questions about our favourites by gathering and analysing data and discussing the results. One of our activities involves us investigating our class and families favourite type of fruit. To help us with this activity we would like everyone in your home to draw us a picture of their favourite fruit. Your child will then add this to our display that shows the favourite fruits. We are answering the investigative question "What are the favourite fruits of our class and their families?"
Gecko feet
In this unit of work we link the development of skip-counting patterns to bars on a relationship graph. We also plot our skip-counting patterns on a hundreds board.
In this unit we look at skip-counting patterns. These are patterns obtained by adding the same, constant, number to make the next number every time. So the difference between any two terms in a skip-counting pattern is the same. This is a good exercise to help reinforce the various concepts relating to pattern. In particular, it helps us to understand the idea of a recurrence relation between consecutive terms.
Skip-counting patterns are also called arithmetic progressions. In secondary school, expressions for both the general term of an arithmetic progression and the sum of all of the numbers in the progression are found.
The learning opportunities in this unit can be differentiated by providing or removing support to students and by varying the task requirements. Ways to differentiate the tasks include:
The contexts for the skip patterns used in this unit can be adapted to suit the interests and experiences of your students. For example in the Exploring part of the unit:
Getting Started
Explain that today we will explore the pattern of 4s by counting the number of feet on geckos. We then use this information to build a relationship graph.
How did you work that out?
Share ideas. Encourage the students to focus on the relationship between the number of geckos and the number of feet.
Exploring
Over the next 2-3 days, the students work in pairs to explore the number patterns of other skip-counts. At the end of each session the students share their charts with the rest of the class.
Reflecting
In today’s session we use calculators to extend our skip-counting into the hundreds. We record our patterns on a hundreds chart.
Which number will be next?
How do you know?
Dear parents and whānau,
This week in maths we have been looking at skip-counting patterns and the charts that can be made from them.
Your child will be able to explain to you exactly what we did in class. Here is a chart made from a skip-counting pattern. Talk with your child about what the next number in the pattern will be. Put that number onto the chart. Discuss with your child how the pattern would continue.
Try to think of how that pattern might describe something in your whānau. Could you make a similar chart of another number pattern related to nature, sport, or another family interest.
This is an important part of maths. Thank you for your help.
Figure it Out Links
A link from the Figure It Out series which you may find useful is:
Link, Algebra, Book One, Which Wheels Where? Page 20.
Equality and equations
The purpose of this unit of five sessions is to develop the algebraic understanding that the equals symbol, = , indicates a relationship of equivalence between two amounts.
This sequence of lessons provides a fundamental and important foundation for students to be able to read, write, and understand an equation.
The essence of an equation is that it is a statement of a relationship between two amounts. This relationship is a significant one of equivalence. The understanding that the amounts on either side of the equals sign are equal in value, is essential if students are to experience success in algebra, and mathematics.
The most common misunderstanding is when students develop a process view of an equation as a procedure to follow to get an answer, rather than a structural or relational view of equivalence.
Students should be immersed in a range of experiences that support them to explore the concept of equivalence and balance. During these experiences, the teacher must carefully choose the language they use and model. As equations are introduced, recorded, read and interpreted, words and phrases such as ‘has the same value as’, ‘is the same as’, ‘is equal to’ and ‘ is equivalent to’, rather than ‘makes’, or ‘gives an answer of ’ become very important. It is interesting to note that the word ‘equals’, on its own, has subtly become more synonymous with ‘makes’ or ‘gives an answer’, rather than giving the message of equivalence that it should.
When posing problems that position the unknown amount at the beginning or in the middle of an equation, we challenge the students to explore the relationship statement and the operations from a different perspective. This also occurs when students are asked to find ‘different names’ for the same amount.
Students should have opportunities to read and respond to equations, and record them after having interpreted a number problem expressed in words. In developing the ‘balance’ view of an equation, students will understand the equality relationship expressed in an equation such as 6 = 6, rather than being perplexed by the fact that there is no number problem to ‘answer’. Students will also readily understand relationships expressed in equations such as 4 + 2 = 1 + 5, rather than developing an expectation that a single ‘answer’ will follow the = symbol. Instead of expressing solutions in the arithmetic ‘voice’ of ‘problem, calculation and answer’, it is important in early algebra work, for students to explain their solutions in words that make the equivalence relationship explicit.
The learning opportunities in this unit can be differentiated by providing or removing support to students and by varying the task requirements. Ways to differentiate the tasks include:
The contexts used in the word problems in this unit can be adapted to suit the interests and experiences of your students. For example:
These learning experiences use numbers in the range from 1 to 20, however the numbers in the problems and the learning experiences should be adapted, as appropriate, for the students.
Session 1
SLOs:
Activity 1
Pose subtraction scenarios and have students record their number expressions.
For example:
Jack has eight beans and drops four. (8 - 4)
Jack has 6 beans and drops 1. (6 - 1)
Activity 2
Pose the problem:
“Jack wants to give away some packets of beans. He decides he’ll put six in each packet. He puts some beans of each colour into each packet and writes on the outside of the packet how many there are of each colour."
Write 6 on the class chart.
Demonstrate. For example:
Put 2 bright green and four dark green beans into one envelope and write 2 + 4 in pencil on the outside.
Tell the students that they should take turns to put the beans into the packets and to write on the outside.
6 is the same amount as:
Have students take turns to record their number expressions beside this.
6 is the same as: 5 + 1, 4 + 2, 3 + 3, 2 + 4, 1 + 5
Read these together using the language of, “is the same as.”
Ask whether it would be fair for Jack to give these to his friends. (Yes, because they would be getting the same amount. They would be getting an equal amount.)
Activity 3
Have students tell you what ‘equal’ means. Brainstorm ideas and record these.
6 is the same (amount) as: 5 + 1, 4 + 2, 3 + 3, 2 + 4, 1 + 5
6 is equal to: 5 + 1, 4 + 2, 3 + 3, 2 + 4, 1 + 5
Ask if students know how to write “is equal to” using a symbol. Introduce =.
Model writing 6 = 5 + 1.
Activity 4
Explain that Jack needs packets with these different amounts. Demonstrate, using a ‘six packet’, that each envelope must have the “number equals story” on it.
Activity 5
Conclude the session by reviewing =, equals and its meaning and the meaning of the word equation. Have students explain these, and record what they say.
Session 2
SLO:
Activity 1
Record a ‘six’ equation and read it in different ways together. For example:
6 = 5 + 1, “six is equal to five plus one”, “six is the same as five plus one”.
Highlight the fact that each of the packets in the 6 container have an equal or same amount.
Have students in pairs choose one of the containers (you may need to make multiples of each container depending on class size).
Students begin by taking turns to read aloud to their partner, in the two ways modeled in Step 1 (above), an equation on an envelope selected from the container. They should return these once read.
They should take two packets at a time, check that they have exactly the same amount and record what they find on their “stocktaking sheet” like this:
Students with containers 3 and 4 in particular, will accomplish this quickly.
Activity 2
Place in front of the students the cardboard ‘tickets’ and the plastic pegs.
Pose the task:
“Jack is going to have a bean stall. He needs ‘pegged pairs’ with ten beans altogether in each. We are going to help him. We need to make labels to show the contents, or what's inside."
Elicit from the students that by using one packet from each of their containers, they will have ten beans. If necessary, students can explore this idea and check, using their fingers, showing, for example: 10 = 7 fingers (up) and 3 fingers (down).
We say "7 beans plus 3 beans equals 10 beans" and we write 7 + 3 = 10
We say: "This envelope has 5 dark and 2 light (5 + 2) and this envelope has 1 dark and 2 light (1+2). Altogether that equals 10 so " We write: 5 + 2 + 1 + 2 = 10
Tip out the beans and write the number of each of the colours.
We say" There are 6 dark beans and 4 light beans and that is 10 beans altogether."
We write: 6 + 4 = 10
Review the words, equal, equation and the symbol =, recorded on the class chart in Step 1, highlighting the language of ‘is equal to’ and ‘is the same as’ and that all the equations written are different names for ten.
Session 3
SLOs:
Activity 1
Again, record and ‘test’ student ideas, trying different combinations of pegged pairs. For example:
5 + 5 = 6 + 4
6 + 4 = 7 + 3
Ask why the results are recorded using =.
Elicit reasons such as ,”equals shows that they are the same”, “equals shows that they balance”, “equals shows that both amounts have the same value (10)” , “equals means is the same as”.
Activity 2
Remove the packet of 4 beans, leaving 6 only on one side. Discuss the tipped scales and how to record the removal of the 4 beans.
Record suggestions. For example:
5 + 5 is not the same as 10 – 4
5 + 5 is not equal to 10 – 4
10 is not equal to 6
Accept, ‘put 4 back in again’, but work to elicit, ‘take 4 away from the other side.’
Have a student remove 4 beans from one of the 5 bean envelopes (example above), saying how many are remaining in the envelope (1). Return it to the scales.
Record suggestions that describe what has happened now the balance is restored. For example:
5 + 5 - 4 is equal to 10 – 4
10 - 4 is the same as 10 – 4
10 – 4 = 10 – 4
6 = 6
As equations are recorded, have students explain or demonstrate, using the materials, exactly what is happening. Together reach the conclusion: if you take away the same amount from each ‘side’ or pan, the scales will still balance.
Have student pairs combine the beans from the pegged pairs into single envelopes of ten beans, writing 10 on each.
Have students work in pairs with envelopes of ten beans, some spare beans, paper to record equations and a set of balance scales.
Have students undertake the following tasks
Student Two guesses how many were removed, removes this number from the other envelope, ‘secretly’ records the equation, for example 10 – 5 = 5, and returns it to the scales. They look carefully to check to see if the scales balance. If the scales do not balance, Student Two repeats their turn with another amount. When the scales do balance, both students share their final equations and check the amount in each envelope. Both students finally record the balance, for example, 7 = 7.
The students reverse rolls.
Student One places one ten envelope and a mixture of both colours of beans into one pan to make a number between ten and twenty. The student records the equation: for example, 10 + 2 + 3 = 15.
Student Two places one ten envelope and a mixture of both colours of beans into the other pan. The two-bean mix must be a different combination, but the total must balance the scales (in this case must equal 15). This student records their equation: for example, 10 + 1 + 4 = 15.
Both students then record what they can see in both pans.
10 + 2 + 3 = 10 + 1 + 4
15 = 15
It is important to highlight the balanced nature of the equations. Elicit from the students what their understanding is about equations.
Session 4
SLOs:
Activity 1
Explain that Jack, of Jack and the Beanstalk fame, has some problems for the students to solve and that they may want to use the equipment to help them.
Distribute a copy of Copymaster 1 to each student. Read through the problems together.
Highlight that each student will be writing equations for each problem.
Students should choose whether to work on the problems alone or with a partner; however, each student should complete their own recording sheet.
Session 5
SLOs:
Activity 1
Introduce the True/False game. (Copymaster 2)
(Purpose: To recognise when amounts are equal or not equal.)
Model a ‘true’ equation such as 1 + 3 = 2 + 2, highlighting the fact that the amounts on both sides are the same or equal to each other. Each expression is equal to 4. Model a ‘false’ equation such as 1 + 3 = 3 + 2, highlighting the fact that both sides are not the same and not equal to each other. 4 is not equal to 5. This is false (not true).
Students play in pairs. They shuffle the playing cards and deal 10 to each player. The remainder of cards is placed in a pile, face down, handy to both players.
The aim of the game is to be the first person to have an equal number of true and false equations (five of each).
As each player turns over their cards, they sort them into true and false groups, face up in front of themselves. If they have more of one group than the other, they continue to take cards from the top of the pile, till the number of their true and false cards is equal.
The first player to have equal numbers of true and false cards calls, “Stop!”
This caller must explain to their partner, for each of their decisions, how they know they are correct in their true/false decisions. They can use beans to support their explanation.
The game begins again. The winner is the person who wins the most of three games.
Activity 2
Students play Same Name snap, using cards from Copymaster 3.
Purpose: To recognise when amounts are equivalent (or not equivalent) and to give the ‘number name’ for the ‘same name’ expressions.
How to play:
Student pairs shuffle the cards and deal all cards so each student has an equal number of cards. These are placed in a pile, face down in front of each student. Student One turns over the top card and places it, face up, between both students. Student Two does the same, placing their card on top of their partner’s card. If the two expressions have equal value, either student calls Same Name, states the number that the expression represents, and the correct equation using either ‘is equal to’ or ‘is the same as’. For example:
2 + 3 is placed on top of 4 + 1.
“Same name! Five! Two plus three is equal to four plus one.” or
“Two plus three is the same as four plus one.”
The caller collects the card pile, records the equation, 5 = 2 + 3 = 4 + 1 on their scoring paper, and the game begins again, with the winner of this round placing the first card.
The student who does not call, can challenge the caller if they believe the “name” is not true for either or both expressions. If they are correct, they collect the pile and record the correct equation. The original caller must erase the incorrect equation.
The game finishes when one student has all the cards, or when one student has recorded ten ‘same name’ equations.
Activity 3
Conclude this session by discussing learning from the games, and reviewing ideas recorded on the class chart over five sessions.
Dear parents and whānau,
In maths this week the students have been learning how to read and write addition and subtraction equations. The algebra focus has been on helping the students to understand that equals (=) means “is equal to” or “has the same value as”, rather than being a sign that indicates “the answer”.
They have been playing the Same Name Game in class, so your child will be able to show you how to play. It would be helpful if you can use the phrases “is equal to” or “is the same as”, as you play the game together.
Thank you.
Making Patterns
In this unit students explore patterns involving transformations of shapes. Students make and identify patterns that involve translation, reflection, and rotation. They make their own patterns and pictures to show the transformations, and discuss with others how they included the different transformation elements.
Translations (slides), reflections (flips), and rotations (turns) are explored in this unit.
Translations are slides or shifts of a shape along a line.

Reflections are flips of a shape to make an image as though it is reflected in a mirror.

Rotations are turns, so when a shape is turned about a point, either inside or outside of itself, the image is a rotation of the original shape. This unit uses examples where the rotation happens around the centre point of a shape.
The learning opportunities in this unit can be differentiated by providing or removing support to students and by varying the task requirements. Ways to make the tasks more accessible include:
The objects and pictures used in this unit can be changed to suit the interests and experiences of your students. For example, local flowers and pictures of native insects and butterflies are likely to be more engaging than generic pictures of flowers and butterflies. You could also incorporate an outdoor walk where students look for examples of translations, reflections and rotations. Images of Native plants, animals, butterflies and marine mammals can be found at: Doc Native Plants, Doc Native Animals, Native Butterflies Slideshow and Native Marine Mammals.
Te reo Māori vocabulary terms such as neke (translate), whakaata (reflect) and huri (rotate) could be introduced in this unit and used throughout other mathematical learning.
Session 1
In this session students make patterns that show translations.
Are the pictures the same each time? (Yes)
How are the pictures the same? (shape, size, orientation, colour)
Session 2
In this session students make patterns that show reflections.
Session 3
In this session students make patterns that show rotations.
Sessions 4 and 5
In these sessions students make an underwater sea picture that shows translation, reflection and rotation.
Which animal shows reflection? (Octopus)
How else could you show reflection in your picture? (Put two fish nose to nose.)
How could you show the translation in your picture? (Use 2 or more of the same animal and orientate them the same way.)
How could you show rotation in your picture? (Use 2 or more sea stars and rotate each one.)
Dear parents and whānau,
This week we have been making patterns. Your child is going to be a Pattern Detective and look for patterns at home and in their neighbourhood that show translations (a picture or pattern that repeats to make a pattern) or rotations ( a picture or pattern that repeats around in a circle). One place to look for these is in wallpaper or tiling. These patterns can also be found in nature. Please ask them to explain what is happening in the patterns they find.
Matariki - Level 1
This unit consists of mathematical learning, at Level 1 of the New Zealand Curriculum, focused around celebrations of Matariki, the Māori New Year. The sessions provide meaningful contexts that highlight Māori culture and provide powerful learning opportunities that connect different strands of mathematics.
In this unit the students will apply different mathematical and statistical ideas, such as the properties of symmetry. In this, they will demonstrate understanding of the features of a shape that change and remain invariant under translation, reflection and rotation.
Students also apply simple probability. For example, given this set of cards, what is the chance of getting a bright star if you choose one card at random? Random means that each card has the same chance of selection.
The set of all possible outcomes contains four possibilities. Two of those possible outcomes are selecting a bright star card. The chances of getting a bright star are two out of four or one half. There is a one quarter chance of getting a fuzzy star and the same chance of getting a rainy cloud.
The learning opportunities in this unit can be differentiated by providing or removing support to students, or by varying the task requirements. Ways to support students include:
Although the context of Matariki should be engaging, and relevant, for the majority of your learners, it may be appropriate to frame the learning in these sessions around another significant time of year (e.g. Chinese New Year, Samoan language week). This context offers opportunities to make links between home and school. Consider asking family and community members to help with the different lessons. For example, members of your local marae may be able to share local stories and traditions of Matariki with your class.
Te reo Māori language is embedded throughout this unit. Relevant mathematical vocabulary that could be introduced in this unit and used throughout other learning include āhua (shape), shape names (e.g. whetū - star), hangarite (symmetry, symmetrical), whakaata (reflect, reflection), huri (rotate, rotation), tātai (calculate, calculation), tāpiri (add, addition), hautau (fraction), raupapa (sequence, order), tūponotanga (chance, probability), and ine (measure).
Lesson One
What shape is a star?
Today we are going to make some stars to display using shapes.
How do you know that you have got all the diagonals? (Students might notice that the same number of diagonals come from each corner)
Does the star have mirror lines? How do you know?
Lesson Two
In this lesson your students explore family trees, working out the number of people in their direct whakapapa. This may be a sensitive topic for some students. Thinking about our relatives who are no longer with us, or have just arrived, is a traditional part of Matariki, the Māori New Year. According to legend, Matariki is the time when Taramainuku, captain of Te Waka O Rangi, and gatherer of souls, releases the souls of the departed from the great net. The souls ascend into the sky to become stars.
That question needs to be treated sensitively but the focus is on biological parents, usually a father and mother. You might personalise the answer by telling your students the names of your mother and father. Draw a diagram like this, or use an online tool to create the diagram:
My mother and father had parents too. What are your parents' parents called?
How many grandparents (koroua) do you have?
Students may have different ways to establish the number of grandparents, such as just knowing, visualising the tree and counting in ones, or doubling (double two),
Nowadays, many students will still have living great grandparents. You might personalise the idea using your whakapapa.
What do we call the parents of your great grandparents?
Now I want you to solve this problem. How many great great grandparents do you have?
Use the context as a vehicle for introducing even numbers (multiples of two), Act out three children getting their parents (other students) and bringing them to school. Change the number of students and work out the total number of parents. Find a way to highlight the numbers that come up, such as shading the numbers on a virtual Hundreds Board.
Students might notice that even numbers occur in the 0, 2, 4, 6, 8 columns of the hundreds board.
Lesson Three
Matariki is a time for cultural activities, such as story-telling, music, and games. Titi Rakau is a traditional game that involves hitting and throwing sticks, usually to a rhythmic chant. It was used to enhance the hand-eye coordination of children and warriors. Rakau can be used as a vehicle for fractions and musical notation, as well as physical coordination. You can make the tasks below as simple or as difficult as you like.
What fractions has the bar been broken into? (Quarters)
Each of these notes (crotchet) is one quarter of a bar in this music.
The popular chant associated with Ti Rākau (E Papa Waiari - available on YouTube) is in 6/8 time meaning there are six quaver beats to a bar. If you watch a video of a performance with Rākau the sticks are often hit on the ground on the first and fourth beats, or clicked together on the second, third, fifth and sixth beats.
Lesson Four
The rising of Matariki, in late May or June, signals to Māori that it is the start of a new year. It is appropriate for students to reflect on the passage of time. For young students there are important landmarks in the development of time, including:
Cooking in a hāngī
In the first part of the lesson students work with the first two ideas, recalling the past and anticipating the future.
Watch carefully. At the end of the video I will ask you about how to make a hāngī.
I want you to put the pictures in the order that they happened. Put them in a line. Be ready to explain why you put the pictures in that order.
Why does this happen before this?
Why does this happen after this?
What might have happened before the hole was dug?
What might have happened after the food was served?
Chances of a good year
In former times, tohunga, wise people of the village, looked at the sky before dawn to watch the rising of Matariki. They used the clarity of the stars to predict what the new year would bring. A clear sky with the stars of Matariki shining brightly signalled a good season for weather and the growing and harvesting of crops. A cloudy sky signalled bad luck.
If you saw this, what would you predict?
There will be plenty of rain but not too much, and the crops will grow well.
It is going to be a bit windy.
There will be lots of food in the rivers, lakes and sea.
Lesson Five
This lesson involves making rēwena paraoa (potato bread). The process of making it takes three stages; preparing the ‘bug’, mixing and baking, then serving. Therefore, it is not a continuous lesson. Preparation and serving food are important activities for Matariki celebrations. It would be beneficial to invite older students, or community members, in to help with this session.
2 cups of flour
1 teaspoon of sugar
Up to one cup of luke-warm water (as needed to maintain a paste-like consistency)
How many slices should we make?
How thick will the slices be?
How many cuts will we make?
Dear family and whānau,
This week we have been exploring shapes and sequencing events. Ask your child to find examples of shapes such as triangle, square, hexagon and trapezium around the house. Ask them about how the shapes were used to make stars in class. To extend the work we have been doing on sequencing events, when you are engaging in activities at home that have a defined sequence, ask your child questions to explore before and after actions, for example why does this happen before this? What might happen after we have done this?