Purpose
The purpose of this unit is to build upon the knowledge students have of combining and separating groupings to five and to use this as a building block to knowing combinations within and up to ten.
Specific Learning Outcomes
- Instantly recognise and describe a group of five in multiple representations of numbers within and to ten.
- Apply and record the operation of addition for groupings within ten.
- Understand the language of subtraction and apply the operation of subtraction to groupings within ten.
- Make connections between the operations of addition and subtraction and develop and understanding of the relationships underpinning the family of facts.
- Know and apply addition and subtraction facts within ten.
Description of Mathematics
The ability of young children to recognise small quantities without counting has been somewhat overlooked in the early emphasis we have given to counting. These lessons build upon the student’s recognition and knowledge of groupings to five, to scaffold ready combinations and separations in numbers to ten.
A goal within primary mathematics is for students to use partitioning strategies when operating on numbers. By building images and knowledge of basic combinations at an early age, the ability to naturally partition larger numbers will be strengthened. Students should be encouraged to instantly recognise and use their knowledge of these combinations rather than relying for an unduly prolonged period on counting strategies.
This set of lessons focuses on knowing combinations of numbers between five and ten. They develop the quinary (fives) partitioning of ‘five and’, whilst consolidating combinations (+) and separations (-) within five.
A range of equipment is available to represent these quinary partitions. Students should be encouraged to make the connections between each of these representations as well as creating some of their own.
In communicating mathematical ideas, students learn to understand and use relevant language, symbols, text and diagrams to express their thinking and record concepts in a range of contexts and in a variety of ways. Teachers have a key role in developing the students’ ability to communicate their mathematical understandings orally and in writing.
The activities suggested in this series of lessons can form the basis of independent practice tasks.
Opportunities for Adaptation and Differentiation
It is important to note that the focus of this unit is on instantly recognising (subitising) collections and not on counting the collection. While many students may be able to count a set of objects they may not be as proficient at subitising small collections. Ways to support students include:
- providing multiple opportunities to subitise with smaller collections up to five before moving onto larger groups
- varying the arrangements of the objects (e.g.in a line, in a dice pattern, closely grouped, randomly spread) and the objects (counters, toys, pencils, pebbles).
This unit is focussed on combining and separating groupings to five. This should be used as a building block to knowing combinations within and up to ten. As a result of this focus, the learning in this unit is not set in a real world context. The context for this unit can be adapted to suit the interests and experiences of your students
- by using collections that are part of the classroom or school environment (e.g. blocks, counters, plastic animals, pens, pebbles, leaves, seeds)
- using te reo Māori for numbers tahi to tekau (one to ten) and counting.
Required Resource Materials
Activity
Session 1
SLO: To recognise and describe a group of five in multiple representations of numbers within and to ten.
Activity 1
- Make paper, crayons/felts, pencils, counters (or similar mathematics equipment) available to the students. Set a time limit as appropriate. Have the students write, draw and show you everything they know about five. This, and the next step, could be done in pairs to encourage tuakana-teina.
- Have the students pair share their work.
- Write the words ‘five’ and rima, and the numeral '5' on a paper chart, whiteboard, or in a modeling book. Collect and record the important ideas that the students have generated. Be sure to use words, symbols and drawings of equations, stories or materials.
Activity 2
- Show tens frame for 5.

Describe it in words: ‘There are five dots filling up one column (or side) of the tens frame’. Or, ‘There are five dots. They fill up half of the tens frame'. Or, ‘There are five dots filling one side of the tens frame and five empty spaces on the other.’ Have the students describe to a partner what they see. Hide the tens frame. Have the student repeat their description to their partner of what they see in their mind.
- Show the tens frames for 6, 7, 8, 9, 10.


For each say the number of dots and repeat 1 above. Encourage participation and accuracy in the oral descriptions including saying how many empty spaces. For example: ‘Seven. Five dots and two dots and there are three empty spaces.’
- Show the tens frames in random order and have the students say the number, make it on their fingers and show a partner.
- Include all tens frames and repeat above, this time with say, show, and write (make writing materials available, or have them use a ‘magic finger’ to write on the surface in front of them or in the air.)


Activity 3
- Introduce a 20 beads frame and animal strips. Discuss the similarities of the representations, model descriptions then have the students describe what they see.
For example: ‘Seven. There are five white beads and two red ones.’
For example: ‘Seven. There are five dolphins and two more dolphins after the dotted line.’
Repeat with the beads or animal strips hidden. Have the students describe a number image to a partner, then show it to them to check to see if they are correct.
- Distribute writing materials. Show numeral cards to 10 in random order and have them draw a matching image (using dots or beads). Emphasise the need for their drawing to show a group of five for numbers 6 – 10. Display the students’ work.
Session 2
SLO: To apply and record the operation of addition for groupings within ten.
Activity 1
- Show the children a dice. Discuss, record and read the dot combinations for four.
4 = 2 + 2, ‘Four is the same as two and two.’
1 + 3 = 4 , ‘One plus three equals four.’
- Show the students other dice faces and have them write and share equations for these. Encourage students to record equations both ways as above. Use the language ‘equals’ and ‘is the same as’.
- Hide the dice, say one of the numbers and ask the students to draw it. Repeat.
Activity 2
- Repeat Activity 1 above with tens frames cards 5 – 10.
- Have the students work in pairs to play Scoring a Tri. (Purpose: to quickly recognise representations of the numbers 5 – 10).
Make the link for the students between tri and three, for example: tricycle (3 wheels), triangle (3 sides and corners).
Each pair has three shuffled piles of cards turned upside down between them:- pile 1: tens frames 5 - 10
- pile 2: digit cards 5 – 10
- pile 3: equation cards 5 + 1 to 5 + 5 (Copymaster 1).
Compete to see who can ‘score a tri’ by turning over 3 matching cards. For example: 
- Students can repeat the game using animal strips, number word cards (instead of digit cards) and expressions. The winner is the person with the most sets.
Activity 3
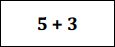
- Show an 8 tens frame. Pose the question “Is 5 + 3 the only way of writing something that is the same as 8?” Discuss and chart the multiple combinations that are the same as 8.
- Distribute a tens frame (5 – 9) to each student and have them each write different combinations for the number of dots depicted.
- Have each student share with a partner what they have done and ask, ‘Have I got them all?’
- Conclude by revisiting the quinary (fives based) equipment used so far and reminding the students of how useful “5 and” is.
Activity 4
Play Murtles 5 and... (MM 5-9) (Purpose: to practice and know 5 + addition facts to 9)
Session 3
SLO: To understand the language of subtraction and apply the operation of subtraction to groupings within ten.
Activity 1
- Tell and write with the students a subtraction story about someone in the class. For example: Erika was sharing her carrot sticks with Sadie. She had eight and gave three to Sadie. How many did Erika have for herself? Ask the students to record what happened using numbers and have them share their recording.
- Model 8 – 3 = 5 on chart paper or in a modelling book (to keep and refer to later). Draw a box around 8 and highlight this is what Erika started with. Talk about how many she gave away and how many were left. Brainstorm and record words for the – subtraction sign. These should include ‘give away, take away, subtract, minus, less’. Read 8 – 3 = 5 several times using all of the words. Emphasise that they mean the same thing.
- Explain that 8 – 3 = 5 is known as an equation because it has the equals sign which means that 8 - 3 is the same as 5. Make the link between the word equals and the word equation.
- Ask the students which is the biggest number in the equation. Ask them why it comes first. Have them model with equipment to understand that you can’t subtract a smaller number from a bigger number (we are not discussing negative numbers here)
- Record the important points discussed on the chart paper.
Activity 2
- Distribute a card with a subtraction expression (Copymaster 2) to each student. Have them make a silent decision whether or not the result of the subtraction will be 5. Have them form two groups, a ‘Yes’ group and a ‘No’ group.
- Have them take turns modelling their equation on the 20 beads (with 10 of the beads covered as they are not needed here) to show and explain why they are correct.
- Ask the students whether knowing about the tens frames helped. With reference to the 20 beads frame, model the connection between 5 + 3 = 8 and 8 – 3 = 5.
- In Attachment 1 there are three expressions, 5 – 7, 5 – 8, and 5 – 9 that are included to provoke discussion about why the big number comes first in subtraction equations. Refer to the chart made in 1 above to emphasise this point.
Activity 3
Have the students work in pairs to play Murtles 5 and... (MM 5-9) in reverse. (Purpose: to practice and know subtraction facts that make 5).
Each student covers all the numbers with see-through counters. They take turns to roll the dice.
If the number rolled can be subtracted from a covered number to leave a result of five, the counter can be removed. The aim of the game is to be the first to lighten Murtle Turtle’s load by clearing all the counters.


Session 4
SLO: To make connections between the operations of addition and subtraction and develop an understanding of the relationships underpinning the family of facts.
Activity 1
- With reference to the 20 beads frame, model the connection between 5 + 3 = 8 and 8 – 3 = 5. Talk about and record these equations and what the students notice about them, in particular that they have the same three numbers. Emphasise that these numbers have a special relationship and that this relationship sometimes means that we talk about “families” of numbers that are related.
- With the group (or class) place a number strip where all the students can see it. Ask what they notice about it (That it is coloured in groups of five). Connect this to the other quinary materials you have been using.
- Have students model with see-through counters on the number strip and record 5 + 3 = 8 and 8 – 3 = 5. Ask if there is something else they can see with these numbers. Encourage them to see: 3 + 5 = 8 and 8 – 5 = 3. Together, model and record all four equations using another number up to 10. Model the same equation on a tens frame. Discuss what is the same about the representations. Emphasise the inverse relationship between addition and subtraction and the phrase : ‘If I know this (eg. 5 + 3 = 8) then I know this (eg. 8 – 3 = 5).’
- Explain the class is making a display of ‘number families’, sometimes called ‘families of facts’. Ask, ‘What is a fact?’ Emphasise that a fact is a true statement.
- Distribute number strips, blank tens frames and counters to pairs of students. Have them make, draw and record in pairs ‘families of facts’ associated with some of the numbers 5 – 10. They can choose to use number strips, tens frames or both. Encourage the students to record the families of different combinations, not just those of ‘5 and’ such as 5 + 3 = 8 (5 + 3 = 8, 3 + 5 = 8, 8 – 5 = 3, 8 – 3 = 5) but also 6 + 2 = 8 (6 + 2 = 8, 2 + 6 = 8, 8 – 2 = 6, 8 – 6 = 2).
- Discuss and display the students’ work.
Activity 2
Have the students in pairs play ‘Go Fish’ or ‘Happy Families’ Copymaster 3 (Purpose: to identify all members of families of facts)
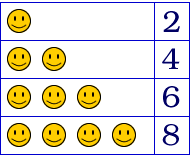
5 + 4 = 9 4 + 5 = 9 9 – 5 = 4 9 – 4 = 5
The aim of the game is to make the greatest number of complete families of facts. To play:
- The Family of Fact cards are shuffled and placed face down. Each player takes seven cards.
- The players sort their cards in their hand into ‘families’, identifying complete families and placing these face up in front of them.
- Each player takes turns to ask their partner for missing family members. If their partner cannot supply the card, they are told to ‘Go fish’. They take a card from the pile.
The game is played till all the cards are used and the winner is the person with the most complete families.
Session 5
SLO : To know and apply addition and subtraction facts within ten.
- Show selected tens frames, 20 beads frame and animal strips modelling example equations such as "7 and 2". Have students model these with their fingers and talk about the related addition and subtraction equations.
- Explain that they will be playing some games just working with numbers, but that they might like to picture fingers, tens frames, bead frames or animals to help them if they need to.
- Explain the purpose of the activities is to practice what they know.
- In pairs play the following games, using playing cards with Kings, Jacks and tens removed, and using the Queen as a zero:
‘Snap’ for a chosen number to 9 (Purpose: to practice and know addition and subtraction facts to 9):
Students draw a number from the pile, for example 7. This becomes the chosen number they must make.
One card is turned over to begin the game.
Students take turns to turn over a card from the pack, placing the turned card on top of the card before. If the turned card can combine in some way with the previous card to make the chosen number, the student says ‘Snap’, states the equation and collects the pile of cards.
The game begins again with the same chosen number.
For example, for the chosen number 7: if 9 is turned, followed by a 2, 9 – 2 = 7 is stated and the pile of cards is collected, or if 3 is turned, followed by 4, 3 + 4 = 7 is stated and the pile is collected.
‘Memory’ for a chosen number to 9 (Purpose: to practice and know addition and subtraction facts to 9):
Cards are turned down and spread out in front of the students. A chosen number is turned over and identified.
Students take turns to draw pairs. If the cards can make the chosen number, using either addition or subtraction, the pair is kept by the player. For example: 4 is turned over and identified as the chosen card. A player draws a 6 and a 2, and states 6 – 2 = 4 and keeps the pair, or a player draws 1 and 3 and states 1 + 3 = 4 and keeps the pair.
The game continues until all cards are used up.
The winner is the person with the most pairs.
‘Dice pairs’ for a chosen number to 9 (Purpose: to practice and know addition and subtraction facts to 9 and family of facts members):
Each player has a blank tens frame and ten counters to place one at a time on the frame to record their score. The winner is the first one to fill their frame.
Players roll two dice, combine these to identify a chosen number of 9 or less. If the combination is more than 9 they roll again.
Players take turns to roll the two dice to make the identified number. Each time they are successful and can state an equation and the other 3 members of the family of facts, they score by placing one counter on their tens frame. For example: If 8 is the chosen number. A player rolls a 2 and a 6 and states 6 + 2 = 8, 2 + 6 = 8, 8 – 2 = 6, 8 – 6 = 2. They are correct and place one counter on their tens frame.
Have students each make puzzle cards for the class to use. (Purpose: to depict a context for a family of facts and record these):
Make available cards marked in 3 sections as shown below, felts/crayons and scissors. Have the students draw pictures of equations, write them, then cut into two puzzle pieces to match. When several have been created, students can play memory match, by turning the pieces upside down and trying to find pictures and matching equations. 
Home Link
Dear parents and whānau,
In class we have been practising addition and subtraction facts up to 9. Ask your child to show you some on their fingers or draw some tens frame pictures to show you what they have been learning. We have been playing these games with cards and dice in class.
Have your child explain how to play these games. They should be fun to play! Use playing cards with Kings, Jacks and tens removed, and using the Queen as a zero.
‘Snap’ for a chosen number to 9.
A player draws a number from the pile, for example 7.
This becomes the chosen number they must make.
One card is turned over to begin the game.
Players take turns to turn over a card from the pack, placing the turned card on top of the card before. If the turned card can combine in some way with the previous card to make the chosen number, the player says ‘Snap’, states the equation and collects the pile of cards.
The game begins again with the same chosen number.
For example: if 9 is turned, followed by a 2, 9 – 2 = 7 is stated and the pile of cards is collected, or if 3 is turned, followed by 4, 3 + 4 = 7 is stated and the pile is collected.
‘Memory’ for a chosen number to 9.
Cards are turned down and spread out in front of the players.
A chosen number is turned over and identified.
Players take turns to draw pairs.
If the cards can make the chosen number, using either addition or subtraction, the pair is kept by the player.
For example: 4 is turned over and identified as the chosen card. A player draws a 6 and a 2, and states 6 – 2 = 4 and keeps the pair, or a player draws 1 and 3 and states 1 + 3 = 4 and keeps the pair.
The game continues till all cards are used up.
The winner is the person with the most pairs.
Pattern Matching
In this unit students explore lines of symmetry in pictures, shapes and patterns and use their own words to describe the symmetry.
In this unit, the central idea is that of symmetry, specifically line symmetry. This is an introductory and exploratory unit on this topic. As such it sets the groundwork for a great deal of later mathematics. As far as geometry is concerned, symmetry is important in classifying shapes (regular polygons versus non-regular polygons), in working with patterns, tessellations, and later curves in coordinate geometry.
Symmetry is fundamental to mathematics, even those aspects that seem to have nothing to do with geometry. For instance, in algebra, symmetric functions deal with variables that are all treated in the same way. Because symmetry is part of a child's environment, both in mathematics and the rest of their life, it is important that students explore the ideas relating to symmetry from an early age.
The learning opportunities in this unit can be differentiated by providing or removing support to students and by varying the task requirements. Ways to support students include:
The context for this unit can be adapted to recognise diversity and student interests to encourage engagement. For example:
Getting Started
In this session we explore shapes and pictures and classify these as having line symmetry and not having line symmetry. Students are encouraged to use their own language to describe objects and pictures that have symmetry.
Why have you chosen that object?
Try using the mirror to see if the sides will be the same.
Can you put a straw down the line of symmetry? (folding line)
How can we tell for sure?
Exploring
Over the next few days students explore things that have line symmetry (or reflection symmetry) as they complete a variety of activities using shapes, familiar objects, pictures, patterns. The students could be organised into small groups and rotated through the activities or they could work independently choosing from a range of activities or marking off completed activities on a contract. As you are monitoring the activities, encourage the use of the vocabulary related to symmetry: reflection (whakaata), line (rārangi), half (haurua), match (tūhono), etc
Templates showing a pattern made with mosaic tiles are provided for the students. Each pattern stops at a line.
Students use mosaic tiles to complete the pattern so that it matches on each side of the line. The line is a line of symmetry.
Teaching Notes:
Templates could be made by drawing around mosaic tiles or setting up a pattern using the tiles and photocopying it.
One student uses concrete materials to create a simple pattern showing a reflective symmetrical pattern.
Other students can locate the line of symmetry using a mirror or placing a straw (string, skewer, pencil, ice-block stick) along the line.
Provide the students with an outline of a butterfly on pre-folded A4 paper or with a line down the middle as well as images of native butterflies such as the Red Admiral (Kahukura) or Rauparaha's Copper to see the reflective symmetry on their wings.
Students paint splodges and patterns on one side of their butterfly.
The paper is then folded to create the matching pattern on the other side of the paper.
Students write a sentence about their picture either to describe how both sides are the same or to say something about the process for making the picture.
Students fold an A4 piece of paper in half one way and then the other.
They cut out shapes on the folds then unfold the shapes and mount them on paper with a contrasting colour.
Students identify the lines of symmetry by drawing them in with a coloured pen.
Some students may want to use more folds to create a more complicated pattern.
Students collect leaves and explore the symmetry or lack thereof in different species. They can create a tray displaying different leaves and use straws or string to show the lines of symmetry found.
Students create their own symmetrical patterns and get a friend to locate the line of symmetry.
Students look in a mirror to see if both sides of their face look the same.
Students take an outline drawing of a person and fold it in half to show a line of symmetry.
They add details to the person to make it a picture of themselves, for example, clothing, facial features, hair.
Outline drawings of tekoteko (carved, human-like figures) could also be used and symmetrical Māori designs such as koru could be added.
Students can write a sentence about their picture being the same on both sides.
Reflecting
In this session, review the activities that have been completed over the last few days and revisit the class charts and individual charts made in the initial activity. The students are provided with opportunities to demonstrate their understanding of symmetry, to find examples of line symmetry within the classroom, and to create a symmetrical pattern to contribute to a class book.
What was special about the patterns we made with the butterfly outline?
Why did we put a line down the pictures of ourselves (or the tekoteko)?
Why was this picture of a house put on this chart?
Can you find the line of symmetry in this picture?
Dear family and whānau,
This week we have been looking at symmetrical objects and especially those that have a line of reflective symmetry where both sides are the same, such as faces, butterflies and some shapes. Please help your child to find and draw three things from where you live that have a line of symmetry. For example the table top, the bed, or an egg carton.
Knowing five
The purpose of this unit is to make connections between the different grouping arrangements for five and the symbolic recording associated with these.
This sequence of lessons lays an important foundation for early formal recording of equations. The lesson focus on ‘numbers to five only’ should not be seen as trivial. This focus allows us to establish many key understandings about how numbers work and how we talk about and record them.
The focus in these lessons is not on counting but is on instantly recognising (subitising) combinations to five. The ability of some young children to recognise small quantities without counting has been somewhat overlooked in the emphasis we give to counting. These lessons are a combination of recognising and automatically knowing groupings to five, and recording these combinations and separations in multiple ways. In doing so we establish a base for continued strategy development.
Key concepts underpin these lessons. Students should understand that the number of objects remains the same regardless of their spatial arrangement. They should recognise that there are many different representations for the combination or separation of sets of objects, both in terms of their physical manifestation and in terms of the symbolic representation of the operation.
Early formal recording of equations builds on numeral recognition and introduces symbols for operations: + - and =. Understanding the meanings of and principle use of these symbols is essential to making sense of our symbolic recording in mathematics. Showing written equations in a number of ways emphasises the meaning of the equals sign as ‘the same as’ rather than the narrow perception that it signals that an answer follows the sign.
In communicating maths ideas, students learn to understand and use mathematical language, symbols, text and diagrams to express their thinking. They learn to record concepts in a range of contexts and in a variety of ways. Teachers have a key role in developing the students’ ability to communicate their mathematical understandings orally, visually, and in writing.
The activities suggested in this series of lessons can form the basis of independent practice tasks.
It is important to note that the focus of this unit is on instantly recognising (subitising) collections to five and not on counting the collection. While many students may be able to count five objects they may not be as proficient at subitising small collections. Ways to support students include:
The context for this unit can be adapted to suit the interests and experiences of your students by using collections that are part of the classroom or school environment (for example, shells, blocks, counters, plastic animals, pens, pebbles, leaves, seeds). Encourage students to use te reo Māori for the numbers 1-5 throughout their learning. The “number stories” that you create as a class could also reflect learning from other curriculum areas (for example, counting Minibeasts) or concepts from texts you have read as a class.
A reminder; these activities emphasise quick recognition of amounts, rather than counting, and develop and model a number of ways of recording combinations (+) and separations (-). Each session includes several activities in which an idea is developed.
Session 1
SLO: To quickly recognise patterns within and for five.
Activity 1
If these activities are difficult for your learners, you might start with smaller numbers (e.g. 1). The activities could also be done in pairs of students with mixed abilities (tuakana/teina). Whilst students work in pairs, you could work with students requiring increased support. Students ready for extension could repeat the task, in pairs, with higher numbers (e.g. numbers to 10).
Show a large dice with dots. Ask the students to hold up five fingers when they can see five dots on the dice. Show faces of the dice to the students in a random order.
Set a short time limit and have the students take turns to roll the dice, find the numeral card and picture card to match. The first student to complete a complete set of numeral and picture cards 1 – 5 OR all three ‘five’ numeral cards and pictures is the winner.
Activity 2
Activity 3
Session 2
SLOs:
Activity 1
Have students play Snap in pairs with fives frames cards. Each student has their own pile of cards upside-down in front of them. As they turn over each card they say the number of dots they can see and say snap if it’s the same number that their partner has just laid down.
Activity 2
This can be varied and made a little more abstract with the use of a dice. If a six is rolled, the student just writes 6. For every other roll the student records combinations to five.
For example if a three is rolled the student writes 3 (the dots seen) and 2 (the number of dots needed) or 3 + 2.
Introduce playing cards 1 (ace) – 5 or large digit cards 1-5. Discuss that the queen will be used as zero (she has no number) and model how a 5 and a queen is another way to show 5 + 0 = 5. Students work in pairs and play Memory Pairs to five. (Note: you could also use Numeral cards to make a set of digit cards for this game.)
The students spread out the cards between them face down and take turns to find matching pairs of cards which together make five.
The students keep the digit pairs (for example 4 + 1, 2 + 3, 5 + 0) that make five and count these at the end of the game.
Session 3
SLOs:
Have the students read what they have written and display their work.
Session 4
SLOs:
Activity 1
Discuss stories that could be written about these. For example: “There are three dinosaurs. How many more do I need to make five? Three and what is the same as five?”
Activity 2
Session 5
SLOs:
Dear parents and whānau,
In maths this week we have been really getting to know combinations of numbers to five. (5 + 0, 1 + 4, 2 + 3)
You could help by playing Snap Five using Playing cards 1 (Ace) to 5. The queen is used as zero (she has no number). You could make cards out of scrap cardboard if you don't have playing cards.
Or Memory Fives by spreading the cards out face down and taking turns finding pairs of cards that make 5.
Using five
The purpose of this unit is to build upon the knowledge students have of combining and separating groupings to five and to use this as a building block to knowing combinations within and up to ten.
The ability of young children to recognise small quantities without counting has been somewhat overlooked in the early emphasis we have given to counting. These lessons build upon the student’s recognition and knowledge of groupings to five, to scaffold ready combinations and separations in numbers to ten.
A goal within primary mathematics is for students to use partitioning strategies when operating on numbers. By building images and knowledge of basic combinations at an early age, the ability to naturally partition larger numbers will be strengthened. Students should be encouraged to instantly recognise and use their knowledge of these combinations rather than relying for an unduly prolonged period on counting strategies.
This set of lessons focuses on knowing combinations of numbers between five and ten. They develop the quinary (fives) partitioning of ‘five and’, whilst consolidating combinations (+) and separations (-) within five.
A range of equipment is available to represent these quinary partitions. Students should be encouraged to make the connections between each of these representations as well as creating some of their own.
In communicating mathematical ideas, students learn to understand and use relevant language, symbols, text and diagrams to express their thinking and record concepts in a range of contexts and in a variety of ways. Teachers have a key role in developing the students’ ability to communicate their mathematical understandings orally and in writing.
The activities suggested in this series of lessons can form the basis of independent practice tasks.
It is important to note that the focus of this unit is on instantly recognising (subitising) collections and not on counting the collection. While many students may be able to count a set of objects they may not be as proficient at subitising small collections. Ways to support students include:
This unit is focussed on combining and separating groupings to five. This should be used as a building block to knowing combinations within and up to ten. As a result of this focus, the learning in this unit is not set in a real world context. The context for this unit can be adapted to suit the interests and experiences of your students
Session 1
SLO: To recognise and describe a group of five in multiple representations of numbers within and to ten.
Activity 1
Activity 2
Describe it in words: ‘There are five dots filling up one column (or side) of the tens frame’. Or, ‘There are five dots. They fill up half of the tens frame'. Or, ‘There are five dots filling one side of the tens frame and five empty spaces on the other.’ Have the students describe to a partner what they see. Hide the tens frame. Have the student repeat their description to their partner of what they see in their mind.
For each say the number of dots and repeat 1 above. Encourage participation and accuracy in the oral descriptions including saying how many empty spaces. For example: ‘Seven. Five dots and two dots and there are three empty spaces.’
Activity 3
For example: ‘Seven. There are five white beads and two red ones.’
For example: ‘Seven. There are five dolphins and two more dolphins after the dotted line.’
Repeat with the beads or animal strips hidden. Have the students describe a number image to a partner, then show it to them to check to see if they are correct.
Session 2
SLO: To apply and record the operation of addition for groupings within ten.
Activity 1
4 = 2 + 2, ‘Four is the same as two and two.’
1 + 3 = 4 , ‘One plus three equals four.’
Activity 2
Make the link for the students between tri and three, for example: tricycle (3 wheels), triangle (3 sides and corners).
Each pair has three shuffled piles of cards turned upside down between them:
Compete to see who can ‘score a tri’ by turning over 3 matching cards. For example:
Activity 3
Activity 4
Play Murtles 5 and... (MM 5-9) (Purpose: to practice and know 5 + addition facts to 9)
Session 3
SLO: To understand the language of subtraction and apply the operation of subtraction to groupings within ten.
Activity 1
Activity 2
Activity 3
Have the students work in pairs to play Murtles 5 and... (MM 5-9) in reverse. (Purpose: to practice and know subtraction facts that make 5).
Each student covers all the numbers with see-through counters. They take turns to roll the dice.
If the number rolled can be subtracted from a covered number to leave a result of five, the counter can be removed. The aim of the game is to be the first to lighten Murtle Turtle’s load by clearing all the counters.
Session 4
SLO: To make connections between the operations of addition and subtraction and develop an understanding of the relationships underpinning the family of facts.
Activity 1
Activity 2
Have the students in pairs play ‘Go Fish’ or ‘Happy Families’ Copymaster 3 (Purpose: to identify all members of families of facts)
5 + 4 = 9 4 + 5 = 9 9 – 5 = 4 9 – 4 = 5
The aim of the game is to make the greatest number of complete families of facts. To play:
The game is played till all the cards are used and the winner is the person with the most complete families.
Session 5
SLO : To know and apply addition and subtraction facts within ten.
‘Snap’ for a chosen number to 9 (Purpose: to practice and know addition and subtraction facts to 9):
Students draw a number from the pile, for example 7. This becomes the chosen number they must make.
One card is turned over to begin the game.
Students take turns to turn over a card from the pack, placing the turned card on top of the card before. If the turned card can combine in some way with the previous card to make the chosen number, the student says ‘Snap’, states the equation and collects the pile of cards.
The game begins again with the same chosen number.
For example, for the chosen number 7: if 9 is turned, followed by a 2, 9 – 2 = 7 is stated and the pile of cards is collected, or if 3 is turned, followed by 4, 3 + 4 = 7 is stated and the pile is collected.
‘Memory’ for a chosen number to 9 (Purpose: to practice and know addition and subtraction facts to 9):
Cards are turned down and spread out in front of the students. A chosen number is turned over and identified.
Students take turns to draw pairs. If the cards can make the chosen number, using either addition or subtraction, the pair is kept by the player. For example: 4 is turned over and identified as the chosen card. A player draws a 6 and a 2, and states 6 – 2 = 4 and keeps the pair, or a player draws 1 and 3 and states 1 + 3 = 4 and keeps the pair.
The game continues until all cards are used up.
The winner is the person with the most pairs.
‘Dice pairs’ for a chosen number to 9 (Purpose: to practice and know addition and subtraction facts to 9 and family of facts members):
Each player has a blank tens frame and ten counters to place one at a time on the frame to record their score. The winner is the first one to fill their frame.
Players roll two dice, combine these to identify a chosen number of 9 or less. If the combination is more than 9 they roll again.
Players take turns to roll the two dice to make the identified number. Each time they are successful and can state an equation and the other 3 members of the family of facts, they score by placing one counter on their tens frame. For example: If 8 is the chosen number. A player rolls a 2 and a 6 and states 6 + 2 = 8, 2 + 6 = 8, 8 – 2 = 6, 8 – 6 = 2. They are correct and place one counter on their tens frame.
Have students each make puzzle cards for the class to use. (Purpose: to depict a context for a family of facts and record these):
Make available cards marked in 3 sections as shown below, felts/crayons and scissors. Have the students draw pictures of equations, write them, then cut into two puzzle pieces to match. When several have been created, students can play memory match, by turning the pieces upside down and trying to find pictures and matching equations.
Dear parents and whānau,
In class we have been practising addition and subtraction facts up to 9. Ask your child to show you some on their fingers or draw some tens frame pictures to show you what they have been learning. We have been playing these games with cards and dice in class.
Have your child explain how to play these games. They should be fun to play! Use playing cards with Kings, Jacks and tens removed, and using the Queen as a zero.
‘Snap’ for a chosen number to 9.
A player draws a number from the pile, for example 7.
This becomes the chosen number they must make.
One card is turned over to begin the game.
Players take turns to turn over a card from the pack, placing the turned card on top of the card before. If the turned card can combine in some way with the previous card to make the chosen number, the player says ‘Snap’, states the equation and collects the pile of cards.
The game begins again with the same chosen number.
For example: if 9 is turned, followed by a 2, 9 – 2 = 7 is stated and the pile of cards is collected, or if 3 is turned, followed by 4, 3 + 4 = 7 is stated and the pile is collected.
‘Memory’ for a chosen number to 9.
Cards are turned down and spread out in front of the players.
A chosen number is turned over and identified.
Players take turns to draw pairs.
If the cards can make the chosen number, using either addition or subtraction, the pair is kept by the player.
For example: 4 is turned over and identified as the chosen card. A player draws a 6 and a 2, and states 6 – 2 = 4 and keeps the pair, or a player draws 1 and 3 and states 1 + 3 = 4 and keeps the pair.
The game continues till all cards are used up.
The winner is the person with the most pairs.
Passing Time
In these five activities the ākonga explore sequences of time and the concept of faster and slower. These are teacher-led, whole class activities.
Ākonga experience with time has two aspects:
This unit concerns duration of time.
Ākonga need to develop an understanding of the duration of time and must be able to identify moments of time. Time differs from other areas of measurement, in that ākonga are more likely to meet the standard units of time such as days and hour times, before they have fully grasped the concept of duration of time.
Right from the start ākonga need to be acquainted with the concept of time as duration. They need to have many experiences of duration in order to establish that an event has a starting and finishing point and that these determine the duration of that event. Arranging pictures of events in the current sequence helps develop the concept of duration. The use of relevant words (e.g. before, after, soon, now, later, bedtime, lunchtime), helps to develop the understanding of this attribute of time.
Looking at standard cycles of time follows from the sequencing of daily events. Ākonga learn the sequence of the days of the week. However, ākonga may not intially understand the repeated use of these names. Terms such as today, tomorrow, yesterday, and weekend can be learnt in relation to the cycle of days. The sequence of months can also be developed as well as the grouping of months into seasons. Ākonga may comprehend the week cycle more quickly than the year cycle, because of more frequent experiences of the weekly cycle.
The learning opportunities in this unit can be differentiated by providing more support or challenge to ākonga. For example, session 2 could be modified to include pictures or photos of different activities that ākonga place in a sequence. Alternatively the strip of paper could be split into fewer or more sections depending on the confidence of the child.
The contexts for this unit are strongly based on the experiences of your ākonga. It could be strengthened, if appropriate, by collecting information from whānau about their child’s after school routines (session 3) and by bringing photos of different members of their whānau or themselves to order by age (session 5).
Te reo Māori vocabulary terms such as, wa (time), ra (day) roa (long), and poto (short) could be introduced in this unit and used throughout other mathematical learning. Other te reo Maori that could be useful in this unit are the names of days of the week.
Read ‘How Maui slowed the sun’. Discuss aspects from the story with ākonga.
For example; Why were Maui and his whanau angry at the sun? How do you think you would feel if you lived with his whanau? What are our days like now? Do you think this story is true? Why or why not? (Maui’s story is a traditional Maori story told to explain the length of days).
Session 1: Time on a line
In this activity we sequence events which occur within a school day.
Where does your picture go?
What happens before your picture?
When everyone has pegged their picture to the line, discuss the order of events and ask them to decide where new events belong.
Where would I put playtime?
Where would I put your parents coming to collect you from school?
Which are morning events?
Which events happen in the afternoon?
Session 2: My day
In this activity we sequence the events in our day from when we wake up until when we go to bed. We make these into a wrap-around-book.
The first thing I do is look out the window.
What do you do?
Session 3
In this activity we sequence days of the week. The activity works best if it can be developed over a week, taking a couple of minutes a day. The learning in this session could be complemented with singing a song about the days of the week (in English and other relevant languages).
On Monday I ….go to ballet, visit Grandpa etc
Ask each student to write one thing that happens on Monday on their strip. They can copy one from the class chart if they prefer.
On what day does the chain start?
How many days are in the chain? Can you say them in English? In Māori?
What day was it yesterday?
What day is it today?
What day is it tomorrow?
Session 4 : Fast and Slow
In this activity we discuss things that move quickly and slowly. We begin by reading the story of the hare and the tortoise.
Let’s wave our hands quickly…now slowly
Let’s clap quickly…slowly
Let’s blink quickly…slowly
What other things can we do quickly and then slowly? Make links to relevant learning from other curriculum areas, where possible (e.g. we can beat the drum quickly, we can write letters slowly).
Session 5: Ages
In this activity we begin by looking at pictures of people of varying ages. Alternatively, use photos of you, the teacher, at various ages from birth until your present age.
How old do you think the baby is?
Do you know any babies? Who?
Who do you think is older?
How can you tell?
How old do you think that student might be?
Is that older or younger than you?
What picture do you think I am going to show you next? Why did you guess that?
Dear family and whānau,
This week we look at the passing of time and ask each child to bring three photos to school to put in our "growing" up gallery. We will add a picture to the gallery – taken during the week at school.
Tricky Bags
This unit comprises 5 stations, which involve ākonga developing an awareness of the attributes of volume and mass. The focus is on development of the language of measurement.
Early experiences must develop an awareness of what mass is, and of the range of words that can be used to describe it. A mass needs to be brought to the attention of many ākonga attention as it is not an attribute that can be seen. They should learn to pick up and pull objects to feel their heaviness. Initially, young ākonga might describe objects as heavy or not heavy. They should gradually learn to compare and use more meaningful terms (e.g. lighter and heavier).
As with other measures, ākonga require practical experience to begin forming the concept of an object taking up space. This can be developed through lots of experience with filling and emptying containers with sand and water. Pouring experiences that make use of containers of similar shapes and different capacities (and vice versa), are also important at this stage. They also need to fill containers with objects and build structures with blocks. The use of language such as: it’s full it’s empty! There’s no space left! It can hold more! focus attention on the attribute of volume. The awareness of the attribute of volume is extended as comparisons of volume are made at the next stage.
The stations may be taken as whole class activities (fostering mahi tahi - collaboration) or they may be set up as group stations for ākonga to explore (fostering tuakana-teina - peer learning). We expect that many young ākonga will already be aware of the attributes of volume and mass. For them, these may be useful learning-through-play activities.
The learning opportunities in this unit can be differentiated by providing more support or challenge to ākonga. For example:
The measuring activities in this unit can be adapted to use objects that are part of your ākonga everyday life. For example:
Te reo Māori vocabulary terms such as papatipu (mass), kahaoro (volume), taumaha (heavy) and taimāmā (light) could be introduced in this unit and used throughout other mathematical learning.
Session 1: Tricky bags
In this activity we investigate bags that look the same, but one is empty and the others are filled with books.
Are these bags the same or different?
How do you know?
Are you sure?
Can you guess by just looking, which is heavy?
Session 2: Push and Pull
In this activity we push and pull objects to see which feels heavier.
Are these cartons the same or different?
How do you know?
Are you sure?
How could you find out?
The cartons are too large for you to lift safely. Can you think of another way of finding out how heavy they are?
Do you think they are the same?
Why? Why not?
Which carton is heavier? How do you know?
Session 3: Popcorn containers
In this activity we make popcorn containers for the Three Bears. Any other picture book that describes a quantity of something (e.g. an amount of food) could be used in this session.
What size popcorn would Father Bear want?
What size popcorn would Mother Bear want?
What size popcorn would Baby Bear want?
How could we check if Father Bear's cone holds the most?
Session 4: Fill it up
In this activity we pour water (or beans) between containers and guess how high up the water or beans will go.
What do you think will happen if I pour the beans into the ice-cream container?
How far will it fill up?
Did you guess correctly?
Is the container full?
Is it empty?
Session 5: Book corner
In this activity we look at some picture books that could be read to ākonga or enjoyed independently by ākonga, to reinforce measuring language associated with volume and mass.
More titles and measurement specific activities are available on the Level 1 Measurement Picture Books page.
Dear family and whānau,
This week in maths, we have been exploring activities that develop an awareness of volume and mass (weight). We have been using words like: heavy, light, full and empty to describe objects.
Support your child to look around your home or local area, and find objects that they would describe as being light and objects they would describe as being heavy. Take a photo of these objects or draw pictures of them so your child can share their findings with us at kura.
Ten in the Bed - Patterns
The unit uses the poem “Ten in the Bed” as a context for the students to begin to explore patterns in number and patterns within texts.
This unit looks at some simple number patterns. The work completed in this unit is the kind that helps to provide a foundation for all future pattern work and hence for algebra proper. The key things that the students should learn are that:
As the students go further up the levels they will see that it is possible to formally write down expressions to show how to go from one term in the pattern to the next. They will also see how to find formulae for step (ii).
The learning opportunities in this unit can be differentiated by providing or removing support to students and by varying the task requirements. Ways to support students include:
The contexts for this unit can be adapted to suit the experiences of your students. For example:
Te reo Māori vocabulary terms such as tauira (pattern) and tarua (repeat) as well as counting from kore ki tekau (zero to 10) could be introduced in this unit and used throughout other mathematical learning. Other te reo Māori vocabulary terms that could be useful for this unit are moenga (bed), karu (eyes), kihi (kisses) and matimati (toes).
Session 1
Here we share the story and construct a pattern grid from the story. This pattern grid will be used throughout the sessions. It could be created with paper or with the use of digital tools (e.g. Google Slides).
“Come to bed, come to bed”
There were two (rua) in the bed and the little one said
“Come to bed, come to bed.”
What is happening?
Who can see a pattern in the pictures?
What is that pattern?
Who can see a pattern in the numbers?
What is that pattern?
Students make predictions and are then asked to go and check their answers using paper and pencil or objects.
What did you do to find the answer?
Did someone do it another way?
The chart and book are compiled up to ten and both are displayed for the students to explore further (See pattern grid below.)
Session 2
Here we focus on the number of eyes in the bed to build up a pattern that goes up two at a time. If your students are confident using English and te reo Māori words for numbers, you could incorporate words for numbers from any other languages reflected in the makeup of your class. This should be appropriate for your learners, so as not to add too much additional cognitive loading.
What did you do to work it out?
Record the number of eyes the same way as in the previous session.
Look at the picture of the eyes. What is happening each time?
Look at the numbers. What is happening here each time?
What did you do? Why did you do that? Did someone do it another way?
The class jointly completes the chart (See below.)
Session 3
Here we explore a pattern that increases by five and record it on a pattern grid.
Tell the class that each evening their mother comes in to give the children a goodnight kiss. She gives each child five kisses. Record this information for one child on a chart using pictures and numbers.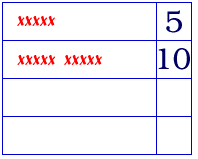
How could we find out?
Record the answer on the chart.
How many kisses will mum give now?
Can anyone see a pattern in the picture?
Is there a pattern in the numbers?
Can we use this pattern to work out how many kisses mum will need to give if there are five in the bed? Seven in the bed?
What did you do to find the answer?
Why did you do this?
Could we do it another way?
How did you use the pattern to help you find the answer?”
Session 4
The students explore patterns of ten using toes as a focus.
Does anyone know how many toes there would be if there were two children in the bed?
How did you work that out?
Session 5
The students design questions around “Ten in the Bed” for their class to solve.
We have looked at patterns of eyes, kisses and toes.
Today you are going to make up your own questions about our story for the class to solve.
(You may need to discuss this with them before they start on their own.)
Dear parents and whānau,
This week in maths we have been exploring number patterns by looking at the poem “Ten in the Bed”. Ask your child to tell you the poem.
Suppose that each child had two teddies.
How many teddies would be in the bed if there was one child in the bed?
How many teddies would be in the bed if there were two children in the bed?
How many teddies would be in the bed if there were three children in the bed?
Keep going up to ten children.
We have made a chart (below) to show the pattern. You could make an empty chart like this and fill it in with your child as you go. See if your child can guess what number of toys is going to come next. Then check that the guess is correct.
Number of teddies
Try it again with a new chart and a different number of teddies.
Enjoy encouraging your child to see number patterns.