As ākonga work through these activities the teacher may need to bring the class or small groups of ākonga together from time to time to discuss and model. Make sure an understanding of what line symmetry is and the names and attributes of common two-dimensional mathematical shapes is developing, alongside appropriate vocabulary.
Teachers may also like to generate a class display of the names and attributes of the shapes to be used over the course of the unit.
Session 1
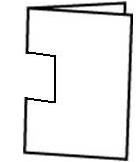
- Take a square piece of paper and fold it in half in front of the class.
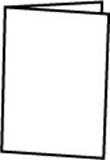
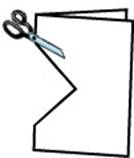
- Using scissors cut out the shape as shown below. Before opening the paper ask the class:
Will the other half be exactly the same?
How do you know the other half will be exactly the same?
When I open this piece of paper, what shape will the hole in the middle be?
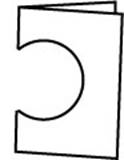
- Open the paper and open up the piece that was cut out. Talk about the attributes of the shape.
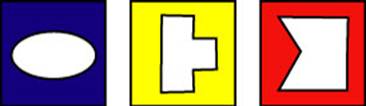
- Repeat this process cutting out the following shapes.
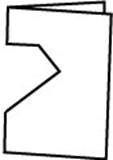
- Discuss the shapes when the paper was folded in half and when it was unfolded. The aim of this discussion is to find out what ākonga know and notice. Questions like the following could be used:
Why did it work like that?
How many sides and how many angles?
What do you notice about the length of the sides?
Are any angles the same?
Does anyone know the name of this shape? - Challenge ākonga: What other shapes could be made by folding a square piece of paper in half and cutting? What shapes do you think are impossible to make?
- Hand out square pieces of paper and get the class to experiment and try to make some new shapes. Some ākonga could record their thinking about the relative attributes that go with the shapes they make. Some ākonga may need shape blocks available to try to replicate with folding and cutting.
Session 2 - Straight Line Shapes
How many different straight line shapes can be made by folding a square piece of paper in half and cutting?
For most of this unit the focus is on straight line shapes. Using a ruler to draw the straight lines onto the folded paper before cutting is encouraged. Working in small groups, the ākonga are to make as many of the following as they can. A tuakana/teina model could work well here.
Make . . .
- 4 different looking shapes with 3 straight sides
- 4 different looking shapes with 4 straight sides
- 4 different looking shapes with more than 4 straight sides
Place these shapes into three piles.
- Shapes with 3 straight sides
- Shapes with 4 straight sides
- Shapes with more than 4 straight sides
Once as many different shapes as possible have been made, assign a category of shapes to pairs of ākonga, e.g. shapes with 3 straight sides. The pairs sort their shapes according to the way they look. A tuakana/teina model could work well here. The ākonga then share with the rest of the class why they sorted their shapes as they did. Ākonga could use known shapes or reference posters to help with this.
Session 3 – Make the Shapes
How many of the following shapes can you make by folding and cutting?
Ask ākonga to fold a square piece of paper in half and cut out a shape so that when they unfold it the hole will be one of the shapes below.
Model doing one shape in front of everyone. Emphasise that you are looking for a line in the shape that you could fold on, so both halves would be the same (this is called a line of symmetry or reflective symmetry).
Get the ākonga to predict which shapes will be the easiest to make, the hardest to make and whether any will be impossible. Ask why they think they will be easy, hard or impossible.


Make some more challenges like the ones above for others in your class. You could provide photographs of things in nature that have lines of symmetry that ākonga could replicate. Search 'reflective symmetry' in a google image search for some ideas.
Session 4 - Alphabet Shapes
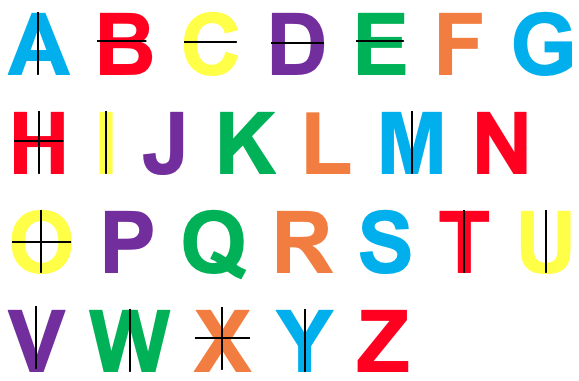
Make as many letters of the alphabet as you can by folding and cutting. This activity could also be adapted to use two-dimensional shapes that are relevant to your current context of learning (e.g. the shape of a marae, a koru, and the shape of a wave; sports gear). Some ākonga may benefit from working in pairs, and/or with the teacher in this session - at least initially.
As a reference point, here are the alphabet letters that do and do not have lines of symmetry.
Session 5 - Reflecting
Ask ākonga (mahi tahi model) to think about the things they have learnt this week, the names of shapes and about their reflective or line symmetry.
Give pairs of ākonga 3-4 of the shapes from the list below that ākonga have become familiar with while completing this unit. Ask them to describe them using their own words and the words they have been learning this week. Also ask them to identify which shapes have line or reflective symmetry. A tuakana/teina model could work well here.
Equilateral triangle, Right angle triangle, Isosceles triangle, Scalene triangle, Square, Rectangle, Trapezium, Rhombus, Parallelogram, regular and non regular Pentagon, Hexagon and Octagon.
Making benchmarks: Mass
In this unit we will explore the idea of having benchmarks of 1 kilogram and 1/2 kilogram, or 500 grams, to aid in estimating the mass of given objects.
It is difficult to estimate the mass of individual items. Try picking up a school bag and estimating its mass. It is something most people aren’t that good at because we haven’t had much practice or we don’t have the same ‘onboard’, meaning a benchmark which can be used to compare and describe the measurement attributes of different objects e.g fingertip to shoulder – 1 metre. Students need to develop personal benchmarks with which to measure various objects in their daily lives. Their personal benchmarks need to gradually relate more to standard measures such as 1 kilogram or 500 grams.
Students also need to be provided with opportunities and experiences to explore the connections between kilograms and grams. To support the understanding of these connections students will explore the language of measurement including prefixes such as kilo. The ultimate aim is for students to be able to choose appropriately from a range of strategies including estimation, knowledge of benchmarks, and knowledge of standard measures in order to approach various measuring tasks with confidence and accuracy.
It is of note that mass and weight are not the same thing. The mass of an object is a measure of the amount of matter in it, and is measured in kilograms (kg), grams (g), and milligrams (mg). Weight is the force that gravity exerts on an object and so can vary from place to place. For example, objects weigh less on the moon than they do on Earth, because the moon has less gravity than Earth. In a science context, weight is measured in Newtons (N). However, the terms mass and weight are used loosely, and inaccurately, in everyday speech to mean the same thing.
This unit can be differentiated by varying the scaffolding of the tasks to make the learning opportunities accessible to a range of students. Ways to support students include:
The context in this unit can be adapted to recognise diversity and student interests to encourage engagement. Support students to measure the mass of familiar items, items of interest or items from their culture, and encourage students to develop benchmarks for mass using items of importance to them. For example, how many marbles or LEGO bricks are in 1kg? How heavy is your favourite book? Can you find a book that weighs 1kg? How many rugby balls in 1 kg? (two, the weight of a regulation rugby ball is 460g). You could go on a nature walk around the community to locate items from nature to compare the weights of, for example rocks and shells. When providing items for students to weigh, consider how these could reflect the learning interests or cultural diversity of your class.
Te reo Māori vocabulary terms such as maihea (mass), karamu (gram), manokaramu (kilogram), and ine-taumaha (scale for measuring weight) could be introduced in this unit and used throughout other mathematical learning.
Session 1
Begin by asking students to bring in their school bag. Pose the question Who has the heaviest bag to carry to school and who carries the lightest bag to school? Several kete filled with rocks or books could be used for the same purpose.
Session 2
The following activities are to provide students with experiences to compare weights of different objects and to create a benchmark of what a kilogram feels like.
In preparation for Session 3 ask students to locate items from around their home that they believe would make good benchmarks for 1kg. Ask them to bring along an object that they think has a mass of one kilogram.
Session 3
What does kilo stand for?
How many kilograms is 2000g?
How many grams in 1.5 kg?
Session 4
The blindfolded individual verbally announces their estimate and a non-blindfolded recorder records the estimation. The non-blindfolded individuals can also estimate the mass of the mystery object.
The process can be repeated for each group member.
Session 5
Dear family and whānau,
This week we are exploring mass and having fun measuring things on the scales and starting to develop a "feel" for a kilogram. Children are asked to bring items to school that they think would be a useful benchmark for 1kg.
Ask your child how much they estimate some items around the house and environment to weigh. Ask them to share their own built in benchmarks for estimating the mass of different items around the home and environment. For example, ask them how much would a big book or a tree branch weigh or ask them to lift a bag of potatoes and explain that it's what 10kg feels like.
We have also learnt a little about how early Māori people measured length using a special person whose job was to be a “standard measure”. Do you know of any different measurement methods or tools that people from different cultures used before the introduction of units like grams, kilograms, centimetres etc.? If you do, we would love to find out more about these different measurement methods.
Figure it out
Some links from the Figure It Out series which you may find useful are:
Place value with two-digit numbers
This unit supports students learning to understand the structure of two-digit numbers and how to operate with them.
Session One
Session Two
Session Three
Session Four
Session Five
Our number system is sophisticated though it may not look like it. While numbers are all around us in the environment, the meaning of digits in those numbers and the quantities they represent are challenging to understand. Our number system is based on groupings of ten. This means ten is our preferred grouping for collecting single objects into groups. Using ten is so common around the world because humans have ten fingers. The part of our brain that controls our fingers is also associated with counting.
To represent all the numbers we could ever want we use ten digits, 0, 1, 2, 3, 4, 5, 6, 7, 8, and 9. The word for digits comes from the Latin word for fingers or toes - digitus - and related to the age-old practice of counting on fingers and toes. We don’t need a new number to represent ten because we think of it as one group of ten. When we use the numerals 10 to represent "ten" we are using place value for the first time. The place of the digit 1 tells us the size of the quantity it represents -one ten. Zero has two uses in the number system, as the number for ‘none of something’ and as a placeholder. That means it occupies a place, or places, in order to identify the values represented by the other digits. In the number 10, zero acts as a placeholder in the ones place.
Place value means that both the position of a digit as well as the value of that digit indicate what quantity it represents. In the number 73 the position of the 7 is in the tens column which means that it represents 7 units of ten (70). Renaming a number flexibly is important. In particular, it is vital that students understand that when ten ones are created they form a unit of ten. For example, the answer to 25 + 35 is 6 tens (60) because 5 ones and 5 ones combine to form another ten. Similarly, when a unit of ten is ‘decomposed’ into ones the number looks different, but still represents the same quantity. For example, 42 can be viewed as 4 tens and 2 ones, or 3 tens and 12 ones, or 2 tens and 22 ones. Decomposing is used in subtraction problems such as 72 – 48 = □ where it is helpful to view 72 as 6 tens and 12 ones.
This unit can be differentiated by varying the scaffolding of the tasks or altering the difficulty of the tasks to make the learning opportunities accessible to a range of learners. For example:
Some of the activities in this unit can be adapted to use contexts and materials that are familiar and engaging for students. For example:
Te reo Maori vocabulary terms such as uara tu (place value), poro-tekau (tens place value block), poro-tahi (ones place value block) and rautaki tatau (counting strategy) could be introduced in this unit and used throughout other mathematical learning.
Before you start this unit you may like to watch the video ‘Counting Collections’ in nzmaths.co.nz which focuses on developing number sense. As an introduction you could try ‘Count it’ for Yrs 1-3.
Prior Experience
This unit is targeted at Level 2 so students should have experience of the following skills from Level 1:
If your students have not yet developed proficiency in these skills, consider revising them prior to, or alongside, this unit.
Session One
In this session the students explore how groupings of ten can be used to aid counting and to perform calculations. They create the sets of countable objects that will be used in later lessons. Consider framing the creation of these countable objects in relation to other relevant learning (e.g. creating painted stones for the school garden, collecting cans for a school-wide food drive).
Acknowledgment: The game 60 second challenge was created by Ann Downton from Monash University, Melbourne.
What is the middle score? How can you tell?
What is the difference between the highest and the lowest score?
Session Two
In this session students learn to match quantities with two-digit numbers and vice versa.
Part One
There are four tens and seven ones.
It is not quite eight tens. There are three beans missing.
I have 26 (put the collection under the shield). I am putting 60 more beans in. What does sixty look like (6 bags of ten). How many beans are there now? How do you know?
Is there an easy way to know it will be 86 without going 26, 36, 46, ... 86?
Part Two
Close to 100 is played in pairs with a dice (1-6). Players take turns to roll the dice and decide if the digit that comes up represents tens or ones. For example, if 5 is rolled it may be used as 5 or 50.
The player adds whatever they chose to their running total. That total is recorded each roll. Players have a total of seven rolls and must use all of these rolls. The player with the total closest to 100 after seven rolls wins. Players’ totals may go over 100. Here is an example:
If appropriate, organise students into pairs or small groups to play this game. It can be adapted to the different knowledge in your class by changing the “close to” number (i.e. close to 10, close to 1000).
Session Three
In this session students investigate how 100 can be partitioned to form ‘number buddies’ like 20 + 80 and 1 + 99.
Part One
How many beads are in each row? How do you know?
How many beads are on the whole abacus (100)? How do you know?
Eight tens and six ones, No tens and nine ones, five tens and two ones.
I’ve got seven tens and four ones. Move over 100 to see how the students react. Look for them imaging where the counter might go below the hundreds board.
I have 12 tens and five ones (125)
Number story:
On day 1 the community planted 48 trees that had been delivered by the council. On day 2 the local marae offered 52 native trees for planting. Altogether 100 trees were planted.
Or: 36 + 17 + 26 + 21 = 100 (36 + 64)
At the local beach, when the tide was down, Aniwa and her cousin collected 36 cockles. The next time they went collecting cockles Aniwa found 17, Rei found 26 and Kori managed to get 21. Over two days they had collected 100 cockles.
Part Two
I have seven tens and two ones. How many beads is that? (72)
How many are left over here? How do you know? (28 - There are two tens and eight ones)
The other player must add on the correct number to that number to make the total 100. Highlight that this involves thinking about what is left from 100 using the abacus. So if correct the other player would key in + 54 = and the calculator would display 100.
The game can be played competitively in pairs with a point awarded for each correct answer (best of ten tries). Get the students to record their work with equations, e.g. 46 + 54 = 100.
Session Four
In this session the students explore different names for the same two-digit number.
Part One
In the last lesson the class explored how 100 can be renamed in lots of ways. In this lesson, we explore the same concept with other numbers.
What would happen to the beans to get the next name for 75? (A bag of ten would be shifted into the ones place)
If we kept the pattern going, when would it end? (75 ones)
What is this number? ‘fifty– twenty-eight’ or 78
What other names for that number can you find? ‘sixty-eighteen’, ‘seventy-eight’ but don’t forget ‘forty-thirty eight’, ‘thirty-forty-eight’.
Part Two
In the game students choose cards to cover the crocodile numbers of their board. The cards provide many options for covering numbers but most options involve renaming. For example, if a student wants to cover 72 they could do so by nominating:
When might renaming two-digit numbers be useful? Examples might include having ten dollar notes and one dollar coins and trying to find out how much money you have in total.
Suppose I have 63 toys. I give 26 of them to my brother or sister. How many do I have left?
How many toys do we still need to take away? Can we rename 43 so it is easy to take away the other six toys?
Session Five
In this session students apply the place value structure of two-digit numbers to change a given number into a different number either mentally or with support of materials.
Part One
Suppose I am set the challenge of changing from 30 to 80. What could I do? Is there a single operation I could key in?
Suppose I am set the challenge of changing 80 to 10 in a single operation. What might I do?
This time I have to change 15 into 46 with one operation. What can I do?
If I write 15 + □ = 47 does that help you work out what to do?
Part Two
Players take turns to enter a starting number, say 34, and pass over the calculator with a change instruction, say “Change 34 into 88 with one operation.” Restrict the numbers to two places though moving to 3 digits is a significant extension for more competent students. A player gets a point for every correct change they give. The asker gets a point if the suggested change is incorrect. Look for the following:
What did you do to make the problems harder for your partner?
Dear parents and whānau,
Our next mathematics unit is based on Place Value. So we will be working a lot with two-digit numbers like 26 and 79. We will be using materials grouped in tens so we can make sense of the quantities that the numbers represent. For example, 62 means 6 tens and 2 ones and is said as “Sixty-two.”
We will also rename the two-digit numbers in flexible ways so that we can apply renaming to the operations, particularly addition and subtraction. Ask your child to discuss the strategies we are learning and explain their thinking.
That's not fair!
In this unit we play probability games and learn about sample space and a sense of fairness.
Three important ideas underpin this unit:
Students should be given lots of experience with spinners, coins, dice and other equipment that generates outcomes at random (e.g. drawing a name from a hat). The equipment can be used to play games, which should lead to a discussion of fairness (or otherwise) of the equipment and to finding the possible outcomes of using it. As they play games, record results and use the results to make predictions, they develop an important understanding - that with probability they can never know exactly what will happen next, but they get an idea about what to expect.
Students at this Level will begin to explore the concept of equally likely events, such as getting a head or tail from the toss of a coin, or the spin of a spinner with two equal sized regions. Students can handle simple fractions at Level 2, and assigning simple probabilities provides them with an interesting and useful application of these numbers. Students can understand that the probability of getting a head when tossing a coin is 1/2. Given a spinner that is marked off equally in three colours, students can also understand that the probability of getting any one of the colours is 1/3 because there are three equally likely events and one of them has to happen.
This unit can be differentiated by varying the scaffolding of the tasks or altering expectations to make the learning opportunities accessible to a range of learners. For example:
Some of the activities in this unit can be adapted to use contexts and materials that are familiar and engaging for students. For example:
Te reo Māori vocabulary terms such as tūponotanga (probability), matapae (prediction) and tōkeke (fair) could be introduced in this unit and used throughout other mathematical learning. Another term that may be useful in this unit is Putakitaki (Paradise duck).
We introduce the unit by rolling dice and investigating the numbers that come up.
What number do you think I will roll?
Why do you think that?
Roll the die and see whether students' predictions were correct. Repeat a couple of times.
List these on the board and tell the students that this list of all the possible outcomes is called the sample space.
List these predictions on the board or on chart paper.
With the class, roll the die twenty times keeping track with a tally chart. Summarise onto a class chart.
lllllGive pairs of students a die and ask them to work together to roll it 20 times. As they finish, ask them to record their results on the class chart.
Why are all our results different?
If you rolled the die another twenty times what do you think would happen? Why?
Now let's add our results together.
What do you think that we will find?
Use a calculator to sum down each of the columns
Number rolled
240 rolls
At this level it is likely that the students may attribute uneven results to "special luck". It is through continued experience that students come to appreciate the mathematics of probability.
Exploring
Over the next 3 days the students play a number of probability games. Copymasters for each game are attached to this unit. They are encouraged to think about the sample space and to make predictions as they play the games. They will also begin to think about whether the games are fair.
Tell the students that they are going to play a number of games in pairs over the next 3 days and there are some general things they need to do with each game:
Note: At this level do not expect the students to make mathematically sound predictions or systematically identify all possible outcomes. It is likely that they will make incomplete lists of possible outcomes. In future work, as they have similar experiences, their thinking will become more systematic and mathematically sound. The main aim of this unit is to start the students thinking about possible outcomes and notions of fairness.
Probability games to select from:
Bunny hop (Copymaster 1)
Sample space = {Heads, Tails}
As there is an equal chance of getting a head or a tail you would expect the bunny to be close to 0 after a number of turns.
Doubles (Copymaster 2)
Sample space
There are 6 ways of getting a double or 6 out of 36.
It is unlikely that the students will be this systematic about identifying the sample space. However they should identify that you are more likely to get non-doubles.
Pūkeko racing (Copymaster 3)
Sample space = {2, 3, 4, 5, 6, 7, 8, 9, 10, 11, 12}
The table shows the ways of getting each sum. 7 (6 ways) is the most likely followed by 6 and 8 (5 ways).
Odds or evens (Copymaster 4)
Sample space = {1 3, 5 (odd) and 2, 4, 6 (even)}
For this game the probability of each player winning is equal.
Sums (Copymaster 5)
From the table for Pūkeko racing you can see that there are 24 ways of rolling a 5, 6, 7, 8 or 9 which is a probability of 24 out of 36 or 2/3. The probability of rolling a 2, 3, 4, 10, 11, or 12 out of 35 or 1/3.
Up or down (Copymaster 6)
Sample space = {heads, tails}
This is very similar to the bunny hop game. You expect the climber to be close to 0 after a number of turns.
At the end of each session have a class sharing time to discuss a couple of the games.
Reflecting
On the final day of the unit ask the students to invent their own games using either coins or dice. Share the games with others in the class.
Which number came up the most? Why do you think it did?
If we rolled the die again do you think we would get the same results? Why?
Dear parents and whānau,
This week in maths we have been playing probability games, discussing if they are fair and what likely outcomes might be. We played the Bunny Hop game in class and we would like to share this with you.
Bunny Hop Game
The winner is the player who is on the highest number after 10 tosses each. Before you play, talk together about where you think the counters are most likely to be after 10 tosses each.
Fold and cut
In this unit ākonga explore line or reflective symmetry and the names and attributes of two-dimensional mathematical shapes. They fold and cut out shapes to make shapes that have line symmetry.
A shape that can be folded down a line to produce two matching halves is said to have line symmetry or reflective symmetry. The fold-line is called a line of symmetry. A line of symmetry can also be described as a mirror line or line of reflection because the part of the object that is on one side of the line is reflected onto the other side of the line.
The goal at this level is to support ākonga to independently describe reflective symmetry in their own language, and demonstrate understanding of this concept. This creates a foundation on which to build a more complex understanding of symmetry at higher levels of the curriculum, e.g. the order of reflective symmetry and rotational symmetry.
Learning the names and attributes of common two-dimensional mathematical shapes is important and necessary as ākonga develop a geometry vocabulary. The following are common two-dimensional mathematical shapes and their attributes that could be introduced in this unit. Not all these shapes need to be presented to all ākonga. Teachers need to select the ones appropriate, based on the readiness of ākonga.
Note that pentagons, hexagons and octagons are any shapes with 5, 6 or 8 straight sides. The length of sides do not need to be the same nor do the angles need to be the same.
Pentagons, hexagons and octagons with sides the same length and angles the same are called regular pentagons, regular hexagons and regular octagons. A square is a regular quadrilateral and an equilateral triangle is a regular triangle.
This unit can be differentiated by varying the scaffolding of the tasks or altering the difficulty of the tasks to make the learning opportunities accessible to a range of learners. For example:
The context in this unit can be adapted to recognise diversity and student interests to encourage engagement. Ākonga can identify familiar and natural objects with line symmetry, such as; skateboards, swimming goggles, running shoes, pipi or other shells, flowers, maunga reflection on an awa, leaves, butterflies, logos, kōwhaiwhai patterns or other cultural motifs.
Te reo Māori vocabulary terms such as āhua (shape), whakaata (reflect/reflection), and hangarite (symmetry/symmetrical) could be introduced in this unit and used throughout other mathematical learning.
As ākonga work through these activities the teacher may need to bring the class or small groups of ākonga together from time to time to discuss and model. Make sure an understanding of what line symmetry is and the names and attributes of common two-dimensional mathematical shapes is developing, alongside appropriate vocabulary.
Teachers may also like to generate a class display of the names and attributes of the shapes to be used over the course of the unit.
Session 1
Will the other half be exactly the same?
How do you know the other half will be exactly the same?
When I open this piece of paper, what shape will the hole in the middle be?
Why did it work like that?
How many sides and how many angles?
What do you notice about the length of the sides?
Are any angles the same?
Does anyone know the name of this shape?
Session 2 - Straight Line Shapes
How many different straight line shapes can be made by folding a square piece of paper in half and cutting?
For most of this unit the focus is on straight line shapes. Using a ruler to draw the straight lines onto the folded paper before cutting is encouraged. Working in small groups, the ākonga are to make as many of the following as they can. A tuakana/teina model could work well here.
Make . . .
Place these shapes into three piles.
Once as many different shapes as possible have been made, assign a category of shapes to pairs of ākonga, e.g. shapes with 3 straight sides. The pairs sort their shapes according to the way they look. A tuakana/teina model could work well here. The ākonga then share with the rest of the class why they sorted their shapes as they did. Ākonga could use known shapes or reference posters to help with this.
Session 3 – Make the Shapes
How many of the following shapes can you make by folding and cutting?
Ask ākonga to fold a square piece of paper in half and cut out a shape so that when they unfold it the hole will be one of the shapes below.
Model doing one shape in front of everyone. Emphasise that you are looking for a line in the shape that you could fold on, so both halves would be the same (this is called a line of symmetry or reflective symmetry).
Get the ākonga to predict which shapes will be the easiest to make, the hardest to make and whether any will be impossible. Ask why they think they will be easy, hard or impossible.
Make some more challenges like the ones above for others in your class. You could provide photographs of things in nature that have lines of symmetry that ākonga could replicate. Search 'reflective symmetry' in a google image search for some ideas.
Session 4 - Alphabet Shapes
Make as many letters of the alphabet as you can by folding and cutting. This activity could also be adapted to use two-dimensional shapes that are relevant to your current context of learning (e.g. the shape of a marae, a koru, and the shape of a wave; sports gear). Some ākonga may benefit from working in pairs, and/or with the teacher in this session - at least initially.
As a reference point, here are the alphabet letters that do and do not have lines of symmetry.
Session 5 - Reflecting
Ask ākonga (mahi tahi model) to think about the things they have learnt this week, the names of shapes and about their reflective or line symmetry.
Give pairs of ākonga 3-4 of the shapes from the list below that ākonga have become familiar with while completing this unit. Ask them to describe them using their own words and the words they have been learning this week. Also ask them to identify which shapes have line or reflective symmetry. A tuakana/teina model could work well here.
Equilateral triangle, Right angle triangle, Isosceles triangle, Scalene triangle, Square, Rectangle, Trapezium, Rhombus, Parallelogram, regular and non regular Pentagon, Hexagon and Octagon.
Dear family and whānau,
We have been exploring different shapes in class this week, focusing on ones that have reflective symmetry, that is shapes that can be folded in half so both halves are the same. It would be appreciated if you could support your child to look for objects and shapes around your home that have reflective or line symmetry. They could make a list of the objects and draw a picture showing how the object could be 'folded'. Furniture, art, cutlery, plates, electronic items, things in the garden and other items around the home could have reflective symmetry.
Figure it Out Links
A link from the Figure It Out series which you may find useful is: