Purpose
The purpose of this unit of three session is to develop understanding of how to recognise and record relationships of (equality and) inequality in mathematical situations.
Specific Learning Outcomes
- Understand the equals symbol as an expression of a relationship of equivalence, and explain this.
- Recognise situations of inequality and use the inequality (‘is not equal to’) symbol, ≠.
- Understand that < and > symbols can make equivalent statements.
- Use relationship symbols =, <, > in equations and expressions to represent situations in story problems.
- Understand how to find and express the difference between unequal amounts.
Description of Mathematics
The first relationship symbol that most students encounter is the equals symbol, =, which communicates a relationship of equivalence between amounts. It is important for students to understand that symbols help us to express relationships between numbers and that equivalence is just one such relationship.
Inequality is the relationship that holds between two values when they are different. Their relative value is described with specific language including ‘is greater than’, ‘is more than’, ‘is bigger than’ or ‘is less than ‘ or ‘is fewer than’. These are expressed using the symbols, <, >, which are said to show ‘strict’ relationships of inequality. Whilst not introduced here, the symbols, ≤ , meaning ‘is less than or equal to’, and , ≥, meaning ‘is greater than or equal to’, are known as ‘not strict’. The notation ≠, meaning ‘is not equal to’ is briefly introduced here as it is a useful, if infrequently used, relationship symbol.
Algebra is the area of mathematics that uses letters and symbols to represent numbers, points and other objects, as well as the relationships between them. Through exploring both equality and inequality relationships, and the symbols used to express these, students develop an important and heightened awareness of the relational aspect of mathematics, rather than simply holding the computational view of mathematics that arises from the arithmetic emphasis that is dominant in many classrooms.
Opportunities for Adaptation and Differentiation
The learning opportunities in this unit can be differentiated by providing or removing support to students and by varying the task requirements. The difficulty of tasks can be varied in many ways including:
- encouraging students to work collaboratively in partnerships such as older or more skilled learners working with younger or less capable learners (tuakana/teina)
- varying the complexity of the numbers used in the problem to match the number understanding of students in your class. For example, increase the complexity by using larger numbers for students who are able to count-on to solve problems.
- using the activities suggested to form the basis of independent practice tasks.
The contexts for this unit can be adapted to suit the interests and experiences of your students. For example:
- instead of heights of buildings you might use heights of trees in a native forest, the heights of mountains such as the Southern Alps, or heights of people
- change the stories from the copymaster to include more familiar contexts
- te reo Māori that could be introduced in these sessions are orite (equal) and kaore e orite (not equal)
Required Resource Materials
- Unifix cubes
- Street map diagram (a simple, made up one), A1 or A2 size, for example:

- Small blank cards
- Copymaster 1
Activity
Session 1
SLOs:
- Understand the equals symbol as an expression of a relationship of equivalence, and explain this.
- Recognise situations of inequality and use the ‘is not equal to’ symbol.
- Recognise and describe in words the relative size of amounts.
Activity 1
- Begin by talking about buildings in your school, suburb, town, city, or a city nearby. List any tall buildings which are known by name. Ask if anyone knows any (familiar) buildings that might be the same height. If using trees, begin by talking about the trees in a local bush reserve, forest or garden and have an image of a forest scape ready for step 2.
- Show a skyline picture of Auckland City and ask what features the students notice. (eg. ‘buildings are of different heights’).

Elicit descriptive, comparative language: tall, taller, tallest, short, shorter, shortest, same).
Point out that we have been comparing and describing the buildings in relation to one another and explain that we will now be investigating relationships between numbers. - Make unifix cubes available to the students and tell them to think of their favourite number between (and including) one and ten. Ask them to take this number of cubes of one colour.
For example, one student takes seven pink cubes.
Place a simple city street map in front of the students, or create one with them.

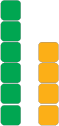
Have the students join their cubes to make buildings for this city. When they have made their ‘tower buildings’, have them locate them, standing up, in places of their choice between the streets, creating a ‘cityscape'. If adapting to use native forest, rivers and streams could replace the roads of the street map, and cubes can become 'trees'. This adaptation would be continued on throughout the remainder of the sessions and activities. - Have students look carefully at their ‘city’ and identify any buildings that they think might be the same height. Select several students to test their idea by taking the two identified ‘towers’, standing them side-by-side and comparing their heights. If they are the same they should count the number of ‘storeys high’ they are (number of cubes) and, on the class chart, write an equation and words to show this. For example:
 5 = 5 five is equal to five
Read the equation together, “Five is equal to five” and “Five is the same as five.”
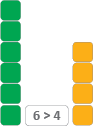
The buildings are then returned to their place ‘in the city’. - Have students now identify towers that are not the same in height.
Have a student describe how these numbers (of storeys) are ‘related’: “six is more than four”, “four is less than six”, “six is not equal to four.” Ask, “How can you write this?” Record the students’ suggestions, accepting all ideas. - On the class chart write "6 ≠ 4, six is not equal to four" and have students in pairs, read this expression of inequality to each other, read it together.
Have students identify more ‘unequal buildings’ and record these as inequality statements on the chart and read them.
If possible retain the class ‘cityscape’ for Session 2.
Activity 2
- Make plain A4 paper, felt pens, and cubes available to students. Have them work in pairs to create their own small ‘city’ with street map and cube buildings (or forest or mountain range).
- On separate paper, each student is to write about the buildings in their ‘city’. They should draw at least four pairs of buildings and for these, write both equality and inequality statements in words and symbols, as modeled in Activity 1, Step 5 (above).
Have student pairs retain their maps for Session 2.
Activity 3
Conclude the session by having the students share their recording and discussing how the symbols = and ≠ show us how numbers are related to each other.
Photograph the class and pair ‘city models’ to display with student recording from Activity 2, and from further sessions.
Session 2
SLOs:
- Recognise situations of inequality and use the appropriate symbols, ≠, <, >, to express this.
- Understand that in using < and > symbols, we can make equivalent statements.
Activity 1
- Place the class ‘city’ from Session 1 with its map and tower buildings in front of the students. Review the symbols = and ≠ and ask the students, “What is common about these symbols?” (They both express a relationship between numbers.)
Explain that there are more relationship symbols and that they will learn about two more in this session. - Ask for a volunteer to find two towers that match this number expression:
6 ≠ 4
Have student pairs discuss the towers
then, as a class, record their observations, including ‘6 is more than 4’ and ‘4 is less than 6.’ Ask if anyone knows symbols that show each of these relationships. - Write these symbols on the class chart.
< >
Write the words, ‘is more than’, and ‘is greater than’, together on the class chart, and ‘is less than’ or ‘is fewer than’ together.
Have students discuss these in pairs and decide which symbol goes with which pair of phrases and why they think that. - Accept all ideas. Conclude, agree, model and record "six is greater than/is more than 4".
Activity 2
- Make available to the students small pieces of card (the same size)and felt pens or pencils. Explain that they are now to work in pairs with their own ‘city’.
Each student is to write at least four inequality cards for pairs of ‘buildings’. For example:
- Have the students then mix up their cards so that they don’t match the ‘buildings’. They then swap with another student pair, and correctly match their cards and ‘buildings’.
Activity 3
- As a class, discuss and conclude that the same relationships can also be expressed using the “is less than’ or ‘is fewer than’ symbol. Demonstrate with ‘buildings’ (cubes) from Activity 1, Step 4. (above):

"Four is less than/is fewer than 6" - Have students return to their own displays from Activity 2, Step 1 and write four more cards expressing ‘is less than’ relationships.
Each student should now have written at least 4 pairs of cards; 16 cards in total for the pair.
Activity 4
- Have students shuffle the cards they have made in Activity 3, Step 2 and swap these with another student pair.
Each pair is to play a short Memory game with these cards by spreading them out face down in front of them and trying to find matching pairs of statements. For example:


- Students who finish quickly can create towers to match some of the pairs of inequality statements.
Activity 5
Conclude the session by reviewing the four relationship symbols (one of equality and three of inequality) that have been used in Sessions 1 and 2.
=, ≠, <, >.
Retain student ‘cities’ and relationship cards for Session 3.
Session 3
SLOs:
- Use relationship symbols =, <, > in equations and expressions to represent situations in story problems.
- Understand how to find and express the difference between unequal amounts.
Activity 1
- Begin asking, “Who walked to school this morning?” Say that you are going to read a short story (Copymaster 1).
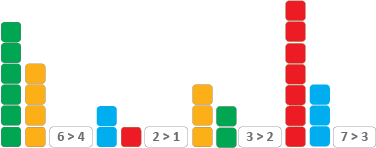
Explain that the students must listen very carefully to the story. As they do so, they should record relationship expressions, in order, for any numbers that they hear. Read the story once. Highlight an example (eg. 3 >2 weetbix) and read the story again. - Have students compare their expressions and equations in pairs.
- Share and discuss the expressions and equations as a class, recording them on the class chart.
Activity 2
- Write the word ‘difference’ on the class chart. Ask students to explain this, giving examples from their own life, and record their ideas. For example: "There’s a difference between the number of people in my family and Maia’s family. There’s five in my family and eight in Maia’s. They’re not the same."
- Refer to the inequality expressions recorded on the class chart in Activity 1, Step 2
For each discuss and record the difference. For example:
Weetbix: 3 > 2, 2 < 3,
Three is one more than two. Two is one less than three.
The difference is one.
Age: 60 > 50, 50 < 60
Sixty is ten more than fifty. Fifty is ten less than sixty.
The difference is ten.
Cats: 6 > 0, 0 < 6
Six is six more than zero. Zero is six less than six.
The difference is six.
Dog: 1 = 1
One is the same as one. There is no difference.
The difference is zero.
Activity 3
- Make available to the students, small pieces of card (the same size) and felt pens or pencils.
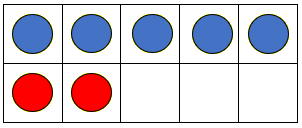
Display two ‘towers’ from the class ‘city’. Ask. “What is the difference between the two towers? How do you know?” For example:
Show: and write 
Elicit explanations such as 'there are two more green ones, there are two less/fewer yellow ones'.
Write 6 – 4 = 2 on the class chart and on a card. 
Highlight the fact that when we solve a subtraction problem we are finding the difference. - Have student pairs go to their ‘cities’ and relationship cards from Session 2.
Explain that they are to write a difference card and a subtraction equation card as shown in Activity 3, Step 1 for each of their inequality expression pairs. Have partners check each other’s cards.
For the pair, there are now 32 cards in total, 8 sets of four cards.
These can be put together in a bag, or combined with an elastic band. - Have student pairs exchange full sets of cards. Have pairs, or fours, play Fish for Four with one set of cards.
Purpose: To recognise equivalent pairs of inequality expressions, and their matching subtraction equation and difference statements.
How to play:
Cards are shuffled. Five are dealt to each player. The spare cards are put in a pile, face down, handy to all players.
Players check to see if they have any complete sets in their hand. If so, these are displayed face up in front of them. Each player then privately identifies which set they will collect and they take turns to ask one other named player for a specific card to complete their set.
For example:
In hand: and
At their turn, the player says, “Name, do you have the card, four is less than six?”
If the named player has the card, they must forfeit it. The successful player can ask again till they are told, “No. Go fish.” That player then takes a card from the top of the upturned pile of spare cards. It is then the turn of the next player.
The winner is the player with the most complete sets when all cards are used.
Activity 4
Conclude this session by reviewing key learning from this series of three lessons. Sets of cards can be used as an independent consolidation task.
Home Link
Dear parents and whānau,
In maths we mostly write equations. These use the equals (=) symbol. This symbol tells us that two amounts are equivalent. However sometimes numbers or amounts are not equal.
In maths this week, the students have been learning how to record inequality expressions such as 8 > 6, (eight is greater than or more than six) and 6 < 8 (six is less than or fewer than eight.) They have also learned to find the difference between numbers by solving a subtraction equation (in this case 8 – 6 = 2) and to state the difference (the difference is 2).
They have made their own card games to play with you at home.
Your child will explain how to play Fish for Four.
We hope you enjoy playing Fish for Four, and enjoy helping your child to practice their learning about inequality expressions and number relationships.
Lonely kiwi
In this unit we have a first look at uncertainty and chance. We begin to develop an intuitive sense of what chance and possibilities are about through games that involve following rules, making predictions and seeing what happens.
Although students at this level won't be ready to fully grasp the idea of chance they will develop some valuable intuitive notions. Underlying the activities is the idea that some events can be influenced by information, whereas others rely largely on luck. This provides the basis for the two ways of determining probabilities: theoretically and experimentally. Later on, we explore certain situations such as rolling dice, using spinners, choosing cards to determine precise values of probability. This is the theoretical aspect. Ideally you would always like to do this as you are then sure exactly what the probability is. However, in other situations we have to rely on a series of experiments and deduce the likely probability of an event through the long-term frequency of its occurrence. This applies to the kind of events that insurance companies are interested in such as the likelihood of an accident or the length of life of a 30 year old male.
The learning opportunities in this unit can be differentiated by providing or removing support to students and by varying the task requirements. Ways to adjust the difficulty of the tasks include:
The contexts for this unit can be adapted to suit the interests and experiences of your students. For example:
Te reo Māori vocabulary terms such as ika (fish), ōrite (same), rerekē (different) and tūponotanga (chance) as well as colours in te reo Māori (such as whero, ma, kōwhai, etc) and counting from tahi ki tekau (one to 10) could be introduced in this unit and used throughout other mathematical learning.
Session One: Tūi and Kereru
In this first session we make our own set of cards using pictures of Tūi and Kereru.
Shuffle the cards.
Put the cards face down in one pile.
Players decide who will collect "same pairs" and who will collect "different" pairs.
Take turns turning a card from the top of the pile.
Compare the two cards. If they are the same, the player collecting "same pairs" takes them. If they are different, the other player takes them.
The game continues until all cards are used.
The winner is the player who collects the most cards.
Was one of the players luckier than the other one? What made you think this?
How many times did you win?
How many times did your partner win?
Was it better to be a "same" or a "different"? Why?
(note: The probability of different pairs is slightly greater than that of same pairs.)
Session Two: Tūi, Kereru and Kea
I this session we add 6 Kea to our pack of Tūi and Kereru cards and play the game again.
Was one of the players luckier than the other one? What made you think this?
How many times did you win?
How many times did your partner win?
Was it better to be a "same" or a "different"? Why?
Was it easier to win today? Why/Why not?
Session Three: The little lost kiwi
In this session we add one kiwi to our pack of Tūi, Kereru and Kea and play a new game.
Rules:
Spread the cards out face down.
Players take turns to turn over two cards.
If the cards are the same the player keeps the pair of cards but does not have another turn.
If the cards are different the cards are turned back face down.
Continue taking turns until all the cards (except the kiwi) are collected.
What card do you think you will turn up next? Why do you think that?
Which cards do you think will be the last?
Which are the hardest pairs to find? Why?
Which are the easiest pairs to find?
What can you tell me about the kiwi?
Why do you think the game is called The little lost kiwi?
Can you think of another name for our game?
Session Four: Greedy Pūkeko
In this activity the students roll a dice to feed fish to our three Pūkeko. The students will investigate the chance of giving a fish to their Pūkeko.
Rules:
The students take turns rolling the dice.
The student whose colour shows gives their Pūkeko a fish.
The game continues with players taking turns until all the fish are eaten.
Which coloured Pūkeko got the most fish?
Was there a lucky colour in your group?
Was it lucky in all the groups? Why/Why not?
Session Five: Feeding Greedy Pūkeko
In this game the students experiment with different dice.
Rules:
The students take turns first selecting and then rolling one of the dice.
They give a fish to the Pūkeko whose colour is shown.
The game continues with players taking turns until all the fish are eaten.
Which Pūkeko got the most fish?
Was there a lucky colour in your group? Why?
Was it lucky in all the groups? Why/Why not?
What difference did the dice you chose make?
In the game we want to stop Greedy Pūkeko from screeching for food. What should we do? (Check that the students understand that they need to feed Greedy Pūkeko to stop him screeching.)
Dear parents and whānau,
This week we have been learning about probability by playing games. As we have played the games we have thought about how likely it is to get certain things. Your child will bring home one of our copies of Little Lost Kiwi. As you play the game you could help your child by asking questions that focus on the likelihood or chance of finding pairs. What card do you think you will turn up next? Why do you think that? Which cards do you think will be last? Which are the hardest pairs to find? Why? Which are the easiest pairs to find? What can you tell me about the pig? Why do you think the game is called The little lost kiwi? Can you think of another name for our game?
Rules for Little Lost Kiwi.
We hope that together you enjoy playing Little Lost Kiwi.
The teddy bears’ fraction picnic
This unit supports students to equally partition objects and sets into fractional parts.
In this unit students explore equal partitioning of objects and sets, and how to name the parts they create using fractions. The easiest partitions are those related to halving since symmetry can be used. For example: halves come from partitioning a whole into two equal parts, and quarters come from partitioning a whole into four equal parts.
An object is partitioned according to an attribute, or characteristic. For example, a banana might be partitioned by length, but a sandwich partitioned by area. Some attributes are more difficult to work with than others. Length is the easiest attribute but others such as area, volume (capacity), and time are more difficult.
The results of partitioning a set into fraction parts can be anticipated, using number knowledge and strategies. For example, one quarter of 20 could be found by:
In this unit we apply three criteria when evaluating students’ capacity to partition and object or set into fractional parts:
The learning opportunities in this unit can be differentiated by providing or removing support to students and by varying the task requirements. The difficulty of tasks can be varied in many ways including:
The contexts for this unit can be adapted to suit the interests and experiences of your students. For example:
Te reo Māori vocabulary terms such as hautau (fraction), ōrite (equal), haurua (half), hauwha (quarter), hautoru (third) and toha (share) as well as counting from kore ki tekau (zero to 10) could be introduced in this unit and used throughout other mathematical learning. Other te reo Maori that could be useful in this unit are teti pea (teddy bear) and hanawiti (sandwich).
Session One
Rawiri and Hine are friends. They always share their food equally. How could they cut this sandwich? (Slide Two)
What does equal mean?
What do we call these pieces? (halves)
Why do you think there is a 1 and a 2? (2 refers to the number of those parts that make one)
Is the sandwich cut in half? Why? Why not?
What other ways could Rawiri and Hine cut their sandwich in half?
Cut this sandwich in two pieces that are not halves.
What is true for the sandwiches that are cut in half?
What is the same or the sandwiches that are not cut in half?
The key idea of halving is that both Rawiri and Hine get the same amount of sandwich. As the sandwich is not exactly symmetric through a horizontal mirror line you might get interesting conversation about the equality of shares. Slide Five may provide some stimulus for the discussion. Using the cut-out pieces of sandwich, show how halves map onto each other by reflection (flipping) or rotating (turning). With paper sandwiches you can fold to show that mapping of one half onto another.
Can your students distinguish when a shape or set has been halved?
Session Two
In this session, students explore the impact of other Teddy Bears joining in the picnic. What happens to the size of the portions as more shares are needed? How do we name the shares?
Imagine that four Teddy Bears went on the picnic instead of two. Pāpā still packed the same amount of food. What would happen then?
How could we cut a sandwich into four equal parts? What will the parts be called?
Does each Teddy Bear get the same amount of sandwich?
Common solutions are:
Students often miss the option of dividing the area of the sandwich by length…
Or other possibilities…
This time the challenge is to share each picnic food into quarters.
The shape of the sector of cheese places a restriction on how it can be partitioned. Likely responses are (left is correct, right is not):
Finish the session with the game called ‘Make a whole sandwich.” Students need copies of the first page of Copymaster 3 (halves and quarters) and a blank dice labelled, 1/2, 1/2, 14, 2/4, 3/4 and choose. The aim of the game is for players to make as many whole sandwiches as they can.
Players take turns to:
At any time a player can rearrange their sandwich pieces to make as many whole sandwiches as possible. Time the game to finish in five minutes which is long enough to gather a lot of pieces.
Session Three
In this session, students explore the equal sharing of picnic foods among three Teddy Bears. Thirding an object or set is generally harder than quartering because symmetry is harder to use. Your students should observe that thirds of the same object or set are smaller than halves but larger than quarters.
We explored how to cut sandwiches into two and four equal parts. What are those parts called? (halves and quarters)
What parts will we get if we share the food among three Teddy Bears?
Which is bigger, one half or one quarter? Why?
How big do you think one third will be? Why?
Find different ways to share one sandwich equally among the three Teddy Bears.
Is this sandwich cut into thirds? (No, the parts are unequal)
Do the parts have to be the same shape to be equal? (Banana is a good example)
Why are thirds harder to make than halves and quarters? What other fractions would be hard to make? Why?
PowerPoint 2- Slides 9-11, show how halving quarters produces eighths and halving thirds produces sixths. It is important for students to connect the naming of these equal parts to how many of those parts form one whole (sandwich).
One sixth Two sixths Three sixths Four sixths
(or one third) (or one half) (or two thirds)
How much of a sandwich is 2/3? 3/4? 5/8? etc.
Session Four
In this session, students work from part to whole. Usually students encounter problems where the whole is well-defined, and they are shown, or must create, the required fraction. As they progress to more complex tasks, it is also important that students can relate a fraction-part back to the whole from which that part may have been created.
Suppose there are eight Teddy Bears at the picnic. This piece is one eighth of a sandwich, how can we find the size of the whole sandwich?
How can we check [Name]’s estimate of the whole sandwich?
This is one fifth of the banana. How long is the banana?
This is one third of the doughnut. How big is the doughnut?
This is one half of the bun. How big is the bun?
This is one sixth of the chocolate cake. How big is the cake?
This is one quarter of the packet of walnuts. How many walnuts are in the whole packet?
Independent work
I will make a chart with this pretend piece of food.
Provide the students with a copy of Copymaster 5 to reduce the writing load.
Session Five
In this session, students connect fractions of regions and fractions of sets. Partitioning of a set into equal parts fluently requires multiplicative thinking that most young students do not possess yet. However, exposure to problems with equal partitioning provides opportunities to learn that develop additive part-whole thinking and the ‘sets of equal sets’ concept, that is fundamental to multiplication and division.
How many smarties do you think go on each quarter? Remember that the quarters must be equal.
Let’s imagine there are three smarties on each quarter. How many smarties would that be on the whole cake?
Last time the cake was in quarters. What fractions is it in now? (fifths)
Will the five Teddy Bears get more or less than four Teddy Bears got?
How many smarties are on the cake?
If I put two smarties on each fifth how many would be on the whole cake?
How many smarties can I put on each fifth?
Dear family and whānau,
This week we are exploring fractions in a story about the Teddy Bears’ Picnic. We know that fractions come from splitting one thing into equal parts. The number of parts we make tells us the name of the fraction. For example, if we split one into four parts, we make quarters or fourths.
You can support your child with this learning by asking them to split drawings of shapes into various equal parts, and then having them recreate what a whole may look like of other shapes (if the shape was a part, such as a half or quarter).
Ways to Add
In this unit students explore different ways to communicate and explain adding numbers within ten and beyond. The representations included are number lines, set diagrams, animal strips and tens frames.
In this unit students are introduced to different ways to represent the addition of single digit numbers using sentences, equations and number lines. Students will be able to communicate their thinking using the representations.
The learning opportunities in this unit can be differentiated by providing or removing support to students and by varying the task requirements. The difficulty of tasks can be varied in many ways including:
The contexts for this unit are a tens frame waka and native animals. The materials can be adapted to suit cultural knowledge and interests of your students. Using physical items that have significance to your students might be more engaging than using standard mathematical equipment. For example, if you have a big set of shells or stones for environmental studies you might use those shells as the materials for session 1. You might create ‘story shells’ that are appropriate to your students, such as hatchlings in a nest, baked goods in a tray, whanau members in whare, or people at a feast.
Session 1
In this session students are introduced to using a diagram or picture to communicate an addition equation. You may need to adjust the numbers used in the lesson in response to the knowledge of your students.
How many kaihoe/rowers are in the waka?
Place 2 red counters in the tens frame and ask:
How many kaihoe/rowers are in the waka now?
Students may count from one, i.e. 1, 2, 3, 4, 5, 6, 7.
Some students will be able to count on from the five i.e. 5... 6, 7.
Using two different colours will help encourage students to count on and support subitising (recognising 7 counters instantly).
How many kaihoe/rowers are in this waka?
Count with me as I add more kaihoe/rowers.
How many kaihoe are in the waka now?
How many red counters did we put in?
How many blue counters are there? (Write 5 in blue.)
And how many red counters are there? (Write 3 in red)
5 and 3 makes how many counters?
Record the equation 5 + 3 = 8.
Session 2
In this session students continue to use tens frames to represent addition equations. They work on simple “change unknown” problems (e.g. 8 + □ = 10) in this lesson. You need a set of tens frames with dots. These can be made using the Copymaster.
Show students the waka model. How many kaihoe can get in the waka? How do you know?
Some students may recognise that 5 + 5 = 10.
Show the students a tens frame waka with 6 kaihoe. For example:
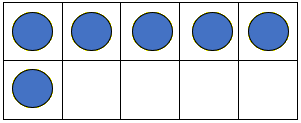
How many kaihoe are in the waka?
The waka needs a full crew. How many more kaihoe do we need?
Students may be able to image 4 more dots and then count all the dots, or they may need you draw the 4 dots before they can count all the dots. Consider providing physical materials (e.g. counters) for those who need it.
4 + □ = 7
Session 3
In this session students are introduced to Animal strips as a way to communicate addition equations. The animals are native to Aotearoa/New Zealand.
How many animals are on the strip?
How many animals are on the strip?
How many animals are there altogether?
Session 4
In this session students are introduced to the number line as a way to represent addition problems.
"I am making a putiputi (woven harakeke flower). I pick 4 strips of harakeke. Then I pick another 3 strips of harakeke. How many strips of harakeke do I have?
Expect students to tell you that the total is 7.
Draw a number line above the number strip as shown below. Highlight that the numbers go at the end of the counters, not the middle as you might do when pointing to the counters.
Remove the number strip and counters so only the number line remains.
What numbers have I written?
Why did I only write those numbers?
Session 5
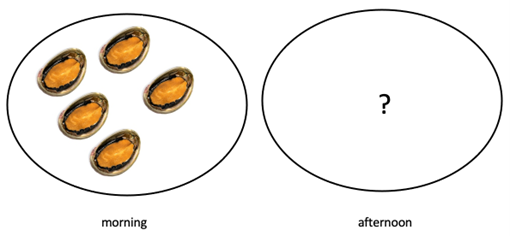
In this session students consolidate their use of representations. Provide them with an open people to solve, such as:
Mihi collected some paua in the morning and some more paua in the afternoon.
She collected 12 paua altogether. How many paua did she collect in the afternoon?
6 and 6 equals 12
6 + 6 = 12
Let students explore possible solutions. Encourage them to use as many representations as possible. Some students may need support with counters and numbers strips.
Can you find all the answers? How will you do that?
After a suitable time, record all the answers students found. Organise the equations systematically.
1 + 11 = 12
2 + 10 = 12
3 + 9 = 12
….
9 + 3 = 12
10 + 2 = 12
11 + 1 = 12
Ask students what patterns they notice. Can they explain why the patterns occur?
If time permits, use the same scenario to explore change-unknown addition problems.
Mihi collected 5 paua in the morning and some more paua in the afternoon.

She collected 9 paua altogether. How many paua did she collect in the afternoon?
Change unknown problems can be represented using a number line and equation.
5 + ㅁ = 9
For high achievers explore start-unknown addition problems such as:
Mihi has some paua. She gets 4 more paua. Now she has 10 paua.
How many did she have to start with?
Dear family and whānau,
This week in maths we have been using different representations to show addition number sentences. One way is using a set diagram, and then writing a number sentence (equation) to go with it:
6 + 4 = 10 or 6 and 4 equals 10
With your child draw some other set diagrams using 2 colours and record addition equations. This will help your child to understand addition.
Taller/Wider/Longer
This unit encourages students to use measurement language and counting to compare the attributes of length, width or height of objects in a variety of game situations. The transition from counting all to advanced counting is also supported.
Measuring is about making a comparison between what is being measured and a suitable measurement unit. The first step in the measuring process is understanding that objects have attributes that can be measured. Initial experiences are needed to develop awareness of the attribute and to introduce the necessary language, for example, long, longer, short, shorter, tall, taller, wide, wider, narrow, narrower.
The activities in this unit provide experience in using measurement vocabulary.
The learning opportunities in this unit can be differentiated by providing or removing support to students and by varying the task requirements. The difficulty of tasks can be varied in many ways including:
The contexts for this unit can be adapted to suit the interests and experiences of your students. For example:
Te reo Māori vocabulary terms such as tāroaroa (tall - person), poto (short), tāroaroa (height of a person), teitei (height, tall), whānui (wide, width), whāiti (narrow) roa (long, length) could be introduced in this unit and used throughout other mathematical learning. Numbers in te reo Māori can be used alongside English throughout the unit.
Session 1
In this session we introduce the language of comparison that will be used throughout the unit.
Are they tall?
Who is taller?
Compare the heights of the two students to see who is taller.
Ensure that all students understand that taller means more tall than.
Is my string longer?
Is my string shorter?
The following three sessions provide games in which students will practice the language of comparison.The games could be introduced in three separate sessions or all be introduced in one session and then played in groups rotating over several sessions. These games are also suitable to go into a general box for early finishers to use during other maths lessons.
Session 2: Wiggly Worms
Wiggly Worms is about the language of length. Students will be encouraged to use the words long, short, longer, shorter, longest, shortest.
Session 3: Tremendous Trees
Tremendous Trees is about the language of height, students will be encouraged to use the words tall, short, taller, shorter, tallest, shortest.
Session 4: Wonderful Walls
Wonderful Walls is about the language of width, students will be encouraged to use the words wide, narrow, wider, narrower, widest, narrowest.
Session 5: Reflection
Dear parents and whānau,
In maths this week we are studying measurement and we are learning to use the language of comparison. You can help by asking your child plenty of questions that use the words taller, shorter, longer, wider, and narrower. For instance, “Which is wider, the bench or the kitchen table?”, “Which is taller, the cat or the dog?” "Which is longer, your book or mine?" If you speak a language other than English at home, encourage your child to bring some phrases around the words taller, shorter, longer, wider, and narrower to school. We can share and practice using these as a class.
Inequality symbols and relationships
The purpose of this unit of three session is to develop understanding of how to recognise and record relationships of (equality and) inequality in mathematical situations.
The first relationship symbol that most students encounter is the equals symbol, =, which communicates a relationship of equivalence between amounts. It is important for students to understand that symbols help us to express relationships between numbers and that equivalence is just one such relationship.
Inequality is the relationship that holds between two values when they are different. Their relative value is described with specific language including ‘is greater than’, ‘is more than’, ‘is bigger than’ or ‘is less than ‘ or ‘is fewer than’. These are expressed using the symbols, <, >, which are said to show ‘strict’ relationships of inequality. Whilst not introduced here, the symbols, ≤ , meaning ‘is less than or equal to’, and , ≥, meaning ‘is greater than or equal to’, are known as ‘not strict’. The notation ≠, meaning ‘is not equal to’ is briefly introduced here as it is a useful, if infrequently used, relationship symbol.
Algebra is the area of mathematics that uses letters and symbols to represent numbers, points and other objects, as well as the relationships between them. Through exploring both equality and inequality relationships, and the symbols used to express these, students develop an important and heightened awareness of the relational aspect of mathematics, rather than simply holding the computational view of mathematics that arises from the arithmetic emphasis that is dominant in many classrooms.
The learning opportunities in this unit can be differentiated by providing or removing support to students and by varying the task requirements. The difficulty of tasks can be varied in many ways including:
The contexts for this unit can be adapted to suit the interests and experiences of your students. For example:
Session 1
SLOs:
Activity 1
Elicit descriptive, comparative language: tall, taller, tallest, short, shorter, shortest, same).
Point out that we have been comparing and describing the buildings in relation to one another and explain that we will now be investigating relationships between numbers.
For example, one student takes seven pink cubes.
Place a simple city street map in front of the students, or create one with them.
Have the students join their cubes to make buildings for this city. When they have made their ‘tower buildings’, have them locate them, standing up, in places of their choice between the streets, creating a ‘cityscape'. If adapting to use native forest, rivers and streams could replace the roads of the street map, and cubes can become 'trees'. This adaptation would be continued on throughout the remainder of the sessions and activities.
Read the equation together, “Five is equal to five” and “Five is the same as five.”
The buildings are then returned to their place ‘in the city’.
Have a student describe how these numbers (of storeys) are ‘related’: “six is more than four”, “four is less than six”, “six is not equal to four.” Ask, “How can you write this?” Record the students’ suggestions, accepting all ideas.
Have students identify more ‘unequal buildings’ and record these as inequality statements on the chart and read them.
If possible retain the class ‘cityscape’ for Session 2.
Activity 2
Have student pairs retain their maps for Session 2.
Activity 3
Conclude the session by having the students share their recording and discussing how the symbols = and ≠ show us how numbers are related to each other.
Photograph the class and pair ‘city models’ to display with student recording from Activity 2, and from further sessions.
Session 2
SLOs:
Activity 1
Explain that there are more relationship symbols and that they will learn about two more in this session.
6 ≠ 4
Have student pairs discuss the towers
then, as a class, record their observations, including ‘6 is more than 4’ and ‘4 is less than 6.’ Ask if anyone knows symbols that show each of these relationships.
< >
Write the words, ‘is more than’, and ‘is greater than’, together on the class chart, and ‘is less than’ or ‘is fewer than’ together.
Have students discuss these in pairs and decide which symbol goes with which pair of phrases and why they think that.
Activity 2
Each student is to write at least four inequality cards for pairs of ‘buildings’. For example:
Activity 3
"Four is less than/is fewer than 6"
Each student should now have written at least 4 pairs of cards; 16 cards in total for the pair.
Activity 4
Each pair is to play a short Memory game with these cards by spreading them out face down in front of them and trying to find matching pairs of statements. For example:
Activity 5
Conclude the session by reviewing the four relationship symbols (one of equality and three of inequality) that have been used in Sessions 1 and 2.
=, ≠, <, >.
Retain student ‘cities’ and relationship cards for Session 3.
Session 3
SLOs:
Activity 1
Explain that the students must listen very carefully to the story. As they do so, they should record relationship expressions, in order, for any numbers that they hear. Read the story once. Highlight an example (eg. 3 >2 weetbix) and read the story again.
Activity 2
For each discuss and record the difference. For example:
Weetbix: 3 > 2, 2 < 3,
Three is one more than two. Two is one less than three.
The difference is one.
Age: 60 > 50, 50 < 60
Sixty is ten more than fifty. Fifty is ten less than sixty.
The difference is ten.
Cats: 6 > 0, 0 < 6
Six is six more than zero. Zero is six less than six.
The difference is six.
Dog: 1 = 1
One is the same as one. There is no difference.
The difference is zero.
Activity 3
Display two ‘towers’ from the class ‘city’. Ask. “What is the difference between the two towers? How do you know?” For example:
Show:
Elicit explanations such as 'there are two more green ones, there are two less/fewer yellow ones'.
Write 6 – 4 = 2 on the class chart and on a card.
Highlight the fact that when we solve a subtraction problem we are finding the difference.
Explain that they are to write a difference card and a subtraction equation card as shown in Activity 3, Step 1 for each of their inequality expression pairs. Have partners check each other’s cards.
For the pair, there are now 32 cards in total, 8 sets of four cards.
These can be put together in a bag, or combined with an elastic band.
Purpose: To recognise equivalent pairs of inequality expressions, and their matching subtraction equation and difference statements.
How to play:
Cards are shuffled. Five are dealt to each player. The spare cards are put in a pile, face down, handy to all players.
Players check to see if they have any complete sets in their hand. If so, these are displayed face up in front of them. Each player then privately identifies which set they will collect and they take turns to ask one other named player for a specific card to complete their set.
For example:
In hand:
At their turn, the player says, “Name, do you have the card, four is less than six?”
If the named player has the card, they must forfeit it. The successful player can ask again till they are told, “No. Go fish.” That player then takes a card from the top of the upturned pile of spare cards. It is then the turn of the next player.
The winner is the player with the most complete sets when all cards are used.
Activity 4
Conclude this session by reviewing key learning from this series of three lessons. Sets of cards can be used as an independent consolidation task.
Dear parents and whānau,
In maths we mostly write equations. These use the equals (=) symbol. This symbol tells us that two amounts are equivalent. However sometimes numbers or amounts are not equal.
In maths this week, the students have been learning how to record inequality expressions such as 8 > 6, (eight is greater than or more than six) and 6 < 8 (six is less than or fewer than eight.) They have also learned to find the difference between numbers by solving a subtraction equation (in this case 8 – 6 = 2) and to state the difference (the difference is 2).
They have made their own card games to play with you at home.
Your child will explain how to play Fish for Four.
We hope you enjoy playing Fish for Four, and enjoy helping your child to practice their learning about inequality expressions and number relationships.