Session 1
SLOs:
- Instantly recognise patterns for teen numbers.
- Make groups of ten and represent teen numbers with materials.
- Recognise and record words and symbols for teen numbers.
Activity 1
- Show the ākonga single tens frames. Have them show the same number of fingers as the number of dots, say and write the number with their finger in the air or on the mat.
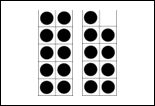
- Show two tens frames, one of ten and the other of a number less than ten, together making a teen number. Have ākonga ‘write’ with their finger how many dots they see. For example:

 13
13
Repeat with several teen numbers.
- Write the numbers 11 – 19 in symbols and words on chart paper, highlighting the inconsistencies of the language and exploring for fun alternative forms of some of the teen numbers, for example, eleven (oneteen), twelve (twoteen), thirteen (threeteen), fifteen (fiveteen). For each word, as appropriate, underline teen in the word, practice saying it and hearing the final consonant, ‘n’. Make the connection between this ‘teen’ word and ‘ten’. Retain this chart to add to later. This chart could also include words for 'teen' numbers from other languages relevant to your ākonga.
- Ask your ākonga what they notice about all of these numbers. (They all have 'teen' at the end and are ten and ‘something’). They are known as teen numbers.
Activity 2
Have ākonga work in pairs to play Teen Pairs. Consider pairing together ākonga of mixed mathematical abilities to encourage tuakana/teina.
Purpose: to recognise and match teen number representations and the words ‘ ten and ____’
Ākonga place between them two piles of cards face down (Copymaster 1).
Pile 1: Tens frame teen number cards (showing two tens frames).
Pile 2: Word Ten and _____ cards.
Ākonga take turns to turn over one tens frame teen number card and say the number of dots they see. They then turn over a word card and read the words aloud. If the tens frames and word card match, they keep the matching pair. The winner is the ākonga with the most pairs.
For example:
Activity 3
- Have ākonga work in pairs to ‘make’ their own group of ten. Give each pair of ākonga forty ice-block sticks, two elastic hair ties, pens and chart paper or a mini whiteboard.
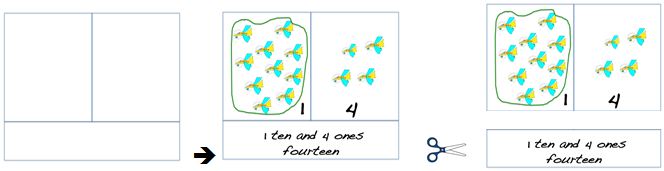
- Have each ākonga pair choose and write in symbols a number from eleven to nineteen and take that many sticks. Have them count out and make one bundle of ten using the hair tie, then write and draw what they have. For example:


12 is ten and two - Have them unbundle and return their sticks, then repeat with another teen number making use of spare sticks as required.
- Ask the ākonga to return to the whole group with their drawings, keeping them hidden. Have the ākonga take turns to describe to the class what they have drawn, and ask another ākonga to say what number it is. The drawing is then shown.
- The kaiako concludes by recording the ‘ten and _________’ words beside each of the teen numbers on the class chart begun in the earlier activity. Also consider exploring together the Place Value sticks animation, available from https://e-ako.nzmaths.co.nz/modules/PVanimations/
Session 2
SLOs:
- Make groups of ten and represent teen numbers with materials.
- Recognise and record words and symbols for teen numbers.
- Understand that in a teen number, the 1 represents one group of ten
Activity 1
- Have ākonga sit with a partner. Tell them that each pair is going to be making teen numbers on their fingers and ask them to discuss how they will do this. Look and listen for those ākonga who immediately identify that one of their pair will be the ‘ten person’, holding up ten fingers each time.
- Hold up a mixture of cards with number names in words, symbols and those reading ‘ten and ___’. (Copymaster 2). Each time, check to see if ākonga pairs can achieve the cooperative representation on their fingers.
- The kaiako makes a teen number from ice block sticks, having ākonga count to ten as the ten bundle is made.

Hold up the ten bundle and ask, 'Do I still have ten sticks here?' (yes) 'How many bundles of ten do I have?' (1). Record this on the chart, for example, I have fifteen. 15 is ten and five. 15 is 1 ten and 5 ones. Discuss the language of ‘ones’ and that sometimes ‘ones’ can be called ‘units’.
- Model some more examples then have ākonga individually draw and write about some of their favourite teen numbers. For example '12 is 1 ten and two ones'.
Activity 2
If available, have ākonga work in small groups or pairs to explore, find and display the four matching cards in the BSM 9-1-48 card game.
Alternatively, ākonga can make a class puzzle matching game. Provide each ākonga with card, pens and scissors. Have them make their own puzzle pieces which can then be combined with those made by their classmates and mixed up to make a matching pairs game. Before cutting these up, photocopy an extra 3 or 4 sets to be used later on in this unit.
Activity 3
- Return to the class chart started in Session 1. Record te reo Māori words for teen numbers, highlighting ‘tekau mā’ is ‘ten and’, connecting this mathematics language with the other expressions already recorded.
- Photocopy a few more sets of the matching game ākonga made in Session 2, Activity 2. Distribute this game so that your ākonga can play it in small groups of 3-4. The purpose of this game is to match word, pictorial and symbol representations of teen numbers.
Ākonga deal out 7 cards each. The remaining pile of cards is placed in the centre of the group. Ākonga take turns to ask one other player for a card needed to complete a set of 3 teen family cards. If the other player does not have the card sought, the requesting player takes one from the pile. As sets are complete, ākonga place these in front of them.
The winner is the player with the most complete sets.
Session 3
SLOs:
- Understand that in a teen number, the 1 represents one group of ten.
- Expand teen number notation and understand simple place value.
- Understand and apply a ten for one exchange.
Activity 1
- Display the chart started in Session 1. Record beside the numbers 11 – 19 the description ‘1 ten and x ones’ for each of the numbers.
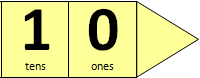
- Using enlarged arrow cards demonstrate and discuss the place value notation that we use, highlighting tens and ones language.
- Introduce ākonga to plastic beans and containers. Have them work in pairs to make up containers with ten beans in each and discuss what the containers will be called. (a container is ‘one ten’ or ‘a ten’). Have ākonga discuss the similarities between the sticks they have been using and the beans.


NB. The container for the beans looks different from the ones, but can still be unpacked. This is a subtle and important shift. Also consider exploring together as a group or class the place value beans animation, available from https://e-ako.nzmaths.co.nz/modules/PVanimations/ - Give ākonga time to become familiar with the beans and the arrow cards. Have them make and model teen numbers with the equipment, explaining this to their partner.
- Have each ākonga complete a think board sheet (Copymaster 3) or a mini poster about one of their favourite teen numbers. Display these.
Activity 2
Ākonga play Go Teen in pairs. A tuakana/teina model could work well here.
Purpose: to use ten ones to make one group of ten, when adding two single-digit numbers.
Ākonga have playing cards (ace - 9), shuffled and face down between them. Alternatively you could print out numeral cards 1-9. They have single beans and empty tens containers (or single ice block sticks and hair ties), single digit and tens arrow cards available.
The players take turns to turn over two playing cards. When the two numbers are added, if they make less than ten they return them face down to a discard pile.
If they make more than ten they keep their playing cards, take the total number of beans, group the materials showing the total as 1 ten and units. They also show the number with the arrow cards.
However, if the number has already been made by their partner, (the arrow cards for that number have been used) the ākonga must simply return their playing cards to the discard pile.
The winner is the player with the most tens (containers with beans) when all the arrow cards have been used up.
Session 4
SLOs:
- Understand and apply a ten for one exchange.
- Understand how to decompose a ten in order to subtract.
Activity 1
- Kaiako models a teen number with containers and beans and asks, ‘What number is shown here?’. For example, 18:

A problem is posed in which the number being subtracted requires the ten to be ‘unpacked’ or decomposed:
'Here are the beans Gardener Gavin is going to plant. He plants 9 in the first row. How many beans are left to plant in the second row? How can we work this out?'
Ākonga can discuss strategies for subtracting 9 and suggest what they can do with the materials. Kaiako models this and some more examples can be explored together.
- Ākonga are provided with place value materials and are each given some subtraction problems to solve with decomposition (Copymaster 4). Ākonga should record with pictures, words and an equation what they did and what their result is. The thinkboard (Copymaster 3) could be used again - it could be laminated and be reusable with a whiteboard pen.
- Share as a class and discuss. The language of making ten (composing) and breaking ten (decomposing) can be introduced.
Activity 2
- The kaiako asks a ākonga to model twenty using place value material. Discuss what this represents: two tens is the same as twenty. Rua tekau is a good example of this concept.
- Have the ākonga play in pairs or small groups First to twenty.
Purpose: to understand how to compose and decompose a ten.
Equipment: Ākonga beans and containers, numeral cards 11- 14, a set of playing cards 2 – 5, a dice with a + or – symbol marked on each of the six faces, mini whiteboards and markers.
How to play:- Numeral cards are spread out face down.
- Each ākonga selects a card and makes that number using place value equipment.
- Players take turns to roll the dice and turn over a playing card. They follow the instructions on the card, either adding or subtracting from their materials.
- Each time an ākonga has a turn they are required to write the equation.
- The winner is the first ākonga who has two containers of ten beans (twenty).
For example: one ākonga turns over and models 13, rolls + and 3, and makes 16.
At their next turn the ākonga may have to – 4, followed on the next turn by – 3.
This will require the ākonga to decompose the ten.
The ākonga will have recorded for the three turns so far:
13 + 3 = 16
16 – 4 = 12
12 – 3 = 9
Conclude the lesson with a focus on the words, ‘place value’. The kaiako writes ‘place value’ on a chart and asks ākonga what this could mean. They are encouraged to look at all the recording of teen numbers completed throughout these lessons. Accept all responses, but conclude by highlighting and recording that 'the place of a numeral in a number tells us what it is worth or its value.' Show the enlarged arrow cards drawing attention to the words tens and ones.
Arty Shapes
In this unit ākonga participate in a variety of art based activities to develop their knowledge of 2-dimensional shapes. They use their own language to describe their works and the shapes they have used.
This unit begins an exploration of basic 2D shapes, their properties and the mathematical language associated with them in both te reo Māori and Engligh. There is a progression from the way the ākonga think of and see these objects to the more formal mathematical ideas and descriptions. In order to be able to communicate on any topic, there is a need for a common language. This unit takes the initial steps in the formulation of this common language.
The learning opportunities in this unit can be differentiated by providing or removing support to ākonga and by varying the task requirements. Ways to differentiate the tasks include:
The context for this unit can be adapted to suit the interests, experiences and cultural makeup of your ākonga. This unit begins with looking at Piet Mondrians's artwork. In Session One, ākonga practice identifying shapes and describing them. Instead, or following this discussion, you could work with ākonga to identify art in their culture. Possible contexts of art in te ao Māori could be raranga/weaving, whakairo/carving, or peitatanga/painting. The art that is utilised in this learning should make clear links to the specific learning outcomes, meaning it should include images of 2-dimensional shapes (i.e. triangle, square, oblong, circle, oval, diamond).
Te reo Māori vocabulary terms such as tahi (one), rua (two), toru (three), tapatoru (triangle), tapawhā rite (square), tapawhā hāngai (non-square triangle), porowhita (circle), porohema (oval) and taimana (diamond) could be introduced in this unit and used throughout other mathematical learning.
Throughout each session encourage the ākonga to talk about what they are making and the features of the shapes they are using. Discuss the similarities and differences in shapes and encourage a wide use of a range of terms. Counting the numbers of sides and the numbers of corners each shape has is also a good way to get ākonga to focus on shapes.
Questions or pātai to use:
A word wall, vocabulary poster, or T chart may be a useful scaffold for ākonga to use throughout this unit.
Session 1: Shape collage
Begin the session by looking at some of Piet Mondrian’s primary coloured and cubist art works. Have ākonga identify the shapes they can see and describe these.
As the ākonga identify the shapes and their features, record these in a visible place (e.g. whiteboard, on a large poster).
Session 2: String shapes with PVA
Session 3: Shape stencils in crayon and dye
Session 4: Shape mobiles
Session 5
In this session ākonga reflect on one of their art-works made in the previous sessions, discuss and describe it and write about their work. Encourage ākonga to use both te reo Māori and English to describe their artworks.
Their writing could then be published and displayed, either in a classroom display or in a large book for the book corner. Encourage ākonga to share their produced artwork and learning with family and whānau.
Family and whānau,
This week at school we are looking at different shapes and the ways they are used in art works. It would be great if you could walk around your home and discuss the pictures on the walls with your child. Encourage them to tell you about the shapes they see.
Teen numbers (building with ten)
The purpose of this unit of sequenced lessons is to develop knowledge and understanding of the place value structure of numbers from ten to twenty.
When ākonga meet the number ten they meet a two-digit number for the first time. They begin to develop awareness of the concept that there are no more numerals to learn and we just ‘recycle’ them. This is their entry into the structural world of our tens based number system.
Ākonga are introduced to the language of digits, place and value. It is a considerable conceptual shift for ākonga to move from a face value understanding (i.e. that a numeral represents a number of units that can be counted) to a complex place value understanding in which a numeral can represent a group or a number of groups, that are in themselves made up of units that can be counted.
As ākonga study teen numbers and their meaning and structure (rather than simply ‘saying’ them in a counting sequence), the focus is on developing the understanding that the value of a digit depends on its' place. This is not trivial and it is made more challenging by the language of teen numbers.
Ākonga often confuse the number names such as ‘fourteen’ and ‘forty’ because the adult enunciation of the word endings is often unclear. In hearing ‘fourteen’ ākonga may expect to see the 4 appear first in the symbolic form because that is the number that comes first when they say it. Seeing 14 and hearing ‘four – teen’ therefore has the potential for confusion.
Ākonga need many opportunities to make these numbers with materials. When using place value material for the first time, ākonga need the opportunity to group single units to make one ten. By doing this they come to understand that ten ‘ones’ or units do in fact comprise one 'ten'. The first equipment to use therefore is that which can be physically grouped, one by one, to make or compose one group of ten, or a ‘ten’, and be able to be unpacked or decomposed again into ten ones. When this is complemented by symbolic recording that accurately matches the representation of the number, understanding of two-digit notation is developed. Equipment in which the tens are already pre-grouped can be used once grouping to make ten is well understood.
It is a considerable shift for ākonga to then use materials in which the ten looks completely different from the ones (for example, money) and to trust the 'ten for one' trade. The greatest abstraction is the digits in our number system, where the tens and ones look exactly the same but it is only their place that tells their value.
In depth exploration of place value with teen numbers is essential if our ākonga are to work with real understanding of the numbers within our number system.
The activities suggested in this series of lessons can form the basis of independent practice tasks.
The learning opportunities in this unit can be differentiated by providing or removing support to ākonga and by varying the task requirements. Ways to differentiate the tasks include:
Using the place value language structure within te reo Māori to develop and reinforce the understanding that teen numbers represent 'ten and' may support conceptual understanding of teen numbers. Display a chart to reinforce this conceptualisation. Oral communication of te reo Māori for numbers up to 20 will also be useful in the context of enhancing the interest and cultural relevancy of this learning.
Session 1
SLOs:
Activity 1
Repeat with several teen numbers.
Activity 2
Have ākonga work in pairs to play Teen Pairs. Consider pairing together ākonga of mixed mathematical abilities to encourage tuakana/teina.
Purpose: to recognise and match teen number representations and the words ‘ ten and ____’
Ākonga place between them two piles of cards face down (Copymaster 1).
Pile 1: Tens frame teen number cards (showing two tens frames).
Pile 2: Word Ten and _____ cards.
Ākonga take turns to turn over one tens frame teen number card and say the number of dots they see. They then turn over a word card and read the words aloud. If the tens frames and word card match, they keep the matching pair. The winner is the ākonga with the most pairs.
For example:


Activity 3
12 is ten and two
Session 2
SLOs:
Activity 1
Hold up the ten bundle and ask, 'Do I still have ten sticks here?' (yes) 'How many bundles of ten do I have?' (1). Record this on the chart, for example, I have fifteen. 15 is ten and five. 15 is 1 ten and 5 ones. Discuss the language of ‘ones’ and that sometimes ‘ones’ can be called ‘units’.
Activity 2
If available, have ākonga work in small groups or pairs to explore, find and display the four matching cards in the BSM 9-1-48 card game.
Alternatively, ākonga can make a class puzzle matching game. Provide each ākonga with card, pens and scissors. Have them make their own puzzle pieces which can then be combined with those made by their classmates and mixed up to make a matching pairs game. Before cutting these up, photocopy an extra 3 or 4 sets to be used later on in this unit.

Activity 3
Ākonga deal out 7 cards each. The remaining pile of cards is placed in the centre of the group. Ākonga take turns to ask one other player for a card needed to complete a set of 3 teen family cards. If the other player does not have the card sought, the requesting player takes one from the pile. As sets are complete, ākonga place these in front of them.
The winner is the player with the most complete sets.
Session 3
SLOs:
Activity 1
NB. The container for the beans looks different from the ones, but can still be unpacked. This is a subtle and important shift. Also consider exploring together as a group or class the place value beans animation, available from https://e-ako.nzmaths.co.nz/modules/PVanimations/
Activity 2
Ākonga play Go Teen in pairs. A tuakana/teina model could work well here.
Purpose: to use ten ones to make one group of ten, when adding two single-digit numbers.
Ākonga have playing cards (ace - 9), shuffled and face down between them. Alternatively you could print out numeral cards 1-9. They have single beans and empty tens containers (or single ice block sticks and hair ties), single digit and tens arrow cards available.
The players take turns to turn over two playing cards. When the two numbers are added, if they make less than ten they return them face down to a discard pile.
If they make more than ten they keep their playing cards, take the total number of beans, group the materials showing the total as 1 ten and units. They also show the number with the arrow cards.
However, if the number has already been made by their partner, (the arrow cards for that number have been used) the ākonga must simply return their playing cards to the discard pile.
The winner is the player with the most tens (containers with beans) when all the arrow cards have been used up.
Session 4
SLOs:
Activity 1
A problem is posed in which the number being subtracted requires the ten to be ‘unpacked’ or decomposed:
'Here are the beans Gardener Gavin is going to plant. He plants 9 in the first row. How many beans are left to plant in the second row? How can we work this out?'
Ākonga can discuss strategies for subtracting 9 and suggest what they can do with the materials. Kaiako models this and some more examples can be explored together.
Activity 2
Purpose: to understand how to compose and decompose a ten.
Equipment: Ākonga beans and containers, numeral cards 11- 14, a set of playing cards 2 – 5, a dice with a + or – symbol marked on each of the six faces, mini whiteboards and markers.
How to play:
For example: one ākonga turns over and models 13, rolls + and 3, and makes 16.
At their next turn the ākonga may have to – 4, followed on the next turn by – 3.
This will require the ākonga to decompose the ten.
The ākonga will have recorded for the three turns so far:
13 + 3 = 16
16 – 4 = 12
12 – 3 = 9
Conclude the lesson with a focus on the words, ‘place value’. The kaiako writes ‘place value’ on a chart and asks ākonga what this could mean. They are encouraged to look at all the recording of teen numbers completed throughout these lessons. Accept all responses, but conclude by highlighting and recording that 'the place of a numeral in a number tells us what it is worth or its value.' Show the enlarged arrow cards drawing attention to the words tens and ones.


Dear parents and whānau,
In maths this week we have been learning about teen numbers and how they are made of ten plus a single digit number. For example, thirteen is 10 + 3. We have also been introduced to place value, learning that the 1 in 13 is in fact one group of ten.
You can help your child practice this very important idea by playing the game, Teenager match.
Cut up the attached page to make separate cards. Spread them face down on the table. Take turns to choose a pair of cards. If they match, keep the pair. The winner is the person with the most pairs.
[Include a copy of Copymaster 5]
Seesaws
This unit involves the students directly comparing the weight (mass) of two or more objects.
Weight is a measure of the force of gravity on an object. Mass is the amount of matter in an object and a measure of the force needed to accelerate it. This means that the mass of the object on the moon is the same as its mass on earth, but its weight is lighter on the moon. In a science context, weight is measured in Newtons (N), and mass is measured in kilograms (kg), grams (g), and milligrams (mg). However, these terms are often used interchangeably. For practical purposes, the language commonly used to measure weight and mass in everyday life is kilograms, and grams. Choose one term (e.g.weight or mass) and use it consistently with your students.
An important early goal in measurement is for students to understand the attribute they are going to measure. Comparison activities help students develop an understanding of the attribute that is being measured. In the case of mass, the most personal experience is comparing the weights of two objects by holding one in each hand and feeling which has the greatest downward pull. This personal experience can then be transferred to the use of balance and spring scales.
Young students are influenced by what they see. The shape or the size of an object can easily deceive them. For example, students who do not yet conserve the property of mass will think that if the shape of an object changes then so does its mass. In one of the stations, in this unit, the students change the shape of a piece of plasticine and then weigh it to see that the weight has stayed the same.
The learning opportunities in this unit can be differentiated by providing or removing support to students and by varying the task requirements. Ways to provide more support include:
Te reo Māori vocabulary terms such as taimāmā (light), taumaha (heavy), ine-taumaha (scale for measuring weight) and maihea (weight) could be introduced in this unit and used throughout other mathematical learning.
The objects weighed in this unit can be selected to suit the interests, experiences and culture of your students. For example, the students could bring small objects from home or objects that they can collect from around the school playground (e.g. stones, cones, twigs or shells). Bringing items from home might offer important opportunities for oral language (i.e. sharing) When students are making objects out of plasticine, students could make objects to reflect their current learning interests (e.g. a snail, if you are learning about minibeasts). Consider how the use of different objects might reinforce learning from other areas, and contribute to a cohesive learning experience across all sessions/stations.
Station One: See-saws
In this station we work with a partner to make a see-saw using a soft-drink can and a shoe box lid. We then use the see-saw to find objects that are the same weight.
Stop the soft drink can from rolling by fixing it to the table with tape or by putting plasticine rolls on each side.
How did you make your see-saw?
What are some things you found that balance? Show me.
Have you ever been on a see-saw? What happens?
Station Two: Weighing balls and worms
In this station the students, in pairs, experiment with plasticine or play dough to find that changes in an object’s shape does not change its weight.
Will your kiwis be the same weight? Why /Why not?
Check on the balance scales.
Whose worm is longest?
Whose worm is heaviest? Check?
Why are they the same weight?
Whose has made the most balls?
Which ball is the heaviest? Check?
If you both put all your balls together on the seesaw what do you think will happen?
What do you notice? Why is the seesaw balanced?
Station Three: What balances Freddy Frog?
In this station the students experiment to find items that balance Freddy Frog (or an alternative object eg Terry Tui). The students paste their solutions onto a class chart.
What happens on the scales when Freddy is heavier?
Do you think that this "car" will be lighter or heavier? Why do you think that? Were you right?
What are some of the things that you found that were the same weight as Freddy Frog?
Station Four
In this station we line objects up in order of weight so that we can work out who goes where in our "tower". We need to have the heaviest at the bottom and the lightest at the top. Note this activity can also be taken outside using natural materials.
Were your guesses correct?
Tell me how you put the toys in order?
Did you find a lighter toy on your first guess?
How did you check your guess?
Station Five: Bungees
In this station students use a simple piece of elastic as a bungee and measure how far the elastic stretches to compare the weight of different objects.
Dear family and whānau,
This week we have been comparing the weight of objects using soft drink "see-saws" and bungee strings. We have been encouraging the children to use words such as heavier and lighter to compare the weight of objects. Do you speak a language that is not English at home? Perhaps you could discuss these terms at home, and write them down for your child to share with us at school.
At home you might like to make your own "see-saw" or bungee and then use it to compare the weights of small objects.
1. Make a see-saw using a soft-drink can, a shoe box lid and some tape.
2. Make a bungee by attaching a clip to a thin elastic, which is suspended from string.
Skip it to multiply it
This unit explores early multiplication where ākonga are encouraged to skip count to solve story problems, rather than counting all.
This unit develops the skill of skip counting to find the total of several equal sets. At Level One, ākonga are expected to use a range of counting strategies such as counting on, counting back and skip counting. Both conceptual understanding and procedural fluency are important to counting. Skip counting involves understanding that a set can be treated as a composite unit. The last number counted tells how many objects are in the set. Composites can be combined whether they are equal or not, but skip counting (e.g. 5, 10, 15, 20) can be used particularly when the sets are equal. The procedural fluency ākonga need to enact skip counting is knowledge of the skip counting sequences. Ideally, learning word and numeral sequences, like 2, 4, 6, 8… are learned in conjunction with quantity. That way, ākonga realise that the next number is the result of adding two more objects to what is already there.
As well as knowing skip counting sequences, ākonga need fluency in tracking the number of counts. Initially they may use fingers to do that. For example, the fingers in four hands might be skip-counted as 5, 10, 15, 20, while the number of hands is tracked as 1, 2, 3, 4.
The learning opportunities in this unit can be differentiated by providing or removing support to ākonga and by varying the task requirements. Ways to differentiate the tasks include:
The contexts for skip patterns used in this unit can be adapted to suit the interests and experiences of your ākonga. For example:
Te reo Māori vocabulary terms such as tatau māwhiti-rua (skip count in twos), tatau mawhiti-rima (skip count in fives), whakamua (forwards), and whakamuri (backwards) could be introduced in this unit and used throughout other mathematical learning.
Each of the following sessions is designed to take 20 to 25 minutes. This series of sessions can be used in whole class (mahi tahi) or small group situations. The first session develops ākonga ability to skip count in a variety of ways.
Session 1 – Skip Counting
Encourage ākonga to continue counting while you record the numbers they are saying in a loud voice on the board. Then stop and talk about the number sequence and the patterns they can see.
What can you tell me about the big voice numbers?
What patterns can you see?
What patterns did you see?
What numbers are missing from the pattern?
Session 2 – TūĪ in Kōwhai trees
Here are four kōwhai trees.
Place two tūī in (under) each kōwhai tree.
There are two tūī in each kōwhai tree (uncovering the collections and hiding them sequentially). How many tūī are there altogether?
Try to record their responses e.g. Len thought 1, 2, 3, 4, 5, 6, 7, 8; Elinda went 1 2, 3 4, 5 6, 7 8; Hemi went 2, 4, 6, 8; and Kelly went 4 + 4 = 8 (note that this is an additive, not counting, response).
For example, “There are 6 kōwhai trees on High Street. There are 5 tūī in each kōwhai tree. How many tūī are there altogether?” Encourage ākonga to explain how they got their answer.
Session 3 – Fish in Fishponds
How many fish are there altogether?
How can we work it out without counting the fish one by one?
Did anyone do it a different way?
Is there a quick way to work out how many fish there are left?
Session 4 – Cartons and Eggs
How many eggs are there altogether? (You might have cubes, ping pong balls, or other objects as the make-believe eggs).
Sixes are hard to count with, so we are going to use smaller cartons today.
I want you to make problems for each other using the same sized cartons.
You can record your strategies using numbers.
Be ready to share one of your problems with the whole class at the end.
Session 5: Legs on animals
How many legs would be on five goldfish? Do ākonga still realise the problem can be written and solved, 5 x 0 = 0?
How many legs would be on 10, 50, 100 goldfish?” What is always true?
How many legs would be on 10, 50, 100 1-legged kiwi? What is always true?
Dear family and whānau,
At school this week we have been using skip counting to solve simple multiplication problems. At home this week we would like your child to practice skip counting forwards and backwards in twos and fives. Try doing this with them by clapping a beat together or by following a number strip. Change the starting numbers for the sequences.
Start from 2:
2, 4, 6, 8, 10, 12, 14, 16, 18, 20, …
Count down from 14:
4, 12, 10, 8, 6, 4, 2.
Start from 5:
5, 10, 15, 20, 25, 30, 35, 40, 45, 50, …
Start from 15:
15, 20, 25, 30, 40, 45, 50, …
Count down from 45:
45, 40, 35, 30, 25, 20, 15, 10, 5.
Snakes and Scarves
In this unit we explore linear patterns using snakes as the context. We examine, construct and record snakes of different patterns. We also put scarves on our snakes and predict what is hidden.
The main idea behind this unit is for ākonga to develop basic concepts relating to pattern by exploring simple patterns in a novel situation. Ākonga will use multi-link cubes masquerading as snakes. The snakes have colourful ‘skin’ (it's a good chance for everyone to use their imagination). Ākonga play with a variety of snakes, both inventing their own and investigating ones made by other ākonga. In the process, they should begin to see that:
(i) patterns are made up of repeating sections of coloured cubes;
(ii) they can continue a pattern by adding on more cubes of the right colours; and
(ii) they can predict parts of a pattern that are missing.
Pattern is an important idea both in mathematics generally, and as a precursor to algebra. Discovering patterns enables us to predict events. For example, by knowing how the tides work we can predict when high tide will be and when will be a good time to go fishing. This pattern concept generalises in secondary school to finding results that work again and again.
The learning opportunities in this unit can be differentiated by providing or removing support to ākonga and by varying the task requirements. Ways to differentiate the tasks include:
The snake context used in this unit could be adapted to other animals such as huhu grubs, worms or eels. Alternatively, ākonga could come up with their own creature that has a multi-coloured, pattern body.
Te reo Māori vocabulary terms such as tauira (pattern) and He aha muri? (What is next?) could be introduced in this unit and used throughout other mathematical learning. Also, the simple counts and primary colours used in the unit provide an opportunity to use te reo Māori and Pasifika words alongside English, for example, whero (red) and tahi (one).
Getting Started
Today we investigate snakes with special colour patterns. We think about what would come next as we increase the length of our snakes. We also think about what happens when we cover part of our snake with a scarf.
Share ideas about patterns. Encourage ākonga to look around the classroom or think about places in their community for examples of patterns. For example, kōwhaihai patterns at marae or flower patterns at community gardens.
[Make a snake with a blue, red, blue, red, blue pattern.]
Who knows what colour comes next in our snake?
How did you know?
Who knows what colour comes next?
How did you know?
What cubes are hidden?
How did you know?
Exploring
Over the next 2-3 days we examine, construct and record the patterns of our snakes. We cover parts of our snakes with scarves and play ‘guessing games’ with other ākonga.
Can you tell me about your snake?
What colour cubes is your snake made of?
Can you see a pattern in your snake?
With all the ākonga gathered together (mahi tahi model) ask:
What cubes do you think are hidden under the scarf?
How do you know?
Reflecting
We conclude the unit by sharing the pattern snakes that we have made. We look for snakes that are alike.
Dear parents and whānau,
This week in maths we have explored repeating patterns using snakes made of different coloured cubes. We have practised predicting what cubes are hidden when the snake puts on a scarf.
Ask your child to tell you about the pattern of this snake and how the pattern could be continued.
Which cubes do you think are hidden under this scarf?
Can you and your child find or make some simple repeating patterns like this around your home? You could talk about them and play a game covering parts of them and saying what is hidden. For example, items of clothing, mugs, toys, rugs or duvets.