This unit includes several activities for each session. Choose 2-3 activities for a single session or spread each session over more than one day.
Session 1
SLOs:
- To understand that an amount or number of items can be represented with a single unique symbol.
- To correctly write numerals to five.
- To understand that written words and oral words can be represented with a single symbol.
- To recognise and match words and symbols with the amounts they represent.
Activity 1
Play Number Eye Spy.
(Purpose: To identify numbers of items in groups up to five.)
Explain that in the classroom, some things we see might be in groups of two, three, four or five. Give an example, such as a group of three computers at the back of the classroom. Explain that you could give a clue about the items by saying, “I spy with my little eye, three of something.” You might give directional clues as well to develop the vocabulary of movement and position, e.g., “The items are at the front of the room.” Numbers spoken in te reo Māori can be interchanged with English numbers.
Pose the problem of finding matching collections, by changing the number in the group from three. Have students look about the classroom to identify the group of items you have seen. The person who guesses correctly has the next turn. Take digital photographs so the class can make a display of pictures that match each number from one to five, or further if students show proficiency. Use items that have significance to the students, such as their artworks, cultural artifacts, or toys/mascots. Students might draw collections of objects for a given numeral, such as the number of siblings they have in their whānau or their pets at home.
Activity 2
- Play Spot the Spots, using the red and green 1 to 5 dot cards from Copymaster 1a, or the 1 to 5 koru cards from Copymaster 1b.
(Purpose: To subitise groups of up to five dots.)
Shuffle the cards. Hold them up one at a time, so that the students can all see them. As each card is held up, have the students show how many dots they see, by holding up the same number of fingers. Students might be asked to represent the number in different ways, such as say the number in words, write the numeral in the air if they know it, or make a set of counters that match the number and layout.

- Shuffle the cards and distribute (at least) one to each student. Going around the mat circle, ask the students to take turns to hold up their card for the others to see. The other students who have a card with the same number of dots hold up their cards too.
- Distribute numeral cards to 5, or a number fan to each student. Repeat Step 2 above, but this time the students show the numeral (card) that matches each student’s dot card as it is shown.
- The cards can also be used to develop subitising (instant recognition). To encourage imaging, make the card visible for a short time, and ask the student to name the number.
Activity 3
- On the class chart revise together how to correctly write numerals 1 to 5.
Explain that they will be writing numerals. Discuss what numerals are used for in daily life. Students might suggest things like the number of people who live in a whare, the number of kaimoana on a plate, the number of chicks in a nest, etc. - As numerals are formed on the chart, have students practice forming them in the air, and on the mat in front of them. Have them feel and describe that correct form.
Emphasise the correct directionality when forming 2, 3 and 5 in particular.
Model forming each numeral with your back to the students and write the numerals large in the air. Ask students to copy your actions. Adjust your writing hand for students who are left-handed. - Have students return their dot cards from Step 2 by, one at a time, coming to the chart, showing their dot card, saying the number and forming the numeral. Watch for correct numeral formation. Students are likely to need plenty of practice. Students might enjoy writing on small whiteboards or blackboards.
Activity 4
- Write numerals 1 to 5 on the class chart. Ask the students what you have written (numerals). Explain that there are words for these numerals that can be written and spoken. Show word cards, one to five, from page 1 of Copymaster 2. Te reo Māori versions are included.
Hold up the word cards in order and read them aloud together several times. Show them out of order, having the students quickly reading them aloud. - (Using Blue Tac or similar), with assistance from the students, arrange the word cards correctly beside the numerals on the chart. Together check that they match.
Activity 5
Have students work in pairs, or groups of three, to play One, Two, Three, Snap.
(Purpose: To correctly match words, numerals and images of numbers 1 to 5)
Make available to each group, word cards to five (Copymaster 2), numeral cards to 5 (Copymaster 4) and dot or koru images images to 5 (Copymaster 1a or Copymaster 1b). Alternatively, the picture card images from Copymaster 3 can be used instead of the dots.
Each pile is shuffled and placed face down in front of the group.
Explain that students in the group each take turns to take one card from each pile, placing them face up in front of themselves as they do so. If all cards show the same amount (symbol, word and image) they say “Snap!” and keep the set.

If not, the cards are returned to the bottom of each pile.
The winner is the person with the most sets of three at the end of the game.
Activity 6
Conclude the session with a game of Get Together.
(Purpose: To form groups of up to five in response to hearing a number word, a written number word, or to seeing a numeral or a number word.)
Choose a piece of fast-paced music that your students enjoy.
Ask your students to stand. Explain that they are to move about the room in time to music. When the music stops, the teacher will either say a number or show numeral or word cards up to five. Students are to look at the teacher, listen for a number or look for a numeral and, as quickly as possible, make a group of that number, and sit down when the group is formed.
Session 2
SLOs:
- To recognise and match sets of items with written and spoken words and their symbols.
- To correctly write numerals to five.
- To recognise numbers within story contexts.
Activity 1
Ensure that numerals 1 to 5 can be seen by the students. Read them together. Begin by playing Spot the Spots from Session 1, Activity 2. Instead of holding up the same number of fingers, have students write numerals in the air and on the mat with their finger.
Activity 2
(Purpose: To accurately write numerals 1 to 5 in response to hearing number words within a story context.)
- Make paper and pencils available to the students. Explain that you are going to read them a story (Copymaster 5) and they are to listen very carefully and write down any numbers that they hear in the story. They should write these numerals in order across the page. Alternatively, you could tell them a made up story that includes members of the class.
- Introduce the task by reading the first two sentences of the story, show the dog pictures, explain and model what to do.
- Read the story, having them complete the task.
- Read the story again together, having students actively identify the number words as they are read, and writing the numerals on the class chart. Emphasise correct formation of the numerals.
- Have students check each other’s recording.
- Ask if students know of other stories with numbers and record their ideas. For example, The Three Little Pigs, Pukeko counts to ten, Counting for kiwi babies, or The great kiwi 1, 2, 3, book. Suggest that students listen and for numbers spoken or seen during the day.
Activity 3
- Ensure that students can see number words and numerals.
Make a think board template (Copymaster 6) and pencil available to each student. Have the students write their favourite number (between 1 and 5) in the centre of their think board. Have them draw a picture, write their own number “story” that includes their favourite number, show any numbers by drawing dots or pictures of equipment, and write any number words, encouraging English and Te Reo.
You may need to support emerging writers by recording part or all of their story for them, and use digital platforms for students who find handwriting difficult. - Once completed, have student pairs share their thinkboards.
Activity 4
Make the cards from One, Two, Three, Snap (See Session 1, Activity 5) available to the students so they can play a Memory game as they finish their thinkboard. To play memory they should turn all the cards from three sets face down, mix them up and take turns to find matching trios.
Activity 5
Conclude the session with class sharing of thinkboards. Students could take these home to share their learning with their whānau.
Session 3
SLOs:
- To understand and use the addition symbol.
- To recognise and use the written and spoken words for addition, with the addition symbol.
Activity 1
- Ask the students which numerals they have been learning to write. Extend students to write numerals for 6 – 10. Record these numerals on the class chart. Have students take turns to come and write other numerals that they know on the class chart. As they do so, discuss the numerals, highlighting their correct formation, particularly numerals 6, 7 and 9.
- Show a selection of dot cards from 6 to 10 (Copymaster 7a) or koru cards from 6 to 10 (Copymaster 7b), asking students to say what they can see. The focus here is on seeing familiar groups of 1 to 5 dots within the larger group. Some may readily recognise immediately the larger (complete) groups, but this is not the purpose of this task.
- Ask students to say the numbers they see in words. Some students may be able to write the words. For example:
 “I can see five and one.”
 “I can see five (across) and two (in the corners).”
 “I can see four and four.”
 - Ask, “Is there another way to write this, using numerals?”
Guide the students to shared recording on the class chart:
“I can see five and one” → 5 and 1 → 5 plus 1 → 5 + 1
“I can see five and two” → 5 and 2 → 5 plus 2 → 5 + 2
“I can see four and four” → 4 and 4 → 4 plus 4 → 4 + 4
Activity 2
Together, make a chart, or class dictionary page, about addition and its symbol, + , asking and recording what the students already know. Use items that students are familiar with to create stories that might be modelled by addition. For example, “Two weka were hunting for worms. Three more weka came along. How many weka were there then?” Record the stories using addition equations, e.g., 2 + 3 = 5 for the weka story.
Create a class book of addition problems that students make up, including a picture and written story. The equation can be written on the back of the page.
Discuss the addition symbol. Included in the ideas recorded, should be:
+ is a symbol or sign
+ shows that we are joining together two amounts or numbers
+ is an addition symbol
when we see the + sign we can read it as “and”, “plus” and “add”
+is a short way of writing “and”, “plus” and “add”.
Activity 3
- Together, write a mathematics expression about at least two other dot cards and model several ways of reading what has been written:
For example:
 Write 5 + 3 and together read: ‘five plus three’, five and three’, ‘five add three’, ‘five and three more’.
You might also highlight that 3 + 5 and the matching statements could also be written. - Make paper and pencils, or, whiteboards and pens, available to the students.
Distribute at least four dot cards to each child that show numbers of dots greater than 1.
Have students write, talk or draw about their cards. Use their recording to add to the class chart or create a digital presentation.
Activity 4
Ask the students work in pairs to play Read and Draw, using the cards from Copymaster 8,
(Purpose: To read a mathematical expression in at least two ways and to respond to a mathematical expression with a drawing.)
Tell the students the purpose of the Read and Draw task. Explain that they take turns to be the Reader and the Quick Draw person.
The Reader’s task is to read the mathematical expression in at least two ways to their partner. Studenrtsshould check their partner’s drawing before showing them the task card on which the expression is written. Their task is to check the accuracy of the drawing.
The Quick Draw person’s task is to listen carefully to the expression that is read, and to draw a diagram of what they hear, using simple shapes. For example: The Reader reads, 4 + 2: “four and two, four plus two,” and the Quick Draw person draws:

Students should have at least four turns each.
Activity 5
Conclude by playing the Hands Together game using two sets of expression cards from (Copymaster 8).
Each student makes a number of choice on one hand by showing that many fingers. For example:

Have them show their ‘number’ to a friend. (This is to avoid students changing the number of fingers when they see the expression.)
The teacher shows an expression, for example 5 + 3. Children who have made these numbers on their fingers must move to pair up, one student showing 5 fingers and the other showing three. The first pair to form and to show 5 + 3 collects a 5 + 3 expression card each. The game begins again. The game finishes when all cards are used up. Students take turns to read aloud to the class the cards they have ‘won’. Each student should read their cards in a different way from the student before them.
Ask students to bring a favourite small soft toy for Session 4. The teacher also needs to bring a small blanket.
Session 4
SLOs:
- To understand and use the subtraction symbol.
- To recognise and use subtraction written and spoken words, with the subtraction symbol.
Activity 1
Write this symbol on the class chart: +
Ask students to tell you addition words and give examples of how to use them. For example, “plus”, “I have five fingers on this hand plus five fingers on this hand.” Record these words.
Students might make a given addition expression with materials, like counters, and explain what they have made. Explicitly link the meaning of the numerals, and + and = symbols, with the models that are made.
Activity 2
- Together, read the rhyme, “Ten in the Bed.” (Copymaster 9).
You might choose a different scenario that is appropriate to the interests of your students, such as ruru in the kahikatea tree, or people in the waka.
Arrange ten of the students’ soft toys in bed, using the blanket. - Read the rhyme a second time and have the students ‘act out’ one toy falling out each time. Have students take turns to return the toys to the bed, one at a time, and as they do so record addition expressions.
For example 1 + 1, 2 + 1, 3 + 1, reading these together. As you do so, focus on modeling the correct formation of numerals 6 to 9. - Write 10 and ten (symbol and word) on the class chart and discuss. Read the first verse of the rhyme once more. This time discuss how to use symbols to record what has happened. Write 10 – 1, introducing and recording this as ‘ten takeaway one.’ Continue to read the rhyme, verse by verse, writing each mathematical expression and recording the words each time. Introduce the alternative words for the subtraction symbol as you do so. For example 9 – 1, “nine minus one”; 8 – 1, “eight less one”; 7 – 1, “seven subtract one”.
- Ask, “What happened to the number of toys in the bed?” (The number was getting less). Discuss that subtraction symbol, brainstorm and record the student’s ideas of what it is telling us.
Read the expressions and words again and highlight the different ways we can read the subtraction symbol.
Activity 3
- Make available to each student, paper, pencils, five plastic teddies and a tissue.
Have them put their teddies to bed under the tissue, say the rhyme to themselves and each time a teddy falls out, record the expression, for example, 5 – 1. Those who complete this task quickly can write the addition expressions as they return the teddies to bed, or take more teddies and record expressions for 6 to 10. - Have students pair share, reading aloud their mathematical expressions. As they take turns, encourage the students to use the different language of subtraction, such as “Three take away one equals two.”
Activity 4
Conclude the session with a game of Musical Chairs (or cushions). Use music that is appropriate to the interests of your class, such as hip hop or a current fast-paced popular piece.
Set out the number of chairs for students in the group. Record the number on the chart. Play a favourite piece of music. When it stops all students sit down. Have them stand and ask a student to remove one chair then come to record the expression and read aloud what they have written.
For example 10 – 1, “ten chairs minus one chair.”
Explain that one student will not have a seat this time and that this person will get to write and read the next mathematical expression on the chart.
Continue the game till no chairs remain and subtraction expressions have been written for each action.
Session 5
SLO:
- To recognise and write addition and subtraction expressions from story contexts.
Activity 1
- Using class charts from sessions 3 and 4, review the symbols for addition and subtraction.
- Either read the short scenarios from Copymaster 10, exchanging the names of students in the class for those in the scenarios, or create your own. Have the students identify if the story tells of an addition or subtraction ‘event’ and together record these on the class chart as mathematical expressions.
Activity 2
Make pencils, paper, felt pens or crayons available to the students. Have them write at least two of their own scenarios and record the mathematical expressions that represent what is happening. You can motivate them by discussing everyday events in which items are added and subtracted. Contexts might include playing games like tag, using up household items like plates, groups of friends meeting, or birds or other creatures arriving or departing a location, such as penguins in a burrow. Students' illustrations should show what is happening in the scenario and expression.
Activity 3
Conclude the session by having the students pair share, then class share their work. Emphasise the importance of having them read their mathematical expressions in at least two ways.
No way Jose
In this unit we develop the language of probability by considering events which are likely or unlikely. We do this using the context of children's stories.
This unit is about developing the language of probability. The words that are introduced and explored are; always, perhaps, no way Jose, certain, possible, impossible, will, might, won’t, will, maybe, never, yes, maybe, no. These are informal, everyday words that denote chance or probability. By using words that have some familiarity for the ākonga, they will begin to understand the overall concept of probability. As ākonga progress through the primary years they will gradually learn to assign fractions or decimals to given probabilities using both a theoretical and experimental approach.
The learning opportunities in this unit can be differentiated by providing or removing support to ākonga and by varying the task requirements. Ways to support ākonga include:
The contexts for this unit can be adapted to suit the interests and experiences of your ākonga. For example:
Te reo Māori vocabulary terms such as tūponotanga (probability/chance), kaore pea (unlikely), and pea (likely) could be introduced in this unit and used throughout other mathematical learning.
Getting Started
Today we follow Māui and his brothers on their journey to Rā the sun. We will look at the people and things Māui and his brothers are likely to meet.
Discuss with ākonga the setting of Māui's journey. Encourage ākonga to share their ideas about the objects that could be found on the land and sea as Māui journeys to Rā the sun.
Peg/blu tack the picture of the fern beneath the word card "will".
Display the picture beneath the word card "won’t".
Display the picture beneath the word card "might".
Exploring
Over the next 2 to 3 days, ākonga can look at the journeys of other characters in different stories and make decisions about who or what they might meet.
Remind ākonga to peg the pictures beneath the word cards. Stories could be read to ākonga in a tuakana/teina model, retold by other ākonga, listened to on audio books or watched on youtube or other sources.
Tell me why you have put that there?
Why do you think that …….. is impossible?
Could you have put it with one of the other words? Why/Why not?
Reflecting
Dear Parents and whānau,
This week in maths we have been exploring the everyday language of probability. We have used words to describe the chance that an event will or won’t occur. We have used story packs to explore this idea. Your child has brought home to share with you a story pack which contains 3 word cards and pictures of objects for the children to classify. Your child can also draw their own pictures onto blank cards. Begin by reading or retelling the story with your child. You could use a physical, audio, or visual version of the story. There are lots of books available as "read alouds" on YouTube.
As your child is linking the word cards to the pictures you can help by asking questions that encourage your child to explain their thinking.
Tell me why you have put that there?
Why do you think that …….. is impossible?
Could you put that one with another word card? Why/Why not?
Thank you for helping your child understand important aspects of probability. You are welcome to make your own story pack to go with a favourite story from your whānau. Please bring it along to school to share with us, or send it along with your child so we can use it during our maths learning.
Numerals and expressions
The purpose of this unit is to develop students’ understanding of numerals as representing a number of items, and their understanding of the symbols for addition and subtraction as representing joining and separating sets of items.
This sequence of lessons lays a fundamental and important foundation for students to recognise, read and write symbols to record and communicate mathematical ideas. As the symbols become well understood, they also become tools for thinking. This process begins with the introduction of numerals as symbols that represent amounts or numbers of objects. Students hear and see words that are associated with the amounts, and so need to come to understand that a single symbol is representative of all forms of that number, written and spoken, and that the same symbol can represent sets of different items.
Being able to quantify and record amounts is just the beginning. We work on and with numbers. We say we operate on them, and these operations change them. As the symbols that represent the number operations of addition and subtraction are introduced, the students should ‘operate’ on items in real contexts. The language associated with addition and subtraction can be confusing. Students do not always connect "addition", "adding", "and", "plus", or "subtraction", "minus", "takeaway", "less". As many adults use this language interchangeably, students must be supported to connect these operation words with the symbol that represents them.
An expression in mathematics is a combination of symbols (e.g. 4 + 5). An equation is a statement asserting the equality of two expressions (e.g. 4 + 5 = 9). The focus in this unit of work is to have students record expressions, using symbols correctly and with confidence.
In this unit of work, subitising is given an emphasis. The early numeracy stages are defined by a student’s ability to count items, but the ability to subitise or partition an instantly recognised small group of objects into its parts is also important.
The learning opportunities in this unit can be differentiated by providing or removing support to students and by varying the task requirements. Ways to differentiate include:
Many of the activities in this unit suggest ways to adapt them to engage with the interests and experiences of your students. Other adaptations include:
This unit includes several activities for each session. Choose 2-3 activities for a single session or spread each session over more than one day.
Session 1
SLOs:
Activity 1
Play Number Eye Spy.
(Purpose: To identify numbers of items in groups up to five.)
Explain that in the classroom, some things we see might be in groups of two, three, four or five. Give an example, such as a group of three computers at the back of the classroom. Explain that you could give a clue about the items by saying, “I spy with my little eye, three of something.” You might give directional clues as well to develop the vocabulary of movement and position, e.g., “The items are at the front of the room.” Numbers spoken in te reo Māori can be interchanged with English numbers.
Pose the problem of finding matching collections, by changing the number in the group from three. Have students look about the classroom to identify the group of items you have seen. The person who guesses correctly has the next turn. Take digital photographs so the class can make a display of pictures that match each number from one to five, or further if students show proficiency. Use items that have significance to the students, such as their artworks, cultural artifacts, or toys/mascots. Students might draw collections of objects for a given numeral, such as the number of siblings they have in their whānau or their pets at home.
Activity 2
(Purpose: To subitise groups of up to five dots.)
Shuffle the cards. Hold them up one at a time, so that the students can all see them. As each card is held up, have the students show how many dots they see, by holding up the same number of fingers. Students might be asked to represent the number in different ways, such as say the number in words, write the numeral in the air if they know it, or make a set of counters that match the number and layout.
Activity 3
Explain that they will be writing numerals. Discuss what numerals are used for in daily life. Students might suggest things like the number of people who live in a whare, the number of kaimoana on a plate, the number of chicks in a nest, etc.
Emphasise the correct directionality when forming 2, 3 and 5 in particular.
Model forming each numeral with your back to the students and write the numerals large in the air. Ask students to copy your actions. Adjust your writing hand for students who are left-handed.
Activity 4
Hold up the word cards in order and read them aloud together several times. Show them out of order, having the students quickly reading them aloud.
Activity 5
Have students work in pairs, or groups of three, to play One, Two, Three, Snap.
(Purpose: To correctly match words, numerals and images of numbers 1 to 5)
Make available to each group, word cards to five (Copymaster 2), numeral cards to 5 (Copymaster 4) and dot or koru images images to 5 (Copymaster 1a or Copymaster 1b). Alternatively, the picture card images from Copymaster 3 can be used instead of the dots.
Each pile is shuffled and placed face down in front of the group.

Explain that students in the group each take turns to take one card from each pile, placing them face up in front of themselves as they do so. If all cards show the same amount (symbol, word and image) they say “Snap!” and keep the set.
If not, the cards are returned to the bottom of each pile.
The winner is the person with the most sets of three at the end of the game.
Activity 6
Conclude the session with a game of Get Together.
(Purpose: To form groups of up to five in response to hearing a number word, a written number word, or to seeing a numeral or a number word.)
Choose a piece of fast-paced music that your students enjoy.
Ask your students to stand. Explain that they are to move about the room in time to music. When the music stops, the teacher will either say a number or show numeral or word cards up to five. Students are to look at the teacher, listen for a number or look for a numeral and, as quickly as possible, make a group of that number, and sit down when the group is formed.
Session 2
SLOs:
Activity 1
Ensure that numerals 1 to 5 can be seen by the students. Read them together. Begin by playing Spot the Spots from Session 1, Activity 2. Instead of holding up the same number of fingers, have students write numerals in the air and on the mat with their finger.
Activity 2
(Purpose: To accurately write numerals 1 to 5 in response to hearing number words within a story context.)
Activity 3
Make a think board template (Copymaster 6) and pencil available to each student. Have the students write their favourite number (between 1 and 5) in the centre of their think board. Have them draw a picture, write their own number “story” that includes their favourite number, show any numbers by drawing dots or pictures of equipment, and write any number words, encouraging English and Te Reo.
You may need to support emerging writers by recording part or all of their story for them, and use digital platforms for students who find handwriting difficult.
Activity 4
Make the cards from One, Two, Three, Snap (See Session 1, Activity 5) available to the students so they can play a Memory game as they finish their thinkboard. To play memory they should turn all the cards from three sets face down, mix them up and take turns to find matching trios.
Activity 5
Conclude the session with class sharing of thinkboards. Students could take these home to share their learning with their whānau.
Session 3
SLOs:
Activity 1
Guide the students to shared recording on the class chart:
“I can see five and one” → 5 and 1 → 5 plus 1 → 5 + 1
“I can see five and two” → 5 and 2 → 5 plus 2 → 5 + 2
“I can see four and four” → 4 and 4 → 4 plus 4 → 4 + 4
Activity 2
Together, make a chart, or class dictionary page, about addition and its symbol, + , asking and recording what the students already know. Use items that students are familiar with to create stories that might be modelled by addition. For example, “Two weka were hunting for worms. Three more weka came along. How many weka were there then?” Record the stories using addition equations, e.g., 2 + 3 = 5 for the weka story.
Create a class book of addition problems that students make up, including a picture and written story. The equation can be written on the back of the page.
Discuss the addition symbol. Included in the ideas recorded, should be:
+ is a symbol or sign
+ shows that we are joining together two amounts or numbers
+ is an addition symbol
when we see the + sign we can read it as “and”, “plus” and “add”
+is a short way of writing “and”, “plus” and “add”.
Activity 3
For example:
You might also highlight that 3 + 5 and the matching statements could also be written.
Distribute at least four dot cards to each child that show numbers of dots greater than 1.
Have students write, talk or draw about their cards. Use their recording to add to the class chart or create a digital presentation.
Activity 4
Ask the students work in pairs to play Read and Draw, using the cards from Copymaster 8,

(Purpose: To read a mathematical expression in at least two ways and to respond to a mathematical expression with a drawing.)
Tell the students the purpose of the Read and Draw task. Explain that they take turns to be the Reader and the Quick Draw person.
The Reader’s task is to read the mathematical expression in at least two ways to their partner. Studenrtsshould check their partner’s drawing before showing them the task card on which the expression is written. Their task is to check the accuracy of the drawing.
The Quick Draw person’s task is to listen carefully to the expression that is read, and to draw a diagram of what they hear, using simple shapes. For example: The Reader reads, 4 + 2: “four and two, four plus two,” and the Quick Draw person draws:
Students should have at least four turns each.
Activity 5
Conclude by playing the Hands Together game using two sets of expression cards from (Copymaster 8).

Each student makes a number of choice on one hand by showing that many fingers. For example:
Have them show their ‘number’ to a friend. (This is to avoid students changing the number of fingers when they see the expression.)
The teacher shows an expression, for example 5 + 3. Children who have made these numbers on their fingers must move to pair up, one student showing 5 fingers and the other showing three. The first pair to form and to show 5 + 3 collects a 5 + 3 expression card each. The game begins again. The game finishes when all cards are used up. Students take turns to read aloud to the class the cards they have ‘won’. Each student should read their cards in a different way from the student before them.
Ask students to bring a favourite small soft toy for Session 4. The teacher also needs to bring a small blanket.
Session 4
SLOs:
Activity 1
Write this symbol on the class chart: +
Ask students to tell you addition words and give examples of how to use them. For example, “plus”, “I have five fingers on this hand plus five fingers on this hand.” Record these words.
Students might make a given addition expression with materials, like counters, and explain what they have made. Explicitly link the meaning of the numerals, and + and = symbols, with the models that are made.
Activity 2
You might choose a different scenario that is appropriate to the interests of your students, such as ruru in the kahikatea tree, or people in the waka.
Arrange ten of the students’ soft toys in bed, using the blanket.
For example 1 + 1, 2 + 1, 3 + 1, reading these together. As you do so, focus on modeling the correct formation of numerals 6 to 9.
Read the expressions and words again and highlight the different ways we can read the subtraction symbol.
Activity 3
Have them put their teddies to bed under the tissue, say the rhyme to themselves and each time a teddy falls out, record the expression, for example, 5 – 1. Those who complete this task quickly can write the addition expressions as they return the teddies to bed, or take more teddies and record expressions for 6 to 10.
Activity 4
Conclude the session with a game of Musical Chairs (or cushions). Use music that is appropriate to the interests of your class, such as hip hop or a current fast-paced popular piece.
Set out the number of chairs for students in the group. Record the number on the chart. Play a favourite piece of music. When it stops all students sit down. Have them stand and ask a student to remove one chair then come to record the expression and read aloud what they have written.
For example 10 – 1, “ten chairs minus one chair.”
Explain that one student will not have a seat this time and that this person will get to write and read the next mathematical expression on the chart.
Continue the game till no chairs remain and subtraction expressions have been written for each action.
Session 5
SLO:
Activity 1
Activity 2
Make pencils, paper, felt pens or crayons available to the students. Have them write at least two of their own scenarios and record the mathematical expressions that represent what is happening. You can motivate them by discussing everyday events in which items are added and subtracted. Contexts might include playing games like tag, using up household items like plates, groups of friends meeting, or birds or other creatures arriving or departing a location, such as penguins in a burrow. Students' illustrations should show what is happening in the scenario and expression.
Activity 3
Conclude the session by having the students pair share, then class share their work. Emphasise the importance of having them read their mathematical expressions in at least two ways.
Dear family and whānau,
In class this week the students have been learning how to write numerals correctly. They have also been learning to write and read the symbols for addition and subtraction.
Please find attached a popular rhyme, Ten in the Bed that we have enjoyed in class. With some toys from home, you could read and act out the rhyme, supporting your child to write maths expressions such as 10 – 1, (‘ten minus one’) and 9 – 1 (‘nine takeaway one’), as the toys fall out of bed and expressions such as 1 + 1 (‘one plus one’) and 2 + 1 (‘two and one’) as the toys are put back in bed.
You might look for examples in your students’ lives when items are collected or used up. Discuss how addition and subtraction might show what happens. For example, if there are five apples in the bowl and two get eaten, how many are left. You could write 5 – 2 to represent the story.
The focus is on writing symbols correctly and on reading these aloud, using “add, plus, and” for addition, and “takeaway, minus, subtract, less” for subtraction.
Please note, we have not yet focused on writing full equations using the = symbol though your student might know the equals sign already through using a calculator.
Enjoy Ten in the Bed.
Worms and more
This unit comprises 5 stations, which involve the students in developing an awareness of the attributes of length and area. The focus is on the development of appropriate measuring language for length and area.
Early length experiences must develop an awareness of what length is and develop a vocabulary for discussing length. Young students usually begin by describing the size of objects as big and small. They gradually learn to discriminate in what way an object is big or small, and learn to use more specific terms. Vocabulary such as long, short, wide, close, near, far, deep, shallow, high, low and close, focuses attention on the attribute of length. Early area experiences develop an awareness of what area is, and of the range of words that can be used to discuss it. Awareness of area as the "amount of surface" can be developed by "covering" activities such as wrapping parcels, colouring in, and covering tables with paper. The use of words such as greater, larger and smaller, focus attention on the attribute of area.
The stations may be taken as whole class activities or they may be set up as "centres" for the students to use. Some students will already be aware of the attributes of length and area. For these individuals, the activities in this unit may be useful as maintenance learning.
The learning opportunities in this unit can be differentiated by providing or removing support to students and by varying the task requirements. Ways to differentiate include:
The contexts for activities can be adapted to suit the interests and experiences of your students. For example:
Te reo Māori vocabulary terms such as noke (worm), roa (long), iti (small), tāroaroa (tall), whānui (wide), poto (short), whāiti (narrow), tata (near) and tawhiti (far) could be introduced in this unit and used throughout other mathematical learning.
Station 1: Worms
In this activity we roll play dough to make long and short worms. This could be linked to learning focused on Mini Beasts, native animals, ecosystems, and non-fiction genres of writing (e.g. fact files). Picture books such as Carl and the Meaning of Life by Deborah Freedman, Wonderful Worms by Linda Glasers, Wiggling worms at work by Wendy Pfeffer and Superworm by Julia Donaldson could be used to engage students in this learning.
My worm is long
My worm is wide
My worm is tiny
How do you know that your worm is short?
Is your worm the same as everyone else's? Why?
Station Two: Near and Far
In this activity we build a town with blocks and then "drive" our cars around it.
Station Three: Shaping Ourselves
In this activity we make ourselves tall (tāroaroa), short (poto), wide (whānui), narrow (whāiti), close (tata) and far (tawhiti).
Ask the students to make themselves:
As tall as they can.
As short as they can.
As wide as they can.
As close to a table as they can be.
As far from the door as they can be.
Take up loads of space covering the mat (lie down).
Station Four: Wrapping Paper
In this activity we follow directions and colour in large and small objects on our "wrapping" paper (Copymaster 1). We then find an object to wrap in our paper.
How did you decide which were small?
How did you decide which were large?
Which took the longest to colour? Why?
Which were the quickest to colour? Why?
Whose didn’t?
Why not?
Station Five: Moa footprints
In this activity we look at some footprints and decide who they could belong to. In our discussion we focus on the use of language associated with area. This could be linked to learning about native and extinct animals, animal tracks, and non-fiction genres of writing (e.g. fact files).
Who could this belong to?
Why do you think that?
Is your foot as big as the moa? How do you know? How could you check?
Dear family and whānau,
This week we have been exploring activities which develop an awareness of length and area. We have been using words like: long, short, tall, big and small to describe objects.
Longs and Shorts
This week we ask your child to look around at home and find objects that are short. Choose 4 objects and draw a picture of them. Once they have a collection of "shorts" you could ask them to find 4 objects that are long and draw a picture of those.
Turns
In this unit we look at the beginning of the concept of angle. As ākonga come to understand quarter, half and full turns, they also begin to see that ‘angle’ is something involving ‘an amount of turn’.
Angle can be perceived in at least three ways. These are as:
The concept "angle" in the New Zealand Mathematics Curriculum develops over the following progressions:
Level 1: quarter and half turns as angles
Level 2: quarter and half turns in either a clockwise or anti-clockwise direction; angle as an amount of turning
Level 3: sharp (acute) angles and blunt (obtuse) angles; right angles; degrees applied to simple angles – 90°, 180°, 360°, 45°, 30°, 60°
Level 4: degrees applied to all acute angles; degrees applied to all angles; angles applied in simple practical situations
Level 5: angles applied in more complex practical situations
Outside kura, angle is something that is used regularly by surveyors and engineers both as an immediate practical tool and as a means to solve mathematics that arises from practical situations. Ultimately, angles play a fundamental role in mathematics, as an abstract tool, and in their application to "real world" contexts.
The learning opportunities in this unit can be differentiated by providing or removing support to ākonga and by varying the task requirements. Ways to differentiate include:
The contexts for this unit can be adapted to suit the interests and experiences of your ākonga. For example, the contexts for identifying shapes with quarter turns could be a local playground, marae or community garden. This could involve a trip to visit it, or photos could be used. Contexts for exploring the application of angles could include exploration of made up treasure maps, and could follow on from learning about how Māori and Pasifika settlers travelled to New Zealand.
Te reo Māori vocabulary terms such as koki (angle), huri (turn), haurua (half), hauwha (quarter), and koki huripū (full turn) could be introduced in this unit and used throughout other mathematical learning.
Session 1
In the three sessions that follow, ākonga produce artwork that they can collect in their own ‘Turns Book' or display in the classroom.
Session 2
Prior to this session, tie pieces of string to enough crayons for each ākonga to have one each. Do this with a variety of colours. The string should be quite short (about 5cm long - although they can vary in length) so that the angles can fit on an A4 or A3 size piece of paper.
Session 3
This session is similar to session 2, except that the turns are made using ‘combs’ the ākonga make for themselves. As an alternative, you may prefer to have ākonga use crayons lying flat to create the same effect.
Session 4
Corners of shapes can also be thought of as quarter turns. The purpose of this session is to find corners of shapes that are equivalent to quarter turns.
Repeat for other examples.
Does this triangle (right angled) have any quarter turns? (yes)
Are all the corners quarter turns? (no)
Do all triangles have quarter turns (no, provide examples that don't)
Session 5
Use questions such as:
What kinds of turns have we been talking about this week?
How would you describe a quarter turn? A half turn?
What objects do you know that have quarter turns?
How many quarter turns make a half turn? How many half turns make a full turn?
Dear family and whānau,
This week in maths we have been thinking about full, quarter and half turns. We have seen how they can be made by turning our bodies and moving objects.
Play some games of Whakarongo Mai Tamariki Mā (Simon Says) using quarter, half and full turns with your whānau. The person who is the leader can say commands like: Whakarongo mai tamariki mā quarter turn to your left and everyone does it. If the leader just says: Tamariki mā quarter turn to your left everyone should remain still, otherwise they e noho. You can take turns at being the leader.
Learning to count: Counting one-to-one
This unit develops students’ understanding of, and proficiency in, counting one-to-one.
Gelman and Gallistel (1978) provided five principles that young students need to generalise when learning to count. These principles are:
Just like in reading when one spoken word is matched to one written word, counting involves one-to-one correspondence. One item in a collection is matched to one spoken or written word in the whole number counting sequence.
The spoken and written names that are said and read have a fixed order. If that order is altered, e.g. “One, two, four, five,…”, the count will not work.
Assuming the one-to-one and stable order principles are applied then the last number in a count tells how many items are in the whole collection.
The first three principles are about how to count. The final two principles are about what can be counted.
Items to count can be tangible, like physical objects or pictures, or they can be imaginary, like words, sounds, or ideas, e.g. Five types of animal.
The order in which the items are counted does not alter the cardinality of the collection. This is particularly challenging for students who think that counting is about assigning number names to the items, e.g. “This counter is number three.”
The learning opportunities in this unit can be differentiated by providing or removing support to students and by varying the task requirements. Ways to differentiate include:
The contexts for activities can be adapted to suit the interests and experiences of your students. Examples may include:
Te reo Māori vocabulary such as pepeketua (frog) as well as counting in Māori could be introduced in this unit and used throughout other learning.
Students need to simultaneously develop proficiency with number sequences forward and backwards by one, and their capacity to apply those sequences to counting tasks. Ideally students’ ability to say word sequences develops either ahead of, or synchronous to, their need to apply it, so students who can count collections up to ten should be learning number sequences beyond ten.
Session 1: Hundreds board
Count by ones on a hundreds board, both forwards and backwards, and ask questions which help students connect numerals to spoken words. For example,
Can you find the number 8 without counting up or down?
What number comes after eight?
What number comes before eight?
Variations
Have students work in pairs. They take turns drawing a numeral card out of a container, then work together to find the number on a hundreds board and make a set which contains the number they have drawn, for example a set of eight counters.
First work with numbers 1–10 (tahi to tekau), and extend the range as needed to increase the challenge.
Session 2: Slavonic abacus
Count by ones on a Slavonic abacus, both forwards and backwards. While you count, say the numbers out loud with students as you move the beads. This supports them to connect the spoken word and the quantity.
Can you find the bead for number 7?
What number comes after seven?
What number comes before seven?
Note that when practising the backward number sequence it is the amount that remains, not the bead removed, that is counted. Zero is an important number to say at the end, as the expression of the absence of quantity (no beads).
Variations
Have students work in pairs. They take turns to draw a numeral card out of a container, and challenge their partner to find the number on the Slavonic abacus. If needed, they can count the beads together to check that the right bead has been identified.
First work with numbers 1–10, and extend the range as needed to increase the challenge.
Session 3: Frogs in a bucket
We had 15 frogs and one jumped out.
How many frogs are in the bucket now?
17 frogs and one more… 29 frogs and one more… 99 frogs and one more
7 frogs and one less… 15 frogs and one less… 27 frogs and one less…
Variations
If needed, link explicitly to the number sequence by referring to a hundreds board.
Extend the problems to two more/less, three more/less and beyond as students’ understanding and control of sequences grows.
Have students work in pairs, with one student putting objects into a container, and the other student listening and counting how many.
Session 4: What’s changed?
Now close your eyes, and I’m going to change something.
Try to hold the picture in your mind.
Look for students to recognise that the number of items is unchanged though the items vary from the original ones. Aim for acceptance that the number is unchanged by means other than one-by-one counting, though use counting as a ‘fall back’ strategy if needed.
Variations
Students may begin to say the number is invariant because it has been the last few times, without necessarily accepting that number is conserved. Introduce the one more/one less principle with this activity. Vary the number of new objects by one while still retaining the original layout and see if the students detect the change and trust invariance enough to build on it.
Make the variations more significant such as adding or subtracting more than one and changing some parts of the arrangement.
Have the students work on the activity Odd one out in pairs, using Copymaster 1:
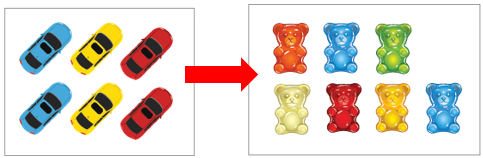
Students work with sets of three cards, and identify one difference between each card and the other two cards in the set. For example, possible answers for the cards with teddies are: the top card is different from the other two because the teddies are sitting down; the middle card is different from the other two because there are different amounts of teddies in each row, and the bottom card is different from the other two because there are 9 teddies.
Session 5: Is there the same number?
Have a look at this collection. Are there more blue teddies, more green teddies or are there the same number? Encourage your students to equate the length of a collection with the quantity of items.
Now close your eyes, and I’m going to change something.
Variations
Vary the spatial arrangement of sets. Begin with a set of objects with some similar characteristics so that students can easily recall the objects that are present. For example, Take a photograph in your mind of the collection. Close your eyes and tell me what you see. Encourage students to pay attention to structure and the organisation of the set, with responses such as “There were two of each animal”, “The animals were on a hexagon”, and “Two on the top, two in the middle, two on the bottom.”
Now I’m going to change something. Vary the spatial layout of the objects, particularly expanding or contracting the length or area of the collection, or rearranging the layout.
Now open your eyes. Are there still the same number of objects? How do you know?
Make minor variations to the total number as well as the spatial layout so that students are required to trust the invariance of the count and build with it or take from it.
Have students work on the activity Domino Count in pairs. This task encourages students to trust the count in the face of different spatial arrangements.
Working with at least one set of dominoes, students sort the dominoes into groups that have the same number of dots, in total. Each group can be labelled with a numeral card, or students could make their own labels. For example:
Once the dominoes have all been grouped, students can arrange the dominoes in a pattern and write the number fact for each domino. For example,
Session 6: Counting dots
The abstraction principle involves the idea that non-tangible items such as sounds, touches, and ideas can be counted. Developing students’ capacity to count items they cannot see and feel is important because it helps them to realise that numbers are ideas.
Messages
Play the game Messages as a class:
Students sit in pairs, back to back, with one student from each pair facing the teacher. The teacher shows a pattern card from Copymaster 2 for a short time. The students turn around and gently tap the number of dots they saw on their partner’s back. The partner shows how many taps they felt by holding up that many fingers. Both players turn around to check whether the number of fingers matches the number of dots on the pattern card. Alternatively, a digit card can be held up instead of a pattern card.
Pattern memory match
Students play pattern match in groups of three or four. Each group needs a set of pattern cards (Copymaster 2) and a set of digit cards.
The pattern cards are spread out individually, face down on. The digit cards are shuffled and put in a pack, face down, in the centre. Players take turns to turn over the top digit card then turn over one of the pattern cards. If the cards match the player keeps both cards and has another turn. Once all of the cards are matched the player with the most pairs wins.
After the game, talk with students about how they recognised some patterns instantly. Look for students to use combinations of smaller groupings, e.g. “I know it’s seven because four and three are seven.”
Dear family and whānau,
This year we are learning about counting. We need to know the skills of counting like saying the numbers in the correct order forward, like "one, two, three..." and backwards, like “ten, nine, eight…”, and matching words and objects one to one.
We also need to understand that counting tells us how many objects are in a collection. We need to trust that once we have counted a collection then that number stays true even if we move the items in the collection around.
Keep looking for chances to practise counting with your child. Ask them to predict how many before they count things, like "how many forks do you think there are in the drawer?" "I've found one more fork. How many do we have now?"