This series of lessons provides different contexts to explore multiplication concepts using arrays such as the one below. This array has 5 rows and 10 columns.

.gif)
Session One: Getting started
- We begin the week with the ‘Orchard Problem’. A picture book about gardens, such as Nana's Veggie Garden - Te Māra Kai a Kui by Marie Munro, could be used to ignite interest in this context.
Jack the apple tree grower has to prune his apple trees in the Autumn. He has 6 rows of apple trees and in every row there are 6 trees. How many apple trees does Jack have to prune altogether?

The start of PowerPoint 1 shows the whole array. Show the complete array. Ask your students to open their eyes and take a mind picture of what they see. Click once to remove all the trees and ask your students to draw what their mind picture looks like. One child could draw their picture on the whiteboard. This could then be referred back to throughout the rest of the lesson.
Look to see if they attend to the rows and columns layout even if the numbers of trees have errors. Discuss the layout.
- Have a pile of counters in the middle of the mat. Ask a volunteer to come and show what the first row of trees might look like. Or get 6 individuals to come forward and act like trees and organise themselves into what they think a row is.
Alternatively click again in the PowerPoint so it’s easy for all to see what the first row of apple trees will look like. Ask your students to improve their picture if they can.
What will the second row look like?
It’s important for students to understand what a row is so they can make sense of the problem. It is also important for them to notice that all rows have the same number of trees. - Arrange the class into small mixed ability groups with 3 or 4 students in each. Give each group a large sheet of paper. Ask them to fold their piece of paper so it makes 4 boxes (fold in half one way and then in half the other way).
- Allow some time for each group to see if they can come up with different ways to solve the Orchard Problem and record their methods in the four boxes. Tell them that you are looking for efficient strategies, those that take the least work.
Allow students to use equipment if they think it will help them solve the problem.
Rove around the class and challenge their thinking with questions like:- How could you count the trees in groups rather than one at a time?
- What facts do you know that might help you?
- What sets of numbers do you know that might help you?
- What is the most efficient way of working out the total number of trees?
- Ask the groups to cut up the 4 boxes on their large sheet of paper and then come to the mat. Gather the class in a circle and ask the groups to share what they think is their most interesting strategy. Place each group’s strategy in the middle of the circle as they are being shared. Once each group has contributed, ask the students to offer strategies that no one has shared yet.
| Likely strategies | Possible teacher responses |
| 1, 2, 3, 4, 5, 6, 7, 8, 9, 10, 11 …. Tahi, rua, toru, whā, rima, ono, whitu, waru, iwa, tekau, tekau mā tahi… | Can you think of a more efficient way to work out how many trees there are? How many trees are there in one row? |
| 6, 12, 18, 24, 30, 36 | Do you know what 6 + 6 =? Or 3 + 3 = ? Can that knowledge help you solve this problem more efficiently? |
| 6 x 6 = 36 | What if Jake had 6 rows of trees and there were 7 trees in each row? |
| 6 + 6 = 12; 12 + 12 = 24; 24 + 12 = 36 | You used addition to work that out. Do you know any multiplication facts that could help? |
2 x 6 = 12; 12 + 12 + 12 = 36 | If 2 x 6 = 12, what does 4 x 6 =? How could you work out 6 x 6 from this? |
| 3 x 6 = 18 and then doubled it | That is very efficient. Could you work out 9 rows of 6 for me using 6 x 6 = 36? |
| 5 x 6 = 30; and 6 more = 36 |
The shared strategies can be put into similar groups.
Who used a strategy like this one?
- Show students PowerPoint 2. The PowerPoint encourages students to disembed a given smaller array of trees from within a larger array. They are also asked to use their knowledge of the smaller array to work out the total number of trees in the larger array. This is a significant ability for finding the totals of arrays using the distributive property of multiplication.
- Provide your students with Copymaster 1. The challenge is to find the total number of trees in each orchard. Challenge your students to find efficient strategies that do not involve counting by ones.
- As a class, share the different ways that students used to solve the Orchard Problems. You might model on the Copymaster to show how various students partitioned the arrays.
Sessions Two and Three: Exploring through work stations
The picture book Hooray! Arrays! by Jason Powe could be used to ignite interest in this learning. In the next two sessions students work in pairs or threes to solve the problems on Copymaster 2. Consider choosing these pairs to encourage tuakana teina through the pairing of more knowledgeable and less knowledgeable students. Enlarge the problem cards and place them at each station. Provide students with access to copies of Copymaster 3 and Copymaster 4 (arrays students can draw on), and physical equipment such as counters, cubes, and the Slavonic Abacus.
Read the problems from Copymaster 2 to the class one at a time to clarify the wording. You may need to revisit the meaning of rows and columns by creating simple examples.
As students work on a station activity, ask them to create a record of their thinking and solutions. The record might be a recording sheet or in their workbook. Note that Part 2 of each problem is open and requires a longer period of investigation.
As the students work watch for the following:
- Can they interpret the problem wording either as a physical representation or as symbolic equations?
- Do they create arrays of equal rows and columns?
- Are they able to use skip counting, additive or multiplicative strategies to find the total number of trees?
- Do they begin to see properties of whole numbers under multiplication? (for example, Apple Orchard Part 2 deals with the commutative property)
At times during both sessions you might bring the class together to discuss confusions or misconceptions, clarify language and share efficient strategies and ways of representing the problems.
Below are specific details related to each problem set.
Orange Orchard
Orange Orchard (Part 1) involves 6 x 8 (or 8 x 6). Students might use their knowledge of 6 x 6 = 36 and add on 12 more (two columns of six). That would indicate a strong understanding of the multiplicative structure of arrays.
Most students will use strategies that involve visualising the array and partitioning the array into manageable chunks (dis-embedding). For example, they might split rows of eight into two fours (6 x 8 = 6 x 4 + 6 x 4), or into fives and threes (6 x 8 = 6 x 5 + 6 x 3). Other students will use less sophisticated strategies such as counting in twos and fives, or a combination of skip counting and counting by ones.
Part 2 is an open task which requires students to identify the factor pairs of 24.
Encourage capable students to be systematic in finding all the possibilities (1 x 24, 2 x 12, 3 x 8, 4 x 6).
Orange Orchard (Part 1) Tame has an orange orchard with 6 rows of trees. In each row there are 8 trees. How many trees does Tame have altogether? Your prediction: Your answer: | Orange Orchard (Part 2) Tame wants to plant another orchard with oranges. He gets 24 trees. Find different ways Tame can plant 24 trees in rows and columns. Show all the different ways. |
Kiwifruit Orchard
Part 1 requires students to coordinate three factors as the problem can be written as 3 x (4 x 5). Multiplication is a binary operation so only two factors can be multiplied at once. Do your student recognise the structure of a single orchard (4 x 5) and realise that the total is consists of three arrays of that size?
Similarly, in Part 2 students must restructure 36 plants into two sets. Do they partition 36 into two numbers, preferably that have many factors? The problem does not say that the two orchards must contain the same number of plants though 18 and 18 is a nice first solution. Once the two sets of plants are formed can your students find appropriate numbers of rows and columns that equal the parts of 36?
Kiwifruit Orchard (Part 1) Lana has three kiwifruit orchards that are the same. In each orchard she has 5 kiwi fruit plants in every row. There are 4 rows. How many kiwi fruit plants does Lana have altogether? Your prediction: Your answer: | Kiwifruit Orchard (Part 2) Lana’s son, Bruce, buys 36 plants to start two Kiwi fruit orchards. How can Bruce arrange the plants into rows and columns? Show different ways. Remember that he must share the 36 plants between two orchards. |
Strawberry Patch
Part 1 is a single array (5 x 12). Students might use the distributive property and solve the problem or 5 x 10 + 5 x 2 (partitioning 12) or 5 x 6 + 5 x 6. Some may re-unitise two fives as ten to create 6 x 10. These strategies are strongly multiplicative. Most students will use smaller units such as fives or two and apply a combination of repeated addition (5 + 5 = 10, 10 + 10 = 20, etc.) or skip counting (2, 4, 6, 8, …).
Part 2 is about factors that have the same product (24). This gives students a chance to recognise that some numbers have many factors and the expressions of those factors have patterns. For example, 6 x 4 and 3 x 8 are related by doubling and halving. The logic behind the relationship may be accessible for some students. If the rows are halved in length, then twice as many rows can be made with the same number of plants.
Strawberry Patch (Part 1) Hera has a strawberry patch. There are 5 rows with 12 strawberry plants in each row. How many strawberry plants does Hera have altogether? Your prediction: Your answer: | Strawberry Patch (Part 2) Sam, Kim and Toni also have strawberry patches. Sam has 6 rows with 4 plants in each row. Kim has 3 rows with 8 plants in each row. Toni has 2 rows with 12 plants in each row. Who has the most strawberry plants, Sam, Kim or Toni? |
Apple Orchard
Part 1 gives students a chance to ‘discover’ the commutative property, the order of factors does not affect the product. In this case 5 x 10 = 10 x 5.
Part 2 applies the distributive property of multiplication though many students will physically solve the problem with objects. Look for students to notice that 12 extra trees shared among six rows results in two extra per row. So, the number of rows stays the same, but the rows increase in length to six trees. Similarly, if more rows are made the 12 trees are formed into three rows of four. The number of rows would then be 9. 6 x 6 and 9 x 4 are the possible options.
Apple Orchard (Part 1) Fatu’s apple orchard has ten trees in each row. There are five rows. Min’s apple orchard has 5 trees in each row. There are ten rows. Who has more apple trees, Fatu or Min? Your prediction: Your answer: | Apple Orchard (Part 2) Besma has six rows of apple trees. Each row has four trees. If she plants 12 more trees, how many rows might she have then. How many trees will Besma have in each row? There are two answers. Show both answers. |
Sessions Four and Five
Sessions Four and Five give students an opportunity to recognise the application of arrays in other contexts.
The chocolate block problem involves visualising the total number of pieces in a block even though the wrapping is only partially removed. PowerPoint 3 provides some examples of partially revealed chocolate blocks. For each block ask:
- How many pieces are in this block?
- How do you know?
Look for students to apply two types of strategies, both of which are important in measurement:
Iteration: That is when they take one column or row and see how many times it maps into the whole block.
Partitioning: That is when they imagine the lines that cut up the block, particularly halving lines. They look to find a partitioning that fits the row or column that is given.
Copymaster 5 provides students with further examples of visualising the masked array.
The Kapa Haka problem is designed around the array structure of seating arrangements for Kapa Haka performances at school.
Begin by role playing the Kapa Haka problem. Use chairs to make a simulated arrangement of seats. You might like to include grid references used to locate specific seats.
Try questions like:
- How many rows are there? How many columns are there?
- How many audience members could be seated altogether?
- If the performance needed 24 seats what could they do?
Use different arrangements of columns and rows.
Give the students counters, cubes or square grid paper to design possible seat layouts with 40 seats. Encourage them to be systematic and to look for patterns in the arrangements. Some students will find efficient ways to record the arrangements such as:
2 rows of 20 seats 4 rows of 10 seats 5 rows of 8 seats
Record these possibilities as multiplication expressions on rectangles of card. Put pairs of cards together to see if students notice patterns, like doubling and halving.
It is important to also note what length rows do not work.
- Could we make rows of 11 sets? 9 seats? Why not? (40 is not divisible by 11 or 9 as there would be remaining seats left over)
If students show competence with finding factors, you could challenge them to find seating arrangements with a prime number of seats such as 17 or 23. They should find that only one arrangement works; 1 x 17 and 1 x 23 respectively.
Reflecting
As a final task for the unit, ask the students to make up their own array-based multiplication problems for their partner to solve.
- Tell the students that they are to pretend to be kūmara growers. They decide how many rows of kūmara plants they want in each row and how many rows they will have altogether. As part of this learning, you could look into how early Maori people grew kūmara. This plant arrived in New Zealand with Polynesian settlers in the 13th Century. However, the climate here was much colder than the Polynesian islands. As a result, the kūmara had to be stored until the weather was warm enough for it to grow. The kūmara plant became even more important once settlers discovered that some of their other food plants would not grow at all in New Zealand’s climate. These kūmara were different to the ones we eat today - which came to us from North America. The books Haumia and his Kumara: A Story of Manukau by Ron Bacon, and Kumara Mash Forever by Calico McClintock could be used to engage students in this context.
- Then they challenge their partner to see if the partner can work out how many kūmara plants they will have altogether.
- Tell the students to create a record of their problem with the solution on the back. The problems could be made into a book and other students could write other solution strategies on the back of each problem page.
- Conclude the session by talking about the types of problems we have explored and solved over the week. Tell them that the problems were based on arrays. Let them know that there are many ways of solving these problems, tough multiplication is the most efficient method. Ask students where else in daily life they might find arrays.
Arrays hooray
In this unit students are given the opportunity to explore multiplication concepts using arrays. The use of multiple strategies and the sharing of strategies is encouraged, in group and whole class situations.
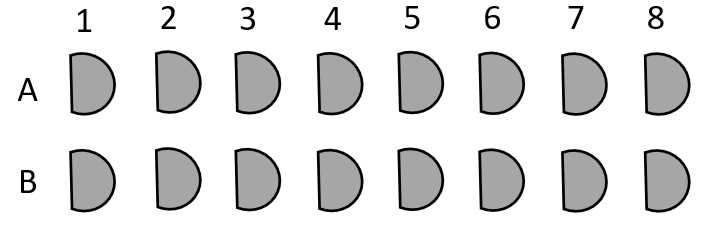
In this unit the students use arrays to solve multiplication problems. Arrays are an arrangement of objects in rows and columns. For example, chocolate blocks are made up of an array of smaller pieces. The block below has two rows and five columns.
Orchards’ layouts are also arrays where the fruit trees are grown in rows and columns to make them easier to look after and easier to pick fruit from.
Arrays are strongly advocated by researchers in mathematics education because they model the binary (two factors) nature of multiplication. Therefore, this unit can be used as an introduction to multiplication. The number of rows and columns gives the factors by which the total number can be found, e.g. 2 x 5 or 5 x 2 for the chocolate block above. Arrays are also used extensively in the measurement of area, in finding all outcomes of a probability situation (Cartesian product), in grid systems on maps, and in spreadsheets and other digital tools. Recognising the multiplicative structure of arrays can be challenging for students, especially those who have little experience with equal sets.
Estimation is also an important component of this unit. Students are encouraged to use their number knowledge to anticipate approximate products when given two factors.
This unit can be differentiated by varying the scaffolding provided or altering the difficulty of the tasks to make the learning opportunities accessible to a range of learners. For example:
The contexts in this unit can be adapted to recognise diversity and student interests to encourage engagement. For example:
Consider how these contexts could provide links to other areas of current learning (e.g. about community gardens, school trips, planting out the school garden).
This series of lessons provides different contexts to explore multiplication concepts using arrays such as the one below. This array has 5 rows and 10 columns.
Session One: Getting started
Jack the apple tree grower has to prune his apple trees in the Autumn. He has 6 rows of apple trees and in every row there are 6 trees. How many apple trees does Jack have to prune altogether?
The start of PowerPoint 1 shows the whole array. Show the complete array. Ask your students to open their eyes and take a mind picture of what they see. Click once to remove all the trees and ask your students to draw what their mind picture looks like. One child could draw their picture on the whiteboard. This could then be referred back to throughout the rest of the lesson.
Look to see if they attend to the rows and columns layout even if the numbers of trees have errors. Discuss the layout.
Alternatively click again in the PowerPoint so it’s easy for all to see what the first row of apple trees will look like. Ask your students to improve their picture if they can.
What will the second row look like?
It’s important for students to understand what a row is so they can make sense of the problem. It is also important for them to notice that all rows have the same number of trees.
Allow students to use equipment if they think it will help them solve the problem.
Rove around the class and challenge their thinking with questions like:
Can you think of a more efficient way to work out how many trees there are?
How many trees are there in one row?
Do you know what 6 + 6 =? Or 3 + 3 = ?
Can that knowledge help you solve this problem more efficiently?
You used addition to work that out.
Do you know any multiplication facts that could help?
2 x 6 = 12;
12 + 12 + 12 = 36
The shared strategies can be put into similar groups.
Who used a strategy like this one?
Sessions Two and Three: Exploring through work stations
The picture book Hooray! Arrays! by Jason Powe could be used to ignite interest in this learning. In the next two sessions students work in pairs or threes to solve the problems on Copymaster 2. Consider choosing these pairs to encourage tuakana teina through the pairing of more knowledgeable and less knowledgeable students. Enlarge the problem cards and place them at each station. Provide students with access to copies of Copymaster 3 and Copymaster 4 (arrays students can draw on), and physical equipment such as counters, cubes, and the Slavonic Abacus.
Read the problems from Copymaster 2 to the class one at a time to clarify the wording. You may need to revisit the meaning of rows and columns by creating simple examples.
As students work on a station activity, ask them to create a record of their thinking and solutions. The record might be a recording sheet or in their workbook. Note that Part 2 of each problem is open and requires a longer period of investigation.
As the students work watch for the following:
At times during both sessions you might bring the class together to discuss confusions or misconceptions, clarify language and share efficient strategies and ways of representing the problems.
Below are specific details related to each problem set.
Orange Orchard
Orange Orchard (Part 1) involves 6 x 8 (or 8 x 6). Students might use their knowledge of 6 x 6 = 36 and add on 12 more (two columns of six). That would indicate a strong understanding of the multiplicative structure of arrays.
Most students will use strategies that involve visualising the array and partitioning the array into manageable chunks (dis-embedding). For example, they might split rows of eight into two fours (6 x 8 = 6 x 4 + 6 x 4), or into fives and threes (6 x 8 = 6 x 5 + 6 x 3). Other students will use less sophisticated strategies such as counting in twos and fives, or a combination of skip counting and counting by ones.
Part 2 is an open task which requires students to identify the factor pairs of 24.
Encourage capable students to be systematic in finding all the possibilities (1 x 24, 2 x 12, 3 x 8, 4 x 6).
Orange Orchard (Part 1)
Tame has an orange orchard with 6 rows of trees.
In each row there are 8 trees.
How many trees does Tame have altogether?
Your prediction:
Your answer:
Orange Orchard (Part 2)
Tame wants to plant another orchard with oranges.
He gets 24 trees.
Find different ways Tame can plant 24 trees in rows and columns.
Show all the different ways.
Kiwifruit Orchard
Part 1 requires students to coordinate three factors as the problem can be written as 3 x (4 x 5). Multiplication is a binary operation so only two factors can be multiplied at once. Do your student recognise the structure of a single orchard (4 x 5) and realise that the total is consists of three arrays of that size?
Similarly, in Part 2 students must restructure 36 plants into two sets. Do they partition 36 into two numbers, preferably that have many factors? The problem does not say that the two orchards must contain the same number of plants though 18 and 18 is a nice first solution. Once the two sets of plants are formed can your students find appropriate numbers of rows and columns that equal the parts of 36?
Kiwifruit Orchard (Part 1)
Lana has three kiwifruit orchards that are the same.
In each orchard she has 5 kiwi fruit plants in every row.
There are 4 rows.
How many kiwi fruit plants does Lana have altogether?
Your prediction:
Your answer:
Kiwifruit Orchard (Part 2)
Lana’s son, Bruce, buys 36 plants to start two Kiwi fruit orchards.
How can Bruce arrange the plants into rows and columns?
Show different ways.
Remember that he must share the 36 plants between two orchards.
Strawberry Patch
Part 1 is a single array (5 x 12). Students might use the distributive property and solve the problem or 5 x 10 + 5 x 2 (partitioning 12) or 5 x 6 + 5 x 6. Some may re-unitise two fives as ten to create 6 x 10. These strategies are strongly multiplicative. Most students will use smaller units such as fives or two and apply a combination of repeated addition (5 + 5 = 10, 10 + 10 = 20, etc.) or skip counting (2, 4, 6, 8, …).
Part 2 is about factors that have the same product (24). This gives students a chance to recognise that some numbers have many factors and the expressions of those factors have patterns. For example, 6 x 4 and 3 x 8 are related by doubling and halving. The logic behind the relationship may be accessible for some students. If the rows are halved in length, then twice as many rows can be made with the same number of plants.
Strawberry Patch (Part 1)
Hera has a strawberry patch.
There are 5 rows with 12 strawberry plants in each row.
How many strawberry plants does Hera have altogether?
Your prediction:
Your answer:
Strawberry Patch (Part 2)
Sam, Kim and Toni also have strawberry patches.
Sam has 6 rows with 4 plants in each row.
Kim has 3 rows with 8 plants in each row.
Toni has 2 rows with 12 plants in each row.
Who has the most strawberry plants, Sam, Kim or Toni?
Apple Orchard
Part 1 gives students a chance to ‘discover’ the commutative property, the order of factors does not affect the product. In this case 5 x 10 = 10 x 5.
Part 2 applies the distributive property of multiplication though many students will physically solve the problem with objects. Look for students to notice that 12 extra trees shared among six rows results in two extra per row. So, the number of rows stays the same, but the rows increase in length to six trees. Similarly, if more rows are made the 12 trees are formed into three rows of four. The number of rows would then be 9. 6 x 6 and 9 x 4 are the possible options.
Apple Orchard (Part 1)
Fatu’s apple orchard has ten trees in each row. There are five rows.
Min’s apple orchard has 5 trees in each row. There are ten rows.
Who has more apple trees, Fatu or Min?
Your prediction:
Your answer:
Apple Orchard (Part 2)
Besma has six rows of apple trees.
Each row has four trees.
If she plants 12 more trees, how many rows might she have then.
How many trees will Besma have in each row?
There are two answers.
Show both answers.
Sessions Four and Five
Sessions Four and Five give students an opportunity to recognise the application of arrays in other contexts.
The chocolate block problem involves visualising the total number of pieces in a block even though the wrapping is only partially removed. PowerPoint 3 provides some examples of partially revealed chocolate blocks. For each block ask:
Look for students to apply two types of strategies, both of which are important in measurement:
Iteration: That is when they take one column or row and see how many times it maps into the whole block.
Partitioning: That is when they imagine the lines that cut up the block, particularly halving lines. They look to find a partitioning that fits the row or column that is given.
Copymaster 5 provides students with further examples of visualising the masked array.
The Kapa Haka problem is designed around the array structure of seating arrangements for Kapa Haka performances at school.
Begin by role playing the Kapa Haka problem. Use chairs to make a simulated arrangement of seats. You might like to include grid references used to locate specific seats.
Try questions like:
Use different arrangements of columns and rows.
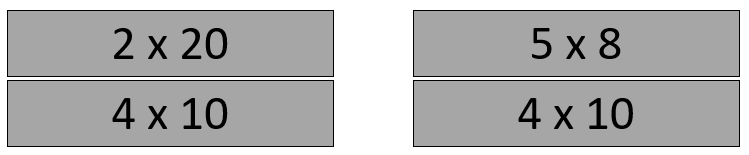
Give the students counters, cubes or square grid paper to design possible seat layouts with 40 seats. Encourage them to be systematic and to look for patterns in the arrangements. Some students will find efficient ways to record the arrangements such as:
2 rows of 20 seats 4 rows of 10 seats 5 rows of 8 seats
Record these possibilities as multiplication expressions on rectangles of card. Put pairs of cards together to see if students notice patterns, like doubling and halving.
It is important to also note what length rows do not work.
If students show competence with finding factors, you could challenge them to find seating arrangements with a prime number of seats such as 17 or 23. They should find that only one arrangement works; 1 x 17 and 1 x 23 respectively.
Reflecting
As a final task for the unit, ask the students to make up their own array-based multiplication problems for their partner to solve.
Dear family and whānau,
This week we have been looking at arrays in class. Arrays have rows and columns like orchards. We have found it easy to figure out the number of things that are in arrays.
Ask your child to find some arrays in your home or neighbourhood. These could include a supermarket car park or an orchard, or an egg box, or the bus seats. Use these arrays to count the number of things in those arrays. You can also help your child to draw a sketch of the arrays showing the columns and rows.
Figure it Out Links
Some links from the Figure It Out series which you may find useful are:
Triangles
This unit encourages students to discover and apply the rule for area of a triangle (area equals half base times height). Students will practise multiplication and division strategies as they calculate areas.
Area is a two-dimensional concept related to the geometric concept of an enclosed region. It can be defined as the size of a surface expressed as a number of square units. Investigations into the size of an area should begin with comparisons between different surfaces and progress to the use of non-standard, and then standard, units. The use of formulae to calculate the areas of common polygons is the final stage of the learning sequence.
When the students are able to measure efficiently and effectively using standard units, their learning experiences can be directed to situations that encourage them to "discover" measurement formula. For example, the students may realise as they count squares to find the area of a rectangle, that it would be quicker to find the number of squares in one row and multiply this by the number of rows. In this unit the students find a formula for calculating the area of a triangle by seeing it as half of a rectangle.
This unit is also designed to allow students to practice their multiplicative strategies as they calculate the area of triangles.In particular it reinforces the fact that the order in which they multiply and divide is not important (commutative property of multiplication).
The learning opportunities in this unit can be differentiated by providing or removing support to students and by varying the task requirements. Ways to support students include:
Tasks can be varied in many ways including:
allowing students to draw and create triangles on tablets or laptops
The context for this unit can be adapted to suit the interests and cultural backgrounds of your students. Area is useful to many everyday pursuits, such as painting a bedroom, creating a vegetable patch, tiling a kitchen or bathroom, interpreting house plans, and working out the size of a playground, marae or field. Some of the activities can be adapted to be taken outside the classroom and into an authentic ‘area’ context (for example, the school sports field).
Te reo Māori vocabulary terms such as horahanga (area), paenga (perimeter), tapatoru (triangle), and tapatoru hāngai (right angle triangle) could be introduced in this unit and used throughout other mathematical learning.
Session 1
In this session students revise how to calculate the area of a rectangle. The knowledge covered in this session is foundational to understanding how to calculate the area of a triangle.
How did we work out the area of the rectangle?
How did we work out 5x7?
Session 2
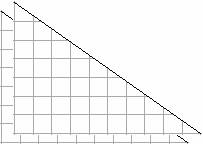
In this session students divide rectangles diagonally to produce right angled triangles. They recognise that the two triangles formed are equal in area.
What do you notice about the areas of the two triangles?
Students should notice that the two triangles have the same areas and that therefore the area of each is half the area of the rectangle. If they had worked out the areas by counting, ask them to use multiplication to check their counting.
What is the area of each triangle exactly?
How could you work out the areas of the triangles? [Halve the area of the rectangle]
What numbers would you need to multiply or divide? [Either base times height times half or base times height divided by two.]
What would be the easiest strategy for you? [Initially students are likely to mistakenly think that they have to multiply the base and height before dividing - often a better strategy is to halve one of these factors before multiplying.]
Have students cut along the diagonal and rotate one triangle to sit on top of the other. Emphasise that the triangles are identical, meaning that they must have the same area.
Ask: Will this work for any rectangle you can make?
Session 3
In this session students draw right angled triangles, complete the rectangle and calculate the area of the original triangle.
Do we have enough information to work out the area?
Could we work out the area of another shape that would help?
Remember what we discovered about rectangles last maths lesson – two identical right angle triangles can be positioned together to make a rectangle - could that help?
Does this work for every right angled triangle?
Can you describe a rule for the area of a right angled triangle?
Are there any clever tricks to make the maths easier? [Divide one of the sides by two before multiplying]
Session 4
In this session students draw non right angled triangles, and experiment with finding their area.
What is the area of the left hand rectangle?
What is the area of the left hand part of the right angled triangle?
What is the area of the right hand rectangle?
What is the area of the right hand part of the right angled triangle?
Does this work for every triangle?
Can you describe a rule for the area of any triangle?
Session 5
In this session students state a rule for the area of a triangle and use it to find the area of some triangles.
Family and whānau,
In maths this week we are learning about the area of triangles. Ask your child to explain to you the rule for working out the area of a triangle. See if they can explain why the rule works using diagrams to show you what they have learned. Your child needs to find the area of 3 different triangles around the house recording the details in their book. Ask them to explain their thinking to you.