Lesson One
- Introduce Matariki, The Māori New Year, to your class. There are many picture books and online videos that could be used to introduce this context. Matariki begins with the rising of the Matariki star cluster, (Pleiades in Greek), in late May or June. For the previous three months the Matariki cluster is below the horizon so it cannot be seen. The rising signals the turn of the seasons and sets the calendar for the rest of the year.
- Show your students the first few slides on PowerPoint 1. Discuss what stars are and how our sun is an example.
What shape is a star?
Today we are going to make some stars to display using shapes. - For each slide discuss how the left-hand star is made then built onto to form the right star. Encourage your students to use correct names for the composing shapes, such as triangle, square, hexagon, trapezium. If necessary, provide a chart of the shapes and their names for students to refer to. Using a set of virtual or hard-copy pattern blocks, support students to make the stars on slides three and four by copying the pattern. Model this for students (especially if using virtual pattern-blocks). It may also be beneficial for students to work collaboratively (mahi-tahi) during this task.
- Encourage students to use the blocks to create their own stars. Slide 6 is a blank canvas of pattern blocks. With the slide in edit rather than display mode, you can use the blocks to form other patterns.
- Copymaster 1 provides two different puzzles for your students. They cut out the pieces to form a star. Glue sticks or blue-tack can be used to fasten the parts in place.
- Other Activities with Stars
- Most star designs have mirror symmetry. That means that a mirror can be placed within the star, so the star appears complete. The reflection provides the missing half of the star. Demonstrate to your students how that works. Copymaster 2 provides four different star patterns. Give students small mirrors and ask them to find the places where a mirror can go so the whole star is seen. You could also demonstrate this on a PowerPoint, or using an online tool. An internet search for “online symmetry drawing tool” reveals a number of websites that could be used. Note that Star Four has no mirror symmetry so it is a non-example. Star Four does have rotational symmetry so it can map onto itself by rotation.
- Copymaster 2 also has half stars on page two. Ask your students to complete the whole star. Be aware that attending to symmetry is harder when the mirror line is not vertical or horizontal. Can your students attend to perpendicular (at right angle) distance from the mirror line in recreating the other half?
- Creating stars by envelopes
- The diagonals of some polygons create beautiful star patterns. The most famous pattern is the Mystic Pentagram that is created within a regular pentagon. Video 1 shows how to get started and leaves students to complete the pattern. The exercise is good for their motor skills as well as their attendance to pattern and structure. Copymaster 3 has other shapes to draw the diagonals inside. Note that a diagonal need not be to the corner directly opposite, it can also go to any corner that it does not share a side with.
- Nice questions to ask are:
How do you know that you have got all the diagonals? (Students might notice that the same number of diagonals come from each corner)
Does the star have mirror lines? How do you know?
Lesson Two
In this lesson your students explore family trees, working out the number of people in their direct whakapapa. This may be a sensitive topic for some students. Thinking about our relatives who are no longer with us, or have just arrived, is a traditional part of Matariki, the Māori New Year. According to legend, Matariki is the time when Taramainuku, captain of Te Waka O Rangi, and gatherer of souls, releases the souls of the departed from the great net. The souls ascend into the sky to become stars.
- Begin by playing a video or reading a book about Ranginui (Sky Father) and Papatuanuku (Earth Mother), the mother and father of Māori Gods.
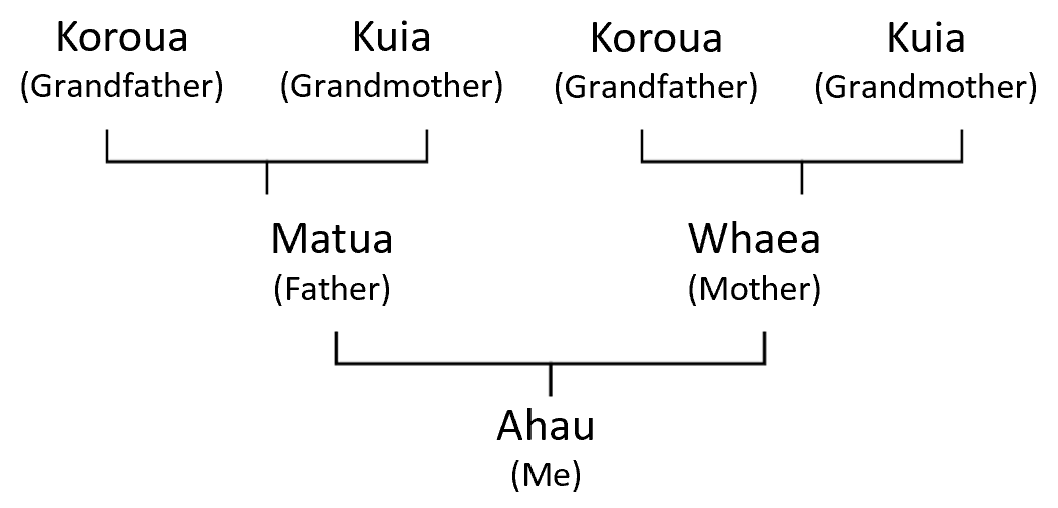
- Ask: How many parents (matua) do you have?
That question needs to be treated sensitively but the focus is on biological parents, usually a father and mother. You might personalise the answer by telling your students the names of your mother and father. Draw a diagram like this, or use an online tool to create the diagram:

- Ask:
My mother and father had parents too. What are your parents' parents called?
How many grandparents (koroua) do you have?
Students may have different ways to establish the number of grandparents, such as just knowing, visualising the tree and counting in ones, or doubling (double two), - Extend the whakapapa tree further.
- Ask: What do we call your grandparent’s parents? (Great grandparents, koroua rangatira)
Nowadays, many students will still have living great grandparents. You might personalise the idea using your whakapapa.
What do we call the parents of your great grandparents?
Now I want you to solve this problem. How many great great grandparents do you have? - Encourage students to work in small groups. Provide materials like counters or cubes to support students. Ask students to draw the whakapapa diagram to four layers and record their strategy as much as they can. After an appropriate time, share strategies.
- Discuss the efficiency of counting based strategies, counting by ones and skip counting in twos. Highlight more efficient methods such as doubling, e.g. 2 + 2 = 4, 4 + 4 = 8, 8 + 8 = 16.
- Ask: Now let’s just think about our parents. If three children in this class invited their parents along, how many parents would that be?
Use the context as a vehicle for introducing even numbers (multiples of two), Act out three children getting their parents (other students) and bringing them to school. Change the number of students and work out the total number of parents. Find a way to highlight the numbers that come up, such as shading the numbers on a virtual Hundreds Board. - Ask: Can anyone see a pattern in the numbers of parents?
Students might notice that even numbers occur in the 0, 2, 4, 6, 8 columns of the hundreds board. - Introduce a challenge: If everyone in this class brought their parents along, how many parents would that be?
- Ask the students to work in small teams with materials. Providing transparent counters and individual Hundred Boards will be useful but provide a range of options. Watch for your students to:
- structure their model as "two parents for every one student"
- deploy materials in an organised way to represent the whole class
- use efficient counting strategies, to systematically find the number of parents
- use recording to organise their thinking, particularly the use of number symbols.
- Share the strategies students used with a focus on the points above. Depending on the current achievement of your students you might extend the problems. For example:
- Ten parents came along. How many students brought them?
- How big would our class be if 100 parents came along?
- If every student in another class brought two parents along, could there be 54 parents? What about 53 parents? Etc.
- If students in our class brought all their grandparents along, how many grandparents would that be?
- If we had to provide a Matariki celebration for our grandparents, what food and drink would we need?
- How much of each food and drink would we need?
Lesson Three
Matariki is a time for cultural activities, such as story-telling, music, and games. Titi Rakau is a traditional game that involves hitting and throwing sticks, usually to a rhythmic chant. It was used to enhance the hand-eye coordination of children and warriors. Rakau can be used as a vehicle for fractions and musical notation, as well as physical coordination. You can make the tasks below as simple or as difficult as you like.
- Look at slide 1 of PowerPoint 2.
What fractions has the bar been broken into? (Quarters)
Each of these notes (crotchet) is one quarter of a bar in this music. - Find a piece of music online with a clear 4/4 time signature. That means there are four crochet (quarter) beats to the bar. This timing is very common in popular music. “Tahi” released by Moana and the Moa Hunters in 1994 is a good example that is easily found online. Ask your students to clap in steady 1, 2, 3, 4, … time with a consistent time between claps as the music plays.
- Introduce rākau, made from rolled up magazines taped together with duct tape. Students might practise hitting the ground with the ends of the sticks on every beat of the 4/4 time. This can be changed to beat one on the ground, and beat two ‘clapping’ the sticks together in the air, beat three on the ground, and beat four in the air, etc.
- Introduce the rest symbol using slide 2 of PowerPoint Two. In 4/4 time the rest is for one beat. So the rhythm is ‘clap, clap, clap, rest, clap, clap, clap, rest…” as is used in “We will rock you,” by Queen. Slide 3 has a bar with two rests. See if the students can maintain that rhythm.
- Slides 4 and 5 introduce the quaver which is a one-eighth note in 4/4 time. See if students can manage the two different rhythms, including the beamed (joined) quavers. Copymaster 4 can be made into cards, or cut out as is, to create different rhythmic bars in 4/4 time. Note that the semibreve (circular note) denotes the whole of four beats, and the minim (stemmed hollow note) denotes one half of a bar. A minim is equivalent to two crotchets.
- Let your students make up a single bar using the cards. Encourage them to experiment with possible rhythms by trailing them with Rakau. Rests are usually part of Rakau to allow movement of the sticks from one position, e.g. floor, to another, e.g. chest. The rhythm a student creates can be played by another using Rakau.
- Look for your students to:
- Apply their knowledge of fractions, such as one half and two quarters make one whole (bar)
- Recognise equivalence, such as two quarters make one whole or two eighths make one quarter.
- Share the bar patterns that students create and play them with Rakau. Rhythms can also be checked by finding an online music composer for children and entering the notes. The software usually has playback.
- Natural extensions of the task are:
- Explore different time signatures. Many Māori action songs are in Waltz time (3/4) meaning that there are three crotchet beats to a bar. A crotchet is one third of a bar in that time signature and a quaver is one sixth of a bar.
The popular chant associated with Ti Rākau (E Papa Waiari - available on YouTube) is in 6/8 time meaning there are six quaver beats to a bar. If you watch a video of a performance with Rākau the sticks are often hit on the ground on the first and fourth beats, or clicked together on the second, third, fifth and sixth beats. - Try to work out and record the rhythm of pieces of music, using the cards. Choose a difficulty that suits your students. For example, E rere taku poi, is in 4/4 time and is the tune to “My Girl.” Kiri Te Kanawa’s recording of Te Tarahiki in 1999 features a six quaver rhythm in 3/4 time.
Lesson Four
The rising of Matariki, in late May or June, signals to Māori that it is the start of a new year. It is appropriate for students to reflect on the passage of time. For young students there are important landmarks in the development of time, including:
- Recalling and sequencing events that occurred in their past.
- Anticipating events that might occur in the future.
- Recognising that time is independent of events, it progresses no matter what is occurring.
Cooking in a hāngī
In the first part of the lesson students work with the first two ideas, recalling the past and anticipating the future.
- Show students a video about preparing and cooking a hāngī. There are many examples online. Before viewing the video prompt your students:
Watch carefully. At the end of the video I will ask you about how to make a hāngī. - At times pause the video to discuss what might be occurring. Use the pause as an opportunity to introduce important language, like hāngī stones, kai (food), prepare, cover, serve, etc.
- Give each pair or trio of students a copy of the first six pictures of Copymaster 5.
I want you to put the pictures in the order that they happened. Put them in a line. Be ready to explain why you put the pictures in that order. - You might allow groups to send out a ‘spy’ to check the order that other groups are using. After a suitable time let the groups ‘tour’ the lines that other groups have created and change their own line if they want to. Bring the class together to discuss the order of events.
Why does this happen before this?
Why does this happen after this? - Do your students recognise the consequential effect of order? e.g. The fire cannot be lit until the hole is dug and there is somewhere to put it.
- Can the students recognise what events occurred between two events? e.g. Covering the food with soil and waiting four hours occurred between putting the food and stones in the hole and taking the cooked food out.
- Discuss:
What might have happened before the hole was dug?
What might have happened after the food was served? - Ask students to draw and caption an event that occurred before the sequence of pictures, and another event that happened after. You could also provide a graphic organiser for students to use. For example, the food must be prepared before or while the hole is dug. It must be bought or gathered before it can be prepared. After the food is served it will be eaten. Copymaster 5, pictures 7 and 8 are before and after pictures.
- Add students’ before and after pictures to the collection from Copymaster 5. You might create a wall display. Some before and after pictures might need to be sequenced. Picture 9 is an event (uncovering the hole) that occurs between two of the six events. Where does it go? Why?
Chances of a good year
In former times, tohunga, wise people of the village, looked at the sky before dawn to watch the rising of Matariki. They used the clarity of the stars to predict what the new year would bring. A clear sky with the stars of Matariki shining brightly signalled a good season for weather and the growing and harvesting of crops. A cloudy sky signalled bad luck.
- At the rising of Matariki, some stars shine brightly while others do not. Each star has a special job. Use PowerPoint 3 to introduce the stars and their jobs. Play a game with Copymaster 6. The first page is a game board. Use the second page to make a set of 12 cards (bright stars, fuzzy stars, and clouds). The second page can be used to make three sets of the cards.
- Put the gameboard down and spread the cards face down on the floor. Mix the cards up while students close their eyes. Students select cards one at a time to cover each of the seven stars. For example, Matariki might be covered by the card for a fuzzy star. Slide 2 of PowerPoint 3 shows a completed gameboard (click through it to place the cards).
If you saw this, what would you predict? - Students should make comments like:
There will be plenty of rain but not too much, and the crops will grow well.
It is going to be a bit windy.
There will be lots of food in the rivers, lakes and sea. - Let students play their own game of predicting the upcoming year. Look to see whether students consider what is on the set of cards in predicting what card might come next.
- After playing the game discuss:
- Is it possible to have a year where every star shines brightly? (No. There are six bright star cards and seven stars of Matariki)
- What is the worst year you can have? (All two clouds and four fuzzy stars come up)
- How likely is it that you will have a good year? (Quite likely since half the cards are bright stars and one third of the cards are fuzzy stars)
Lesson Five
This lesson involves making rēwena paraoa (potato bread). The process of making it takes three stages; preparing the ‘bug’, mixing and baking, then serving. Therefore, it is not a continuous lesson. Preparation and serving food are important activities for Matariki celebrations. It would be beneficial to invite older students, or community members, in to help with this session.
- Explain: In the next three days we are going to make rēwena bread from potatoes. Why is the bread you buy at the supermarket so light and fluffy?
- Some students may have made bread with their parents or grandparents and can talk about yeast as the ‘leavening’ agent. Play an online video of breadmaking and discuss what each ingredient contributes.
- In rēwena bread the natural yeast from potatoes is used to raise the dough. The best potatoes are older taewa (Māori potatoes) which are small and knobbly, but any medium sized aged potato will do. One medium sized potato is needed per recipe (for three students).
- Weighing the potatoes on kitchen scales is a good opportunity to introduce the students to the gram as a unit of mass. Can your students predict the weight of each potato? You might have a potato peeling competition, using proper peelers (not knives). Focus on peeling slowly, with control, as opposed to quickly and without control. The student who gets the longest peel wins. Naturally, you will need to measure the lengths of the peels and come up with a class winner.
- To make one batch of ‘the bug’ cut up the potatoes into smaller bits and boil them in clean water (no salt) until they are soft. You might time how long that takes. Let the potatoes cool and don’t drain the water. Mash the potatoes, water included. Add in (for each recipe):
2 cups of flour
1 teaspoon of sugar
Up to one cup of luke-warm water (as needed to maintain a paste-like consistency) - After you have made a bulk lot of ‘the bug’ put it into clean glass jars to ferment. Fill each jar to one third as the mixture will expand. Cover the jar with greaseproof paper and fix it with a rubber band. Over three of four days the mixture will ferment. Feed it daily with a mix of one teaspoon of sugar dissolved in half a cup of potato water. Your students will be intrigued by the foaming concoction that develops.
- After ‘the bug’ has developed, let your students create their own batch of rēwena bread by following the recipe (PowerPoint 4). This is a good exercise in interpreting procedural language. Read the instructions to the class if necessary or use your most competent readers.
- Once the bread is made it needs to be cut into slices.
How many slices should we make?
How thick will the slices be?
How many cuts will we make? - You might explore sharing slices equally among different numbers of students. Naming the equal parts will introduce fractions. You might explore the different ways to cut a slice in half or quarters.

Greedy Cat
In this unit we explore ways to pose and answer investigative questions about cats by gathering and analysing data and discussing the results.
In this unit, students pose investigative questions with the teacher, then gather, sort, display and discuss data. This data is then used to answer the investigative questions. These skills are foundational to statistical investigations. In particular, posing investigative questions is fundamental to a good statistical investigation. At Level 1 the investigative question is driven by the teacher who models good structure without being explicit about the structure.
In this unit the students are extensively involved in the sorting and display of the data (cat pictures). Sorting is an excellent way to encourage students to think about important features of data and this leads to classifications that make sense to them. In this unit the students compare the groups formed when the data is sorted by one-to-one matching. This one-to-one matching leads to the development of a pictograph. In turn, this provides an opportunity to strengthen the counting strategies of the students as the objects in the data sets are counted and compared.
The learning opportunities in this unit can be differentiated by providing or removing support to students and by varying the task requirements. Ways to support students include:
The context for this unit can be adapted to suit the interests and experiences of your students. For example:
Consider how the text Greedy Cat, and the relevant learning done in this unit, can be integrated in your literacy instruction. If choosing to focus the unit of learning around a different set of categorical data, consider finding a relevant picture book to engage your students in the context.
Te reo Māori vocabulary terms such as ngeru (cat), kuri (dog), and ika (fish) as well as counting in te reo Māori could be introduced in this unit and used throughout other mathematical and classroom learning.
Getting Started
Begin the week by sharing the book Greedy Cat. If you do not have the book, a copy or a video is available online.
(For very young students the teacher may need to record a statement about the cat under the picture, for example, "a fluffy cat").
Exploring
Collect the cat pictures and photocopies these onto A4 sheets. One copy of all the cats will be needed for each pair of students. (Note: If colour is the attribute used you will need to colour copy the cats).
In our last session we drew pictures of cats. We will use these pictures to collect information (data). What information do you think we could collect from looking at these cards? Record students' ideas somewhere visible.
Can you see any cats that are the same or similar? How?
What cats are different? How?
How many cats are there in the pile? One, two, three... tahi, rua, toru .....
As a class, count the number of cats in the pile.
The question is repeated until all the cats are sorted.
Use this counting activity as an opportunity to strengthen the number sequences and one-to-one correspondence of the word name with the item with, students who are emergent (stage 0) on the Number Framework. Ask for volunteers to count the objects, asking them to justify their count. Students at stages 1 and 2 might count by pointing to or touching the objects while students at higher stages may use images of the numbers and be able to 'see' that a group is, for example, four, without needing to count the objects. Discuss the different counting strategies demonstrated by students.
Who do you think has the most cats?
How do you know? Show me.
If the students do not use one-to-one matching you may need to model this.
Students at stage 4 or above may be able to find the difference between the sets by counting-on or back.
Once the categories have been matched 1-1 (in a line) attach the pictures onto a chart.
Record statements beside the chart of cats about the number in each category, and some comparisons between categories.
Over the next two days work with the students to develop investigative questions about cats and to use the photocopied pictures (data) to find the answers.
What size cats do we have?
What types of coats do our cats have?
What sorts of tails do our cats have?
Repeat this with another investigative question (if time allows).
Reflecting
Today we look at a set of "big cats" (for instance, lions and tigers) and pose possible investigative questions. Other animals could be used here depending on the interests and experiences of the children.
Does anyone know the names of these animals?
Where might they live?
Have you ever seen any of these? Where?
What kind of things could we find out about "big cats" from these pictures?
(For example: patterns on their coat, types of tails Are there more spotty cats than stripey cats? Do all cats have bushy tails?)
Dear parents and whānau,
At school this week we have practiced our statistical investigation skills. We have posed investigative questions, gathered, sorted and displayed information about cats after reading the story "Greedy Cat". We will be sharing findings on …………… at ……………..
You are very welcome to join us at this session.
Learning to count: Five-based grouping
This unit develops students’ understanding of, and proficiency in, using five-based grouping.
Gelman and Gallistel (1978) provided five principles that young students need to generalise when learning to count. These principles are:
Just like in reading when one spoken word is matched to one written word, counting involves one-to-one correspondence. One item in a collection is matched to one spoken or written word in the whole number counting sequence.
The spoken and written names that are said and read have a fixed order. If that order is altered, e.g. “One, two, four, five,…”, the count will not work.
Assuming the one-to-one and stable order principles are applied then the last number in a count tells how many items are in the whole collection.
The first three principles are about how to count. The final two principles are about what can be counted:
Items to count can be tangible, like physical objects or pictures, or they can be imaginary, like words, sounds, or ideas, e.g. Five types of animal.
The order in which the items are counted does not alter the cardinality of the collection. This is particularly challenging for students who think that counting is about assigning number names to the items, e.g. “This counter is number three.”
The learning opportunities in this unit can be differentiated by providing or removing support to students and by varying the task requirements. Ways to differentiate include:
The contexts for activities can be adapted to suit the interests and experiences of your students. For example:
Use a variety of equipment to explore five based grouping: a slavonic abacus, five-based tens frames, unifix (or similar) linking cubes, and students’ hands. Using a variety of representations is a powerful way to develop grouping knowledge. These tasks illustrate grouping with numbers from 5 – 10 but can be used with smaller and larger quantities.
Session 1: Finger pattern pairs
An important connection is between the parts that make ten. If a student knows that in 7 + ? = 10 the missing number is three, then they may transfer that fact to the answer to the problem 3 + ? = 10. For example:
Show me seven fingers.
How many more fingers make ten? How many fingers are you holding down?
Write 7 + 3 =10 and say, “Seven plus three equals ten.”
Show me three fingers.
How many more fingers make ten? How many fingers are you holding down?
Variations
Students work in pairs. One student makes a number up to ten with their fingers. The other says the number and writes the numeral for it big in the air.
Find different ways to make a number to ten, for example, seven can be 5 + 2, 3 + 4, 1 + 6 and 0 + 7. Finding ways to make numbers between 10 and 20 is possible in pairs or threes.
Session 2: Slavonic abacus and finger patterns
The Slavonic abacus is five based. The purpose of the colouring is to enable instant recognition of a quantity without counting. Try not to use counting to confirm a quantity as that is counter-productive to the intention of either knowing the quantity or working it out from known facts.
For example:
Make a number between 5 and 10 on the top row. Shift the quantity in one move, not one counter at a time.
Show me that many fingers. Note that this gives all students time to work out an answer and it also provides a way for you to see what each student is thinking.
How many beads are there?
How did you know there were eight?
Encourage grouping-based strategies, such as “I can see five and three” and “There are two missing from ten, so I held two fingers down.”
Variations
Ask the students to convince a partner how many beads have moved.
Ask the students to write the number for the beads on the palm of their hand in invisible ink then show you.
Move to “ten and” groupings such as ten and four to develop teen number knowledge. Students work in pairs to show that many fingers or write the number on the palm of their hand.
Session 3: Five based tens frames
Hold up a single tens frame, such as nine, for no longer than one or two seconds. The aim is for students to image the five-based patterns rather than count the dots one by one.
How many dots did you see?
Show me that number on your fingers.
Write that number big in the air for me.
Discuss the structure that students saw. “I saw five and four.” “I saw one missing from ten.” I saw three threes.”
Variations
Play 'tens frame flash' in pairs or threes. Players take turns to be the ‘flasher’ and show the tens frames, with the other students stating the number of dots on each tens frame as quickly as possible.
Instead of writing the number, talk to a partner about what you saw.
Write what is found with symbols like, 8 + 2 = 10, 10 – 2 = 8.
Progress to two tens frames being shown. Start with numbers less than five, e.g. four and three. Move to ten and another tens frame for teen numbers, e.g. ten and six. Try ‘close to ten’ frames, like nine and eight, with another tens frame, e.g. nine and five.
Session 4: Cube stack
I think there are eight because I saw five and two.
Good work. This would be eight (showing five and three). Can you fix it?
Variations
Students play in pairs with one being the hider and the other the estimator.
Start with a number other than ten, e.g. eight stacks made of five and three.
Students match stacks to finger patterns to help them find the number of missing cubes.
Students write equations for the stacks problems, e.g. 7 + ? = 10.
Progress to taking some cubes from each end. Progress to using two stacks of ten to start, depending on the number knowledge of the students.
Session 5: Ordering fitness fun
How can the shading help to work out where number 6 would go, without having to count?
For example, I knew that 5 went there because it’s at the end of the shaded box.
Dear family and whānau,
In maths we have been working on some number facts. Facts with five are really important because, once we know them, we can use them to help work out other facts. You can practise facts with five with your child at home. Hold up one hand showing five fingers and one hand showing just some fingers. Ask "how many fingers altogether?". Let them test you as well!
Shape Makers
In this unit ākonga describe and classify 2D and 3D shapes. They will use their own language in their descriptions, will explore similarities and differences, and will informally consider sides, corners, curved and straight lines.
Spatial understandings are necessary for interpreting and understanding our geometric environment. The emphasis in the early years of school should include: recognition and sorting of shapes, exploration of shapes, and investigation of the properties of shapes.
In the van Hiele model of geometric thinking there are five levels. The first (Visualisation) is emergent. At this stage, ākonga recognise shapes by their appearance rather than their characteristics or properties. The second level (Analysis) is where ākonga differentiate specific properties of shapes, for example, the number of sides a triangle has or the number of corners in a square. Ākonga recognise certain properties that make one shape different from others. This unit is focused on this second level of the van Hiele model.
Ākonga discover 2D and 3D shapes within their environment (for example, square, cube, poi, desk, bed, starfish) and there is much discussion about which is easier to consider first. Both need to be explored extensively. Sufficient opportunities need to be given for ākonga to communicate their findings about 2D and 3D shapes.
This unit could be followed by the unit Shape explorers.
The learning opportunities in this unit can be differentiated by providing or removing support to ākonga and by varying the task requirements. Ways to support ākonga include:
The context for this unit can be adapted to suit the interests and experiences of your ākonga. For example:
Te reo Māori vocabulary terms such as āhua (shape), tapawha rite (square), porowhita (circle), and torotika (straight) could be introduced in this unit and used throughout other mathematical learning.
Session 1: Loopy Shapes
In this activity we sort shapes according to attributes. Working with blocks in this exploration gives ākonga a chance to construct their own understandings about shapes and how they are related.
Do you see any ways that these blocks are alike? How are they alike?
Can you see any blocks that are different? How are they different?
Let’s sort the shapes by size and see how many we have.
Which loop has the most? Check by counting.
Do the shapes in this loop have other things in common?
Let ākonga work in small groups to sort sets of shapes in a number of different ways. Circulate among the groups encouraging ākonga to describe the classification used. Tuakana/teina groupings could work well here.
Session 2: I spy a shape
In this session we play a version of ‘I spy’ ( or 'Kei te kite ahau') that helps ākonga focus on the shapes around them and the number of sides the shapes have.
After the game has been played several times get ākonga to draw pictures of 3- or 4-sided shapes in the room. Alternatively you could go for a walk outside to look for shapes and then get ākonga to draw these. Some ākonga may draw irregular 3- or 4- sided shapes such as a trapezium or isosceles triangle, this could be used as a teachable moment to extend some ākonga. Glue the drawings onto charts according to the way that ākonga classify them.
Discuss the charts.
What are some of the things you notice about the shapes you found?
Which did you find more of? Why do you think this is?
Do you know what we call these shapes?
Session 3: In the bag
Which shape is in the bag? Today we reach into feely bags to see if we can work out the shape by touch alone.
One of these shapes is in the bag. I wonder if you can tell me which one just by feeling it?
Tell me something you notice about the shape in the bag.
Is this the shape you were expecting?
Can you describe what you can feel?
Which shape do you think it is? Why?
Session 4: Dominoes
In this session we use the mosaic shapes as dominoes for ākonga to explore shapes and match side lengths as they form a trail of shapes.
Are there other ways that you could place that shape tile?
Are there any ways that shape tiles wouldn’t work?
What can you tell me about the shape tile you have chosen to go next?
Why did you choose that shape tile?
Session 5: Shape makers
In this session we use loops of string or wool to form shapes using ourselves as the corners. We extend the idea using geoboards and rubber bands.
Who can tell me about this piece of string? (Long, curly, wiggly, etc.)
What was the string like when we held it tight?
What was it like on the floor?
How else could we hold the string or put it on the floor to change its shape?
What sort of shapes can you make with three people? (or 4 or 5 people etc.)
How many sides will the shape have?
Do all the sides have to be the same length?
Dear family and whānau,
This week we are looking at objects that have the same shapes. For instance doors and windows both have four sides. We found out the names for a number of these shapes, including oblongs (rectangles), triangles and circles.
We would like you and your child to make a list of all things that you commonly use around home that are oblongs (rectangles), triangles or circles. Aim for five things on each list. Your tamariki could draw the object and you could help them write the name of it.
Mary, Mary, Quite Contrary
In this unit students explore and create patterns of two and three elements using the rhyme "Mary, Mary Quite Contrary" as a focusing theme.
This unit is about the simplest kinds of patterns that you can make – those with just two things. So this unit lays the foundation for much more complicated patterns to come. The skills that the student will develop here, such as creating a pattern, continuing a pattern, predicting what comes next, finding what object is missing, and describing a pattern, are all important skills that will be used many times. Indeed they are essentially what mathematics is all about.
The learning opportunities in this unit can be differentiated by providing or removing support to students and by varying the task requirements. As the sessions in this unit focus on simple 2-element patterns it is more likely that ways to extend students may be needed. Ways to extend students include:
The context for this unit can be adapted to suit the interests and experiences of your students. For example:
Te reo Māori vocabulary terms such as tauira (pattern), as well as counting from tahi ki tekau (one to 10) could be introduced in this unit and used throughout other mathematical learning. Other te reo Maori that could be useful in this unit are colours (such as kōwhai and ma), puaka (flower), and huawhenua (vegetables).
Session 1
This session explores simple 2-element patterns around the theme of a daisy.
What will the next petal be?
How do you know?
Session 2
Using the same nursery rhyme theme again, explore patterns with flowers.
Model this idea using magnetic backed coloured flowers on a magnetic board.
Can we read this pattern?
What will come next?
How do you know?
Tell me your pattern.
What will come next?
How do you know?"
Session 3
Simple patterns are again explored but this time using a card game.
Use the copymaster to make a set of cards. Now create baseboards with ten squares. Attach two flower cards to the first two squares to form the beginning of a pattern:
Tell me your pattern.
What will come next?
How do you know?
Session 4
Instead of using flowers we now use vegetables to make 2-element and even 3-element patterns.
Mary likes to grow vegetables. In her garden she grows carrots, tomatoes, pumpkins and kūmara. She grows her vegetables in patterns.
Mary often uses these in her vegetable garden.
How do you know?"
Session 5
The students guess the missing members of a vegetable pattern where more than 1 vegetable has been "eaten".
Dear parents and whānau,
This week in maths we have been looking at patterns using two things, such as two types of flowers or vegetables. You and your child might like to cut out the pictures attached, and make a pattern using a flower and a vegetable.
In class we talked about what a cloche is. Your child can tell you. Make a pattern with a flower and a vegetable and 'use the cloche' to hide one of the plants. Get your child to tell you which plant the cloche is hiding and to explain how they know.
Try the game again but this time use both flowers and one vegetable. Making and seeing patterns, and identifying the missing part of a pattern is an important aspect of maths.
Matariki - Level 1
This unit consists of mathematical learning, at Level 1 of the New Zealand Curriculum, focused around celebrations of Matariki, the Māori New Year. The sessions provide meaningful contexts that highlight Māori culture and provide powerful learning opportunities that connect different strands of mathematics.
In this unit the students will apply different mathematical and statistical ideas, such as the properties of symmetry. In this, they will demonstrate understanding of the features of a shape that change and remain invariant under translation, reflection and rotation.
Students also apply simple probability. For example, given this set of cards, what is the chance of getting a bright star if you choose one card at random? Random means that each card has the same chance of selection.
The set of all possible outcomes contains four possibilities. Two of those possible outcomes are selecting a bright star card. The chances of getting a bright star are two out of four or one half. There is a one quarter chance of getting a fuzzy star and the same chance of getting a rainy cloud.
The learning opportunities in this unit can be differentiated by providing or removing support to students, or by varying the task requirements. Ways to support students include:
Although the context of Matariki should be engaging, and relevant, for the majority of your learners, it may be appropriate to frame the learning in these sessions around another significant time of year (e.g. Chinese New Year, Samoan language week). This context offers opportunities to make links between home and school. Consider asking family and community members to help with the different lessons. For example, members of your local marae may be able to share local stories and traditions of Matariki with your class.
Te reo Māori language is embedded throughout this unit. Relevant mathematical vocabulary that could be introduced in this unit and used throughout other learning include āhua (shape), shape names (e.g. whetū - star), hangarite (symmetry, symmetrical), whakaata (reflect, reflection), huri (rotate, rotation), tātai (calculate, calculation), tāpiri (add, addition), hautau (fraction), raupapa (sequence, order), tūponotanga (chance, probability), and ine (measure).
Lesson One
What shape is a star?
Today we are going to make some stars to display using shapes.
How do you know that you have got all the diagonals? (Students might notice that the same number of diagonals come from each corner)
Does the star have mirror lines? How do you know?
Lesson Two
In this lesson your students explore family trees, working out the number of people in their direct whakapapa. This may be a sensitive topic for some students. Thinking about our relatives who are no longer with us, or have just arrived, is a traditional part of Matariki, the Māori New Year. According to legend, Matariki is the time when Taramainuku, captain of Te Waka O Rangi, and gatherer of souls, releases the souls of the departed from the great net. The souls ascend into the sky to become stars.
That question needs to be treated sensitively but the focus is on biological parents, usually a father and mother. You might personalise the answer by telling your students the names of your mother and father. Draw a diagram like this, or use an online tool to create the diagram:
My mother and father had parents too. What are your parents' parents called?
How many grandparents (koroua) do you have?
Students may have different ways to establish the number of grandparents, such as just knowing, visualising the tree and counting in ones, or doubling (double two),
Nowadays, many students will still have living great grandparents. You might personalise the idea using your whakapapa.
What do we call the parents of your great grandparents?
Now I want you to solve this problem. How many great great grandparents do you have?
Use the context as a vehicle for introducing even numbers (multiples of two), Act out three children getting their parents (other students) and bringing them to school. Change the number of students and work out the total number of parents. Find a way to highlight the numbers that come up, such as shading the numbers on a virtual Hundreds Board.
Students might notice that even numbers occur in the 0, 2, 4, 6, 8 columns of the hundreds board.
Lesson Three
Matariki is a time for cultural activities, such as story-telling, music, and games. Titi Rakau is a traditional game that involves hitting and throwing sticks, usually to a rhythmic chant. It was used to enhance the hand-eye coordination of children and warriors. Rakau can be used as a vehicle for fractions and musical notation, as well as physical coordination. You can make the tasks below as simple or as difficult as you like.
What fractions has the bar been broken into? (Quarters)
Each of these notes (crotchet) is one quarter of a bar in this music.
The popular chant associated with Ti Rākau (E Papa Waiari - available on YouTube) is in 6/8 time meaning there are six quaver beats to a bar. If you watch a video of a performance with Rākau the sticks are often hit on the ground on the first and fourth beats, or clicked together on the second, third, fifth and sixth beats.
Lesson Four
The rising of Matariki, in late May or June, signals to Māori that it is the start of a new year. It is appropriate for students to reflect on the passage of time. For young students there are important landmarks in the development of time, including:
Cooking in a hāngī
In the first part of the lesson students work with the first two ideas, recalling the past and anticipating the future.
Watch carefully. At the end of the video I will ask you about how to make a hāngī.
I want you to put the pictures in the order that they happened. Put them in a line. Be ready to explain why you put the pictures in that order.
Why does this happen before this?
Why does this happen after this?
What might have happened before the hole was dug?
What might have happened after the food was served?
Chances of a good year
In former times, tohunga, wise people of the village, looked at the sky before dawn to watch the rising of Matariki. They used the clarity of the stars to predict what the new year would bring. A clear sky with the stars of Matariki shining brightly signalled a good season for weather and the growing and harvesting of crops. A cloudy sky signalled bad luck.
If you saw this, what would you predict?
There will be plenty of rain but not too much, and the crops will grow well.
It is going to be a bit windy.
There will be lots of food in the rivers, lakes and sea.
Lesson Five
This lesson involves making rēwena paraoa (potato bread). The process of making it takes three stages; preparing the ‘bug’, mixing and baking, then serving. Therefore, it is not a continuous lesson. Preparation and serving food are important activities for Matariki celebrations. It would be beneficial to invite older students, or community members, in to help with this session.
2 cups of flour
1 teaspoon of sugar
Up to one cup of luke-warm water (as needed to maintain a paste-like consistency)
How many slices should we make?
How thick will the slices be?
How many cuts will we make?
Dear family and whānau,
This week we have been exploring shapes and sequencing events. Ask your child to find examples of shapes such as triangle, square, hexagon and trapezium around the house. Ask them about how the shapes were used to make stars in class. To extend the work we have been doing on sequencing events, when you are engaging in activities at home that have a defined sequence, ask your child questions to explore before and after actions, for example why does this happen before this? What might happen after we have done this?