Areas and volumes
This unit is about finding the areas of triangles, and parallelograms, using what students already know about the areas of rectangle. Students will apply multiplication and division strategies as they calculate areas. The ideas are extended to finding the volumes of cuboids (rectangular prisms).
- Recognise that two identical triangles can be partitioned and joined to make a rectangle.
- Recognise that a triangle has half the area of a rectangle with the same base and height lengths.
- Apply the rule ‘area of triangle equals half base times height’.
- Connect the area of a parallelogram to the area of the rectangle from which it can be created.
- Find the volumes of cuboids with whole number dimensions.
Area is a two-dimensional concept, that is it relates to flat space. Area is the internal space enclosed by some boundary. With polygons, like rectangles and triangles, the boundaries are lines or line segments. Area is defined in the maths curriculum as the size of a surface expressed in square units. Investigations of the size of an area should begin with comparisons between different surfaces and progress to calculating with standard, units, such as square centimetres (cm2), square metres (m2), and square kilometres (km2). The use of formulae to calculate the areas of common polygons is an advanced stage of the learning sequence.
Units of area are squares because squares fit together with no gaps or overlaps, and tile infinitely in both dimensions. At the early stages it is important for students to realise that a simple shape, like a rectangle, can be filled with squares arranged in rows and columns to create arrays. Multiplication is an efficient way to count the number of square units. The idea of tiling must become more imaginary (abstract) as students deal with two things:
- Shapes, like triangles and circles, where squares do not fit exactly. Part units, and smaller square units increase precision of the measurement.
- Sides that are not whole numbers, e.g. Find the area of a rectangle that is 3 ½ x 4 ½.
Volume is the three-dimensional equivalent of area. Volume is the amount of space occupied by an enclosed solid. The boundaries might be flat planes, or curved surfaces. The simplest enclosed solid to find the volume of is a cuboid (rectangular prism). Cube shaped units are used for volume for the same reason that squares are used for area. Common units of volume are cubic centimetres (cm3), cubic metres (m3), and cubic kilometres (km3). Cubes fit together with no gaps or overlaps in three dimensions (length x width x depth). Since the units are arranged in three-dimensional arrays, multiplication can be used to count the number of units in a cuboid shaped space. If the cuboid measures 6cm x 4cm x 5cm then 6 x 4 x 5 = 120 cm3 gives the volume.
The learning opportunities in this unit can be differentiated by providing or removing support to students and by varying the task requirements. Ways to support students include:
- using grid paper with square centimetre dimensions so students can ‘see’ the units, and similarly using 1cm cubes to fill cuboids in an array structure, e.g., unit cubes from place value blocks.
- cutting up shapes made with paper, moving the parts, and taping, to show that the areas stay the same, e.g., transform a rectangle into two similar triangles, or a rectangle into a parallelogram.
- directly modelling measurement with scales, like rulers, with opportunities for students to copy correct use of tools.
- clarifying the language of measurement units, such as “metre square” as an area that is 1m x 1m.
- clarifying the meaning of symbols, particularly 45cm2 as 45 square centimetres, and 45m2 as 45 square metres; 45cm3 as 45 cubic centimetres, and 45m3 as 45 cubic metres.
- easing the calculation demands by providing calculators where appropriate. The purpose of the lessons is to understand measurement concepts, not to practise calculation strategies.
Tasks can be varied in many ways including:
- reducing the complexity of the numbers involved, e.g. whole number versus fraction dimensions for side and edge lengths.
- allowing physical solutions with manipulatives before requiring abstract (in the head) anticipation of measures.
- working in two-dimensions before three-dimensions, then connecting the rules for area and volume.
- reducing the demands for a product, e.g., less calculations and words, and more diagrams and models.
The context for this unit can be adapted to suit the interests and cultural backgrounds of your students. Area is useful to many everyday pursuits, such as painting a bedroom, creating a vegetable patch to grow kai, tiling a kitchen or bathroom, interpreting house plans, and working out the size of a playground, marae or field. Volume of cuboids applies to contexts like comparing the size of schoolbags, chilly bins, car boot spaces, or refrigerators, digging an appropriate sized hole for a hāngī, choosing the correct air conditioning unit for a room, looking at packaging (watch for wasted space), and estimating the amount of firewood that has been delivered.
Te reo Māori vocabulary terms such as mehua (measure), horahanga (area), and kahaoro (volume) could be introduced in this unit and used throughout other mathematical learning.
- Cardboard boxes (cuboids) from home, e.g. cereal boxes, cracker packets, dishwasher tab boxes, etc.
- 1 cm3 cubes, e.g. place value blocks, centi-cubes, or similar
- Square metres made from large cardboard cartons, or obtained from Resene paint shops.
- Multilink, unifix, or connecta-cubes (2cm x 2cm x 2cm)
- Rulers
- Calculators
- Grid paper
- Copymaster 1
- Copymaster 2
- Copymaster 3
- PowerPoint 1
- PowerPoint 2
- PowerPoint 3
- PowerPoint 4
Session 1
In this session students revise the rule for the area of a rectangle. This session may not be required if this unit is being taught following a unit on area of rectangles.
- Use PowerPoint 1 to illustrate finding the area of a rectangle using multiplication of length by width.
Apart from chocolate blocks, when do we use area in real life? - Discuss how area is used in contexts like designing a flax mat or tapa cloth, laying carpet or lino in a house, planting a vegetable patch, stocking farms, comparing the size of countries, checking moles on our skin for growth, ordering the paint for a wall, etc.
- Discuss the square units that are used to measure area, such as square centimetres (cm2), square metres (m2), and square kilometres (km2). You might use google Maps to illustrate the size of the larger units using your local area.
- Provide students with grid paper (Copymaster 1) and pose the following challenge:
Draw four different rectangles that each have an area of 36 square centimetres.
Measure the perimeters of the rectangles.
Are the perimeters equal? Explain.
Students should create 2 x 18, 3 x 12, 4 x 9, and 6 x 6 rectangles though they may not consider a square as a type of rectangle (It is!) Adventurous students might consider fractional side lengths such as 4 1/2 x 8, 5 x 7 1/5. Students should note that the perimeters vary with the square having the shortest perimeter. - Tell your students to create a triangle within each rectangle in the following way:
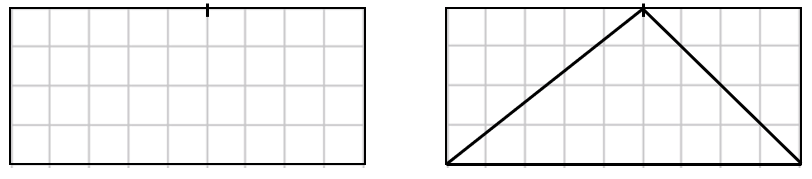
- Mark a spot on the top side. Draw a triangle with that spot, and the two bottom corners of the rectangle as the corners.
Find the area of each triangle. What do you notice?
Students should notice that the areas are all the same, 18 square centimetres.
How does the area of the triangle compare to the area of the rectangle?
Will that still be true if I cut up the rectangle like this?
Students should note that the triangle has half the area of the rectangle. The rectangles and triangles can be cut up to confirm the relationship. Show students that the formula for area of a triangle can be written as area=1/2 × base × height or a=1/2(b×h). - Give your students Copymaster 2 to work on in pairs or as individuals. The worksheet requires finding the areas of triangles. Look for students to:
- Find the base and altitude of the triangle, irrespective of orientation.
- Recognise where the surrounding rectangle could be drawn.
- Calculate the area using the formula, including recording correct units (cm2)
- Gather the class and compare answers.
Session 2
In this session students investigate the relationship between areas of rectangles and related parallelograms. They recognise that a parallelogram can be partitioned into two similar right-angled triangles plus a rectangle. This composition is used to develop a formula for the area of a parallelogram.
- Begin with Slide One of PowerPoint 2.
Imagine each small square is 1cm2.
What is the quadrilateral called? (parallelogram) Why is that a sensible name? (Two pairs of parallel sides)
Find a way to work out the area of the quadrilateral. - Let students explore the problem. They might benefit from using grid paper (Copymaster 1) but encourage visualisation as much as possible.
- Discuss the strategies that students use. Sketch diagrams of their partitions but suggest that counting individual squares and parts of squares is very time consuming, and error prone. Animate Slide One to see how the parallelogram can be partitioned into two triangles and a rectangle. The total area is 8 + 8 + 80 = 96cm2.
- Slide Two shows how the three shapes can be combined to form a single rectangle that has dimensions of 12 x 8 = 96cm2. Slides Three and Four contain two similar problems.
- Work in reverse, starting with a rectangle and partitioning it to form a parallelogram. Slide Five shows how.
What is the area of this parallelogram? (12 1/2 x 10 = 125) - Challenge for the lesson:
Use your quad exercise book (or Copymaster 1). Draw six parallelograms that each have an area of 48cm2. - Let your students experiment to find suitable parallelograms.
Do they begin with a rectangle they know has an area of 48cm2? - Share students’ answers as a class. Try to bring out the following points:
- Any rectangle with an area of 48cm2 can be used to create a set of different parallelograms.
- 48 has many factors, (1 x 48, 2 x 24, 3 x 16, etc.) that give rectangles that can be the base for many parallelograms.
- Show your students Slide Six.
This is [Insert name]’s answer.
Do all the parallelograms look like they have the same area?
Are his/her parallelograms correct? Do they all have areas of 48cm2?
How do you know?
How could we write the rule for finding the area of a parallelogram? (length x height = area) - Slide Seven has a final puzzle that might be used for assessment. Watch to see how students solve the problem.
- Do they find the area of each piece separately?
- Do they work out the area of the whole square (576cm2), then find the fraction of that area for each piece?
For example, the parallelogram is one eighth of the initial square. 1/8×576=72cm2.
- You might look up the Tangram puzzle online and find some target problems for students to solve. Alternatively students can create their own set of shapes by partitioning a shape, like a square, rectangle, or equilateral triangle.
Session 3
In this session students connect the l x w formula for rectangles to finding the volume of cuboids (rectangular prisms).
- Use Slide One of PowerPoint 3 or a packet from home to introduce the cuboid.
Where in the world would you find cuboids?
Students should provide examples such as packets, boxes, buildings, shipping containers, etc. - Discuss the features of the cuboid.
What shapes make up the surface of a cuboid? (rectangles which is the reason a cuboid is also called a rectangular prism)
What shapes do we get if we cut a cuboid with a straight cut?
Students will probably think firstly of rectangles, including squares, but other cross sections are possible with non-parallel cuts. - Introduce the concept of volume.
Who might be interested in the amount of stuff this cuboid holds?
How do we measure the space inside a container?
Students will have ideas of possible measures, such as cubic centimetres. Introduce a small place value block cube which is 1cm3 in volume. Point out the 3 dimensions of 1cm. - Ask: How many cubes of this size could I fit into this cuboid, with no gaps or overlaps?
- Let students discuss their ideas with a partner then share.
What information would you like to know?
Students might suggest measuring the edges of the cuboid.
How do those measurements help? - Discuss how the 1 cm3 cubes might be arranged in the cuboid box. If you have enough cubes, create a layer that covers one rectangular face.
How many cubes make one layer?
Students should connect this question to area using l x w.
How many layers can I make? (You may need to physically step out the layers)
How do I work out the total number of cubes?
Try to arrive at a length x width x depth rule. - Show the students the cuboids on Slides Two, Three and Four. Challenge them to work out the volumes in cm3. It is fine for some students to use a calculator if the calculation is too difficult for them.
- Discuss each cuboid and notice how less information is provided each time. Ask students to explain what the multiplications mean in terms of layers in the cuboid.
- Provide each pair of students with at least one cuboid shaped packet. Ask them to find the volume of the box then exchange boxes with another pair to cross-check the calculations. Gather the class.
Is it easy to compare the volumes of cuboids just by looking at them?
You might find two or three boxes with similar volumes but quite different appearance.
How did the designer of the box know how big to make it?
Students might suggest that the designer knew what the box had to hold. For example, they might know that a 750g box holds 48 weetbix.
What would they do then to design the box?
Students might suggest that the designer arranges the weetbix in rows and works out the edges of the box from there. - Suppose that you used these cubes (unifix or multilink) to fill your packet. You know the volume in cm3. Can you use that result to find how many of these cubes will fit in?
- Give each pair multilink cubes and ask students to solve the problem.
- Do students recognise that each multilink cube has a volume of 8cm3?
- Do they divide the existing volume in cm3, by eight?
- Do they recognise that fraction length sides occur?
- How do they deal with the idea that bigger cubes will be harder to fit in?
- Discuss questions above. Larger cubes leave more empty spaces than smaller cubes if the problem is regarded as a physical challenge.
How might we deal with empty spaces?
Can we still use length multiplied by width multiplied by depth?
Students might realise that fractions are needed, and those fractions are usually represented as decimals in measurement. - Provide each pair of students with 36 multilink cubes, Copymaster 1 (grid paper), scissors, and tape. Search online for “nets of a cuboid” so students recall the flat pattern. Discuss the shapes in the net and how those shapes relate to the faces of the cuboid.
Make three different cuboid shaped boxes that will each hold 36 cubes with no gaps or overlaps.
Give students ample time to build boxes before convening the class. Share the boxes that student pairs create. Find a way to record the dimensions, such as:
Designers Length Width Depth Number of cubes Hone and Bex 4 3 3 36 Tatia and Fatu 2 2 9 36 Mei and Kylie 6 6 1 36 Sid and Leon 9 2 2 36 Is each box unique, that is different from the others? (Students might note that the same dimensions occur but agree that the location of the top makes the box unique)
How will we know when we have found all the boxes? (Encourage a systematic approach based on finding all the triads of factors for 36: 1 x 1 x 36, 1 x 2 x 18, 1 x 3 x 12, 1 x 4 x 9, 1 x 6 x 6, 2 x 2 x 9, 2 x 3 x 6, 3 x 3 x 4)
Session 4
In this session students draw on their knowledge of area and volume to solve problems. There is emphasis on surface area of 3 dimensional solids with links to difference between area and perimeter.
- Show the students PowerPoint 4.
Simone is estimating the area of Lake Taupō. She has two ways, using a triangle and using a rectangle. (Show Slides One and Two).
What units of measurement is she using? (kilometres so the area will be in square kilometres, km2)
Which way do you think is the most accurate? Why?
Students should discuss the pieces of area that are missing from and outside each shape.
Do the outside parts make up for the missing parts? - Ask your students to calculate the estimate of area on each slide. Calculators may assist some students, if needed.
Triangle: 12×42×30=630km2
Rectangle: 26×25=650km2
Check the estimates against the actual area of 616km2.
You could challenge students to estimate the areas of other lakes or cities in your local area, or around Aotearoa. - Use Slide Three to introduce the idea of surface area. Painters and plasterers are dependent on measuring surface area correctly when quoting for jobs. Take one of the cuboid boxes used for measuring volume.
Surface area is the combined area of all the faces of this box.
How would I figure that area out?
Students might realise that each rectangular area can be worked out separately then the areas can be added.
Do any of the faces have the same area? (There are matching parallel faces) - Use the dimensions of the chosen box to calculate the area of each face then find the sum. Be sure to use the correct unit of measure for area (cm2 in this case).
- Ask students to work in pairs again to find the surface area of a cuboid box. Again, they should exchange boxes with another pair to check calculations.
- After a suitable time, gather the class and discuss efficient ways to find the total surface area of a cuboid.
If a cuboid has a larger surface area than another cuboid, then the first cuboid has the largest volume. True or false?
Do students realise that a long skinny cuboid may have a large surface area but have little volume?
Do students connect this idea to perimeter and area of rectangle? (A large perimeter does not mean large area) - Use Slide Four to pose a challenge.
What is the surface area of this cuboid?
Each edge is involved in four rectangles, combining twice with each other edge. With this cuboid the rectangles are:
10 x 6 (Twice) 10 x 4 (Twice) 6 x 4 (Twice)
(10 x 6) + (10 x 6) + (10 x 4) + (10 x 4) + (6 x 4) + (6 x 4) = 248cm2. - Show students Slide Five. You can make the slide available as a Copymaster if you want.
What shape will this net make if you fold it up?
Let students visualise the complete solid. The name for the solid is an oblique prism. You will find images for it online using the search “building oblique prism”.
Discuss: What would be the advantages/disadvantages of a building that is shaped like an oblique prism?
Challenge: Make the solid by cutting, folding, and taping.
The building has glass walls. Calculate the surface area of the glass in square centimetres. (You can pretend the squares are square metres if you want).
Use the task for assessment: Can your students calculate the areas of rectangles and parallelograms?
Session 5
In this session students are given a range of problems related to areas of triangles, rectangles and parallelograms, and to the volume of solids (see Copymaster 3). Let students work on the problems individually before sharing their work with a partner. Ensure students check their solutions against those provided below.
- Rectangle (4 x 9 = 36 cm2)
Triangle (1/2 x 8 x 4 = 16 cm2)
Parallelogram (4 x 8 = 32cm2)
Note that orientation of the shapes may affect students’ ability to identify the base and height. - If you stick to whole number side lengths then the area of the square might be 1, 4, 9, 16, 25, 36, etc. What are these numbers? (Square numbers)
Suppose you chose 4 x 4 = 16 cm2 for the square, then the rectangle might be 1 x 16, 2 x 8, or 4 x 4 (since a square is also a rectangle). The parallelogram is just a ‘pushed’ version of one of those rectangles. It must have the same base and height as one of the rectangles. The triangle can also be made from a rectangle. Keep the base the same but double the height or double the base and keep the height the same. - You could calculate each volume separately, but two edges are the same on each box. The left box has half the volume of the middle box since it is half as tall. It holds more than half as much powder, so it has less air space.
The right box is three quarters the volume of the middle box since 18 is three quarters of 24. The right box holds three quarters as much powder as the middle box since 600 is three quarters of 800. The middle and right boxes have the same ratio of air space to powder space. However, since the middle box has more volume it has the most air space. - Tasmania has an area of 68 401km2. How close did you get? Which shape gave the best estimate.
- The rectangle and parallelogram have the same area because they have the same base and height. Measure if you would like to check.
Family and whānau,
In maths this week we are learning about the area of triangles, rectangles, and parallelograms. Discuss when you might use these in your daily life. You might talk about making a garden , tiling a wall, or covering a floor.
Ask your student to explain to you the rules for working out the area of each shape. See if they can explain why the rule works using diagrams to show you what they have learned. Ask them to find the areas of rooms in your homes, the deck or the garage.
We also explored how to find the volume of a cuboid (rectangular prism like a cereal box). Ask your student to explain how they work out the volume of a cuboid, and what ‘volume’ means. Discuss when volume is used in daily life, such as how much concrete is needed to fill a row of holes when building a fence.