Session 1
- Talk to the students about buildings and how they are constructed. Give them images of buildings to inspire them and for them to discuss. You could also ask a local builder who is a member of your community to come and talk to your class about construction.
What material is used to construct buildings? (wood, bricks, mortar, sand, cement, etc.)
How do builders put a house together?
How do they build walls?
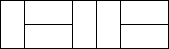
- Get the students to describe the brick pattern on walls. Show them Copymaster 1, or another picture of a brick wall. Talk about the features of the pattern (i.e. there are no gaps, the bricks are in rows, each row is slightly displaced from the row below.)
Why do you want to have no gaps in a wall?
(You might note that some walls do have gaps. Why?)
- Are there any other ways of using bricks to build a wall?
- Get the students to produce their own (2-dimensional) bricks. The bricks should be rectangles that are twice as long as they are wide. This can be done using graph paper and then tracing round one to produce many. Model this process for the class. They could also draw a number of bricks on graph paper to be photocopied, before cutting up the photocopied bricks. Copymaster 2 can be photocopied if you would prefer students not to make their own bricks.
- Ask the students to create a wall using the bricks that they have just produced. They might copy the pattern shown in Copymaster 1 or arrange the bricks in any pattern they like. However, if they think up their own patterns there are two rules that must be followed: (i) there are to be no gaps and (ii) the pattern must be capable of being continued indefinitely (to cover a very big wall!). Draw attention back to the brick wall example shown previously, and highlight each of these features.
Roam and work with the students. If needed, they could work in pairs or small groups. Once they have one brick pattern, see if they can find others. Emphasise that the bricks don’t always have to be ‘horizontal’ and that the pattern doesn’t have to be practical. It’s OK if the pattern won’t produce a very strong wall.
- Bring the class together and let the students discuss the patterns that they have made. The students should be able to identify that their patterns have no gaps and that they can go on forever in all directions. Support them with their explanations as necessary.
- Tell the class that they have been making tessellations. A tessellation is a way of using a fixed shape to cover the whole area of a flat surface (a plane). Tessellations have two important properties: (i) they have no gaps (all of the plane is covered) and (ii) they go on forever (no matter where you go in the plane the shapes will still be covering the part of the plane that you can see. Sometimes we call a tessellation a tiling. Record a summary of these key points on a class chart.
Session 2: Regular Polygons
In this session the students will explore tessellations by regular polygons. The key finding is that regular polygons don’t tessellate. If you haven’t got any solid regular polygons handy then they can be made using Copymaster 3, or displayed digitally.
- Ask the students to recap the work of the last lesson. They can share their ideas with a buddy, small group or the whole class.
What did we do in the last lesson?
What shapes did we use?
What word did we learn? (tessellation or maybe tiling)
How many rules does a tessellation have? What are they?
Display the class chart constructed in the last session, and revise any key points that students didn’t emphasise in discussion.
- Today we are going to look at special types of shapes called regular polygons.
- Show the students a variety of relevant artworks and images that feature tessellations (this could be an opportunity to look at a local tapa cloth or kowhaiwhai panel). Ask them to identify any regular polygons. Emphasise that a regular polygon has sides that are equal and interior angles that are equal.
What we want to do is to see which of these shapes tessellate and which don’t. We’ll then construct this table together.
| Shape | Tessellate? | Why? |
| equilateral triangle | yes | |
| square | | |
| regular pentagon | | |
| regular hexagon | | |
| regular heptagon | | |
| regular octagon | | |
| regular nonagon | | |
| regular decagon | | |
| regular hendecagon | no | |
| regular dodecagon | | |
- Distribute the regular polygons to students and ask them to find out which shapes tessellate and which don’t. Let the students tackle the problem in any way that they like. As you go round their groups check that they understand that there are to be no gaps and that the patterns must continue forever in all directions. Check too, that if they can’t find a tessellation, they can explain why one doesn’t exist. (It isn’t good enough to say that they have tried for 5 minutes and they can’t find one. They need to be able to justify why there have to be gaps or why the pattern can’t go on forever. It should usually be the first reason. This is fortunate, as it is easier to justify.) They could record the findings from their investigations on a large sheet of paper - on which they could draw each tessellation and write a few sentences explaining why it does or does not tessellate. Encourage the students to refer back to the class chart constructed in session 1 for a reminder of the ‘rules’ tessellations must follow.
- Groups who finish early could be asked to see if they could find some different tessellations using a combination of the regular polygons, or using the regular polygons they have not yet investigated.
Bring the class together to discuss their results. After each group has reported and justified their claims add them to the table. A completed form of the table is given below. The angles talked about in the third column are the interior angles of the polygons. If your students are confident in measuring angles, they could measure the angles of the shapes they investigated and add this information to their charts. Otherwise, briefly model the measurement of the angles in a few shapes, and explain how the total sum of the angles is found (i.e. add them together). If your students are not familiar with measuring angles, and you feel this knowledge will be too much in addition to the learning in this unit, you could use the existence of gaps in the pattern of shapes to justify whether the shape does or does not tessellate
| Shape | Tessellate? | Why? |
| equilateral triangle | yes | show pattern; 6 x 60° = 360° so they fit. |
| square | yes | show pattern; 4 x 90° = 360° so they fit. |
| regular pentagon | no | no multiple of 108° makes 360° nor do multiples of 108° plus 180° . |
| regular hexagon | yes | show pattern; 3 x 120° = 360° so they fit. |
| regular heptagon | no | no multiple of 128.57° makes 360° nor do multiples of 128.57° plus 180° . |
| regular octagon | no | no multiple of 135° makes 360° nor do multiples of 135° plus 180° . |
| regular nonagon | no | no multiple of 140° makes 360° nor do multiples of 140° plus 180° . |
| regular decagon | no | no multiple of 144° makes 360° nor do multiples of 144° plus 180° . |
| regular hendecagon | no | no multiple of 147.27° makes 360° nor do multiples of 147.27° plus 180° . |
| regular dodecagon | no | no multiple of 150° makes 360° nor do multiples of 150° plus 180° . |
- Ask the class if they have any new information or conjectures (i.e. statements that have not yet been proven as correct or incorrect) about tilings by regular polygons that could be added to the class chart.
Session 3: Quadrilaterals
In this session the students try to extend their results about regular polygons to more general polygons. The key findings are that regular polygons don’t tessellate and all quadrilaterals tessellate.
- Get the class to recall what happened in the last session. The key points are (a) what is a tessellation; (b) tessellations were found for only three types of regular polygons; and (c) which types? The key points are (a) what is a tessellation; (b) tessellations were found for only three types of regular polygons; and (c) which types? Display the class chart and highlight any information which students did not identify.
- Ask "which shapes do we now know will tessellate?" (The three regular polygons and the rectangle – from the brick patterns.) We know that two kinds of 4-sided figures will tessellate. What other types of quadrilaterals will tessellate?
- Provide the students with various quadrilaterals (see Copymaster 4) and let them experiment. A table can again be constructed like the one in Session 1.
- Give the students the opportunity to experiment for themselves with other quadrilaterals. (For instance the students who finish quickly and can justify what they have done should go on to inventing quadrilateral tilings of their own.) Ask them to record their findings on the chart they constructed in the previous session. Remind them that there are two things that can be varied – the lengths of the sides and the sizes of the interior angles. Suggest that they vary the interior angles first. If your students are not familiar with measuring angles, ask them to look at the lengths of the sides, and whether any gaps are formed when they try to tessellate the new shapes.
- Let the students report back on what they found. What new information did they discover? What conjecture do they have about tessellations by quadrilaterals? Can they justify that conjecture?
Teaching Notes:
The students will discover that any quadrilateral will tessellate. Because the interior angles of any quadrilateral add up to 360° , we need to put four figures together at a point so that each one of the four (possibly) different angles is used. In this pattern, sides of equal length also have to fit together. The pattern below shows how to do this.

We have shown that we can fit four of these polygons together at a vertex without gaps. How can we be sure that we can continue the pattern indefinitely? You can see that the pattern in the figure is made up of a wiggly strip of quadrilaterals. In this strip, one quadrilateral is placed one way and then it’s placed another. These wiggly strips can put side by side forever. What you see in the drawing is what you would see anywhere in the plane.
Notice that it doesn’t matter whether the quadrilateral is convex (no interior angles bigger than 180° ), as above, or concave, as below.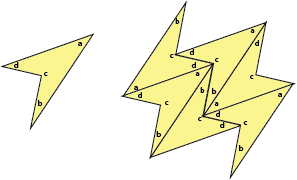
Session 4: Triangles.
If all quadrilaterals tessellate is the same true for all triangles? Repeat the last session but this time use triangles. Provide students with a range of triangles to experiment with (e.g. scalene, equilateral, isosceles, right-angle, obtuse, acute). Briefly introduce the names of the triangles you include, and if appropriate, make reference to the types of angles they demonstrate.
Teaching Notes:
It is easier to establish whether or not triangles tessellate. Since the interior angles of a triangle add up to 180° , we need to make sure that each angle is represented at a point. In the diagram below, the angles form a continuous, straight line. This means that we can put the triangles together to make a row. We can fit two such rows together. In fact we can fit as many rows together as we like until the entire plane is covered. 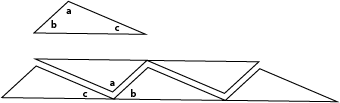
Session 5: Pentagons
Review the facts: all triangles tessellate; and all quadrilaterals tessellate. What do we know about regular polygons? (They don’t tessellate.) Does that mean that no pentagon tessellates? Ask the students to experiment using the pentagons from Copymaster 5 and by inventing their own pentagonal shapes. What results can you find?
If the students can’t find any pentagonal tessellations, you might remind them how they constructed the triangular and quadrilateral tessellations. Rows were very important. So it might be an idea to try to use rows in some way to try to form pentagonal tilings.
The situation with pentagons is more complicated than with either triangles or quadrilaterals. Some pentagons do tessellate and some do not. From the evidence of the regular pentagon, it is unlikely that all the interior angles of a pentagon could cluster around a similar point in a similar way. That means that there have to be at least two types of points where pentagons come together. So we have to distribute the sizes of the interior angles so that this can happen. This enables us to get tilings like the one below.

Session 6: Reflecting
- Discuss with the class the results of the last few days. Refer back to the charts constructed and record some summary statements.
What have you discovered?
What is a tessellation?
What polygons do you know that tessellate?
What polygons definitely do not tessellate? - Now we know that all triangles tessellate, all quadrilaterals tessellate and that regular hexagons tessellate.
What questions do you think that we ought to ask now? (Do you think that all hexagons tessellate? What do you think? Why?) - Experiment for yourselves. Make your own hexagonal shapes and come up with a conjecture.
- After they have tried this for a while, get them to report back on their conclusions.
- Revisit their conjecture about regular tessellations. How could you prove this?
Teaching Notes:
There are other hexagons apart from regular hexagons that do tessellate, such as the concave hexagon shown below.
If we can arrange the angles of a hexagon in such a way that no combination of them will add up to 360° (or 180°), then it won’t be possible for that hexagon to tessellate.
The conjecture that only regular polygons that tessellate are the equilateral triangle, the square, and the hexagon is proved in Fitness, Level 4.
Logo Licenses
This unit examines the use of reflective, rotational, and translational symmetry in the design of logos. Logos are designs associated with a particular trade name or company and usually involve symmetry to make them aesthetically pleasing as well as functional.
This unit centres on symmetry, particularly reflective and rotational symmetry, although there is some reference to translation symmetry. A shape has symmetry if it has spatial pattern, meaning it maps onto itself either by reflection about a line, or rotation about a point.
Consider the Mitsubishi logo. There are three lines where a mirror could be placed and the whole figure could be seen, with the image in the mirror forming the hidden half.
This logo also has rotational symmetry about a point. Each turn of 120⁰ (one third of one full rotation) maps the logo onto itself. Since the logo maps onto itself three times in a full turn of 360⁰, the figure has rotational symmetry of order three.
The mathematics of symmetry is found in decorative design, like kowhaiwhai in wharenui, and wallpaper patterns, and motifs such as logos. Human beings are naturally appreciative of symmetry, possibly because it is prevalent in the natural world. Creatures are approximately symmetrical and reflections in water are a common example of mirror symmetry.
The learning opportunities in this unit can be differentiated by providing or removing support to students, and by varying the task requirements. Ways to support students include:
Tasks can be varied in many ways including:
The contexts for this unit can be adapted to suit the interests, experiences, and cultural backgrounds of your students. Capitalise on the interests of your students. Symmetry is common across all cultures of the world. Kowhaiwhai patterns on the rafters of wharenui (meeting houses), designs on Rarotongan tivaevae, Fijian tapa or Samoan siapo cloth usually involve symmetries. Look for examples of symmetrical design in the local community. Encourage students to capture symmetric patterns they see and use the internet as a tool for finding images in Aotearoa. Search for symmetry to show how common geometric patterns are throughout the world.
Te reo Māori vocabulary terms such as hangarite (symmetry, symmetrical), hangarite hurihanga (rotational symmetry), whakaata (reflect, reflection), huri (rotate, rotation), and neke (translate, translation) could be introduced in this unit and used throughout other mathematical learning.
Getting Started
What pattern can you see in the shape?
How did the way we made the shape affect the symmetry it has?
You may want to show how the whole shape is visible if the mirror is located along the fold line.
Mirror symmetry and fold symmetry have the same meaning with 2-dimensional shapes.
It is important for students to see that one half of the shape maps onto the other half by folding and flipping actions. Each alternative term can be demonstrated. Holding a mirror along the fold line enables students to see an image of the whole shape even when one half is masked. Similarly, the amended (cut) circle can be refolded in half and traced around. Then flip the paper over the fold line and trace around it again. The traced figure will be that of the whole amended circle.
Before opening up the circle ask:
What pattern do you expect the shape to have?
Is there another type of pattern in this shape?
Students may not recognise that the cutout shape has rotational symmetry as well. Trace around the shape on a whiteboard. Turn the shape one half turn (180⁰) to show that the shape maps onto itself.
The shape has half turn symmetry. How many times will it map onto itself in a full turn?
Students should predict order 2 rotational symmetry. That means the shape maps onto itself twice, in a full turn.
How are the shapes the same? How are they different?
Do both shapes have the same symmetry?
Most students will realise that there are two lines of reflective symmetry (the fold lines) but the half turn rotational symmetry is harder to spot.
Session Two: Car logos
What make of car was that?
How do you know?
Session Three: Logos in the media
The Starbucks logo belongs in the bottom left cell as it has reflective symmetry but no rotational symmetry.
You work for an advertising company as a logo designer. There are five new companies that need new logos. They have stipulated that the logo must have some symmetry but must also suggest what goods and services they provide. (If you wish, they may also be required to come up with a slogan that captures the message, e.g. "Just do it".)
Here are the companies:
Session Four
Dear family and whānau,
This week we are looking at symmetry and at company logos. We appreciate your help by working with your child to find examples of logos in magazines, television commercials or on websites. For homework your child is asked to sketch two logos in their book and describe their symmetries. Ask your student to explain what reflective and rotational symmetries are, using the logos as examples.

Figure it Out Links
Some links from the Figure It Out series which you may find useful are:
Keeping in Shape
This unit examines tessellations, that is, ways of covering the plane (a two-dimensional surface) with copies of the same shape without any gaps or overlaps. Students will investigate what properties shapes must have in order to tessellate. The tessellations investigated involve both non-regular and regular polygons.
Tessellations can be found in a variety of contexts, including in kitchen and bathroom on tiles, linoleum flooring, patterned carpets, parquet wooden floors, and in cultural patterns and artworks. They also demonstrate an application of some of the basic properties of polygons.
Tessellations have other, practical uses. Brick walls are made of the same shaped brick repeatedly laid in rows (a tessellation of rectangles). Bees use a basic hexagonal shape to manufacture their honeycombs (a tessellation of regular hexagons). These tessellations provide a strong structure for their two different purposes.
A key features of tessellations is that the vertices of the figure, or figures, must fit together, meaning that there are no gaps or overlaps in the pattern created, and that the pattern completely covers a given two-dimensional space. This can be achieved in two ways. Either the corners of the basic shape all fit together to make 360° , or the corners of some basic shapes fit together along the side of another to again make 360°. Therefore, a necessary precursor to this unit is a lesson or series of lessons that give the class a sound knowledge of angles in degrees. You might use Measuring Angles, Level 3 for this purpose. The Problem Solving lesson Copycats, Geometry, Level 3 could also be used as part of the Exploring stage of this unit
Fitness, Level 4 follows on from this unit and looks at both regular and non-regular tessellations. In the regular case it shows that regular tessellations can be made only with equilateral triangles, squares and regular hexagons. Semi-regular tessellations involve two or more regular polygons. This unit also investigates the possibility of non-regular tessellations.
Related to the idea of tessellations is that of Escher drawings. There is a unit on that at Level 4, Tessellating Art, though some of the concepts there would be accessible to students at Level 3.
The learning opportunities in this unit can be differentiated by providing or removing support to students and by varying the task requirements. Ways to differentiate include:
The difficulty of tasks can be varied in many ways including:
The contexts for this unit can be adapted to suit the interests and cultural backgrounds of your students. For example, tessellations are prominent in Islamic art traditions and in tapa cloth designs from Pacific nations. Students might be fascinated by the work of Dutch artist Escher, who built his work on distorting regular polygons to create ‘life-like’ tessellation patterns, or by the work of New Zealand artist Glen Jones or Australian artist Bruce Bilney. Tessellation might fit well with efforts to beautify the school environment. Mosaic tiles can be created from fired clay, or cobblestones created from concrete. Look for examples of tessellations in students’ environment such as lino, or tile patterns, facades of buildings, or honeycombs in beehives. Look online for examples of tessellation in the natural and human-made world.
Session 1
What material is used to construct buildings? (wood, bricks, mortar, sand, cement, etc.)
How do builders put a house together?
How do they build walls?
Why do you want to have no gaps in a wall?
(You might note that some walls do have gaps. Why?)
Roam and work with the students. If needed, they could work in pairs or small groups. Once they have one brick pattern, see if they can find others. Emphasise that the bricks don’t always have to be ‘horizontal’ and that the pattern doesn’t have to be practical. It’s OK if the pattern won’t produce a very strong wall.
Session 2: Regular Polygons
In this session the students will explore tessellations by regular polygons. The key finding is that regular polygons don’t tessellate. If you haven’t got any solid regular polygons handy then they can be made using Copymaster 3, or displayed digitally.
What did we do in the last lesson?
What shapes did we use?
What word did we learn? (tessellation or maybe tiling)
How many rules does a tessellation have? What are they?
Display the class chart constructed in the last session, and revise any key points that students didn’t emphasise in discussion.
What we want to do is to see which of these shapes tessellate and which don’t. We’ll then construct this table together.
Bring the class together to discuss their results. After each group has reported and justified their claims add them to the table. A completed form of the table is given below. The angles talked about in the third column are the interior angles of the polygons. If your students are confident in measuring angles, they could measure the angles of the shapes they investigated and add this information to their charts. Otherwise, briefly model the measurement of the angles in a few shapes, and explain how the total sum of the angles is found (i.e. add them together). If your students are not familiar with measuring angles, and you feel this knowledge will be too much in addition to the learning in this unit, you could use the existence of gaps in the pattern of shapes to justify whether the shape does or does not tessellate
Session 3: Quadrilaterals
In this session the students try to extend their results about regular polygons to more general polygons. The key findings are that regular polygons don’t tessellate and all quadrilaterals tessellate.
Teaching Notes:

The students will discover that any quadrilateral will tessellate. Because the interior angles of any quadrilateral add up to 360° , we need to put four figures together at a point so that each one of the four (possibly) different angles is used. In this pattern, sides of equal length also have to fit together. The pattern below shows how to do this.
We have shown that we can fit four of these polygons together at a vertex without gaps. How can we be sure that we can continue the pattern indefinitely? You can see that the pattern in the figure is made up of a wiggly strip of quadrilaterals. In this strip, one quadrilateral is placed one way and then it’s placed another. These wiggly strips can put side by side forever. What you see in the drawing is what you would see anywhere in the plane.
Notice that it doesn’t matter whether the quadrilateral is convex (no interior angles bigger than 180° ), as above, or concave, as below.
Session 4: Triangles.
If all quadrilaterals tessellate is the same true for all triangles? Repeat the last session but this time use triangles. Provide students with a range of triangles to experiment with (e.g. scalene, equilateral, isosceles, right-angle, obtuse, acute). Briefly introduce the names of the triangles you include, and if appropriate, make reference to the types of angles they demonstrate.
Teaching Notes:
It is easier to establish whether or not triangles tessellate. Since the interior angles of a triangle add up to 180° , we need to make sure that each angle is represented at a point. In the diagram below, the angles form a continuous, straight line. This means that we can put the triangles together to make a row. We can fit two such rows together. In fact we can fit as many rows together as we like until the entire plane is covered.
Session 5: Pentagons
Review the facts: all triangles tessellate; and all quadrilaterals tessellate. What do we know about regular polygons? (They don’t tessellate.) Does that mean that no pentagon tessellates? Ask the students to experiment using the pentagons from Copymaster 5 and by inventing their own pentagonal shapes. What results can you find?
If the students can’t find any pentagonal tessellations, you might remind them how they constructed the triangular and quadrilateral tessellations. Rows were very important. So it might be an idea to try to use rows in some way to try to form pentagonal tilings.
The situation with pentagons is more complicated than with either triangles or quadrilaterals. Some pentagons do tessellate and some do not. From the evidence of the regular pentagon, it is unlikely that all the interior angles of a pentagon could cluster around a similar point in a similar way. That means that there have to be at least two types of points where pentagons come together. So we have to distribute the sizes of the interior angles so that this can happen. This enables us to get tilings like the one below.

Session 6: Reflecting
What have you discovered?
What is a tessellation?
What polygons do you know that tessellate?
What polygons definitely do not tessellate?
What questions do you think that we ought to ask now? (Do you think that all hexagons tessellate? What do you think? Why?)
Teaching Notes:
There are other hexagons apart from regular hexagons that do tessellate, such as the concave hexagon shown below.
If we can arrange the angles of a hexagon in such a way that no combination of them will add up to 360° (or 180°), then it won’t be possible for that hexagon to tessellate.
The conjecture that only regular polygons that tessellate are the equilateral triangle, the square, and the hexagon is proved in Fitness, Level 4.
Dear family and whānau,
This week in maths we have been looking at tessellations of the plane by different shapes. Your child will be able to tell you what ‘tessellation’ means.
It would be appreciated if you could help your child look around your house (e.g. in artworks and tiling) and local neighbourhood to see if they can find any of the tessellations that we have been talking about. Your child should then make a sketch so that we can talk about them next week.
Here is a challenge: We also know that we can’t use a regular octagon (like a stop sign) to tessellate by itself. But together can you find a non-regular octagon (any 8 sided shape) that will tessellate? A non-regular octagon will have eight sides of unequal length and eight interior angles of unequal size.
Figure it Out Links
Some links from the Figure It Out series which you may find useful are:
Tessellating Art
In this unit we apply our understanding of why tessellations work to form our own unique tessellating shapes. We use these shapes to create interesting pieces of art in the style of M.C. Escher, a famous Dutch artist.
This unit is built around the famous artist Maurits Cornelius Escher. Escher was born in Leeuwarden, Netherlands on June 17th, 1898. He studied at the School of Architecture and Decorative Arts in Haarlem but soon gave up architecture in favour of graphic arts at the age of 21.
All M. C. Escher works (C) Cordon Art, Baarn, the Netherlands. All rights reserved. Used by permission.
Escher is famous for two types of engravings. One of these involves impossible situations and the other is his variation on the theme of tessellations. A typical impossible situation shows four men climbing stairs. As you follow the men around and up their particular flights, you realise that they are going round and round. With regard to tessellations, Escher took a tessellation and, by adding and subtracting from the basic unit of the tessellation, turned it into a repeated picture.
There are many web-sites that explore the life and work of M.C. Escher. You can easily find one by entering his name in your search engine.
By emulating Escher and exploring tessellations in this unit, the students will gain a greater appreciation of the way that tessellations work. Hence they will see how mathematics, art and even nature interact.
Other units that refer to tessellating are Keeping in Shape, Level 3 and Fitness, Level 4. It might be useful to have done Measuring Angles, Level 3 before attempting this unit.
Students can be supported through the learning opportunities in this unit by differentiating the nature and complexity of the tasks, and by adapting the context to suit the interests, experiences, and cultural backgrounds of your students. Ways to support students include:
The difficulty of tasks can be varied in many ways including:
The contexts for this unit can be adapted to suit the interests, experiences, and cultural backgrounds of your students. For example, tessellations are prominent in Islamic art traditions, in tapa cloth designs from Pacific nations, and in Māori tukutuku panel designs.
Tessellation might fit well with efforts to beautify the school environment. Mosaic tiles can be created from fired clay, or cobblestones created from concrete or mud bricks. Once they are fired or dried they can be painted in traditional Maori patterns that reflect transformation.
Te reo Māori vocabulary terms such as rōpinepine (tessellate, tessellation), neke (translate, translation), huri (rotate, rotation), whakaata (reflect, reflection), and hangarite (symmetry, symmetrical) could be introduced in this unit and used throughout other mathematical learning.
Getting Started
We begin our exploration of tessellating art by altering squares and parallelograms.
What can you tell me about this tessellation?
Why is it a tessellation?
Which of the regular tessellations does it look like it has been made from?
Can you see how this tessellation has been made? Show us.
Look at the tessellating shape and predict how it was altered.
Will your new shape tessellate? Try it and see.
Is your altered shape symmetric? What type of symmetry does it have?
Does the new shape have to be symmetric to tessellate?
(Note: When altering a square by translating opposite sides to form a new tessellating figure, the alteration does not have to be symmetrical.)
Describe the movement of the shape as you tessellate with it? (translation or shifting)
What did you discover about altering shapes to create new shapes that also tessellate?
Why do you think it is possible to alter shapes in this way and still end up with a shape that tessellates?
Did you create any shapes that do not tessellate? Why do you think that they won’t tessellate?
Exploring
Over the next 2-3 sessions we use our imaginations to create interesting art pieces using altered tessellating shapes.
Brainstorm for ideas about what the shape could be. In the following shape the addition of an "eye" creates a fish-like shape.
Tell me about the symmetries of your shape? (reflection symmetry, rotational symmetry)
How are you generating the tessellation? (translating? rotating? reflecting?)
Why does your shape tessellate? (Encourage the students to focus on the fact that the sum of the angles at any point must equal 360 degrees)
Reflecting
In this final session we analyse tessellations and attempt to predict the processes that were used to create them.
What shape do you think has been altered?
How do you think it was altered?
Dear family and whānau,
This week we have been working on a unit that changes a square tessellation into a piece of art similar to that produced by a famous Dutch artist called Escher. At home this week we would like you to help your child transform an equilateral triangle into an interesting piece of tessellating art.
All M. C. Escher works (C) Cordon Art, Baarn, the Netherlands.
All rights reserved. Used by permission
Figure it Out Links
Some links from the Figure It Out series which you may find useful are: