A Model World
The purpose of this unit is for students to apply and refine their measurement skills and to develop an understanding of enlargement and reduction, through making scale models to be used in a short, animated stop-motion film.
- Understand and describe proportion using the language of mathematics.
- Understand the principles of scale.
- Create scale drawings.
- Calculate scale dimensions.
- Make accurate metric length measurements.
- Understand that the value of the scale factor of a reduction is less than 1 and for an enlargement is greater than 1.
- Understand the reciprocal relationship between the scale factors of a transformation.
- Understand that the scale factor of a reduction can be found by multiplying by a fraction or by dividing by its reciprocal whole number.
- Accurately multiply length measurements by a given scale factor .
- Make accurate angle and circumference measurements.
- Accurately measure a photograph and record measurements.
- Calculate relative proportional relationships between two body parts.
- Make a model using scale measurements.
There has been a burgeoning of special effects within the modern film industry. One skill required to create historical, real, fantastical or futuristic worlds, is being able to produce accurate scale models of people and places. Companies such as WETA Workshop (NZ), have teams of people who are skilled in creating ‘miniature’ worlds, which then come to life in larger-than-life size upon the big screen. They also create collectible items that are small models of large screen characters and places. Much mathematics is involved in this process of creating scale models.
Enlargement (or reduction) is a transformation that changes the size of an object represented in two or three dimensions, into an image of the object in which the component parts are all in the same proportion or ratio to the original. The ratio of any two corresponding measurements in the object and its image is called the scale factor.
To understand this, students must recognise that the two figures (the original object and its image) have the same shape, and that the centre point and angle sizes do not change (are invariant). An enlargement, or a reduction, involves a direct transformation, in which length measurements are multiplied by the same multiplier, or divided by the same divisor, resulting in a proportionally adjusted length, area or volume measurement.
The relationship between the scale factor, going from a large figure to a small figure, and that of going from the (same) small figure to the (same) large figure, is a reciprocal one. For example, if the original object is made 3 times bigger, it is increased by a scale factor of 3. If the original object is made 3 times smaller, the scale factor is one third (0.33…). The scale factor is the number used as the multiplier in the scaling process. An important understanding to be developed, is that in calculating scale measurements of reductions, students can multiply by the fraction or divide by its whole number reciprocal, and the result will be the same.
It is important that students learn to express, interpret, and record scale in different ways. One expression is as a ratio, 1:3, another is as a description in words, such as one centimetre to three centimetres, and another is as a graphic.
At this level students are become increasingly comfortable and efficient in measuring, estimating, using appropriate standard units of length, and making calculations using these units. They learn to apply measurement skills and formulae to practical tasks, use a range of additive and simple multiplicative strategies with whole numbers, fractions, and decimals, and learn to understand and work with proportions and ratios. The human body is a fascinating context for exploring proportions and the relative size of component parts. By building scale models, selecting appropriate scales, and by using ratio to translate the dimensions of the original object into its scale model, students come to understand the consistent proportional nature of this type of transformation.
As students create their own proportional sculpture, they learn about the conventions of model making, and apply their new knowledge of the practical design elements, materials and processes particular to this art form. They learn from exploring the animation work of other artists, and they recognise the power of this art form in communicating messages and in providing entertainment.
Note: the scale factor of 1/10 is used in these sessions. This means that the models are small in size. Should the availability and cost of construction materials not be a limiting factor, a 1/6 scale can be used. This is the preferred scale of many model makers of figure replicas.
Associated Achievement Objectives
The Arts
Visual Arts
- Investigate the purpose of objects and images from past and present cultures and identify the context in which they were made, viewed and valued.
- Explore and use art-making conventions, applying knowledge of elements and selected principles through the use of materials and processes.
- Develop and revisit visual ideas, in response to a variety of motivations, observation and imagination, supported by the study of an artist’s works.
- Explore and describe ways in which meanings can be communicated and interpreted in their own and others’ work.
English
Speaking, Writing and Presenting
Purposes and audiences
- Show an increasing understanding of how to shape texts for different purposes and audiences.
INDICATORS:
- construct texts that show an awareness of purpose and audience through deliberate choice of content, language and text form;
- convey and sustain personal voice where appropriate.
The learning opportunities in this unit can be differentiated by providing or removing support to students, and by varying the task requirements. Ways to differentiate include:
- beginning with simple enlargements to establish the ratio relationships between lengths, before solving problems with more complex enlargements. For example, enlarge a simple figure by a scale factor of three
- using calculators to reduce the cognitive load associated with calculation
- using stop-motion technology (free as a mobile phone app) to make the tasks accessible for all students
- providing opportunities for students to work in collaborative teams to encourage the sharing of ideas and understanding, peer scaffolding, and productive learning conversations.
The context for this unit is stop-motion video. The subject of the video can be anything that is of interest to students. For example, students might tell a Māori or Pasifika legend through animation or create an advertising campaign for a product. They might animate a dance routine or bring a famous historical figure to life. Draw on the expertise of your community if possible. There might be people experienced in creating stop-motion videos who could come and talk to your class about their role and creations.
Te reo Māori kupu such as hoahoa āwhata (scale drawing, scale diagram), whakarahi (enlarge), whakaiti (reduce), and ine (measure) could be introduced in this unit and used throughout other mathematical learning
Previs is the abbreviated term for ‘previsualisation’, which includes the conceptual design and storyboard for a movie.
The conceptual design of the story for the short animated film (about a child and a pet) is not specifically developed within this mathematics unit of work. It is assumed that the development of each student’s film storyboard will be undertaken within wider classroom programme (e.g. as a part of literacy and inquiry), and will parallel and complement the mathematics and art within this series of lessons.
Learning activities
Whilst this unit is presented as a sequence of five sessions, more sessions than this may be required. It is also expected that any session may extend beyond one teaching period.
Session 1
This session is about understanding the animation context for making scale models and for learning key ideas about human body proportions.
SLOs:
- Understand and describe proportion using the language of mathematics.
- Understand the principles of scale.
Activity 1
Write the words film animation on the class chart/computer screen.
Brainstorm and record the students’ related knowledge and ideas.
Explain that film animation will be the focus of this and subsequent lessons.
Activity 2
- Explain that the students will watch two short movie animations after which they will work in pairs to consider and record the similarities and differences between each of the animation clips. Show short films (e.g. 2 minutes each) that are relevant to your students (i.e. relate to their learning and interests, cultural backgrounds, current events)
- Make chart paper available.
Have students work in pairs to create a Venn diagram, in which they consider and record the similarities and differences between each of the animation clips.
Have them share their ideas in pairs.
Activity 3
Highlight the physical process of simple animation in 2 dimensions.
- Illustrate the 2D animation process by showing a flip card or flipbook animation - there are many freely available to watch online. Ensure the animation is relevant to your students and the wider context of this unit.
- Make sets of small pieces of paper (e.g. 10 pieces per set) available to students and have them draw and create their own flip animation sequence. (For example, of a person performing a simple sporting action.) Have them swap and compare their 2D animations.
Activity 4
Highlight the physical process of animation in 3 dimensions.
- Find a stop motion video that uses 3 dimensional figures to demonstrate this, or use the video you showed in Activity 2. Make small moveable plastic figurines available to pairs of students.
- Discuss how a simple animation feature can be created.
Agree that both processes involve a series of tiny movement changes, which, when sped up create the animation effect. This is called stop motion animation. - With your class, discuss what contexts you could draw on to inspire your model making and stop-motion animation. Record and select the ideas as a class. One idea could be used to inspire the whole class, or several ideas could be used and distributed amongst small groups. Consider what will be most engaging, meaningful, and effective for your class.
- Have students research information about stop motion animation, or make available Copymaster 1. As part of this, ask students to find examples of stop-motion animation and 3D models that relate to the theme(s) that students have selected. Ask students (independently or in pairs) to present their information in an appropriate and relevant format. Share and discuss the findings.
Activity 5
- Ask what the designers may have had to consider in their creation of a 3D model for animation. List ideas and lead discussion to proportion and scale. Ask students to share if, and where, they have heard the terms before (e.g. during measuring tasks, when cooking or baking, reading a map, during art).
- Write agreed definitions of proportion and scale, using student knowledge and recognised sources.
For example:
Proportion: the correct relationship between the size, shape and position of the different parts of something.
Scale: an indication of the relationship between the distances on a map and the corresponding actual distances, and/or the relationship between two sets of dimensions or measurements of an object and a different size copy of the same object.) - Distribute Copymaster 2.
Discuss and have students complete this.
Explain they will be making scale models of a friend.
Have them predict the head to body ratio they expect to find when they measure their friend.
Activity 6
Conclude with a summary of learning about stop motion animation and the mathematics they anticipate using in creating a scale model of a friend.
Session 2
This session is about creating an enlargement of a 2D image (drawing), and exploring the concept of scale.
SLOs:
- Understand the principles of scale.
- Create scale drawings.
- Calculate scale dimensions.
- Understand that the value of the scale factor of a reduction is less than 1 and for an enlargement is greater than 1.
- Understand the reciprocal relationship between the scale factors of a transformation.
- Understand that the scale factor of a reduction can be found by multiplying by a fraction or by dividing by its whole number reciprocal.
Activity 1
Begin by reviewing the following ideas: flip charts, flip books, stop motion, 3D models. Review the definitions of scale and proportion generated in the previous session. Explain that the ideas will be explored in the following task.
Activity 2
Have students undertake a simple enlargement task. Model the process outlined in the instructions, as necessary, and roam to ensure students have accurately enlarged and reduced the size of the image.
Make available A4 blank paper, pencils, rulers, string and the following set of instructions.
On a landscape A4 page:
- Draw a rectangle 8cm x 10cm.
- Inside the rectangle draw a simple picture or shape.
- Over the top draw a grid of squares 2cm x 2cm.
- Draw a second rectangle 16cm x 20cm.
- Draw a grid of squares 4cm x 4cm.
- Enlarge the image drawn in Step 2.
Activity 3
- Distribute a copy of Copymaster 3 to each student and have students record their answers to the following questions: Model the process involved, as necessary, and roam to ensure students have accurately enlarged and reduced the size of the image. After modelling, it might be necessary for you to work with a small group of students in need of more support, delivering more direct teaching and modelling around each question.
What is the size relationship between the Step 3 shape (Figure 3) and the Step 6 shape (Figure 6)? (Double in size)
Explain how you know, using measurements. (16 cm are double 8 cm, 20 cm are double 10 cm, 4 cm x 4 cm squares are double 2 cm x 2 cm squares)
How do you write this as a ratio? (2:1)
What is the Scale Factor? (2)
Explain how you know. (All measurements in Figure 3 are multiplied by 2 to create Figure 6.)
What is the size relationship between Figure 6 and Figure 3? (Half in size)
Explain how you know, using measurements. (8 cm is half 16 cm, 10 cm is half 20 cm, 2 cm x 2 cm squares are half 4 cm x 4 cm squares)
How do you write this as a ratio? (1:2)
What is the Scale Factor? (1/2)
Explain how you know. (All measurements in Figure 6 are multiplied by 1/2 to create Figure 3.)
What do you notice about the relationship between the enlargement scale factor and the reduction scale factor? (They are reciprocals: 2/1 and 1/2)
The scale factor of an enlargement is always_______________ (greater than 1).
The scale factor of a reduction is always_______________ (less than 1 but greater than 0).
If the scale factor connecting the object with its image is usually shown by the letter k, use these symbols to write a statement about:
An image that is larger than the original object: enlargement. (k > 1)
An image that is same size as the original object. (k = 1)
An image that is smaller than the original object: reduction. (0 < k < 1)
- Provide time for students to share and check their answers with a partner. Gather the class together and discuss student responses to the questions. Encourage students to share any mistakes they made, or misconceptions they discovered they had, and work through these with the class.
Activity 4
Make available lengths of wool or string.
Have each student investigate the accuracy of their enlargement by carefully placing the thread over a particular part of their original picture of image (Figure 3), measuring and doubling the thread and laying it on the same part of the Figure 6, image to check that it is exactly double (x2).
Conclude by emphasising that when enlargement or reduction is undertaken, every length measurement of the original (object) is multiplied by the scale factor to create the image.
Session 3
This session is about students applying their knowledge of scale to making a small 3D model of a friend.
SLOs:
- Make accurate metric length measurements.
- Accurately multiply length measurements by the given scale factor.
Activity 1
- Explain that in this session students will prepare one character for their short animation film of their friend and their pet. Show the stop motion video from Session 1. As they watch, ask them to consider the practical process of making a scale model of their friend.
- As a class, brainstorm the steps students think they might need to take to make a scale model of their friend.
Activity 2
- Place in front of the students a set of tape measures, lengths of wire, wire clippers, plasticine, and lengths of coloured thread.
Tell the students they will need their pencils, paper and a ruler. Make calculators available as appropriate. - Have students refer back to the class brainstorm, and record, in pairs, a possible logical sequence of steps for making an operational 1/10 scale model of their partner.
- Share these ideas as a class, discuss, and agree on, and model, a sequence of steps, such as:
- Draw a stick figure picture of their partner with at least one arm and one leg bent in some kind of action. (This does not have to be exactly in proportion as it is for recording purposes only.)
- Use the tape measure to accurately measure from joints, the key body length measurements (lower leg, upper leg, forearm, upper arm, body length to hips, neck, head, hand foot). Record these measurements on the matching part of the stick figure drawing.
- Draw a second identical stick figure diagram of their friend. Calculate, using the scale factor of 1/10, the length measurements for the scale model they will be constructing, and record these on the second figure. Check calculations with a friend.
- Using lengths of wire and wire clippers, make a wire armature scale model of their friend, using the measurements recorded on their second diagram.
Practical considerations:- Highlight the need for accurate length measurements, with an additional small allowance for joins.
- Two wire lengths can be cut and twisted together for strength. (This will depend on the wire. It should have both firmness and flexibility.)
- Legs can be made in one piece, but at the knee joint (where the upper and lower leg measurements meet) tie a coloured thread to the wire. (Once plasticine is layered onto the frame, these will mark the correct ‘bend points’.) Apply this procedure to the arms as well.
- Allow extra wire bent on each foot to insert into a small ball of plasticine so the model can be secured in a standing position.
- When each partner’s model is complete, check their model measurements with their second diagram, to ensure that the model is to scale.
- Mould the ‘flesh’ onto the wire armature by wrapping the plasticine around the wire and leaving exposed, the thread that is tied to mark the joint.
Activity 3
- Before the students begin their model making process, discuss and have a student model several measurements on a friend. Discuss and agree on start and end points for each measurement. For example, begin the upper leg measurement at the outer hipbone and stop beside and just above the knee joint. Ensure your students understand how to measure accurately (e.g. no gaps or overlaps, start at 0) and are sensitive to their partners.
- Use each of these measurements to model and record calculations, applying the scale factor and its reciprocal. Ensure that examples include multiplying an actual limb measurement by 1/10 or 0.1 and dividing the same limb measurement by 10. Recognise and agree that these multiplication and division operations achieve the same result.
- Have individual students explore both methods using a calculator, and check their results with a partner.
Activity 4
Have students complete the process up to the end of Step 4, stopping at regular intervals to check progress with reference to the agreed steps, and to answer questions. Model the steps of the process as needed. Roam, provide feedback and support students to refer back to the steps of the process and the teacher-made model.
Activity 5
Conclude the session by sharing models and reflecting on the process of creating a 3D scale wire model. Reflect on the class’s ideas around scale and proportion, that were shared in Session 1, and what they thought the process of model making was going to be like.
Session 4
This session is about having students recognise that angles stay the same when a scale model is made, and about students making, scaling and applying circumference measurements.
SLOs:
- Understand and demonstrate that when the length of sides changes by the same scale factor, angles remain the same (are equal).
- Make accurate angle and circumference measurements.
- Accurately multiply circumference measurements by the scale factor of 1/10.
Activity 1
Begin this session by reviewing the process of making a model 1/10 the size of the original object. Review the reciprocal relationship between the model size and the size of the friend.
Activity 2
- Point out that measurements of length have been made to make the models.
Using one wire model figure, bend it into an action pose with a leg and arm bent.
Ask: What other aspects of this figure can be measured? - Guide the conversation to discussing angle measurements. Agree that we measure angles. If needed, discuss how to measure angles and the tools used.
Write this (incorrect) statement on the class chart:
When scale models are made, the scale factor applies to all length and angle measurements.
Have students discuss in pairs whether they agree or disagree with this statement, have them state their position to the class and explain how they know that they are correct. - Have students share their ideas.
If necessary, suggest and follow this process.
Make available a camera or cellphone.
Have one student model the action pose of the wire figure.
Take a profile photo of the person and of the action figure.
Print or display (e.g. on mirrored screen) the photo and use a protractor to measure the identified angle in both pictures. For example: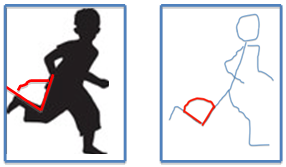
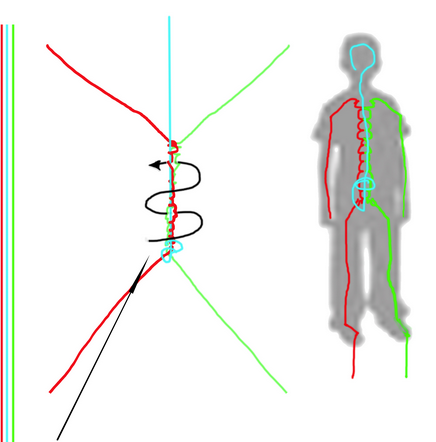
- On the class chart write a concluding statement:
When lengths change by the same scale factor, angles remain constant (equal).
Draw a diagram like this:.png)
Together record the enlargements and reductions (reciprocal scale factors).
Together measure the angles using the protractor.
Repeat this with other examples. Students could create these examples in pairs, with one student drawing a shape to be enlarged and reduced by specific factor, before asking their partner to complete the problem.
As an extension, you could ask students to measure the angles, or create a shape with a specific angle to be enlarged or reduced
Activity 3
- Explain that students will now complete their scale models for animation, by adding ‘the flesh and clothes’ to the wire skeleton. They will do this by wrapping plasticine around the wire armature, moulding it into a realistic body shape, and by adding texture and detailed features as appropriate.
- Encourage students to recognise the need to continue to keep the ‘rounded’ body measurements in proportion, and not have models that are too fat or thin. This should include making and recording at least 4 circumference true measurements (head, arms legs and waist) of their partner, and multiplying each of these by 1/10 or (dividing by the reciprocal) to calculate the 3D scale model values. Ensure students are sensitive to the measuring of their partner’s bodies.
- Have partners check each other’s calculations. Allow time in the remainder of the session for the models to be completed, ready for animation.
Activity 4
- Display and share models. Have students give constructive peer feedback on the proportions and level of realism and detail in each other’s models.
- Give time for adjustments to be made in response to feedback.
- Explain that, if possible, for the next session, each student is to bring a photograph of their something (e.g. a pet) that could be included in their stop motion video, and at least one true length measurement of one part of the item: e.g. if a pet was being used, the tail, back leg, or body could be measured. If necessary, constrain this, so that everyone in the class (or in their groups) brings a picture of a similar item.
Session 5
This session is about making a scale model from a picture when all true measurements are not available.
SLOs:
- Accurately measure a photograph and record measurements.
- Calculate relative proportional relationships between two body parts.
- Calculate scale dimensions.
- Make a model using scale measurements.
Activity 1
Have students share and discuss their models and identify the most challenging part of the process so far.
Activity 2
- Have students share the photos they have brought to school
- Show Copymaster 4 (A4 size) and discuss the profile photo features. Have students decide if their own photo is suitable for measuring. This Copymaster uses pets as an example. Adapt the Copymaster 4 table and resource as necessary to fit the context that you and your students have chosen.
- Distribute A4 copies of Copymaster 4 and make available lengths of wool or string.
Explain to student they will need pencils, rulers and erasers and have them complete the measurements only for Table 1. Compare these with a partner and agree on a value for each. - Together discuss how to complete Table 1. Model and discuss how to approach Table 2.
- Have students repeat 2 and 3 above for Tables 3 and 4, concluding by comparing these with a partner and agreeing on a value.
Activity 3
- Make available plasticine and tape measures.
- Explain that the pets will not have wire armatures, but will be made from plasticine only.
- Have students use the scale measurements to create their pet models, adding texture and details as appropriate.
- Share plasticine models and reflect on the mathematical process of making a scale model from a photograph
Activity 4
- Refer back to Copymaster 1 and/or the research information that students have already gathered around stop motion.
- Make cameras and video cameras available.
- Have students display the storyboards created during literacy/inquiry time.
- Have students work in pairs and prepare to begin filming, using their storyboards.
- Allow sufficient time for students to make a stop motion animation movie of a few seconds duration, and to evaluate their product and process. Continue filming.
- Provide time for students to share their work, reflect on it, and give and receive feedback. If time permits, students could create a small presentation (verbal, digital, written etc.) outlining the process and steps followed, challenges faced, inspirational videos they found, what they enjoyed etc.
- As a class, evaluate the success of the unit and, if appropriate, decide on how students will apply the skills, knowledge, and outcomes developed in this unit in the future (e.g. Could they plan a unit to teach to younger classes? Could they share the videos with the wider school or enter them in a competition? Could they contact a local stop motion expert for feedback and advice?)
Dear parents and whānau,
In mathematics we have been learning to make scale models. We have used these to create very short video animations using a stop motion process.
We will present our film product and explain our work on ___________ at ___________
Please come and enjoy our post-production presentation.
Thank you.